Leaderboard


Popular Content
Showing content with the highest reputation since 05/18/2025 in all areas
-
Sorry some of you were disappointed in the way the Awards Show was run. Some of you always will be. Based on all the feedback I have received, you are not in the majority. Bill and Aris did a great job with less than 200 categories for a number of years with a show that generally lasted four hours or longer. Most still complained the show ran too long every year, and nobody did anything to fix it. Currently there are 225 regular categories. That number is likely to increase next year. Something needed to be done about the Marathon Awards Show. San Marcos used slides over dinner in 2023 and it worked well. In 2025 we knew we had to put a fix into the Awards Show to get it organized and finished a timely manner. We concluded there was no way to read 225 categories, no matter who was reading, and finish the show in a timely manner. We choose showing the slides over dinner. The plan was to show the slides twice, but everyone was finished eating, so they only ran once. Not sure if the slides ran long or dinner ran fast. We also for the first time I know wrote a script. Everyone who had a speaking roll had written remarks that we walked through prior to the show. FYI, we did cut back on the amount of time we spent thanking everyone, but understand, these folks have put two years of their life into a convention for IPMS and deserve some recognition. The result was an organized show that was completed in two hours. By the time everyone had picked up their models, the slide show was posted online in multiple places so everyone could see who won. Even then, we had people pounding on the Contest Room doors and yelling at volunteers demanding their models. I can't see where we are going back to a four hour show where we announce all the winners. We have received a lot more positive feedback than negative. That doesn't mean we are not looking to improve in 2026 and make some changes to make it easier for people to see the winners. We are always doing our best to improve the convention experience. That does not mean we are going to please everyone. We look at all the feedback and try to create the best convention we can. Scott Hackney 2nd Vice President, IPMS/USA6 points
-
I started this 11 years ago, but my cat got ahold of it and chewed apart the stretched chassis and ate the fuel tanks. The cat is still alive. It started as IBG's 15cwt C15A, and everything behind the spare is scratch-built. The larger wheels came from IBG's Holmes Breakdown kit; details from PART helped dress it up. Decals were pieced together from the Matchbox Monty's caravan, various 1:72 sheets, and the IBG sheet. The unit sign was made by trimming the corners off a Portuguese flag decal, with white "72" numbers swiped from the numbers jungle on the Airfix USAAF Bomber Service set's decal sheet. Something I learned was that, when the Commonwealth forces were ordered to paint the white star on their vehicles prior to the Normandy landings, many Canadian units applied the markings crooked to differentiate themselves from the Americans! (A good website for Canadian vehicle markings is https://www.canadiansoldiers.com/vehicles/markings/vehiclemarkings.htm.) Weathering included everything from oils to MIG pigments. The bed's cover was made from toilet tissue, and the stores in the bed came from Italeri, Academy, Prieser and my own scratch-building. Note the cases of beer back there - since it's a Canadian truck, I'm saying they're Elsinores.
 4 points
 -
Got the front and rear work done for the bumper and doors to the body. Little things are beginning to add up. A couple of things need to be done to the chassis and engine and then I can begin painting the frame and get the engine installed. The grill guard that I had done I found to be too small so a new one was made up which protects the headlights much better. After that the front bumper was easy to get done. Next up is to get the trim done for the rear doors.
4 points
-
Got quite a bit more done in the last few days. Radiator and shroud are set as well as the fenders and running boards. Next is to get the hood sections done. The center needs to be tweaked so that the hinge will work. The gap needs to be closed some with a brass sliver on each side. Side pieces will also need hinges but are set to go.
4 points
-
For me BEST AWARDS CEREMONY EVER.! do not have the need to hear my name or waste the time hearing everyone else's. Having the winners posted within a couple days is more than good. I hope the ceremony stays exactly the same - short and sweet. I do however agree with sticking to the schedules Dave4 points
-
I have always liked Tester's Dullcoat, but sometimes it dries to a semi-matte rather than a dead flat finish. I recently read on-line another modeler say that he lets a bottle of Tester's Dullcoat sit until the "flattening agent" (you know what I mean, all that 'stuff' that gathers at the bottom of the bottle) settles to the bottom. Then he draws/pours off a quantity of the solvent. This increases the concentration of the flattening agent and depending on how much you draw off, the finish that can vary all the way up to dead flat. I decided to give this a try. I took a new bottle of Dullcoat which had settled completely and poured off about 1/3 to 1/2 of the carrier/solvent. I was a bit afraid that it might be spotty or have flecks of flattening agent in the finish so I tested it on a scrap piece of plastic with a flat paint on one side and a high gloss black on the other. i thinned the Dullcoat as normal for my airbrush and gave each finish a coat. The matte finish was still matte, no surprise. But the high gloss dried to a DEAD FLAT and there was no flaking or spotting on either finish. I then tried it on my current project that had gloss and matte surfaces plus decals and I got an even dead flat finish over all. 60 some odd years of modeling and I am still learning.3 points
-
Ok.... after the debacle of diverting to build the RF-84F, I'm back to work on this 1/48 Martin T4M torpedo bomber. I started by making a 3rd tailplane, as the first 2 just didn't cut it. I tried to "carve" the ribs on the far left one and that was too rough looking. I used the skinning method on the center one, but it had some gunk under the skin when I folded it over that resulted in having to try to sand the ribbing which ruined a section. It seems the 3rd time was the charm! The far right shows the 3rd tailplane I've built by sanding thicker sheet plastic to airfoil shape and skinning it with with "drawn ribbed" .005 sheet plastic (as seen in the post above). This one has much more consistent ribbing. Since I'd had trouble before trying to scribe the elevon hinge line, this time I sawed the elevons off of the tailplanes, glued some half-round to their leading edges, and carved a groove in the rear edge of the tailplane so that the elevons fit snuggly into that groove when I reattached them. I also realized that according to the scale plans the tail fin does NOT sit on top of the tailplane; instead, the tail plane is mounted on either side of the tail fin just below the lowest rib. So, that meant cutting out the center section of the tail plane (the thickness of the tail fin) and drilling holes so I could use thick wire for mounting pins. This pic shows test fitting each tailplane half to the fin. Not absolutely perfect, but certainly workable! Front and rear views of test fitting the tail fin and tail planes to the balsa fuselage (which will be vacuformed in the end). Moving to the wings.... I realized the wings AND the ailerons would be easier to skin if they were separate, so I sawed them apart. I also reasoned that the center of the bottom wing, where it's attached to the fuselage, the landing gear, and where the torpedo hangs would probably be the most heavily reinforced wing area so I used .010 sheet plastic with no ribbing to skin it. I used "ribbed" .005 sheet for the upper wing section, but note that I had to leave a space for a wing tank (the blue rectangle) when drawing in the ribbing. All that's left now is to use the .005 sheet to skin the rest of the wings and also skin the ailerons! By the way.... I'm using Gorrilla brand contact cement to attach all of the skinning. It only takes 2-3 minutes after applying before it's ready to use. BUT, it is NOT designed for "polystyrene", so it has to be used only in thin coats, which is exactly what's called for in this build. It seems to sand better than the regular "wood working" contact cement I first tried and gives me slightly more working time than using superglue. Critiques, questions, and comments welcome as I stumble forward with this project! 😁 Gil
3 points
-
This is the Muroc Models 1:72 kit of this weird test article, a glider used to verify the aerodynamic qualities of the JB-1A unmanned flying bomb (which flew for a total of five seconds when it was finally tested). Apparently, it didn't like slowing down - landing it was a challenge, and its landing gear was unsprung, giving it a suspension not unlike that of a shopping cart. I built it in three days - it's a simple kit, and I added detail to the cockpit, plus some nose weight so it sat right. The yellow is ModelMaster deep yellow.
3 points
-
My latest effort is the 1/48 Hobby Boss FJ-4 Fury. The kit has recessed panel lines and rivet detail, and average cockpit detail. Overall shapes and outlines appear accurate, save for one glaring error: the rear fuselage, between the trailing edge of the wings and the horizontal stabilizers, had a very prominent "dip" that shouldn't be there. A review of this kit in Bert Kinzeys' Detail & Scale book on the FJ-4 has instructions on how to correct this error, but I decided to live with it as is. Wing fold joints are included, but you must cut the wing tips apart yourself. Overall, parts fit is good, with a little filler needed at the wing roots and at spots along the fuselage and nose. The kit decals provide markings for two Marine jets, from VMF-451 'Warlords', and VMF-232 'Red Devils', but the blue in the VMF-451 markings are way too light. Hobby Boss offers kits of both the FJ-4 and FJ-4B, but you can build either variant from either kit. If you build an FJ-4, be sure to sand off the rear-most speed brake door on each fuselage half, and use the nose gear door without the antenna fairing. My references for this build were: Squadron/Signal Publications No. 103, FJ Fury in Action; Naval Fighters No. 25, North American FJ-4/4B Fury, by Steve Ginter; and the excellent FJ Fury in Detail & Scale, Part 2: FJ-4 and -4B Variants, by Bert Kinzey. Another valuable online source of photos and information was this web page on Replica in Scale: https://replicainscale.blogspot.com/search?q=fj-4 I wasn't happy with the barely-there kit instrument panel detail and how the cockpit consoles were represented, so I used an aftermarket cockpit set from AMS Resin. The kit seat is good, but lacks cushions and belts. The AMS resin seat wasn't that much better, but it did have a seat cushion, belts, and oxygen hose molded in. The kit has nicely detailed sidewall parts, but I couldn't get them to fit with the resin cockpit set. The AMS set also includes a detailed part for the area under the rear of the canopy, for which Hobby Boss provides nothing. The cockpit parts were airbrushed Model Master Acryl Dark Gull Grey, then details were hand-painted, and attached to the fuselage half. The AMS set also included a exhaust piece with flame holder, but it didn't fit well so I used the kit exhaust, and a length of styrene tube with the flame holder glued to the end to give the exhaust pipe some depth . The intake trunk fit pretty well but still needed sanding and putty to eliminate seams. The nose intake ring lacks the approach light at the bottom, so a section was cut from the intake and three small holes drilled, and painted Tamiya clear red, amber, and green. The cutout for the lights was then filled with Micro Krystal Klear. I ended up doing a lot of sanding around the intake to smooth everything out. Before closing up the fuselage halves, I added several large fishing weights to keep the model from being a tail-sitter. The fuselage speed brakes can be posed open, and have good detail inside, but I glued mine shut. The fit here was poor. The prominent vents on each fuselage side were too thick, so they were sanded down to paper-thinness, glued on place and faired in with Vallejo putty. The openings to these vents are also shaped incorrectly, but I didn't try to correct them. Airframe assembly went smoothly. Minor gaps at the wing root, nose and fuselage were filled with Vallejo putty, and Mr. Dissolved Putty. Wing fences are molded onto each wing, and were sanded to thin them to a more accurate scale thickness. Parked FJ-4's usually have a nose-up stance. The kit nose gear strut is a little short, so I added a one-eighth inch section of styrene rod to the top of the strut, and replaced the compressed torque links with a photo-etched one from my spares box. The nose gear fork was cut away and repositioned turned to the right. I added wire brake lines to the kits' main gear struts, and painted all the struts Tamiya Titanium Silver. Most of my reference photos showed that the main gear doors were often open when the jet was parked, but the kit doors had no detail on the insides. I used very thin sheet styrene cut to fit inside each main door, and cut lightening holes in them based on the photos I had. I also added rivets with a riveting tool along the door edges for added detail. One painted and highlighted with Tamiya panel line wash, they looked much better. All the gear bays were painted white, then the details highlighted with Tamiya black panel line wash. North American usually painted the entire inner surface of their landing gear doors red, but careful study of photographs indicated that Reserve jets had white inner gear doors, outlined in red. The landing light in the smaller nose gear door was painted Chrome Silver, and a wire added to the back of this light. The kits' wingtip pitot probe was too thick and inaccurate, so I built a new one with lengths of styrene rode and wire. The FJ-4 series has three fuel dump vents: one on each wingtip trailing edge, and another just under the fairing above the rudder. The wingtip vents are molded solid, so they were drilled out and sanded to shape. The tail dump pipe was recreated with a small piece of styrene rod drilled out and glued in place, then painted red. A small white position light was also added to the rear of the vertical fin fairing just above the rudder. I also added a missing vent on the left side of the upper fuselage, behind the canopy. The kit includes two drop tanks, two Sidewinders, and six Bullpup air-to-ground missiles, but the FJ-4 never carried Bullpups. The FJ-4 had long legs for a fighter, and therefore didn't usually carry drop tanks, either, so I left these off as well. I should point out here that the Navy flew the FJ-4B attack version, while the Marines flew the FJ-4 fighter version. Reserve squadrons often flew a mix of both types. I primed the model for painting with Tamiya White Fine Surface Primer. The paint scheme I chose was that of a Navy/Marine Reserve jet based at NAS Memphis in 1962. It was in the standard Gull Grey over White undersurfaces and control surfaces, but with the entire nose, tail, and forward half of the wings painted Florescent Orange. I used Model Master acrylic Flat Gull Grey for the topside color, Tamiya White Primer for the underside color, and Model Master Acryl Florescent Red (which is actually Orange) for the high-visibility color areas. Leading edges of the wings and stabilizers were sprayed Titanium Silver as well. After painting was complete, I gave the entire jet a coat of Future Floor Polish for a gloss coat, then applied the decals. No decal sheets existed for the jet I was making, but fortunately they are easily scrounged. The '6M' tail code, wing code, bureau number, and aircraft number came from AeroMaster and SuperScale letter and number sheets from my decal catalogs. The Navy/Marine Reserve service designator came from an old Testor F2H Banshee kit. The rest of the markings came from AeroMaster sheet #14193, 'Furies of The Fleet in Color, Pt. 2'. Once all the markings were applied, a final coat of Mr. Super Clear Matt sealed the decals. The final step was attaching the canopy, which led to the trickiest part of the build. Under the rear section of the FJ-4/4B canopy is a cylindrical object which isn't identified in any of my references, but I do recall reading somewhere that it's an oxygen regulator. A black coiled cable, resembling an old telephone cord, runs from this 'regulator' to the rear of the ejection seat. The cord is stretched taught when the canopy is open. It's very visible in photographs, so I recreated the cord by wrapping thin copper wire around a small drill bit, spraying it black, and attaching it to the 'regulator', which was then glued to the underside of the canopy. When dry, the canopy was then attached to the model. The Hobby Boss 1/48 Fury kits are a mixed bag: beautiful, crispy-molded and engraved parts that are flash-free with good fit, but with sub-par cockpit detail and a large 'dip' on each side of the rear fuselage that shouldn't be there. Still, a little extra detailing and work will reward you with a fine model of this very capable Navy fighter of the 1950's.
3 points
-
I built this electronic version of the S-3 Viking with a Black Box resin interior, Paragon resin wing folds, and the Metallic Details resin/PE engine set. Here's the BB resin cockpit painted and installed. It fit better than any other resin cockpit I've ever used on a model! Note that it's actually an S-3A/B cockpit and the main IP isn't accurate for the ES-3A electronic cockpit; but who can see under that dark tinted canopy? Even so, I did install only one of the control sticks to be more accurate for this version. The ram air intake in the tail fin was just a hole in the kit, so I used some of the tubing seen there, capped off with a punched plastic disk to create an intake duct. Using the Paragon resin wing folds involves major surgery and some heavy sanding to blend them into the wings. You do need to be careful also not to break off the small disks that do extend a bit higher than the folds on the top side, though they're not as fragile as they look. This the Metallic details resin and PE engines set, partially assembled. The instructions take careful study as they don't show clearly all of the casting areas that need removal. However, once you start trying to test fit things you'll figure out there's more to be done! The resin parts fit together VERY well! The advantages offered using this set are the realistic fan blades that you can actually see through ala the real engine, circular intake housings with no seams to sand, and they and their pylons all fit so well to the model I was able to paint them and decal them separately and then add them to the model after painting and decaling the fuselage. This pic of the left engine shows just how amazing the finished product looks! The markings came from a CAM decal sheet. The model was pre-shaded with black lines before painting the overall Light Ghost Gray scheme and then all panel lines were done with a pencil. On to the rest of the pics! The only other anomaly on this kit was the need to add 25+ antennas of various shapes, sizes, and types in various spots! The kit instructions require a bit of study to be sure to get them all in the right spots. This is #21 for this year and I'm going to try to slide yet one more quick build in just under the wire in the coming week! Critiques, questions, and comments welcome as always! Gil
3 points
-
Brewster Buffalo done wheels up for fun. Note the decal setting solution that I didn't clean off properly. It doesn't show as much in normal lighting. Kit went together well with the exception of the wing to fuselage joint. The wings are inset into recesses and the recesses are a bit larger than the wings so there's a rather substantial gap around them that needs attention. All in all, not a bad little kit and makes a nice display model
3 points
-
Joe, as long as you get there before Friday night when registration ends, you should still be able to register and enter your model(s) that you bring. You don't need to be there all four days, but it is one thing I do recommend you do one year as the experience is mind-blowing sensory overload. Not to mention the incredible people you meet.3 points
-
For the third week of the Corsair I spent most of the week super detailing the landing gear utilizing the photo etch details. This required removing some of the kit molded details and replacing them with the photo etch. These were then installed in to the fuselage. I then base coated the underside in light grey paint. Speaking more in to the scheme, I have had lots of comments on the scheme. There are a lot of variations of schemes used on many different Corsairs. However, the scheme I will be using is one that the client has requested. The lower section is light grey and the upper with be intermediate blue. I will also be having the wings lowered and the flaps down. I started on the flaps. The starboard inside flap has a square hole that is used in various versions. The instructions have this filled for on this version. I am currently working on the rest of the wings and will then paint the base coat on the topside. You can see all the photos and details from the start in the build log at: https://davidsscalemodels.com/build-log/1-48-f4u-1a-corsair/3 points
-
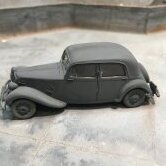
Favorite model when I was a kid. Had to re-do it. Enough said that you can't relive your childhood. Fought me all the way, but it's done.
3 points
-
Hey everyone! While as Secretary I was not the one in charge of planning these events, I was a part of the discussion leading up to the convention and I wanted to let you know that there was much discussion revolving around how to best resolve the two main components of the event; not keeping everyone there for hours AND recognizing those who received awards. I understand the points you're making and the frustration with the way it was done this year. Please know that I have copied down the issues you mentioned as well as your suggestions for our next meeting and future discussions regarding the awards ceremony. I also want to thank y'all for including suggestions to improve it. I know this might not be the detailed answer you're looking for but I wanted to jump on here and make sure you knew that you're not only heard but that this will be getting discussed also. Joe Terry Secretary IPMS/USA3 points
-
When It Rains, It Pours Or, why do all the model kits I have on order - or Kickstarter etc... come in at the same time? 😉 First up is from Pestilence Labs, and is the star the brand new movie Nosferatu is the Count Orlock. If you haven't seen the movie yet,what are you waiting for? It is Very dark and VERY frightening. This kit is mostly 3D printed (the base seems resin cast) with none of the typical defects associated with that process. It comes in 5 parts - the bust, head, hand, hat and base. I am a big fan of the artist Brom, and Mindwork Studios once again collaborated with him to put out a series of his artwork turn 3D. There was 5 or 6 figures, but I could only choose one, and this one had the most frightening face. I was playing around with Army Painter's Speed Paints (1.0) and loved them. In short they are more than a wash, but less than straight forward paint. It was designed for the mini guys who would have to spend days or weeks painting an army to get them ready for the table top. For our purposes I think it also fits in where it you're an armor builder, but don't really care all that much about figures. This paint would fit the need to get a figure or two on the vehicle with little aggravation. When you apply them over a white primer, the primer will be colored (like a paint), and also a bit will gather in the folds etc... (like a wash.). The method had become know as "slap chop". The one downside with 1.0 is that if you think the color needs a second coat, and applied it the first layer reactivated and you ended up with a mess. So it was necessary for a clear coat to be misted over every step taken to seal the first layer in. To that end Army Painter came out with Version 2.0, and like regular paints, once the first layer dried - it was dried, and another layer could be put in over the top. And that led to the technique of "Double Slap Chop". Check it out and try it. The next figure, from the Suite Life, is recognizable to any 5th Element fain is the bad guy, Zorg. The likeness to the actor Gary Oldman is amazing. it is also 3D printed, and comes in 8 parts - head, bust, base, 2 arms, 2 hands, and the Zorg weapon, the Zorg ZF-1. Next is the latest addition to Gillman Productions' The Thing series - Childs. Once again the likeness to actor Keith David is spot on. Childs, along with MacReady were the last survivors of Outpost 31 after the Thing attacks. The ending is left ambiguous, but some feel that the Thing has replaced Childs... This model affirms that theory. While he looks perfectly normal in the front, the back shows a split open head with tentacles emerging. Ewww... The kit comes in 7 parts - The bust, base Hand with the top pf a whiskey bottle, the bottom of the bottle and 3 tentacles. It also comes with a decal for the whiskey. I haven't look yet as to weather it's an actual water slide decal or just paper that needs to be cut and glued onto the bottle. Filmy's Girls usually come out with a new kit right before WonderFest. This year was no different. They had previously release a comedic 1/6th (or is it 1/3) Space Girl, Daphne, who I think is an homage to the 1950s sci-fi space films. This time we see Daphne again. But this time as a 1/4 scale bust. Perfect for modelers like me who are running out of room. Another member of my modeling club and I often exchange kits. "You have this one? No? Here ya go." Back and forth. I gave him the full sized kit of the Daphne kit I just mentioned and in return I got this cool collection of miniatures. 🙂 The group of guys are representing the main cast of Kelly's Heroes (1970), The one with the blue paper id Wolfman Jack howling with an LP in his hand. The one with the yellow is a car hop on skates, and then finally a Gamorrean Guard as seen in Return of the Jedi. This kit was gotten because my Local club, The BPMS, has a number of group builds each year. This winter has become British Sci-Fi night. To expand it as much as possible we are allowing American movie subjects - War of the Worlds etc... as long as they come from a book written by a British Sci-Fi author. I just loved The Thunderbirds as a kid, and especially Thunderbird 2 (I guess that's were I get my love of big ugly spaceships from). so that's what I'll be building for the December. So all that should keep me busy for the summer. Thanks for looking.3 points
-
Had a piece of very good luck at the PAMSCON show in Lakeland FL today.... spent $20 for 30 raffle tickets and though only ONE of them was a winner.... THIS is what I won! 😁 Got almost 10x my investment back with that 1 lucky ticket! Gil
3 points
-
This will be my 2nd stab at scratchbuilding a model. It's seems to be more seldom done these days since there's SO many kits available that weren't out there just 10yrs ago. Still, there ARE still gaps, especially in 1/48, which is my primary scale of choice. This will take more time than my usual builds and it will be easier to post progress as I go along as opposed to trying to post everything at once at the end. This the Martin T4M-1. It's never been made in 1/48 in vacuform or resin to my knowledge. I've seen 2-3 scratchbuilt over the last 40yrs, but no kits have been produced except in 1/72. After finding some suitable plans I had them enlarged to 1/48. You can see the two pieces cut out of the plans laying under and beside them. I started by first gluing two blocks of balsa together with a sheet of copy paper trapped between them, using white glue. This allows the two "halves" to later be pried apart. Then those cut out plans were taped to the top and side of the balsa and it was cut to the rough shape seen above on a scroll saw. Note that I actually forgot the "dip" for the 3rd cockpit opening for the gunner's position and had to add that later! The two rough halves seen above were then glued back together and the fuselage was sanded to shape. I used rough and medium grit sanding sticks for this step. Although I did cut out one of the side view templates (as seen on the left in the first pic above) to check the shape as I went, I actually found it easiest to just use "mark-1 eyeball" for 90% of the work. I'm satisfied the outline matches the drawings close enough for "government work"! The over-arching idea here is to make a fuselage that can be split back apart into 2 halves that will be used to vacuform the fuselage in plastic. Next up were the wings. I decided to use the KISS principle and just carve them from solid balsa. The wing thickness on the plans is 1/4", so I used a sheet of 1/4" balsa. I decided not to vacuform the wing parts, but to simply use them as "cores" and wrap them in very thin sheet plastic (more on that below with the tailplane surfaces). Luckily for me, the top and bottom wing of the T4M is virtually identical, so all I had to do was cut out the top wing plan and use it to cut the 1/4" balsa sheets to shape on the scroll saw. The next step was to give the block balsa wings their airfoil shapes. The first thing to do then was to draw a center line in fine tipped black marker around the edges of each sheet. Since I also had a 1/8" sheet of balsa handy, it was used as a template to draw the lines. Those center lines would help me judge the evenness of my sanding as I progressed, especially on the trailing edge since both the top and bottom rear surfaces had to taper down exactly to that rear center line! The leading edge was easily done as all it needed was simple "rounding", which was done with sanding sticks. I taped a large sheet of 80grit sandpaper to the front edge of my workbench to do the heavy sanding on to work on getting the airfoil shape. Again, I just used "mark-1 eyeball" to sand a tapering surface on the top and bottom. I switched back and forth between them frequently always trying to sand just as much on one as I'd just done on the other; and to also maintain the same angle I was holding the piece at while sanding. Once again, I found this easier than expected and the heavy 80grit paper helped speed the process along. Once both were sanded to shape I only had to add the pilot's cutout in the center to make the "top" wing. One part of scratchbuilding is knowing you have to engineer things that kits give you. I had to figure out HOW I would attach the bottom wing to the fuselage. Again, trying to go the simplest way, I decided to cut the airfoil shape into the fuselage bottom so the wing can be fit up into it. The scroll saw has more than earned its keep on this project! I tackled the tail surfaces next. Since they're smaller I decided to use thick sheet plastic to carve their blanks. After transferring their plan shapes to the sheet plastic heavy scissors was used to cut them out. They were then hand sanded to their airfoil shapes just like the wings. Note the very thin piece of .005 plastic sheet at the top of the pic. This was what I'd use to "skin" them with, so I didn't have to worry about any sanding marks on the plastic blanks. This and the following pics will show the method used to make the ribbed skinning for the horizontal tailplane, but the same method was used for the fin and rudder too. Note that the tailplane plan has been drawn in pencil onto the .005 plastic sheet, including the "rib" lines. Also note that they do not go all the way to the edges of the drawing/part. The .005 sheet was then placed onto a folded piece of paper towel to give it a slightly padded surface under it. A straight edge and a ball point pen was then used to draw in the rib lines (whether or not the ink transfers to the plastic is not important). This method creates an indented line on the inside and a raised "rib" on the outer surface of the thin sheet. Here, the tail plane blank (which had already been used in 2 previous failing attempts at ribbing!) has been superglued to the first half of its "skin". After it set, more superglue was applied to the other half and it was folded over onto the top. This method isn't perfect.... it produces rough edges at the sides and rear, but those can be carved and sanded to shape. On one of my first attempts I tried using contact cement instead of superglue. It worked ok, BUT when it came time to sand it and the .005 was sanded through, the contact cement did NOT sand well. Superglue solved that problem! Here are the rough sanded and primed tail plane parts. I'm very satisfied with the representation of the structural ribbing as being even and visible enough for my purposes. I believe that once they've been fine sanded and painted they'll look the part, pun intended! That's where things stand as of today! My next step will be to try to "skin" the wings. More pics when more progress has been made. Comments, critiques, questions, and suggestions are all welcome as always! Gil
2 points
-
Some more details have been added to the wings..... The 4 wing fold panels have been scribed in, their hinges added, and another coat of primer sprayed on. The hinges were made by sawing notches every 1/16" along a piece of half-round plastic strip. Note that hand holds have also been drilled out in the wingtips of the bottom wing. There's still yet MORE filling and sanding to be done, as evidenced by the one seam line running down into the one wing fold panel and some other slightly marred spots here and there, but little by little the wings are getting there!
2 points
-
I started the 1/32 Fisher resin F9F-5 Panther last Sunday and finished it this evening. This was the starting point. The resin casting is VERY smooth, extremely nice, and the kit engineering is ingenious. That fuselage is cast as 1-piece and also hollow! The combination cockpit/nose gear bay/speed brake bay is designed to be slid up into the hollow nose from underneath after getting it painted. There's even a tray cast into the front of the cockpit designed to hold pennies or nickels as nose weight (I used fishing sinkers). The wings are cast as 1-piece wing tip to wing tip with the gear wells cast in and the proper dihedral already set. The elevators and ailerons are positionable and the flaps and speed brakes are separate. The resin landing gear are wire reinforced so that they have the strength to hold the model. The kit also includes a fret of PE parts for the cockpit, wing fences, the Tiny Tim rockets, and to help detail the landing gear. The model was primed with Tamiya Silver, which was then masked off on the leading edges of the wings, tail planes, and vertical fin. Rattle can Tamiya T-55 Dark Blue Gloss was used for the USN Navy Blue. When it was dry the red squadron trim was masked off and airbrushed on. The decals are from the kit and represent a typical Panther operating in Korea, but is not accurate for any one plane. This Fisher resin kit is now VERY rare (and expensive) ever since Fisher was burned out of his home in California a few years ago, losing all of his molds and being unable to replace them ever since. If you find this kit at anything near or less than $200 and want it, snatch it up as it's worth 2-3 times that! Critiques, questions, and comments welcome as always! Gil
2 points
-
Gil, Gil, Gil... That Panther turned out great especially for what, a weeks build? The overall build looks amazing especially the finish. Who would have thought that Tamiya's dark blue would fit the bill? Color really looks good too! Any more pics of the office/office chair? I had the twogar for the longest time and sold it a few years ago for a nice penny. I also have the Fisher conversion for the Skyraider to make it into the station wagon variant as my dad called it when he crewed on one while at Pax Riv. This is something I won't be selling anytime soon.. Thanks, after seeing your build, I am getting the itch to do the AD-5. I know its for the Air Force variant but with a lil TLC and some mods, I got this! Happy Modeling, Mike
2 points
-
This is the Minicraft 1/144 Boeing 727-200 built OOTB; although I did turn the nose gear. After finishing the ES-3A Shadow (which can be seen below) I figured I could get at least one more "quick build" in before the year's end. This is a very nice kit with decent fit, though the indented panel lines could be a bit sharper. The kit is designed to use modern airliner decals so there are no passenger windows to fill and no separate windshield to install. The top fuselage tail fin intake is separate and can be added at the end of the build, as can the engines, wings, and tail planes unless you're building a contest model. In that case their fit will need slightly more close attention. However, for a 5 day "shelf sitter", their fit is very good! These are the kit decals, though NOT (strictly speaking) the kit "scheme". Originally I was building an Eastern 727, but too late discovered my decals were for the -100 and too short! So, I had to resort to using the kit supplied Pan Am decals, which fit quite well. However, the bottom should be white and not NMF. Meh.... I left it like it is! On to the rest of the pics! The two empty holes in the back are for the tail bumper, which went "pinging" out of my tweezers into the blackhole under my bench! If it ever reappears I'll glue it in place. This makes #21 for the year! I have number 22 underway (something completely different!) and IF I apply myself it should be done by New Year's eve! Questions, comments, and critiques welcome as always! Cheers! Gil
2 points
-
This gun was a beast, as a kit and in reality. Developed at the end of WW II, it nevertheless saw service in the US for a short time until it was overtaken by the first generation of SAMs. It could fire up to 60,000 feet and earned the nickname "The Stratosphere Gun". This is the 60's vintage Lifelike kit of it that I got in a bag at the last IPMS Nationals. Amazingly, it was only missing two parts, one that I replaced by scratching up a replacement and the other was the fourth figure that came with the kit which I did without. There was not one part that wasn't covered in flash and/or mold seams or had sink marks or mold release pin marks. When I was done with the clean up my modeling area was under a 1/4" thick coating of plastic dust from filing and sanding every single part. Fit was mostly ok but some areas needed extra help to go together and the instructions weren't very specific on how some things went with other things. It came with a cover for the top of the gun that I have to believe was not used in action but rather when traveling or not in use. It was a typical 'action model' of its era having many moving parts which always makes assembly interesting. It could be displayed in battery or in travel mode, the two bogey wheel sets used similarly to those on a German 88. The figures were typical 60's molds and the poses somewhat stilted. Since the gun was used after the armed forces were integrated, I painted the ammunition handler as an African American. That skin tone is tricky. You may notice the round in the tray. That's the automatic loader. The tray tilts down and an arm swings around and shoves the round into the breach. Lifelike had a series of these 1/40 scale military kits and they all had cute nicknames on them. This gun was "Tilly the Toiler" ( There were no decals in the bag so I couldn't do that), An Amtrac was "Winne the Whale" and a 155 SP gun was "Choo Choo Baby". They also did some of the support equipment for a Hawk AA Missile battery, but they weren't named to my knowledge.
2 points
-
HI ! Here another project I have done in the past using the EDUARD kit ..If you like to view more pic of it , I have set up an GOOGLE page for it , just visit this link : https://photos.app.goo.gl/4BieFCWNi6GxWP2m6 Enjoy ! Jmarc
2 points
-
Here's a sampling of some of my models from 2025. Different genres, different scales, some OOTB others conversions or detailed. All were fun and that's what it's all about.
2 points
-
And the final grouping.... 1/48 Wings vacuform O2U-1 Corsair with a scratchbuilt cockpit, replacement resin engine, and aftermarket Scarf ring and Lewis gun. 1/48 UMa AV-8B Harrier Plus II, OOTB. 1/144 Minicraft Boeing 727, OOTB. 1/32 Trumpeter P-51D Mustang with some 3D printed parts added. 1/48 Tamiya Ki-61 Tony, OOTB. 1/48 Monogram AV-8B Harrier with some 3D printed cockpit placards and a home-vacked windscreen to replace the cracked one in the kit. 1/32 Revell P-51D-5 with some 3D printed additions. 1/48 F-100C conversion built using the Cutting Edge resin set and a Monogram F-100D kit. All in all I'm happy with the year, especially considering almost 1/3 of the builds were not injection molded kits (4 resin and 3 vacs)! Here's wishing everyone a boatload of modeling FUN in 2026! Gil
2 points
-
Update #1 Ok here we go.. I do apologize for the delay but the mancave needed some attention.. 🙄 So I got the interior all painted up, installed and I went ahead and buttoned up the fuselage halves. One thing I did and it was my fault sort of speak. I wanted to drill out the side air vents just in front of the engine access panels and my hand started shaking. Before I knew it, I essentially removed the vent lol. I had a spare clear spure from a Tamiya Spit lying around and so I used both the fuselage lights and voila, I have side engine vents! Before I forget, the P-39N-5 had armored platting behind the pilots head instead of the armored glass and the sole pic of the aircraft that I'm doing had the platting installed. Not sure why Hasegawa raised the main fuel caps(one on each side) on the wings but they did. It took a bit but I sanded the one cap rim down and I'm pleased on how it looks. It's not 100% accurate but at least its flush with the wing! One down, one to go.. Now it's time to start cleaning up the seams and rescribing the panel lines if need be. YAY Glad to be back at my happy place! Happy Modeling, Mike
2 points
-
Here is the update on the ongoing B-1A HYBRID ..Youl'le notice there is only one image available you can view more of the update picture of the projects on the Google link ! (DEC 11th ) .. Today , I continue the work in the front bomb bay ! If you like to help out on this projet I need these ... : from the REVELL 1/48 B-1 LANCER stenciling for the WHITE prototype aircraft, this was on the decal sheet of the first edition of the B-1 kit.. I'm also seeking the NOSE WINGLETS + LEFT TAIL STABILIZER .. used parts are welcome as long they are useable ! A big thank you for helping out , without your help I won't be able to do a good job on the project !... ..If you like to view more WIP of this project and 2 other 1/48 B-1 bombers ,This is 'PHASE 2' by the way follow this Google link https://goo.gl/photos/QkeSiGZuvcRfG7yV7 Enjoy and it's an 'rendez-vous' next week for more on this particular project..!. Jmarc
2 points
-
The fourth week of the A-4M I worked on getting the base coat of paint applied and also worked on more details on the aircraft. The guns mounted at the wing root leading edge were detailed with photo etch and installed. The refueling probe was painted and installed, and the wing leading edge slats were installed in their extended position. I decided to paint the tail rather than applying the kit decals. This was because the details on the rudder would make it difficult to lay down the full decal. The aftermarket decal set gives you just the white stars which would be easier to apply. I also assembled and painted the drop tanks. The upcoming week I will start applying the numerous decals. Once these are done I need to detail the canopy, mount the HUD, install the light lenses and drop tanks to complete the model before the Holidays. You can see all the photos and details from the start in the build log at: https://davidsscalemodels.com/build-log/1-48-a-4m-skyhawk-vma-214/2 points
-
After what was probably 3hrs of tedious masking over 2 days in order to paint the trim colors, some varying aluminum panels, the antiglare panels, gear wells, and the tail pipes; the paint scheme is done! I'll apply a gloss coat to the fuselage and tail fin stripes today to prepare them for decaling. The NMF doesn't need in any gloss to prep for the decals as it should be smooth enough as is. I still need to mask and paint the canopy, nose glass, ejection seat, and repaint the wheels for all of the tires; but final assembly should follow quickly afterward. More pics when she's decaled and finished! Gil
2 points
-
Thanks for following this WIP , it's quite appreciated LINDBERG KNIGHT TWISTER (NOV 26th) ..Today ,I completed the sanding and apply a coat of primer !! If you like to view the complete WIP of this project , just follow this Google link : https://photos.app.goo.gl/PHiSWZwEPTxCbNr77 If you are curious and like to view the 1/48 civils aircrafts I have build so far , just follow this Google link: https://photos.app.goo.gl/R5EibRLDyihRmC6i6 Hope youl'le enjoy the project Jmarc
2 points
-
Started and finished in the same calendar year! This is the Special Hobby kit, which is the basis of a bunch of Griffon-powered Spitfire kits. I took off the Seafire-specific features (the RATO attachments, primarily) and detailed the cockpit with Special Hobby's own photoetched set, plus a Barracuda Studios control column. The exhausts are from Quickboost and the wheels and from Barracuda Studios. I used the kit decals to build Roy Cruickshank's N0. 91 Squadron aircraft in which he was shot down by flak on April 10, 1945; he and his wingman were rescued by a USAAF OA-10 Catalina. Only 120 Mk. 21s were built - it debuted the new laminar flow wing, full wheel covers and a retractable tail wheel. The paints were ModelMaster dark green and ocean grey, with Floquil medium sea grey, all from my Museum of Extinct Paints (aka Evidence I Used to Habitually Overpurchase at the Hobby Shop). It was weathered with oils - I tried to keep it light since the plane didn't last more than three missions.
2 points
-
I still think you need to write up one of these step by step builds for a Journal article. Looking great so far. I've always on the lookout for Vacs as you can get kits of things no one else has ever done.2 points
-
Here is the update on the ongoing B-1A HYBRID ..Youl'le notice there is only one image available you can view more of the update picture of the projects on the Google link ! (OCT 28th ) .. Today , I continue the work in the front bomb bay ! If you like to help out on this projet I need these ... : from the REVELL 1/48 B-1 LANCER stenciling for the WHITE prototype aircraft, this was on the decal sheet of the first edition of the B-1 kit.. I'm also seeking the NOSE WINGLETS + LEFT TAIL STABILIZER .. used parts are welcome as long they are useable ! A big thank you for helping out , without your help I won't be able to do a good job on the project !... ..If you like to view more WIP of this project and 2 other 1/48 B-1 bombers ,This is 'PHASE 2' by the way follow this Google link https://goo.gl/photos/QkeSiGZuvcRfG7yV7 Enjoy and it's an 'rendez-vous' next week for more on this particular project..!. Jmarc
2 points
-
This is the 1/48 CollectAire resin F3D Skynight which I built as a Marine EF-10B. I bought the kit second handed with the fuselage already assembled. Unfortunately there were very large gaps (which I filled with strip plastic and superglue) and the original builder didn't add any (or enough) nose weight so I had to add a clear plastic tail prop to keep it on its gear. Otherwise it's a 10 day "quickie" OOTB build just to diminish the stash. The markings are from the kit and I do like the Playboy bunny on the tail fin! On to the rest of the pics! This gives me a gray and white Skynight to go with the all dark blue F3D I already had on the shelf. Questions, comments, and critiques welcome, as always! Gil
2 points
-
Thanks for following this WIP , it's quite appreciated LINDBERG KNIGHT TWISTER (OCT 24th) ..Today ,I gave a coat of primeur on the fuselage !! LINDBERG KNIGHT TWISTER RACER (OCT 24th ) Today I completed the work on the exhaust If you like to view the complete WIP of this project , just follow this Google link : https://photos.app.goo.gl/PHiSWZwEPTxCbNr77 If you are curious and like to view the 1/48 civils aircrafts I have build so far , just follow this Google link: https://photos.app.goo.gl/R5EibRLDyihRmC6i6 Hope youl'le enjoy the project Jmarc
2 points
-
This conversion was built using the old Cutting Edge resin set with a Monogram F-100D kit. It's not difficult with the conversion providing a new set of wings, vertical tail, one piece main gear doors, and speed brake bay (not used, more below). I also added a Black Box resin cockpit that I had on hand, as well as saving some work by blocking off the intake with a FOD cover. This shows the resin cockpit components with the IP shroud and rear seat ledge already added. The Cutting Edge F-100C resin vertical tail has a choice of a ribbed rudder or a flat rudder as I used. It also has the proper smaller antenna fairing above the rudder. The ammo bay door has been cemented shut and the tail planes (molded in place) removed from the top fuselage rear. Some of the rescribing work has also been done at this point. Removing those tail planes makes it easier to work the fuselage seams on the sides once the upper and lower halves are together. The resin wings and slats were well cast with no warpage, though I did have to rework some of the slat arm openings to allow the slats to better "drop fit". The F-100C wings had no inner flaps, a straight trailing edge, and no wing fences. You can also see the separated tail planes which have been rescribed. They will be reattached after adding a piece of wire to use as a locating pin, and can be added at the end of the build after painting and decaling. The F-100C speed brake had a smaller opening so I added strip plastic to fill in the center slot. As molded, the Monogram center "finger" in the speed brake well is too wide for a "C", so I used a motor tool to grind off the edges of it to make it smaller and match the shape of the speed brake. The Cutting Edge resin set provides an entire new speed brake well, BUT not only is it closed up, but it also requires major surgery to insert it in the bottom fuselage. I figured modifying the speed brake and center finger in the brake well as less (and easier) work to do! You can also see that I've closed up the bottom gun bay door beside the nose gear well. As molded, the exhaust tube isn't deep enough. I opened it up, added a piece of brass tubing to deepen it, and then fabricated a new "flame holder" to detail it and close it off. I used the kit supplied nose part and my old Mattel vacuform machine to make a FOD cover that fits perfectly and can be added at the end of the build! The model was sanded, rescribed, fine sanded and then primed with Alclad Gloss Black. Alclad Aluminum was then used as the base coat and a few panels masked off and done with Alclad Airframe Aluminum for some variation. The burner section was then masked off and sprayed with Alclad Steel. Alclad Clear Sepia, Clear Hot Violet, and Tamiya Clear Blue was then sprayed to make the vertical burn pattern on the rear. Although not bad, I thought it was too stark looking. So..... I remasked the rear and lightly sprayed Alclad Steel over the burn patterns until they were much more obscured, then came back and sprayed very light vertical streaks of Tamiya Clear Blue to finish it off. This looks much more subdued and realistic I think. I used a Cutting Edge sheet of decals to do Col. George Laven's very colorful candy-striped F-100C. Generally the decals went down well, BUT I had to cut out the decals for the wing slats "on the fly" (while applying them) as they weren't supplied as separate sections. It was the same for the top fuselage candy stripes. They're supposed to wrap around the to the fuselage bottom, but they come as one piece and have to be cut "on the fly" and then try to apply the remainder to the bottom fuselage. The problem here is that also involves the main gear doors and there's no separate pieces for those, so MORE cutting is needed. I couldn't do all of that cutting on the wet decals without tearing them, and so I just concentrated on applying the top fuselage decals. Also, the candy stripes for the drop tank tips did not fit the Monogram tanks. I removed them after I couldn't get them to fit and tried to paint the stripes, but after having some primer peel up in the process I just repainted the tips in NMF and let them go at that. Still, it makes for a very colorful bird regardless! On to the rest of the pics! All in all this was a quick and easy conversion compared to many others I've built. The decals gave me fits, but otherwise it was a fun build. Of course now if you want an F-100C, you can just build the Trumpeter kit (if you can live with ITS warts). But, if you still have this conversion in the stash after 20yr (like me), it's worth tackling! Critiques, questions, and comments welcome as always. Gil
2 points
-
155mm self-propelled howitzer of South Africa done in acrylics. Kit by Takom in 1/35. This weapon platform features stabilizing hydraulics towards the front and at rear and is able to fire 2-4 HE rounds per minute at a range of 41.63 miles.
2 points
-
Hotels usually have a "food and drink" minimum that has little if anything to do with the individual room rate although it may affect any fees they charge for use of meeting/ball rooms. Usually the hotel's convention facilities are free if you guarantee a certain number of room nights. That being said about hotels, some convention centers do give a discount on facility charges that can be tied to a group's "food and drink" usage. In at least one case, the local convention authority gave a discount on the city's convention center if a certain number of local hotel room nights were used and they kept track of them. In short, every place is a little bit different.2 points
-
I know a number of people on this thread can remember the banquets from years past, the banquets for the last few years were HUGE improvements over our “slide show” days, so continuing updating and improving is not an issue with me. That said I think there is an unequal divide concerning perceptions of the awards show, between those that regularly go to the banquet and those that don’t. I have always gone to the banquet, it’s part of the convention for me, I could care less how long it goes as I have no plans after except going to the contest room for a bit and then maybe the bar and then my room. Sitting, eating, seeing models I may have missed and talking with both old and new friends has never been a problem for me. I believe it was mentioned that next year Fort Wayne will not have a banquet, OK, but it was also mentioned that it will not be the norm for every convention. While FW doesn’t have a requirement for a banquet in order to get a much better rate on the rooms we need for the vendors and content rooms that will not always be the case, eliminating some sort of banquet is probably not in the cards, but keeping it relevant so it will be well attended and satisfy the requirements is. It seems to me that the banquet is attended by a large percentage of longer term members, and those that attend the entire convention, not exclusively, just mostly. It would be interesting to me anyway to see the difference of opinions between those that go to the banquet and those that don’t, and/or go to a “telecast” version of the awards show. It seems to me the perspectives are different. The answers will certainly be a trial and error process, and tweak along the way, however with the requirements of some sort of dinner maybe the solution is something completely different (to quote Monty Python) like a banquet on a different night with a different presentation, geared to new/continuing members. Congratulations to Hampton on a great convention, they deserve it. For the record, my main critiques of the banquet would be adherence to the posted schedule, the speed of the slide show being too fast and no screens for the people not facing the front of the room, for what it may be worth.2 points
-
Scott, thanks for the explanation. It should be noted that your message does not disregard any criticism in the manner in which the show was conducted. It simply offers a more in-depth view of the event. Those who have not volunteered to work on the Leadership Team of past conventions may not have a clear view of the working relationship between the Leadership Team and the Event Site staff. While the Leadership Team and the Event site Management Group cooperate to make the event a success, there are issues that come up which are not in line with what the Convention Leadership Team would prefer. And, in some cases, the Leadership Team simply has to work in the environment set by the site hosts. Entry times into the Banquet Hall and departure times from various rooms are among those points which sometimes cause difficulty for attendees, not to mention the hotel staff and the Leadership Team. A BIG THANKS to the Hampton Team and to the volunteers who supported the Leadership Team.2 points
-
I went recently to the San Diego Comicon and picked up a couple things. You would think a comic convention wouldn't have models but there are there: These are going to be fun!2 points
-
Here is Vlad's Gallery of the 2025 Nats... https://www.svsmgallery.com/Top-level/Contests/IPMSUSA2025 Thanks much Vlad!2 points
-
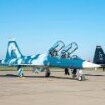
Didn't want to do a Prototype,Soooo 1/72nd Trumpeter with a resin interior (mostly can't see) Mostly kit decals except ANG and state label Scrap Weapons from Spare box,Pitot from Albion alloys and needle Thanks for Looking Comments welcome Bill D.
2 points
-
The Red, White and Blue are standing proud and tall!
2 points
-
My 1/10 scale bust of Frankenstein's Creature and his bride from Insomnia Miniatures. These are based on the 1931 an2 32 movies more that the original source. (The movie we all know bears very little resemblance to Mary Shelley's book.) Painted in black and white to give homage to the movies, they are displayed in photo frame in front of a photo I took of the stonework at a Springfield MA church. Like Comment Send
2 points
-
I haven't been on much, due to a brutal month of May, but I was able to go to the San Diego Model Expo contest. There I got a number of acquisitions, most were purchased, others are raffle prizes. First, I got this on a raffle at my local club meeting: In San Diego, I was able to purchase these: And finally, the guy at the raffle table was giving away books and so I picked up this one: These are the raffle prizes I won in San Diego: Those I'll build, these two I won't and if anyone wants to make me a reasonable offer, they are yours: That's all I have for now; time to get back to the bench.....2 points
-
Thanks for the kid comments guys! Gil, this is my 4th Otaki base kit that I've built so far, and Id put it as one of their better efforts, at least among those four. I have at least that many more to go in my stash, so only time will tell in the end on that. 😉 Paul, those photos are great! Thanks for them! I've seen P-51s at a few air shows, but unfortunately never got the chance to see this particular one.2 points
-
My latest build is an extensive reworking of the old 1/72 Monogram HU-16D Albatross. First issued in 1957, this kit is a true classic, and represents the later HU-16D version, with the taller vertical fin and extended wings. I remember building this kit in my basement sometime in the early 1970's, when I was around ten or eleven years old. It was the first model I spray-painted, using a rattle-can of Testors silver. (Anyone remember watching Flight from Ashia, featuring HU-16's from the Air Rescue Service?) For a kit that is old enough to be eligible to receive Social Security benefits, the fit is good, though I did need to putty and sand the seams on the nose, fuselage, and wing/fuselage joint. Typical for Monogram, the shapes and dimensions look spot-on. I can't vouch for their accuracy, but the 1/48 scale plans of the Albatross provided in Warpaint Series No. 92 match up very well with the kit parts. The major drawbacks are a complete lack of interior detail, toy-like working landing gear, and the airframe is covered with raised rivets that are way oversized. Before starting, I had intended for this to be an easy, nostalgic, out-of-the box build. But I soon decided to at least sand off all the rivets. Then, I decided I wanted the rear crew door open, which necessitated scratch-building at least part of the rear crew compartment. Then I convinced myself that it wouldn't be that much harder to open the hatches over the pilots' seats, which called for scratch-building the entire cockpit. Lastly, I decided I just couldn't live with the kits' over-scale, working landing gear, either. So much for an easy, nostalgic, out-of-the-box build. I was now facing a lot of work, most of it scratch-built. Fortunately, there are some excellent references for the Albatross that are readily available: Steve Ginter's Naval Fighters No. Eleven, Grumman HU-16 Albatross; Warpaint Series No. 92, Grumman HU-16 Albatross; Grumman Albatross: A History of the Legendary Seaplane, by Wayne Mutza, and the old, reliable Squadron/Signal Publications HU-16 Albatross in Action. All were essential in scratch-building the interior details and improving the landing gear. I began by scratch-building the rear cabin. The layout of and equipment used in the HU-16 rear compartment varied greatly, depending on the branch of service and mission. Since I was building a Navy search and rescue plane, I chose a cabin lay-out with two seats and three bunks - nothing else would be visible. I found two suitable seats in my spares box, and added armrests made of wire and thin styrene rod. The bunks were made of very thin sheet styrene, with styrene rod framework. Photos show the rear cabin walls and ceiling on many HU-16's were covered in cloth padding, but I chose the easy route and used styrene strips and rod to replicate the ribs and stringers inside the rear fuselage cabin. The rear cabin bulkhead has two side-by-side doors, one leading to the auxiliary power unit, and the other to the toilet. I scribed the doors into the sheet styrene bulkhead, and added a small porthole window to each door and filled them with Micro Krystal Klear. Rolled-up tissue paper, painted yellow, represents a life raft stored against the aft bulkhead. I also used styrene rod and other small styrene pieces to replicate the hinge of the emergency escape hatch on the starboard side of the rear cabin. The kit rear cabin windows fit very poorly. I cut away as much excess plastic from the windows as I could, and cemented them in place, and used clear canopy glue to fill in several big gaps in the windows. Once completed, the rear crew cabin was sprayed Tamiya NATO Green. Not much of any of this detail can be seen through the open rear cabin hatch, but it's satisfying knowing it's there. The cockpit pushed my meager scratch-building skills to the limit. The flight deck on the HU-16 has a deep recessed walkway between the seats, and it was quite a trick to get the dimensions and positions of the flight deck and all the bulkheads correct. After multiple attempts, I finally got something that was somewhat accurate, and also fit in the fuselage. The pilot and co-pilot seats came from a 1/72 Minicraft B-24, which were heavily modified and detailed with styrene strip and rod, and finished with 3D printed seat belts and harnesses. The instrument panel, made from layers of sheet styrene, was detailed with 1/72 scale instrument decals. I robbed control columns from a 1/72 C-47 kit, which closely matched those used in the HU-16. The avionics and radio racks behind the pilot's seat was made with styrene sheet for shelves, and rod for braces. The radios and other avionics boxes were scrounged from the spares box. A radio operator's seat and table were also scratch-built. I made the overhead center console with a section of a 1/48 TBM Avenger center instrument panel, filed and sanded to shape.The overhead hatches above the pilots' seats were cut away, and new ones made from sheet styrene. I rolled them against a hobby knife handle to give them the proper curved appearance. Before closing up the fuselage halves, I added several ounces of lead fishing weights to the nose to prevent it from being a tail-sitter. This kit is very tail-heavy, so when you think you have enough weight, add at least half again as much. Once closed up, I cemented the windshield in place, but the fit here was terrible. I shimmed and filled as best I could, but fit is sloppy, and looks it. The kit includes a boarding ladder, which doubles as a rear stand to keep the model from sitting on its tail, but it's inaccurate in size and shape. I scratch-built a new one, based on a drawing in the Naval Fighters book, and sprayed it Tamiya Titanium Silver. My references showed that most HU-16D's had an additional anti-collision light added to the base of the fin, just below the leading edge of the horizontal stabilizer. I recreated it with a clear tail light scrounged from the spares box, cemented in place, and faired into the spine with putty. In the process of gluing the fuselage halves together I inadvertently pressed on and broke loose two of the round cabin windows. I scrounged my spares boxes and came up with a section of clear sprue the same diameter as the windows. I cut two sections a quarter-inch long, polished one end of each, and pushed them in place with clear canopy glue. They wound up looking better than the kit windows. The two UHF antennas on either side of the vertical fin were molded solid, so they were removed and replaced with wire bent to shape. Two small tail lights at the base of the rudder were drilled out, painted silver, and filled with tiny drops of Micro Krystal Klear. The outrigger floats had tie-down rings added to the rear of each float, made with thin wire and super-glued in place. The kit engines come molded into the cowls, and are very poor representations of the Wright R-1820 radials. I ordered Reskit resin replacements for the engines, and once painted, they look terrific. Exhaust pipes on the rear of each cowling were cut away and replaced with small sections of styrene rod, with the ends hollowed out. The kit props have excellent hub detail and the blades needed just some trimming and removal of some mold lines. I detailed the wheel wells by adding additional ribs and stringers made of styrene strip, plus some wires for hydraulic lines and some scrap pieces for actuators and pumps. The kit landing gear is designed to retract, but the parts are way over-scale. I purchased a white metal gear set from Scale Aircraft Conversions, but it was designed for a different kit. Making it fit the Monogram wing and fuselage was a real trick. The main struts are too short, so spacers made of sections of the kit struts were added to the gear wells in the underside of the wings. The nose gear well was completely scratch-built, boxed in with sheet styrene and detailed with styrene strips and pieces from the spares box. To get a more accurate nose gear strut, the hinged part of the kit strut was grafted onto the lower section of white metal strut. The grossly inaccurate kit wheels were replaced with a much nicer resin set from Reskit. The wing, which comes in five pieces and is 16" long when assembled, was strengthened by adding a brass rod spar. The main gear wells in the upper wings were detailed with ribs made of styrene strips. The wingtip lights were molded solid, so they were cut away, filled with Micro Krystal Klear, and painted Tamiya clear red and green. I decided to finish the kit in the markings of a US Navy search and rescue plane based at Midway Island in the mid-1960's. The upper fuselage was sprayed Tamiya Gloss White. The tail planes, bottom of the hull, and wing were sprayed Model Master Acryl Gloss Engine Grey. The outrigger floats, wing tips, rear fuselage stripes, and center upper wing section were sprayed Tamiya Lemon Yellow, which looked brighter and more accurate than Chrome Yellow. The high-visibility yellow fuselage stripe and wing areas were bordered with stripes sprayed Tamiya semi-gloss black. Once painted, I sprayed the model with a coat of MicroGloss. Decals came from several sources: national insignia, service designators, prop warning stripes, and anti-glare panel decals came from Print Scale sheet #72-136. An ancient Micro Scale sheet, #72-184, provided the upper wing walkway, bureau numbers, and upper wing 'RESCUE' marking. The 'MIDWAY' station designator on the tail fin was a custom decal made by Above & Below Scale Graphics. I wasn't satisfied with the color of the Print Scale or Micro Scale wing walkway, so I painted over the Micro Scale walkway with a lighter and more accurate (to my eye) shade of grey. The RESCUE arrows and the small decals on the external wing tanks came from my decal catalogs. Another coat of MicroGloss sealed the decals. The final step was making antenna wires with thin transparent nylon thread. Like all of my models, once on the shelf all I can see are the mistakes, but I'm still pleased with the results. For a kit that was first issued almost 70 yeas ago, it still builds up nicely and with some extra work, it can make a fine model of this important and often-overlooked aircraft.
2 points