All Activity
- Today
-
Brilliant job! So smooth and clean!
-
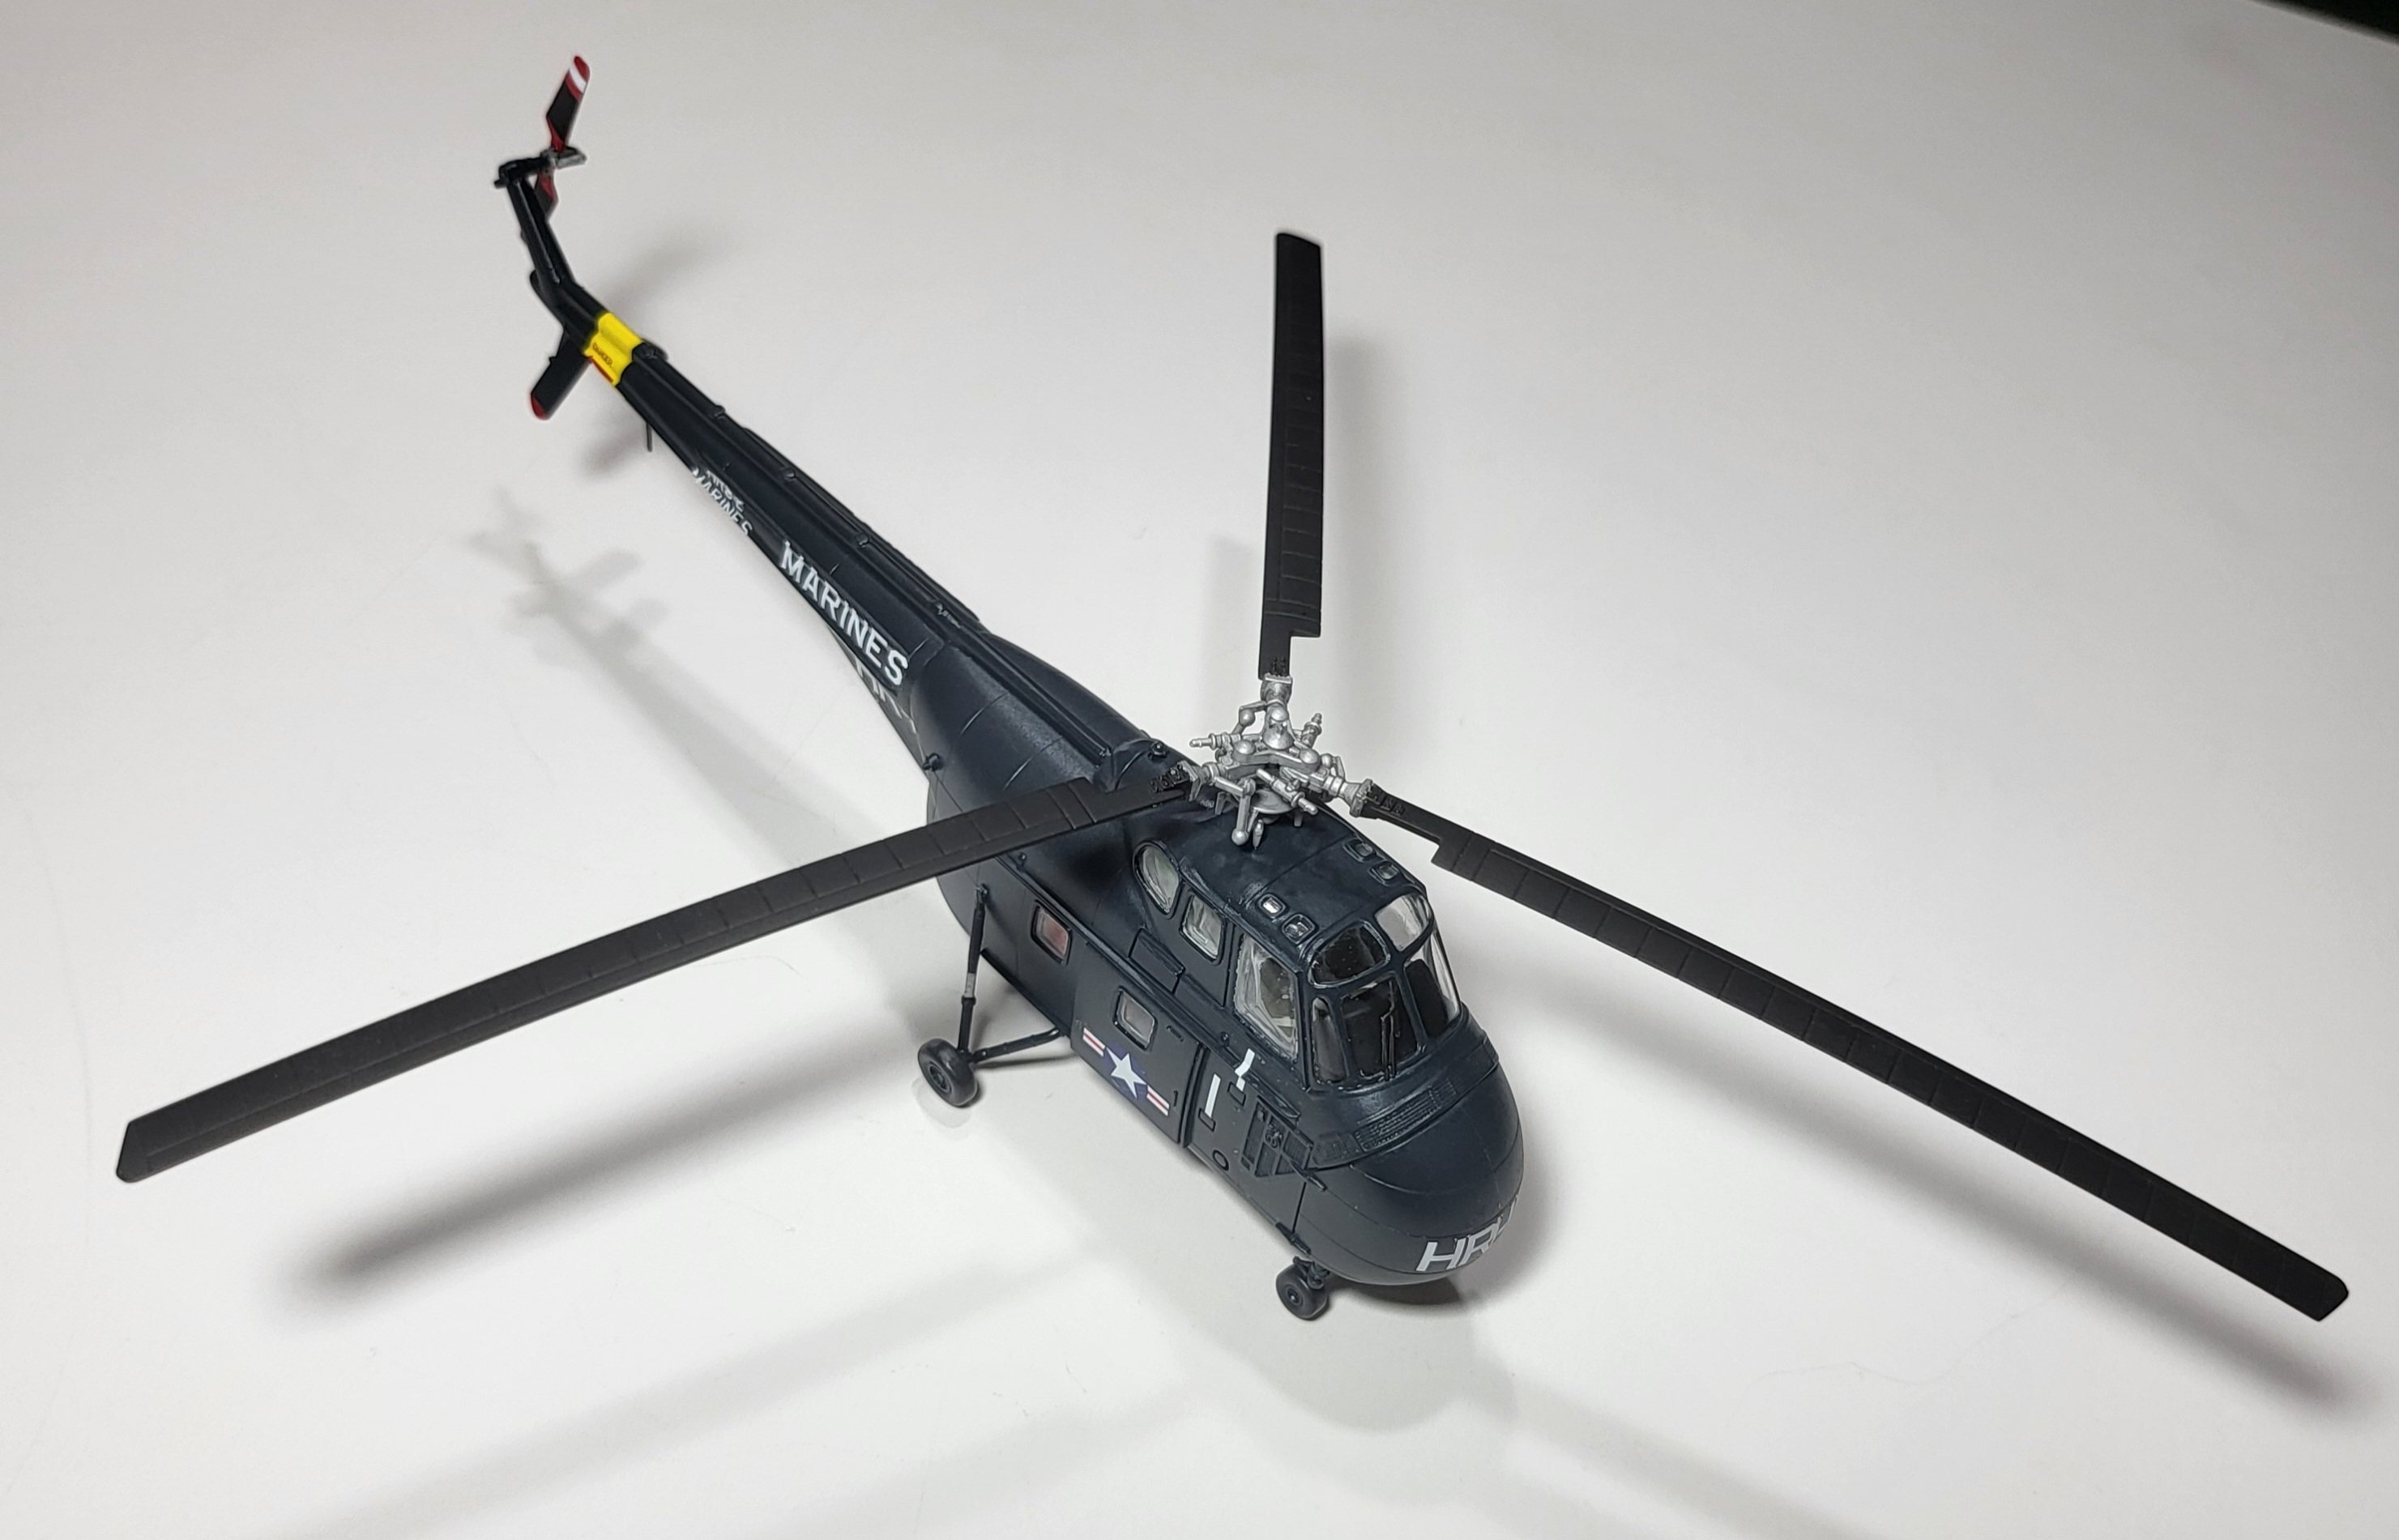
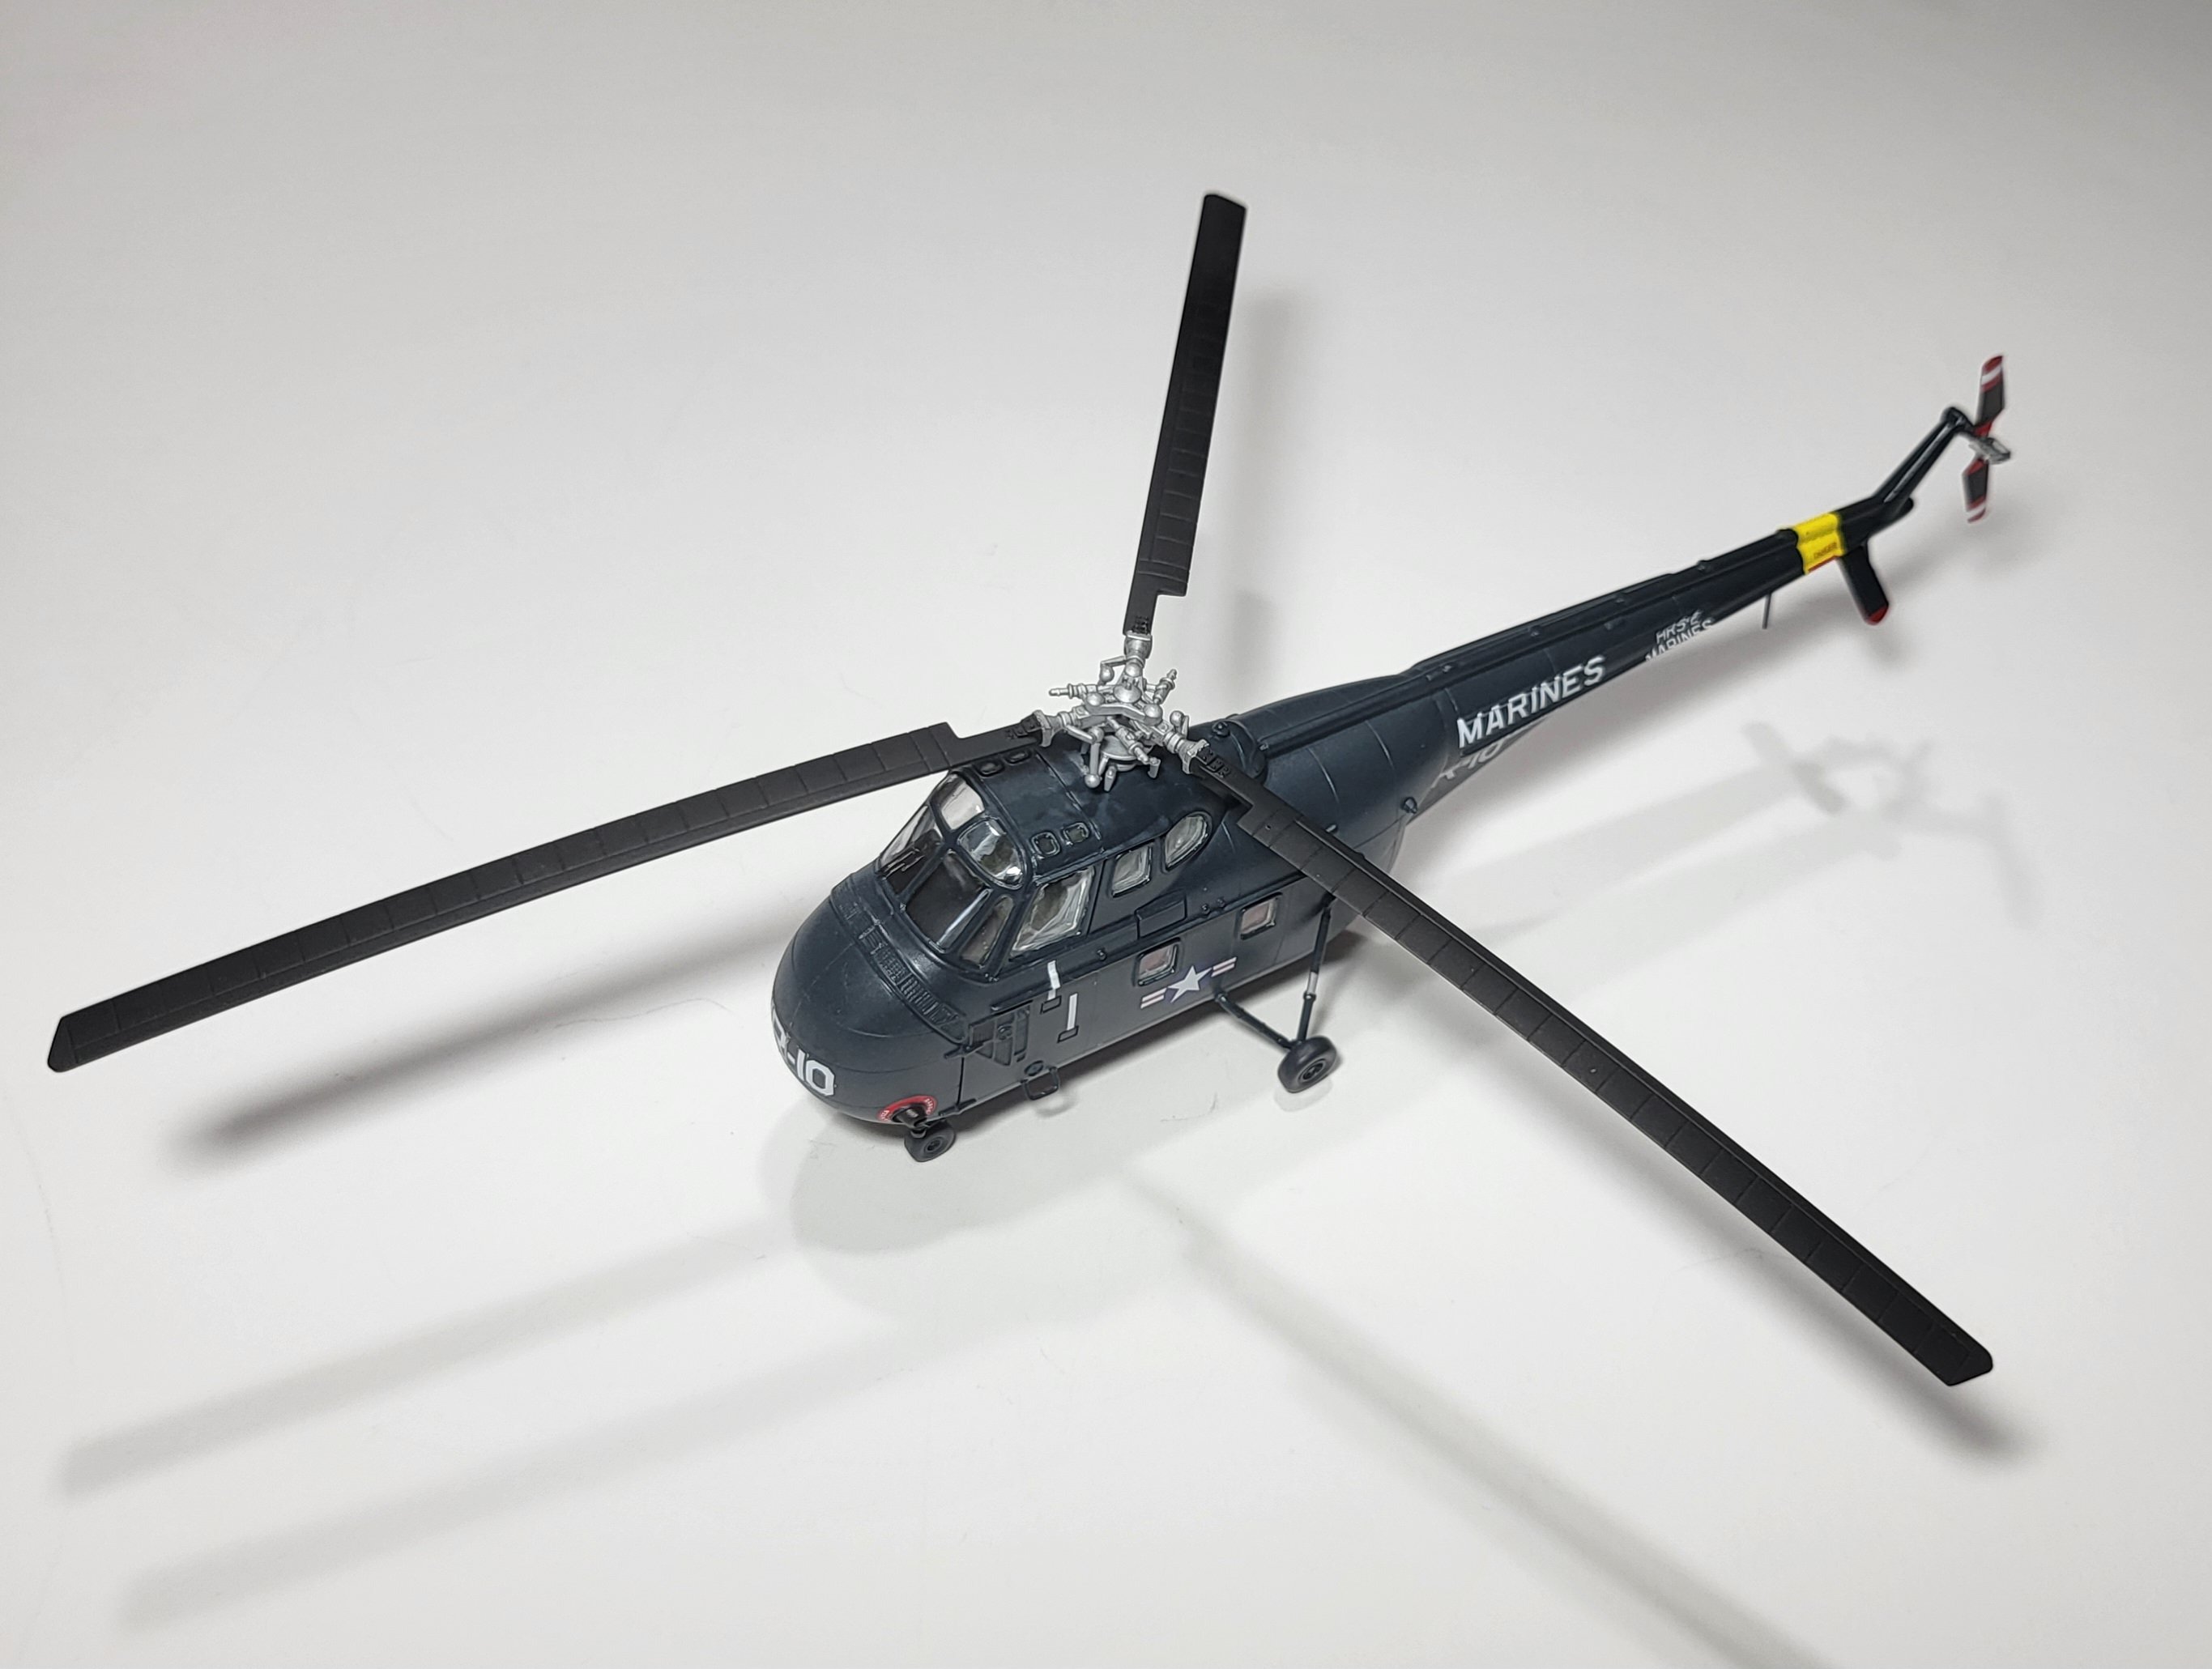
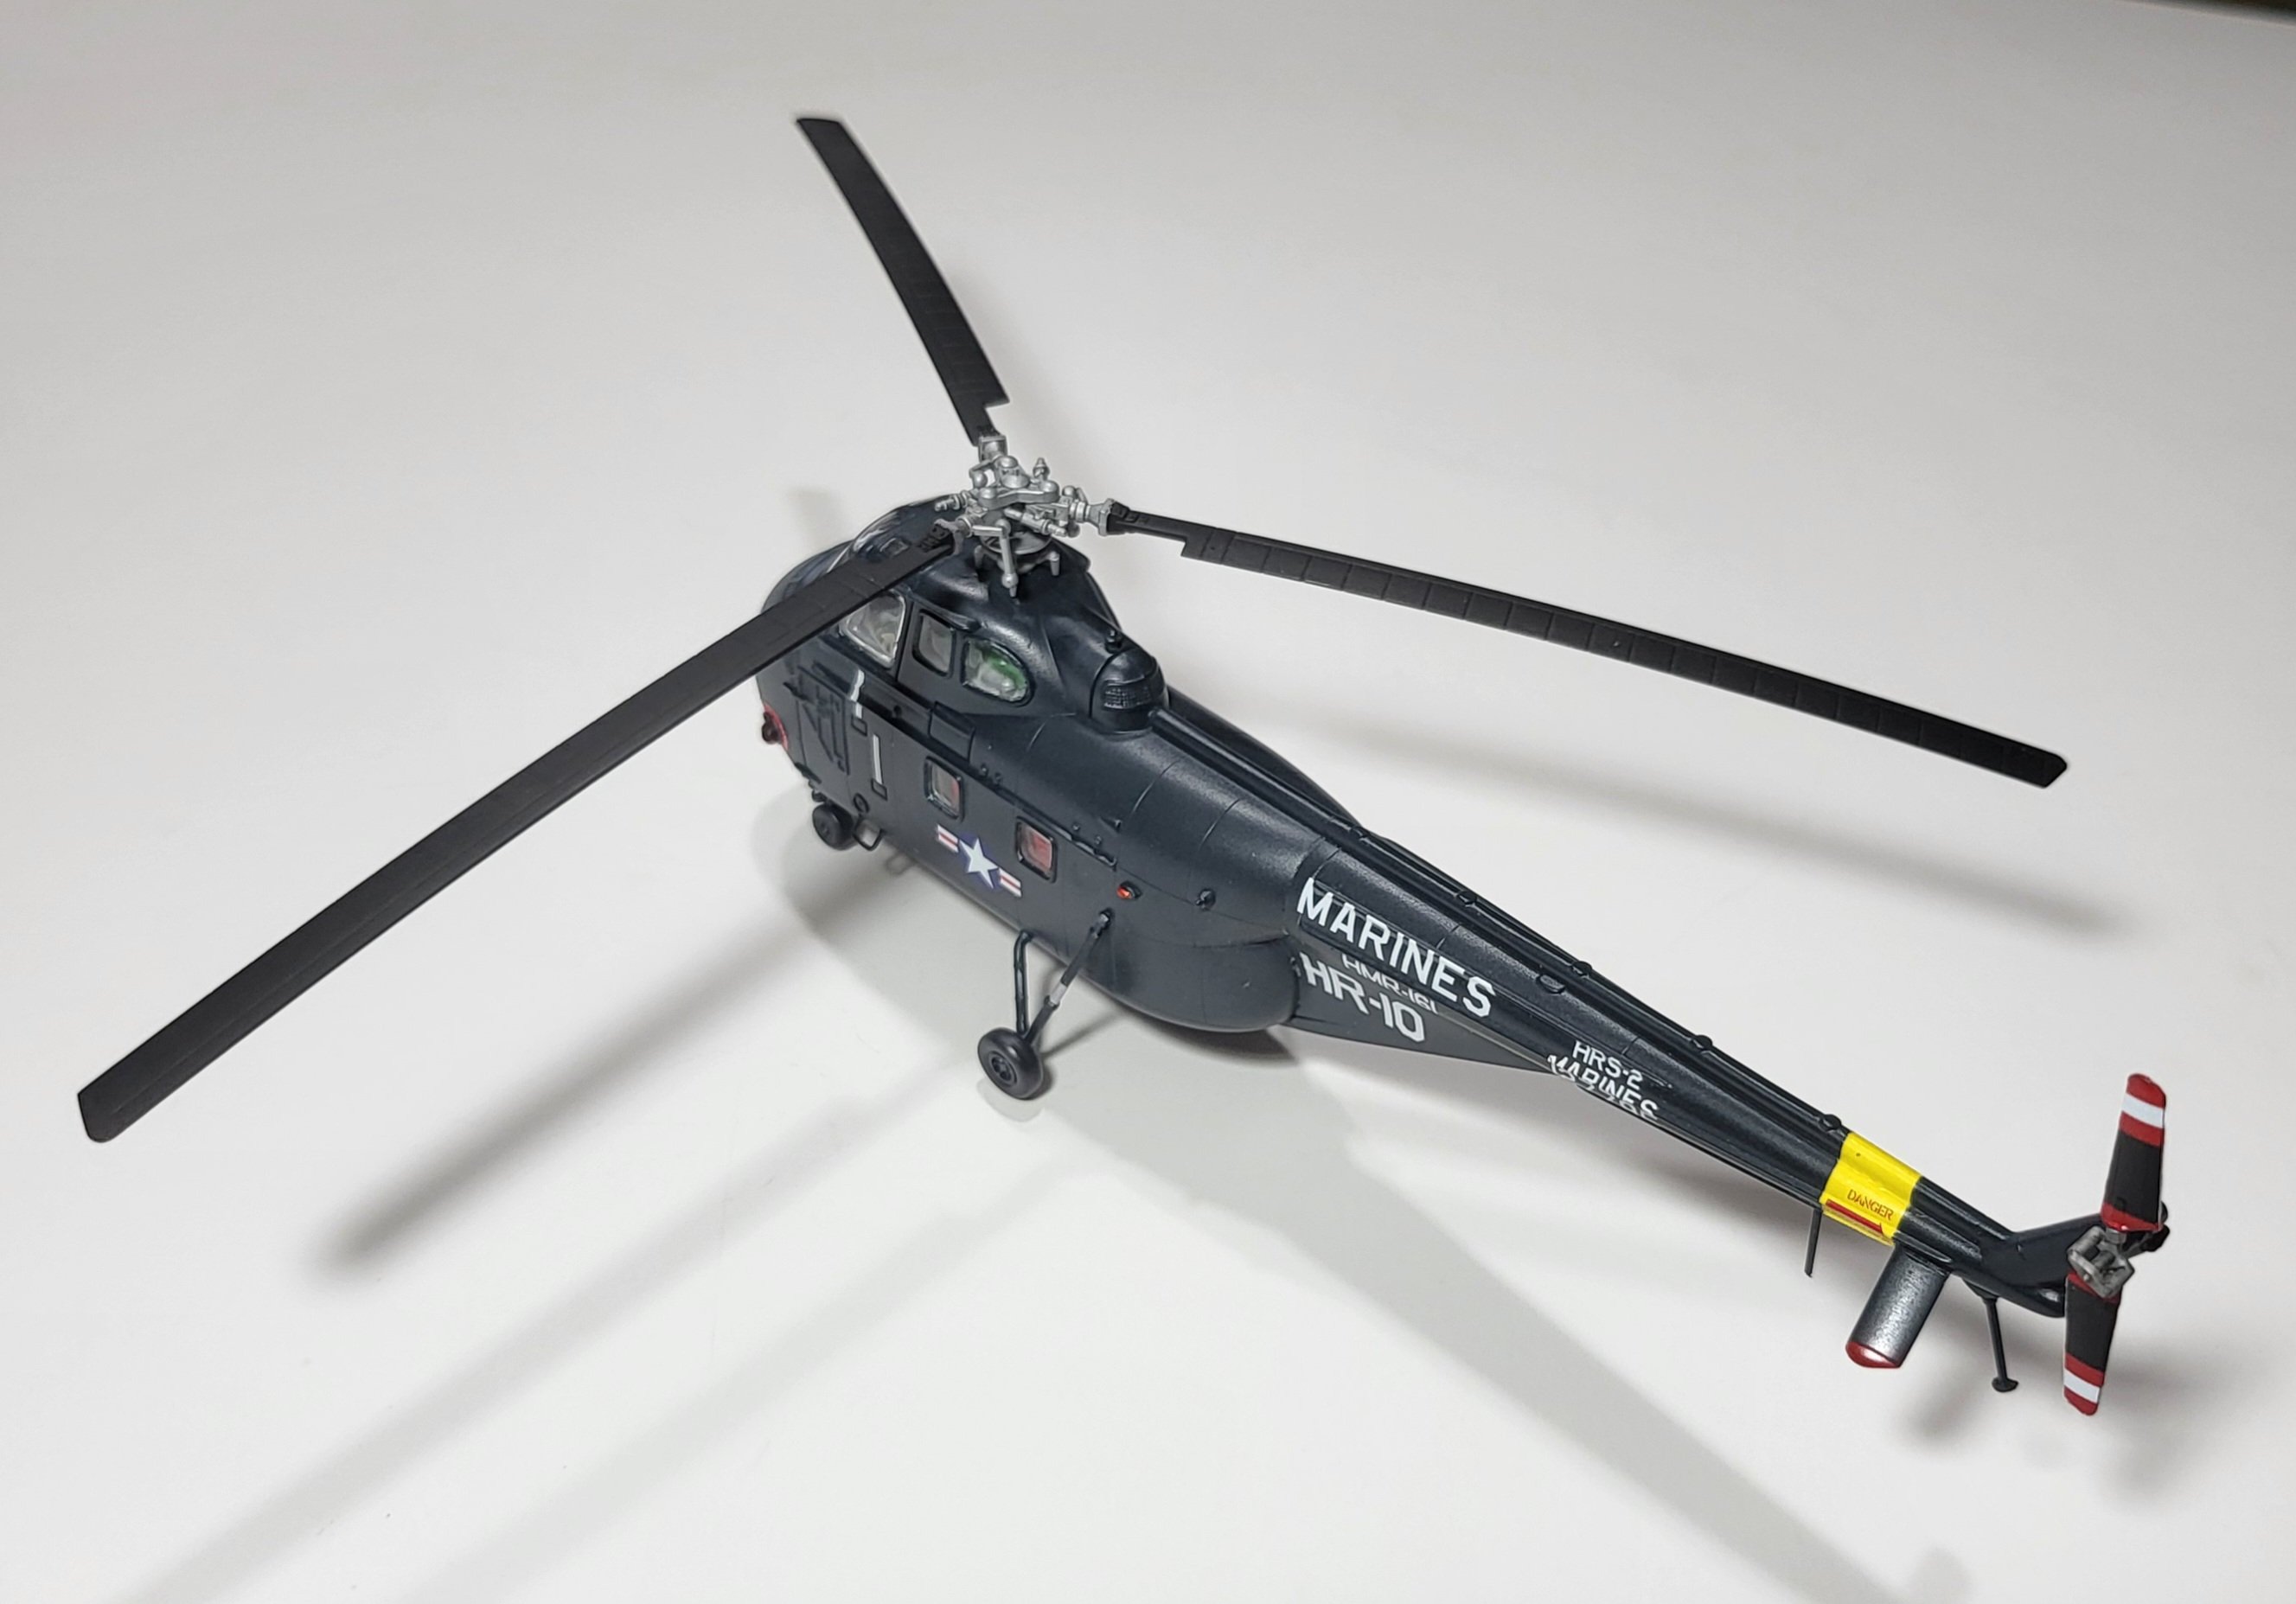
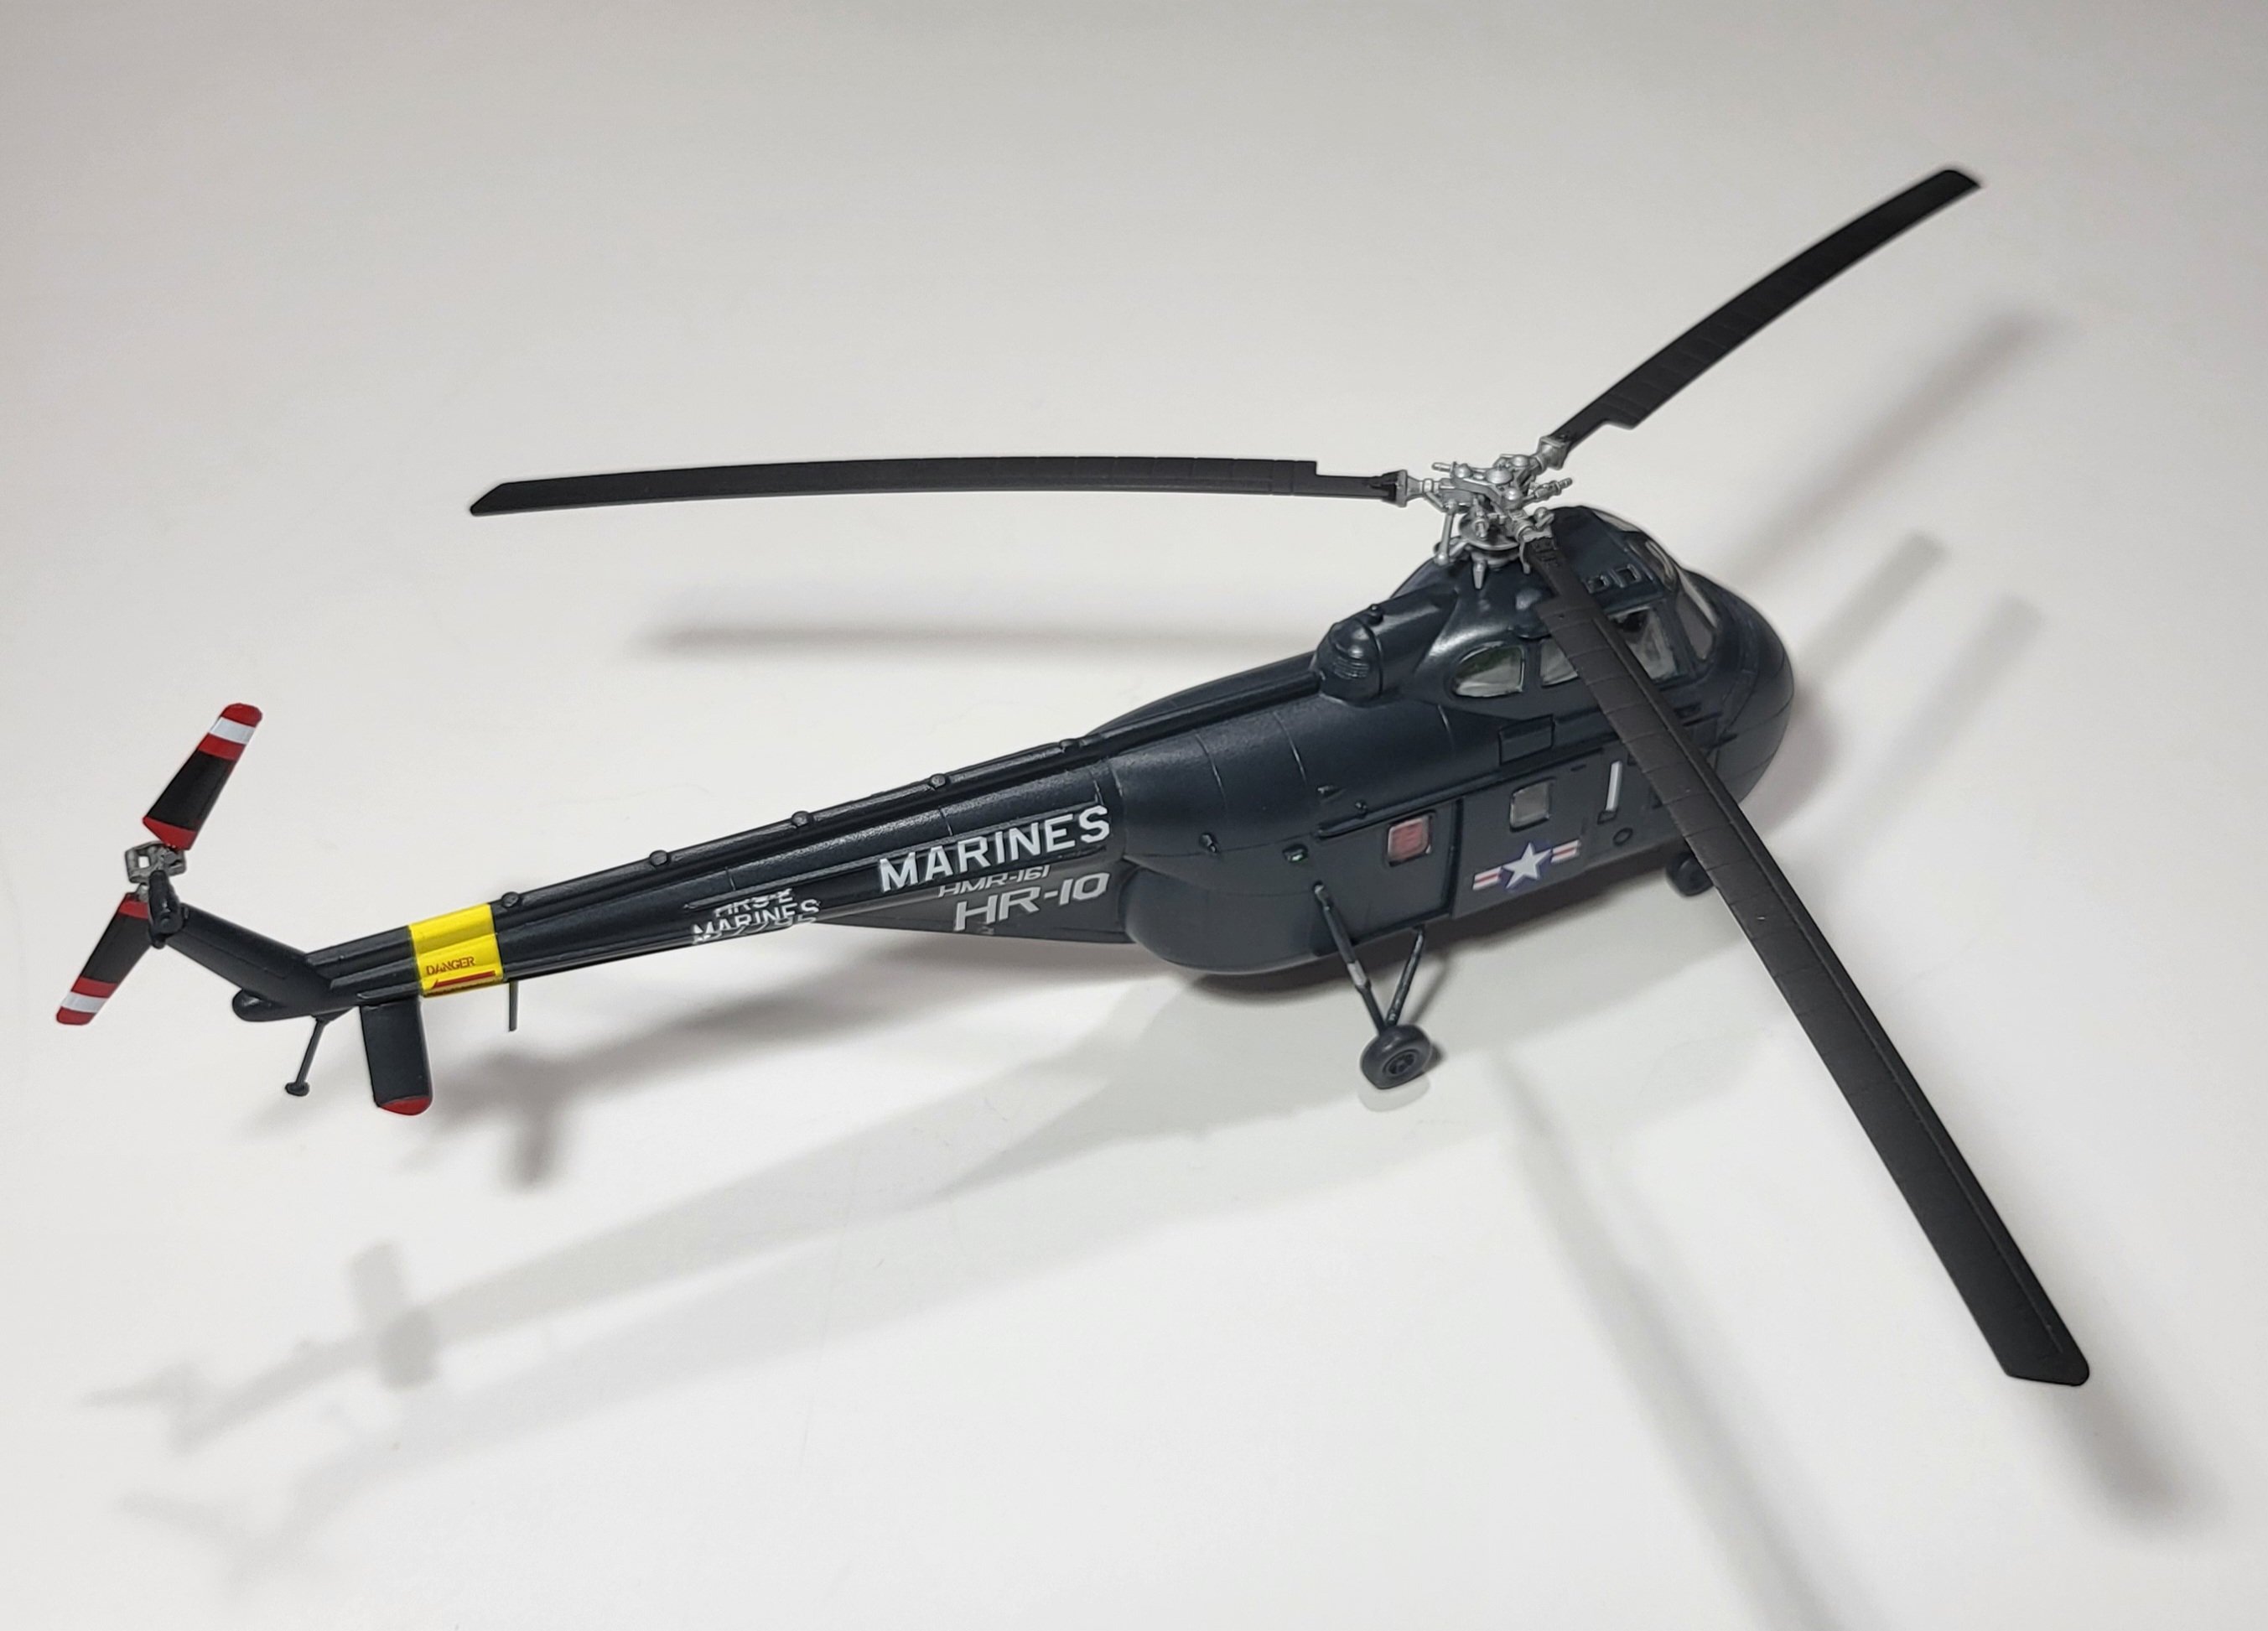
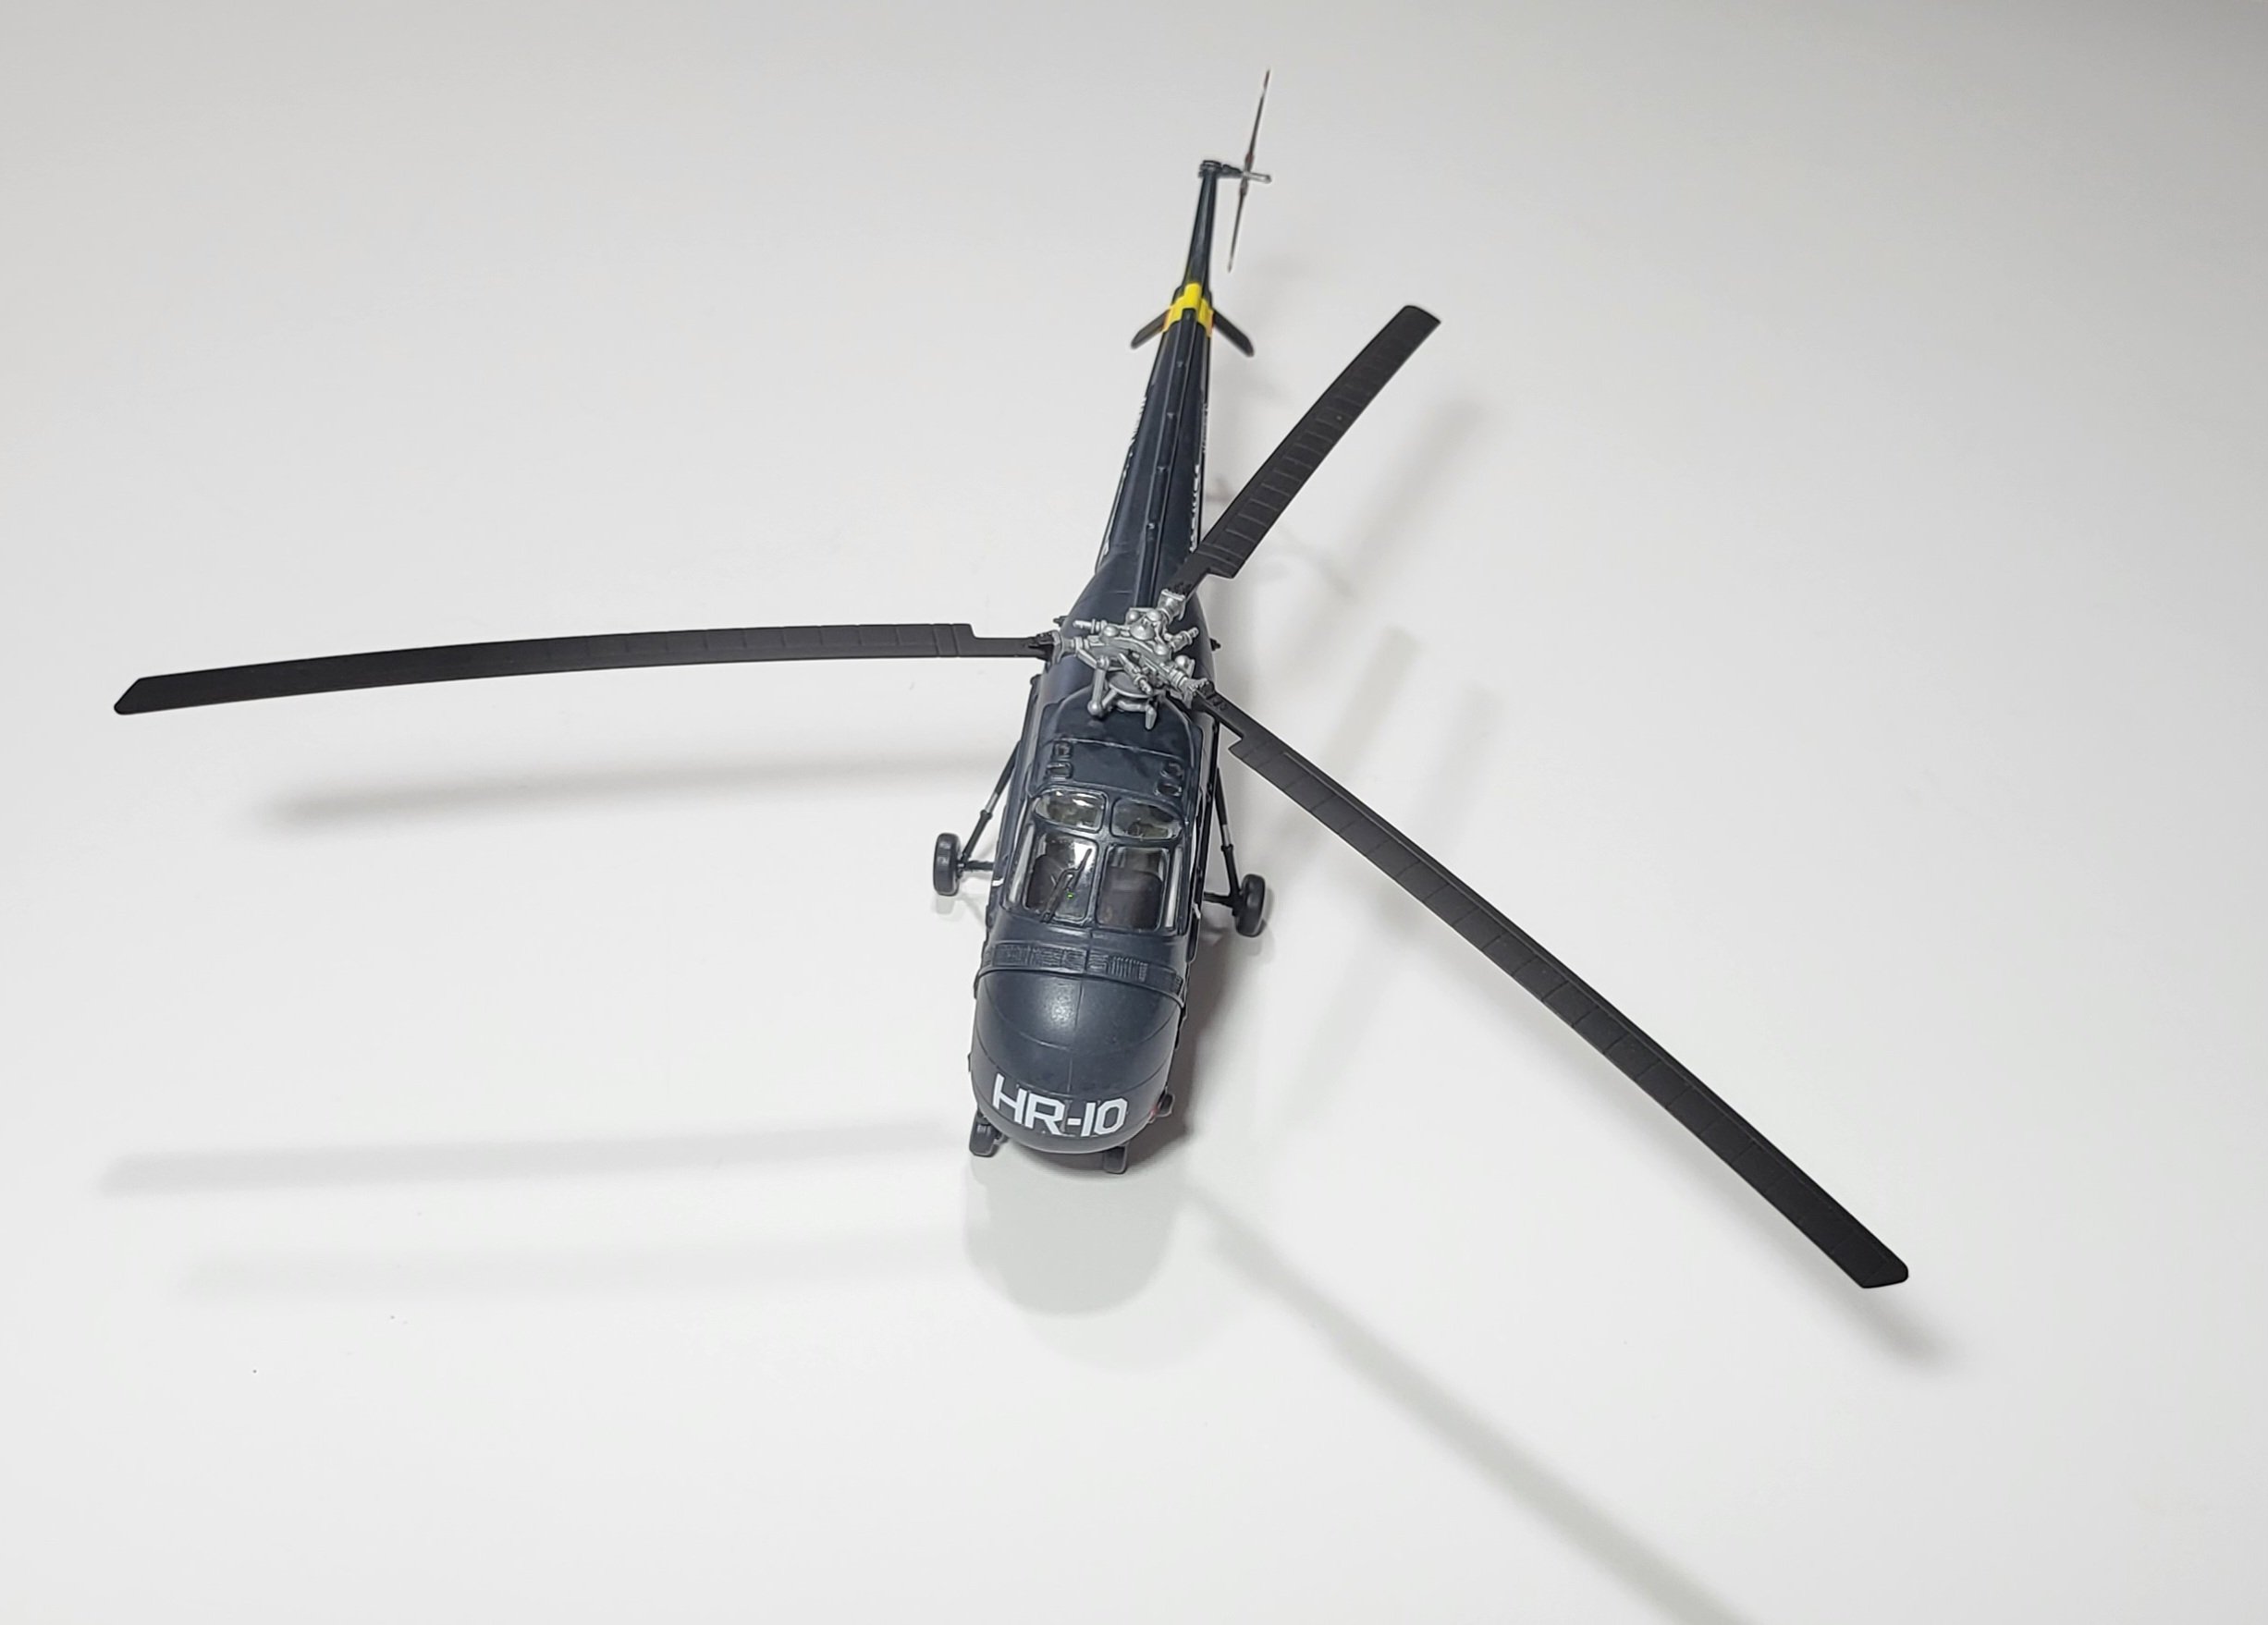
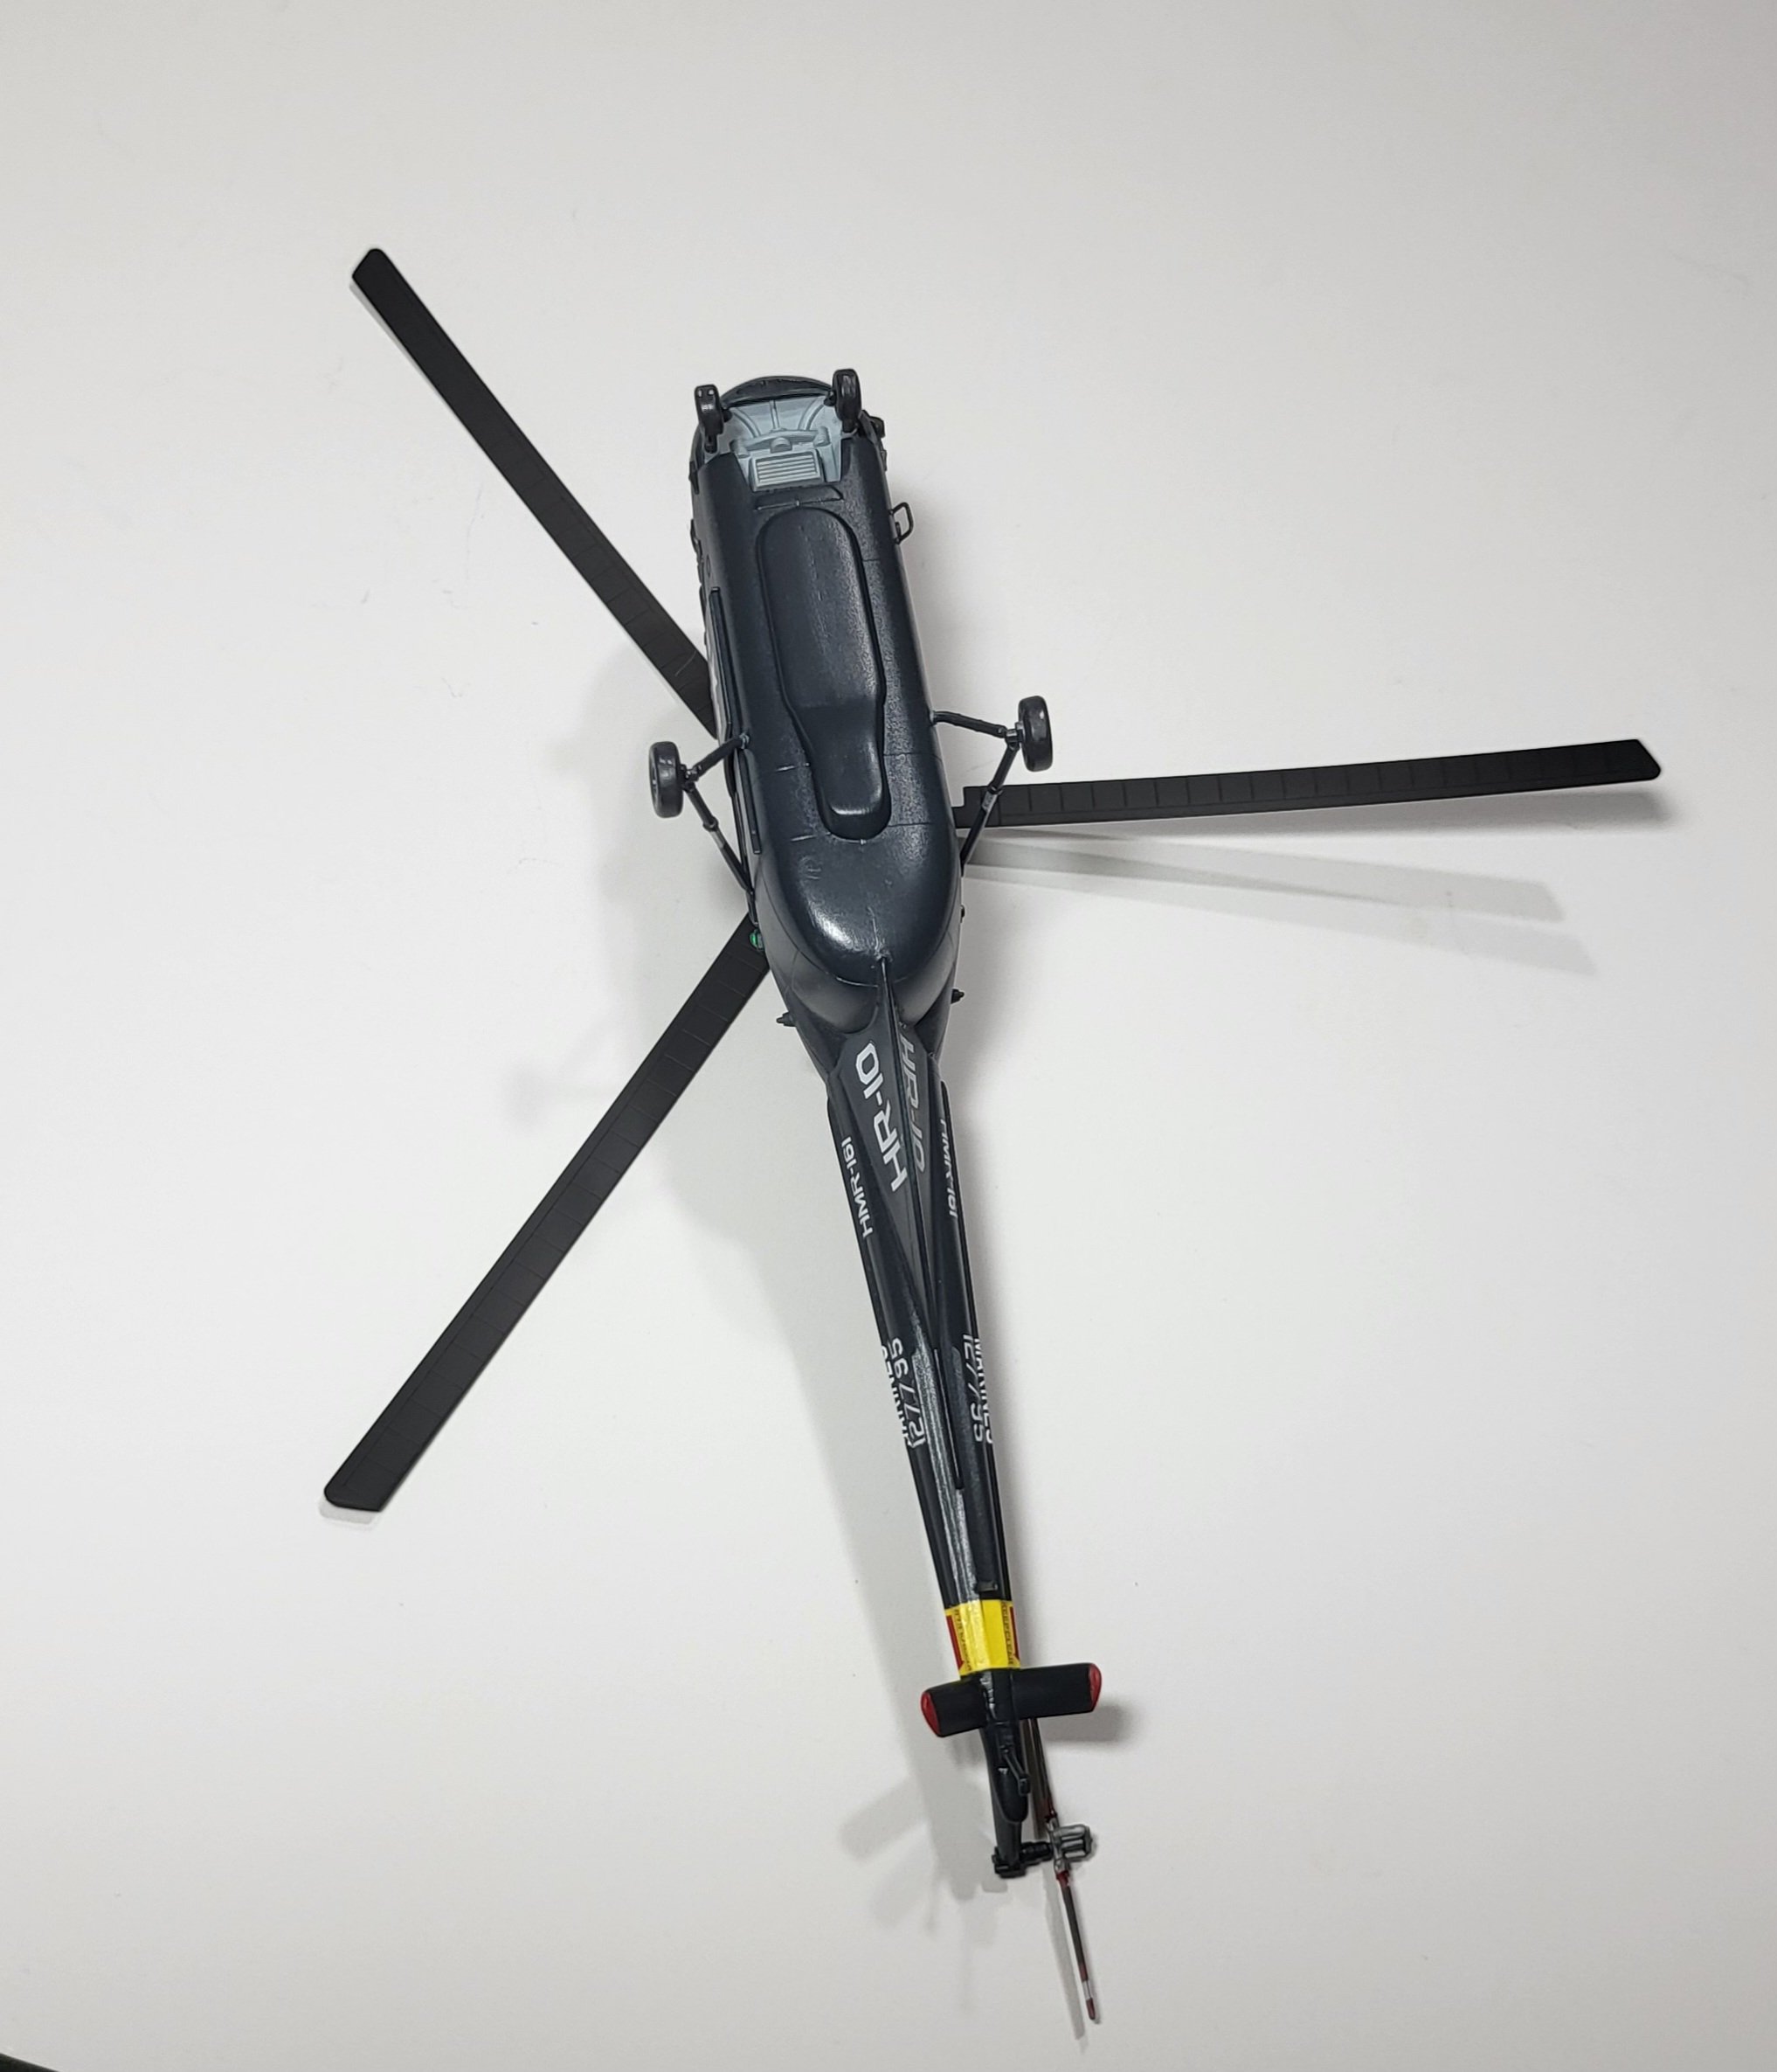
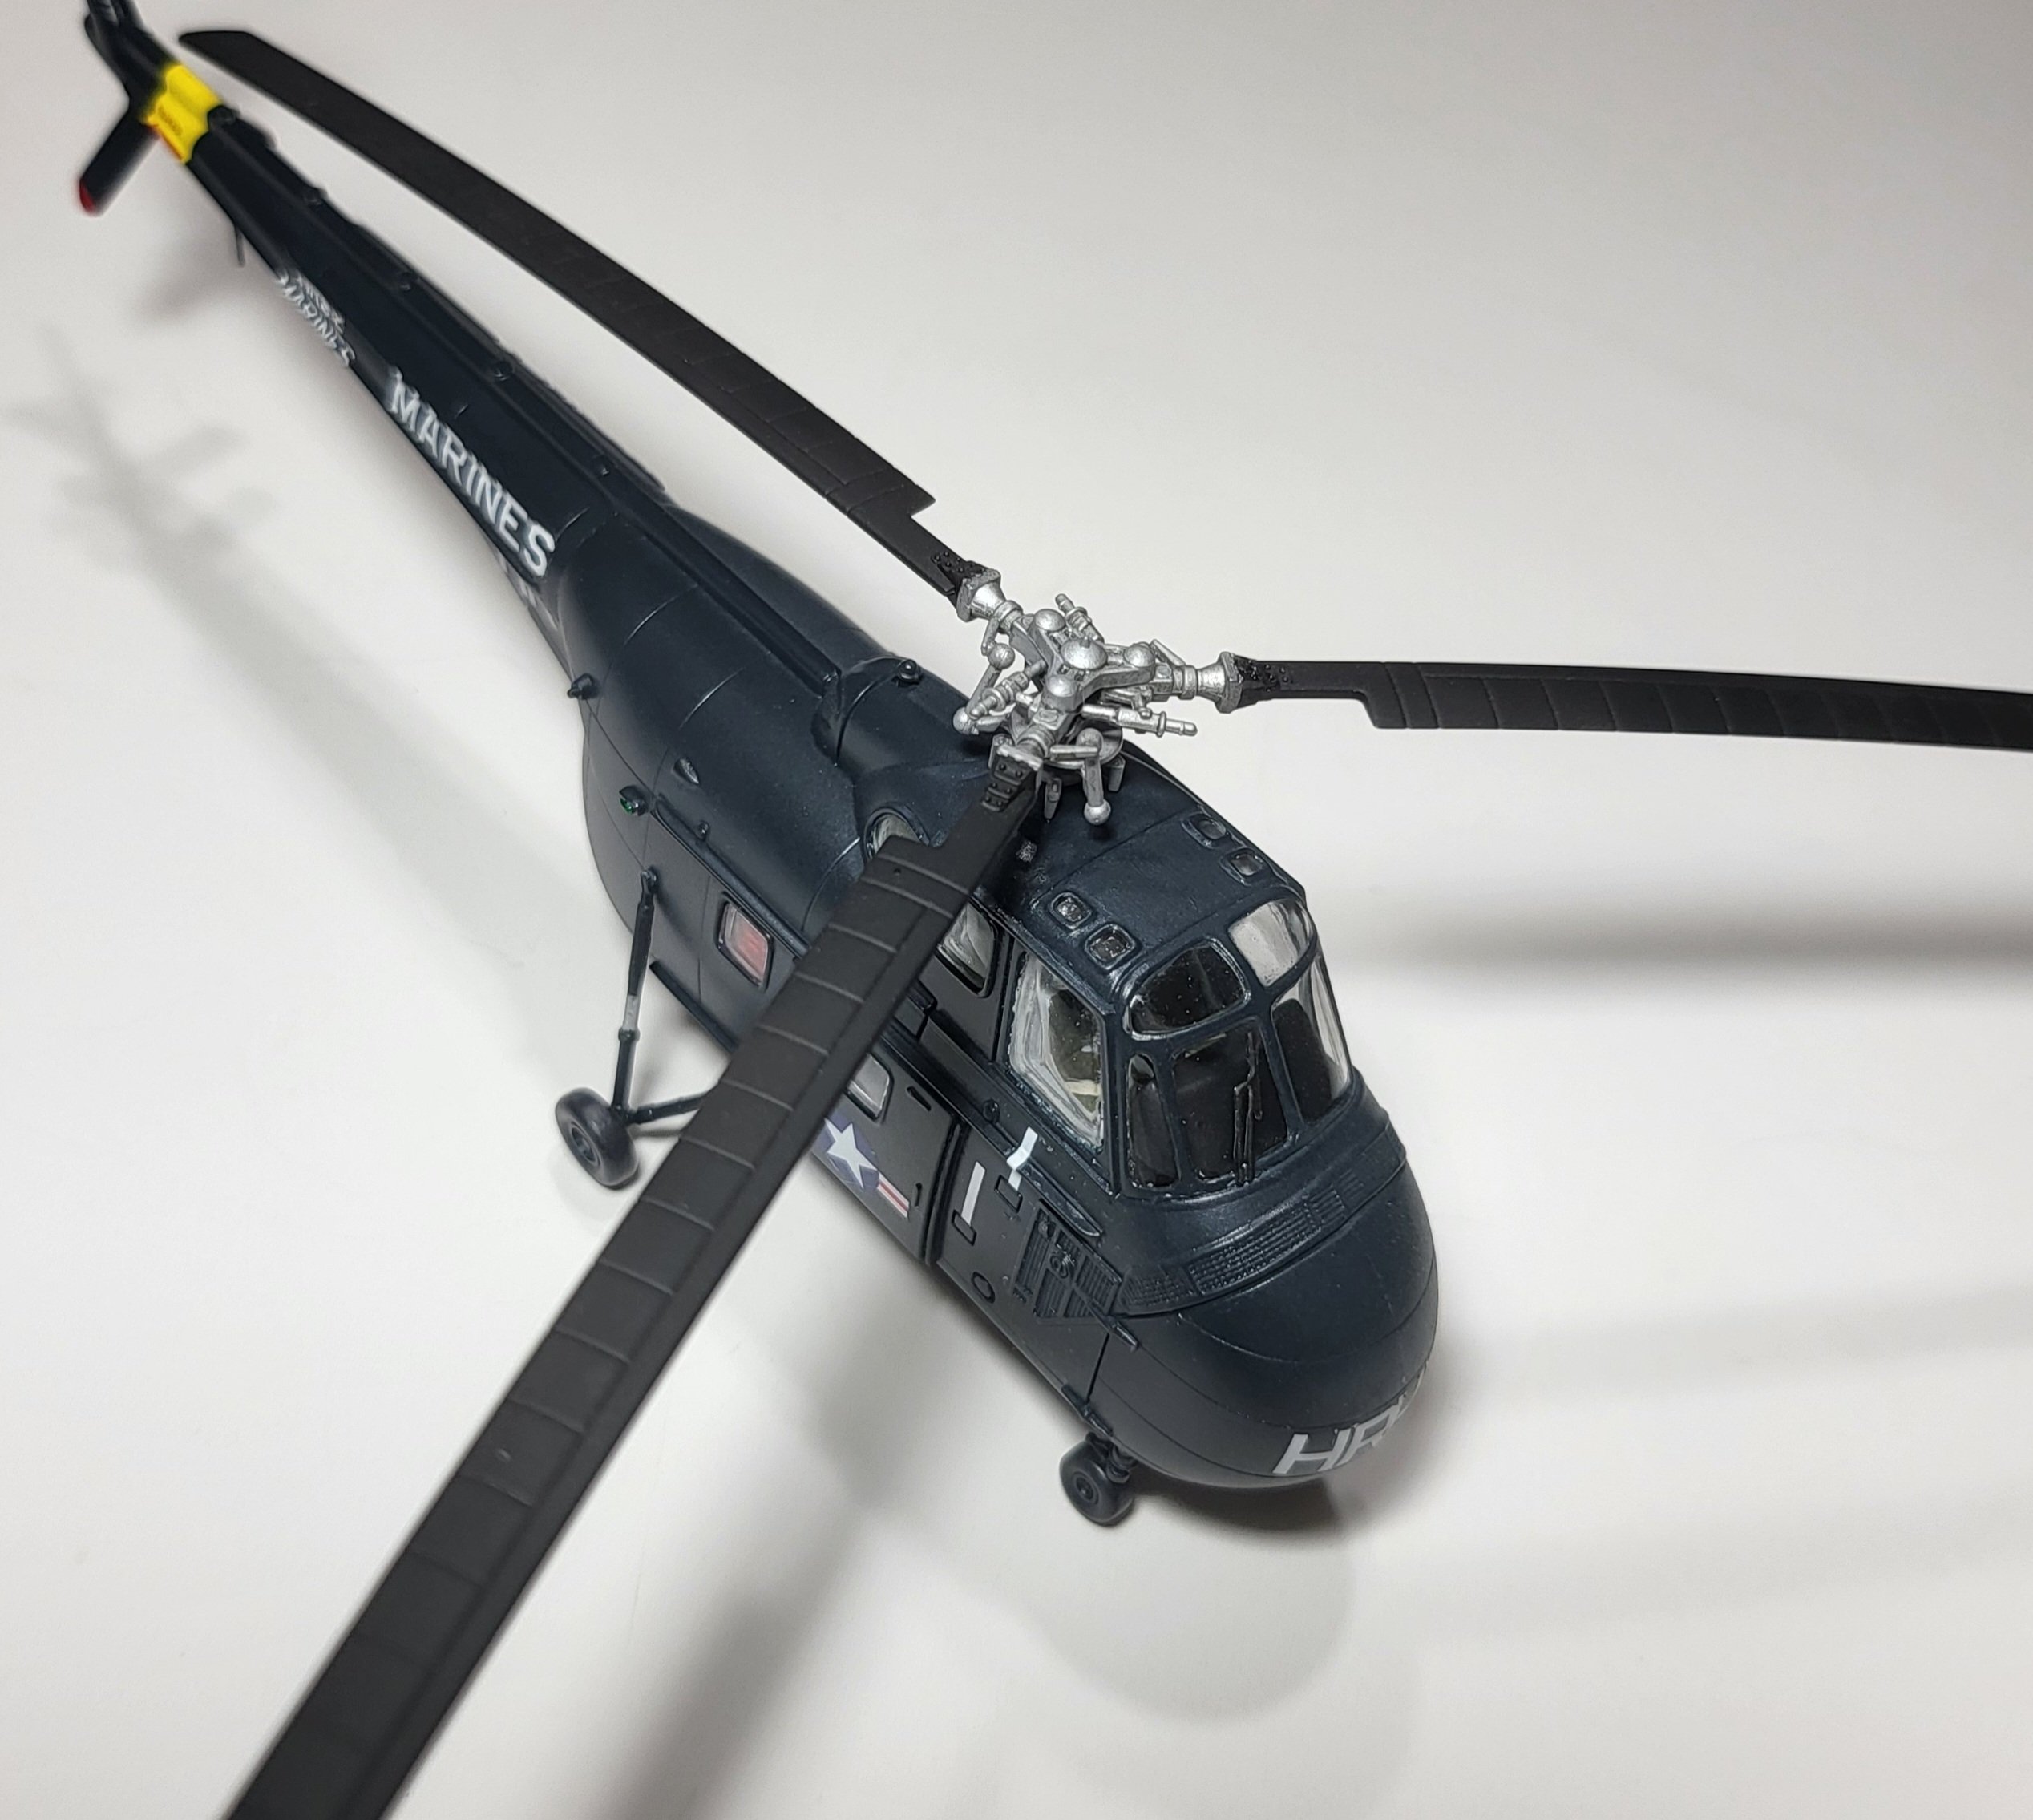
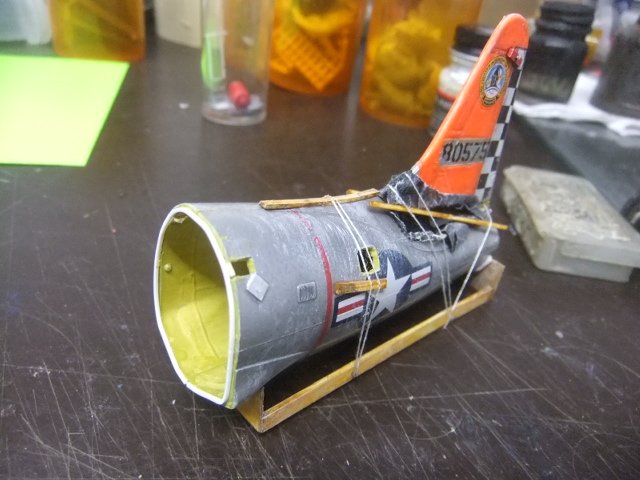
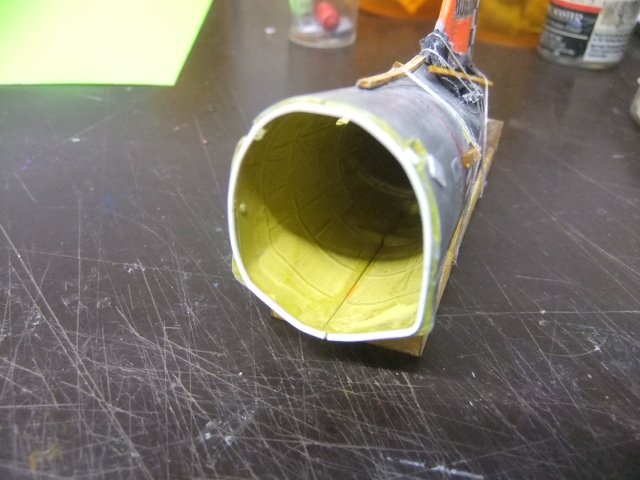
A nice little kit I built OOB.

-
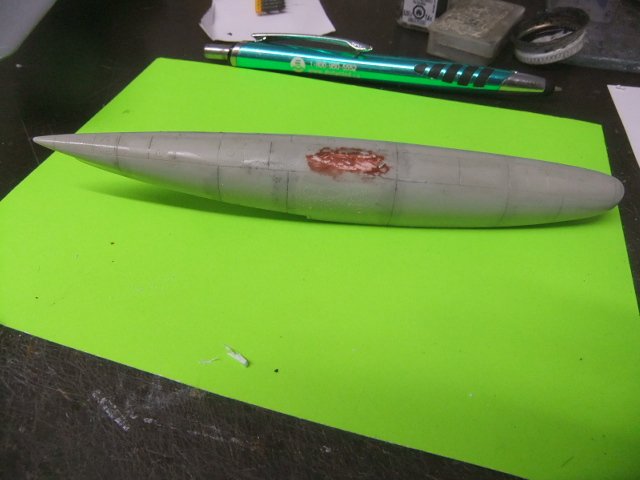
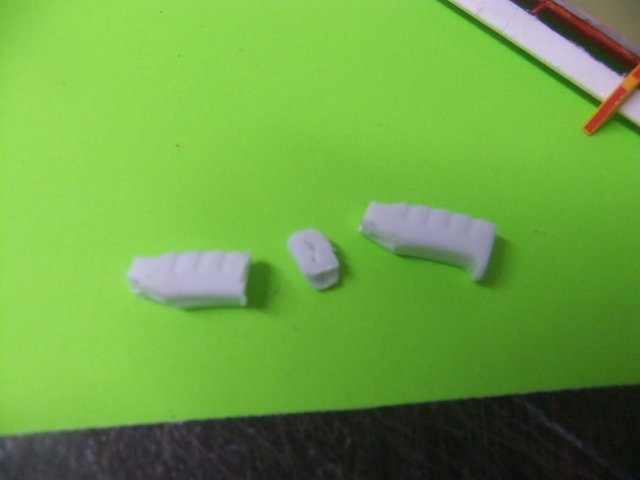
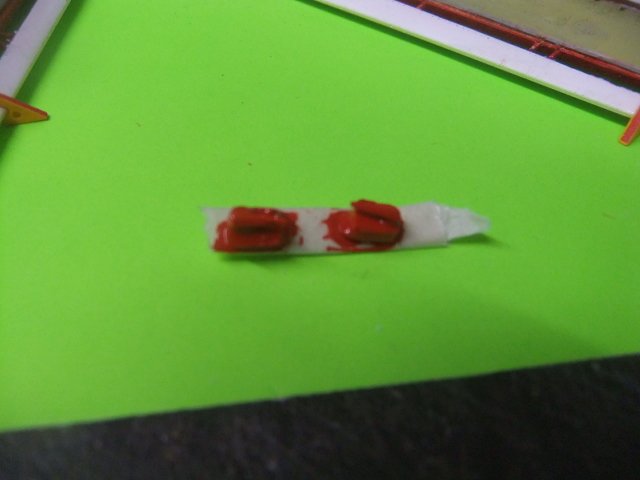
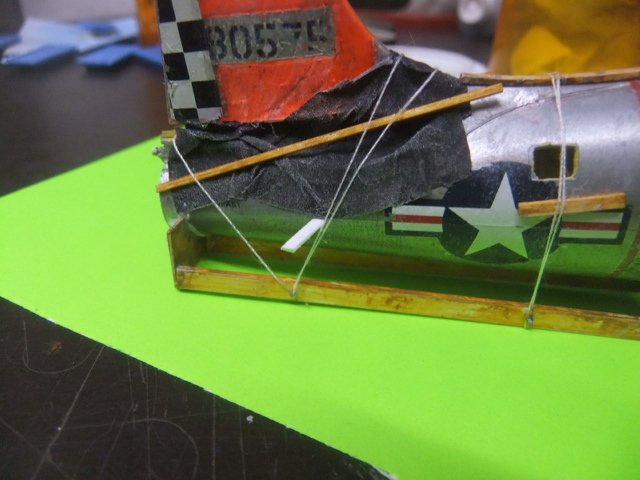
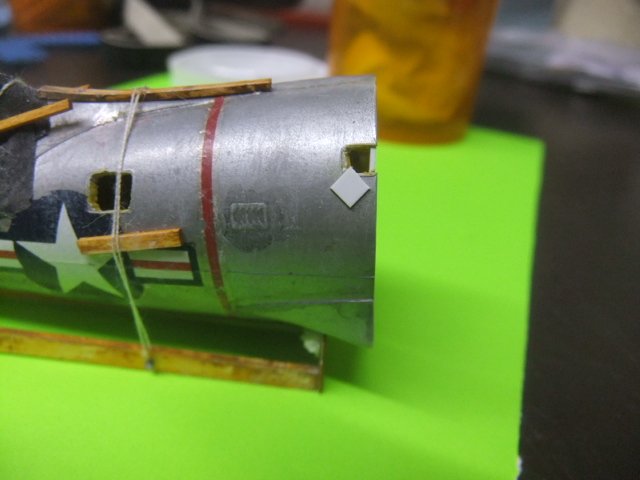
First I'd like to thank you for following this post , it's quite appreciated ! T-6 KOREAN FLOAT PLANE (OCIDENTAL + MODIFICATION) (JUN 30th ) ..Today , I started working on the floats ! If you like to view the complete 'WIP' of this project , just follow this GOOGLE link. https://photos.app.goo.gl/Hk6hkr5HVKEz8rpk8 A big Thank you for following the project it's more than appreciated. hope my weekly update meet your expectation ! ! Enjoy .. and it's an 'RENDEZ-VOUS for more .... Jmarc
-
First I'd like to thank you for following this post ,it's quite appreciated ! BOEING INCITUS MQ-27 / CU-169 SCAN EAGLE 1/48 ( 3dPRINTED +ADDITIONS) (JUN 30th ) Today I continue working on the carrying base ! If you like to view the complete WIP on this project , just follow this Google link : https://photos.app.goo.gl/jrWyBiNZSJHCUknZ9 If you like to view all the DRONES I have done so far in 1/48 , just follow this link: https://photos.app.goo.gl/mjGm69hDKYaDuFNX6 Enjoy ! Jmarc
-
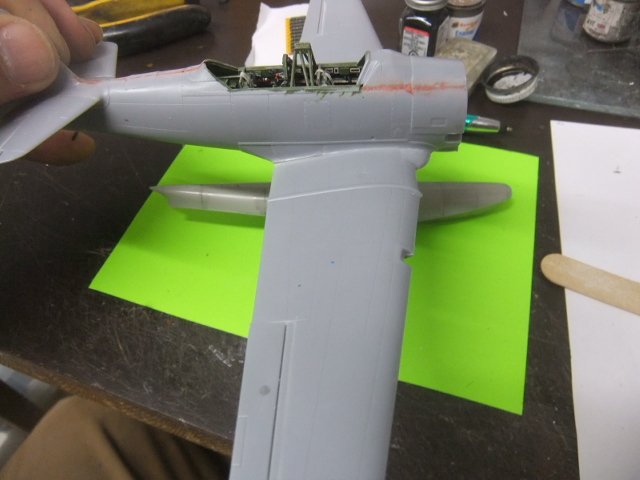
First I'd like to thank you for following this post , it's quite appreciated ! 1/48 LOCKHEED T-33 SILVER STAR (TESTOR) (JUN 30th ) Today I painted the detials done yesterday and started the front section ! If you like to follow the complete WIP on this project , I have set up an GOOGLE page, just follow this link .. https://photos.app.goo.gl/mCtpo97pwYCFaYE39 If you like to view the complete STASH PARTS done so far ,just followthis GOOGLE link .. https://photos.app.goo.gl/NtNSgh1zJgx9jRSx5 Enjoy ! Jmarc
- Yesterday
-
untilJoin us for our annual Model Show & Contest, held in conjunction with Riverside, Iowa's TREKFEST—the celebration of the future birthplace of James T. Kirk. The event takes place each year on the last Saturday in June at the AIR CONDITIONED Trinity United Methodist Church. The contest features three exciting categories: Star Trek, Sci-Fi/Fantasy, and 3D Printed/Scratch-Built. Celebrity judges will be on hand to present Bestof Category awards, the Celebrity Choice Award, and the People's ChoiceAward. Make it a weekend to remember by enjoying three days of TREKFEST activities, including parades, celebrity Q&A sessions, autograph opportunities, and much more. Whether you're a modeler, a Star Trek fan, orsimply love science fiction, there's something for everyone! Air-Conditioned Trinity United Methodist Church 11 East 2nd Street Riverside Iowa 52327 Registration 8:30am-12:00pm Admission * $10 for first model $2 each model up to 6. Walk-ins Free Judging * All categories will be judged according to IPMS rules * Awards will be given for1st, 2nd, 3rd, and Best Of in each category * Additional awards include Peoples Choice Award, Celebrity Choice Award, Noli Mendoza award for Best USS Enterprise Celebrity Judging and award ceremony 2pm
-
That is very impressive and very clean! Way to go!
-
Started this kit to do a fun build of something outside my normal builds. It was a quick build, pretty much built in under 2 hours. Unfortunately, I will be needing to do lots of putty and sanding but I am still happy with it and looking forward to seeing it finished.
-
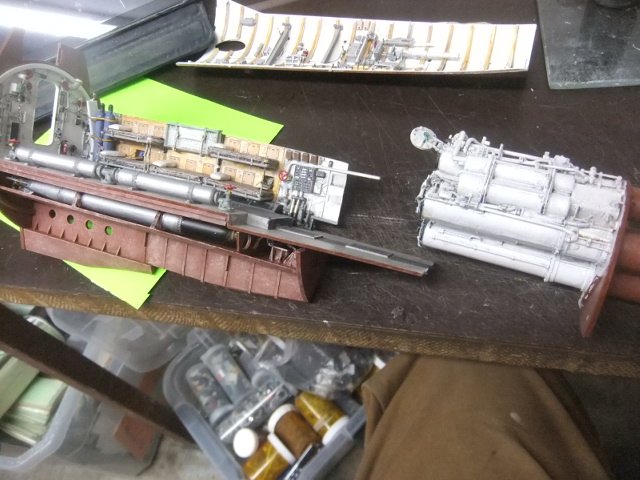
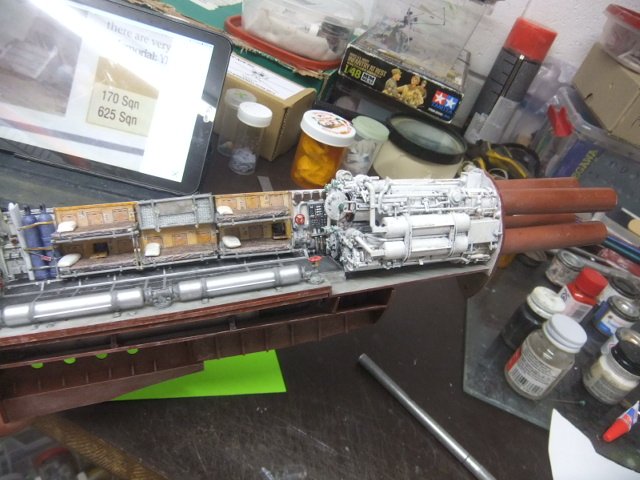
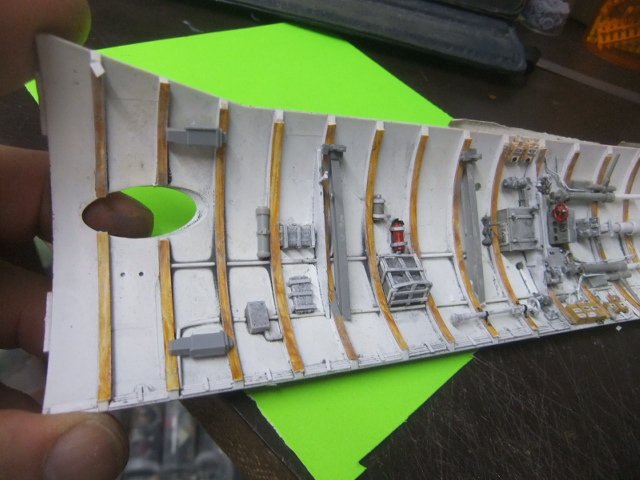
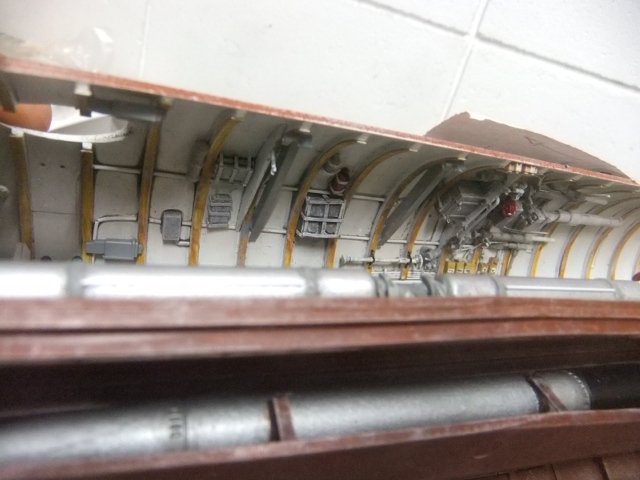
First I'd like to thank you for following this WIP it's quite appreciated ! TRUMPETER 1/48 GERMAN SUBMARINE TYPE VIIc (JUN 29th)...Today I before I continue on the project , I had an transport misapp , so I repair it and continue working on the ceiling details ! If you like to see the complete WIP on this project , just follow this Google link : https://photos.app.goo.gl/EZKenssCafCXix326 If you are curious and like to view the other WWII GERMAN sub I have done in 1/48 , just follow this link : https://photos.app.goo.gl/BcwASAzLsZRq5mQf7 Enjoy ! jmarc
-
Thank you for following the 'WIP' on this project ,it's quite appreciated ! (JUN 29th)...Today I start working on the light cover of the wing tips ! f you like to see the complete WIP on this project , just follow this Google link : https://photos.app.goo.gl/1W6Eu6c7EvJeyLGT6 If you are curious and like to view the SCI-FI kits I have done in the past ,just follow this link : https://photos.app.goo.gl/D2FAQcJCoNhHNjkdA Enjoy ! jmarc
-
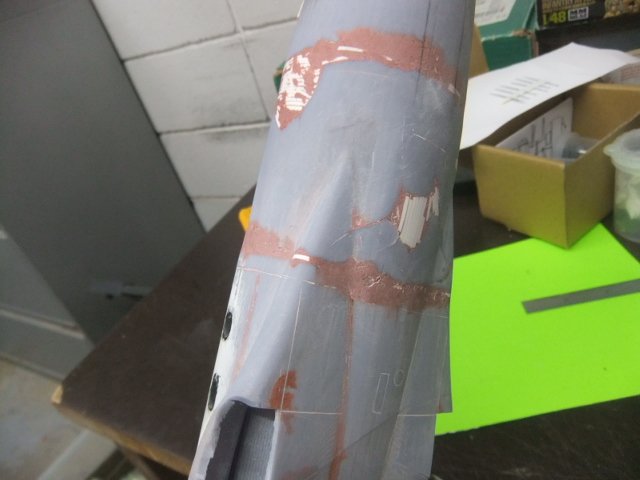
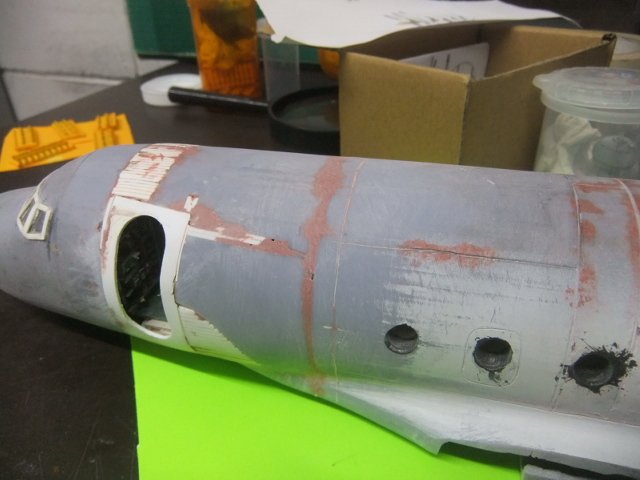
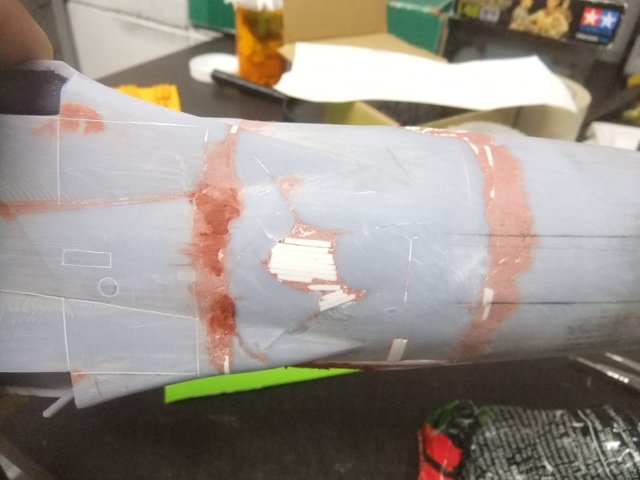
Thanks for following the WIP on this project , it's quite appreciated !, here the latest update AVRO C.102 JETLINER (3D +SCRATCH) (JUN 29nd ) Today , I sanded the work done last week also sand down the bulge that appear on the side fuselage and bottom , where the 3d resin delaminated and apply more putty on ther problem areas If you like to view the complete WIP on this project , just follow this Google link : https://photos.app.goo.gl/uvk6ymGqZHgpWDaR9 If you like to view what I have completed so far on the AVRO CANADA project , I have set up an GOOGLE page for them , here the link: https://photos.app.goo.gl/FpZs5m3ic3c3eL329 Enjoy and it's an 'rendez-vous' next week for more on this particular project..!. Jmarc
-
First I'd like to thank you for following this post ,it's quite appreciated ! BOEING INCITUS MQ-27 / CU-169 SCAN EAGLE 1/48 ( 3dPRINTED +ADDITIONS) (JUN 29th ) Today I start working on the carrying base ! If you like to view the complete WIP on this project , just follow this Google link : https://photos.app.goo.gl/jrWyBiNZSJHCUknZ9 If you like to view all the DRONES I have done so far in 1/48 , just follow this link: https://photos.app.goo.gl/mjGm69hDKYaDuFNX6 Enjoy ! Jmarc
-
First I'd like to thank you for following this post , it's quite appreciated ! 1/48 LOCKHEED T-33 SILVER STAR (TESTOR) (JUN 29th ) Today I continue working on the last exterior details of the tail section ! If you like to follow the complete WIP on this project , I have set up an GOOGLE page, just follow this link .. https://photos.app.goo.gl/mCtpo97pwYCFaYE39 If you like to view the complete STASH PARTS done so far ,just followthis GOOGLE link .. https://photos.app.goo.gl/NtNSgh1zJgx9jRSx5 Enjoy ! Jmarc
-
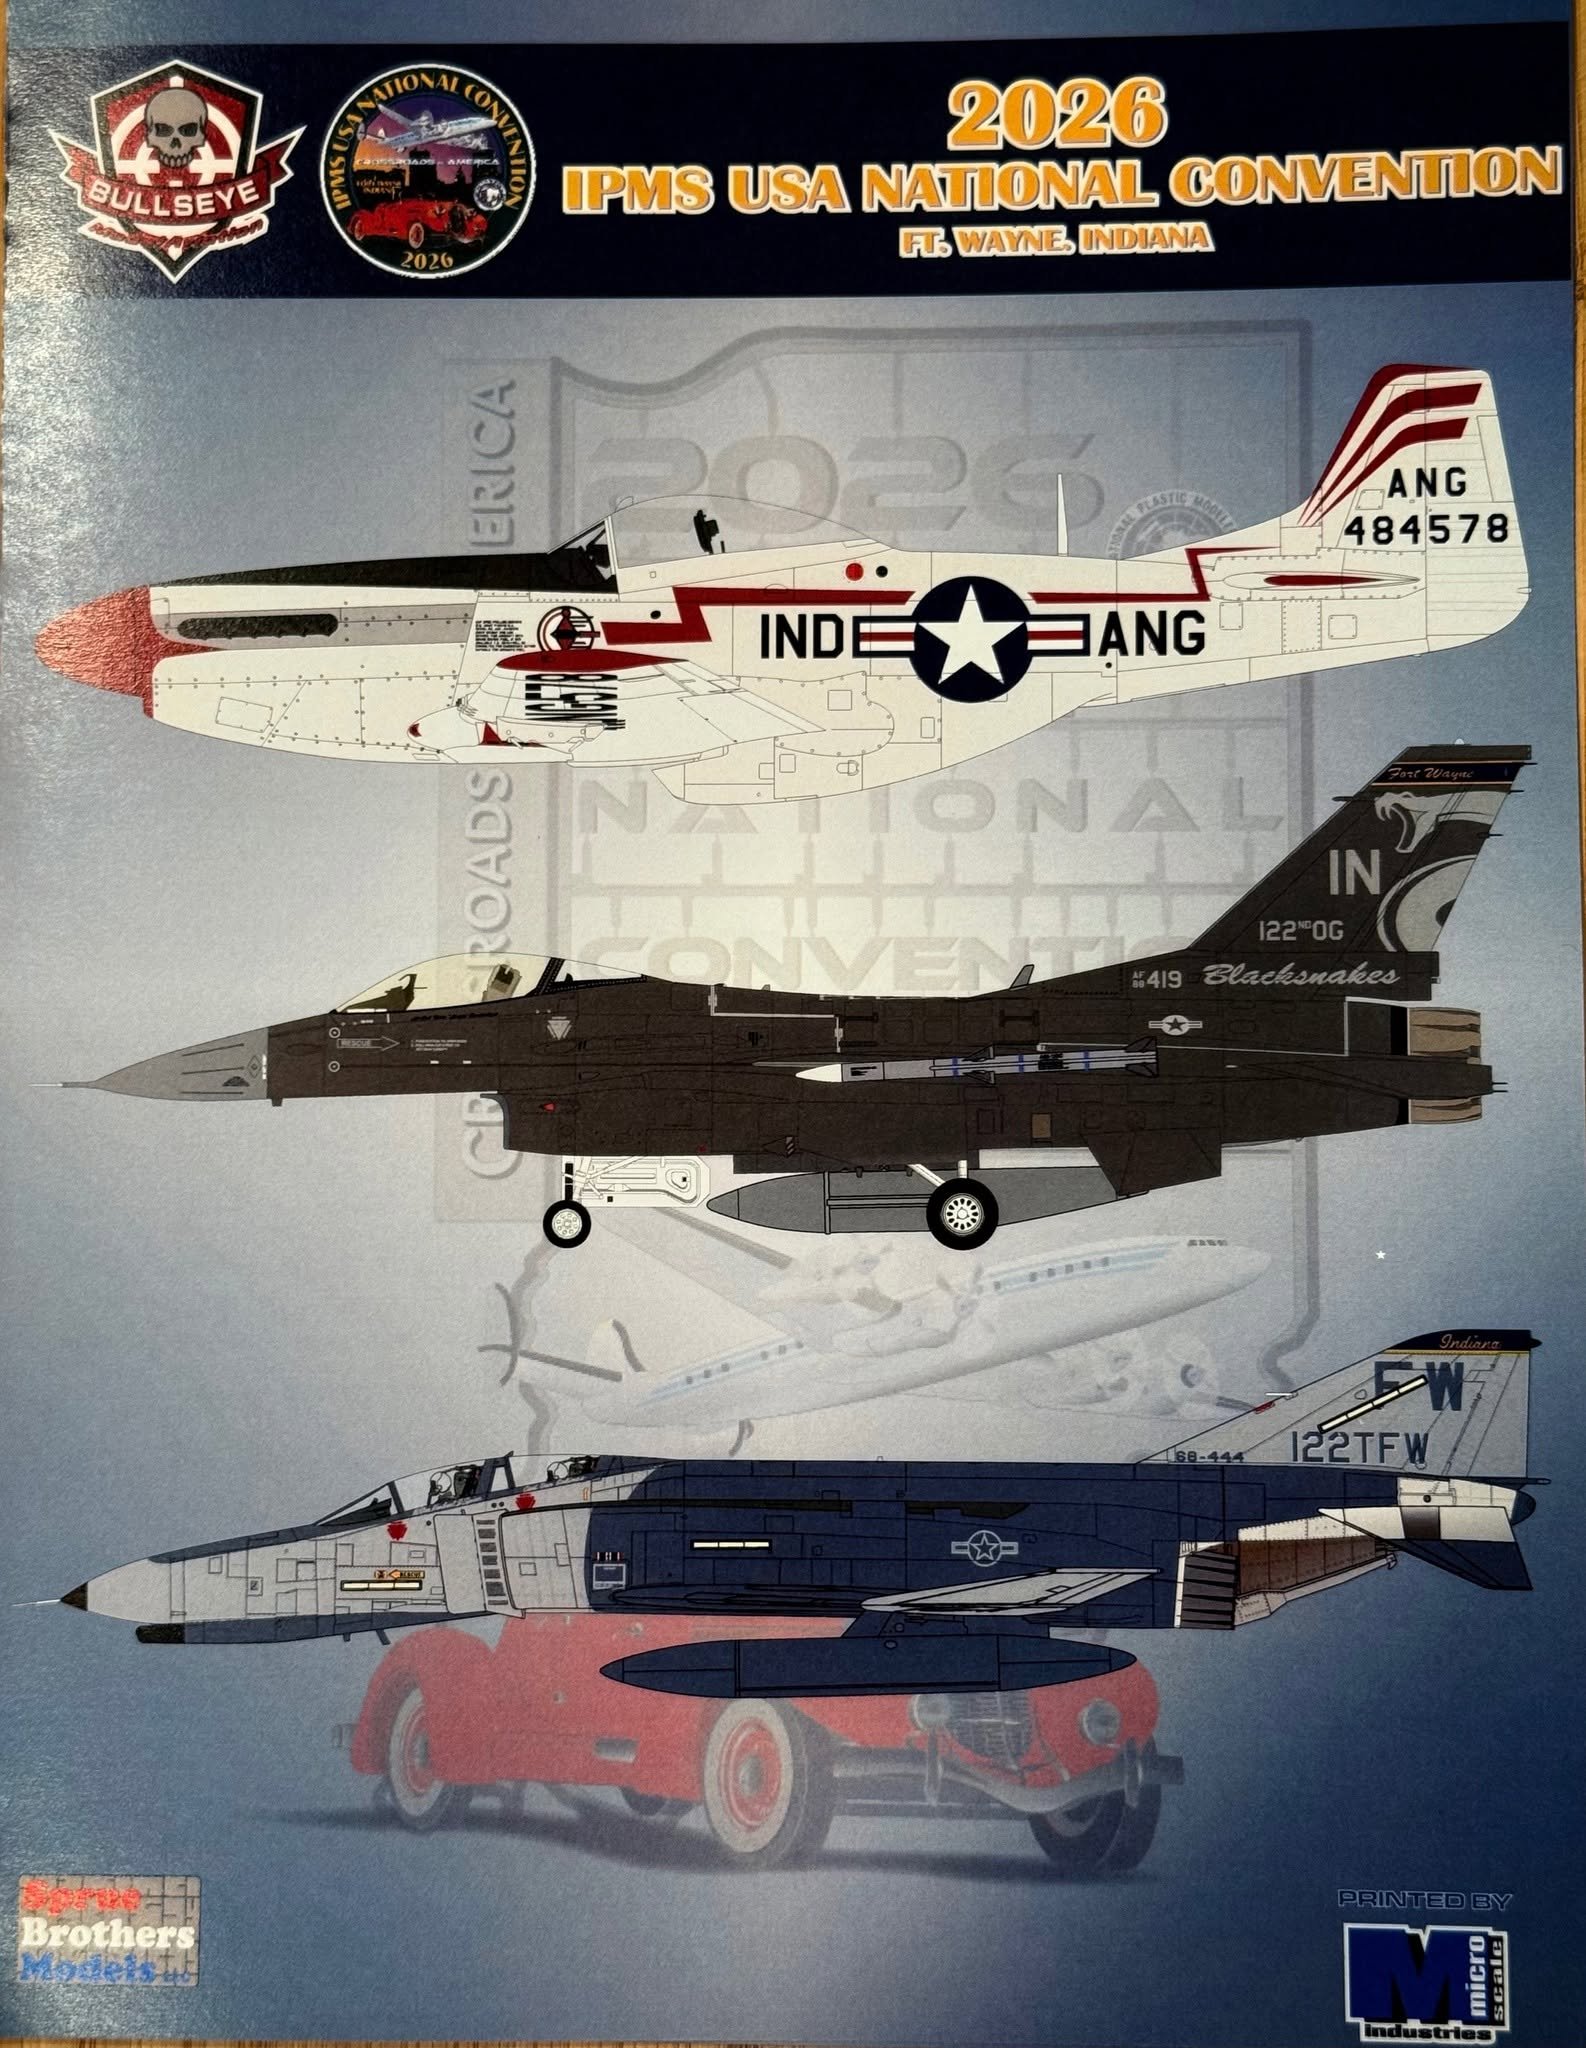
 Here's a preview of the aircraft models sheet that you'll receive at the 2026 IPMS National Convention in Fort Wayne, Indiana. A big thank you to Sprue Brothers for sponsoring this sheet! I will post pictures of the automotive sheet once I receive it.
-
- 1
-

- Last week
-
untilAnnouncing the inaugural PennWest Model Show to be held on Saturday, August 14th, 2027, at the Quality Inn and Suites, 1545 Wayne Avenue, Indiana, PA 15701. The PennWest Model Show has 51 entry categories and uses the Open Judging format. The major categories include Aircraft, Automotive, Ships, Figures, Military Vehicles / Armor, Railroad, Sci-Fi, Gundam / Mecha, Maschinen Kreiger (MaK), Steam Punk, Buildings and Structures, Real Space and Humor. Gold – Silver – Bronze awards can be earned along with at least 10 special “Best Of” awards. The PennWest Model Show includes raffle prizes, vendors, and an onsite food court.
-
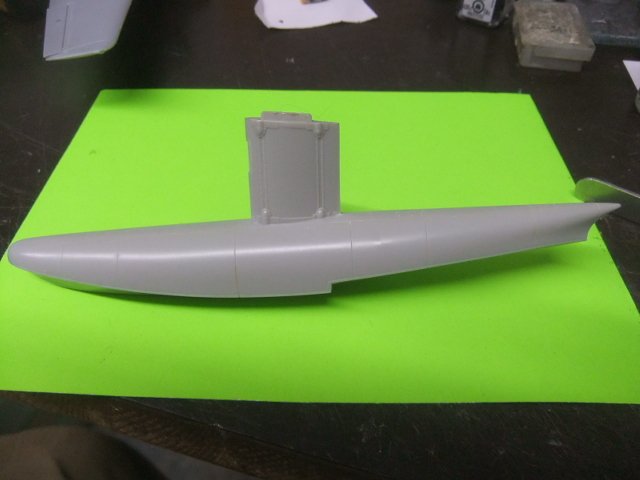
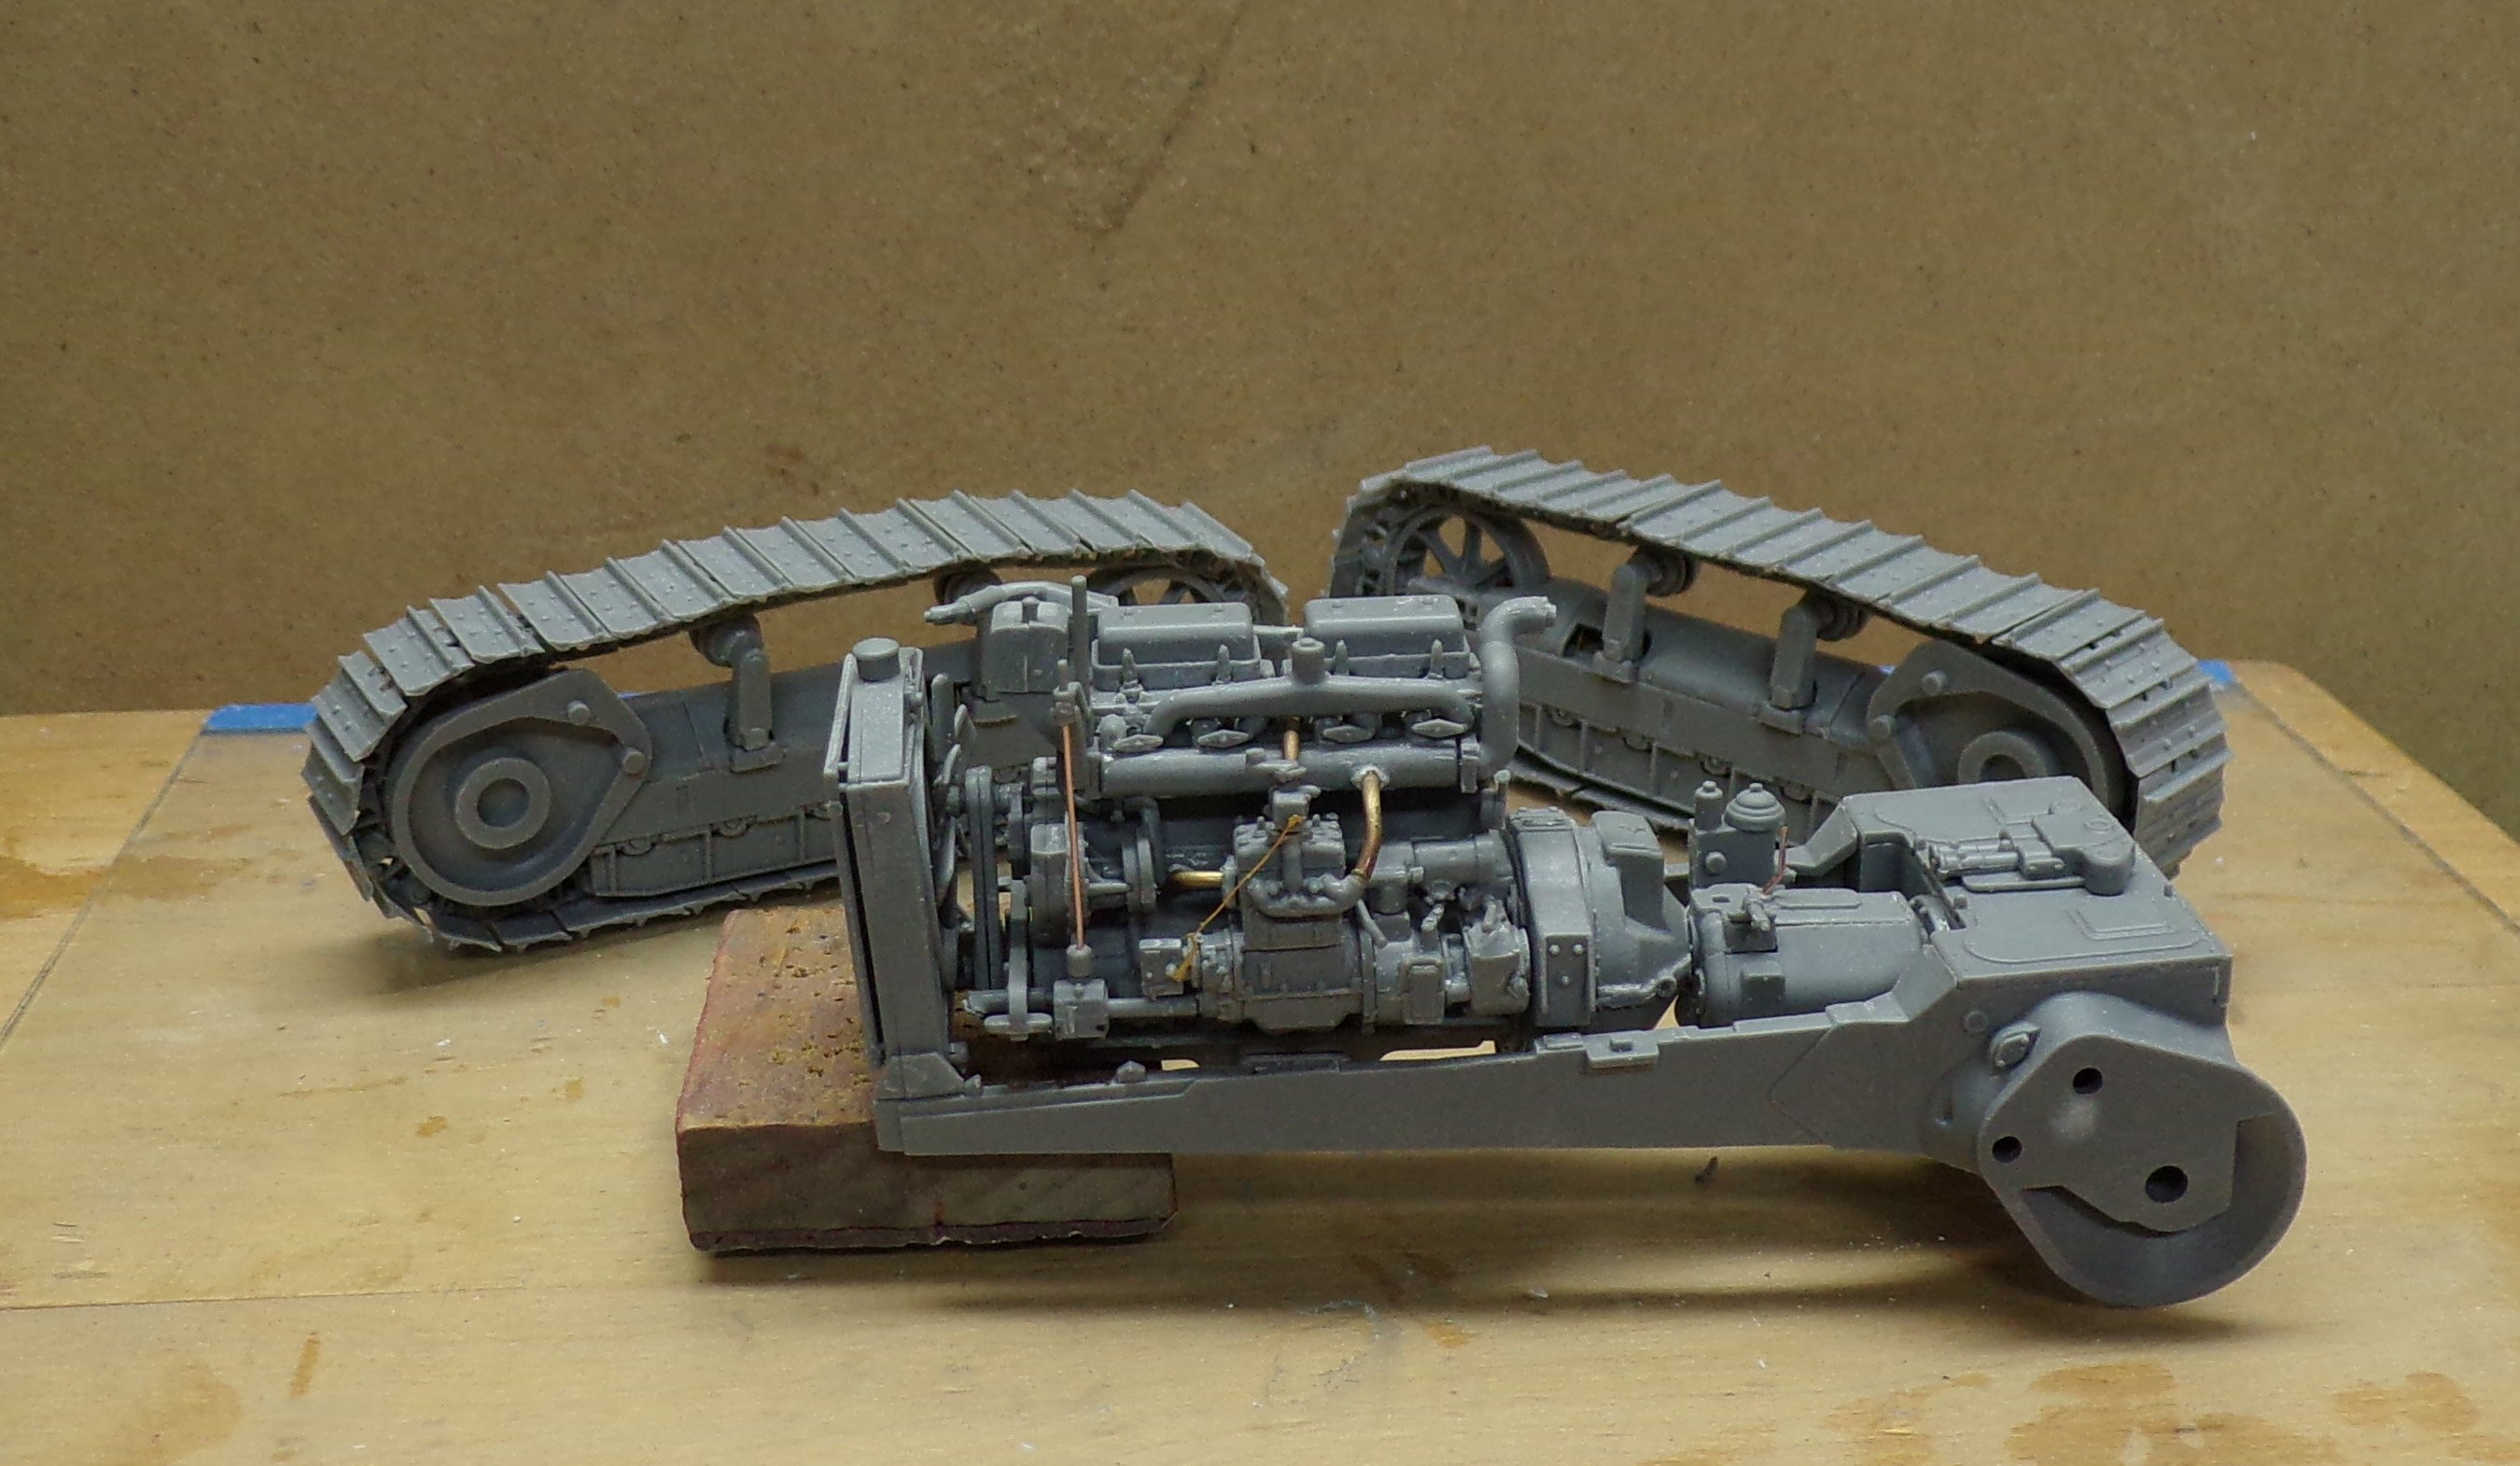
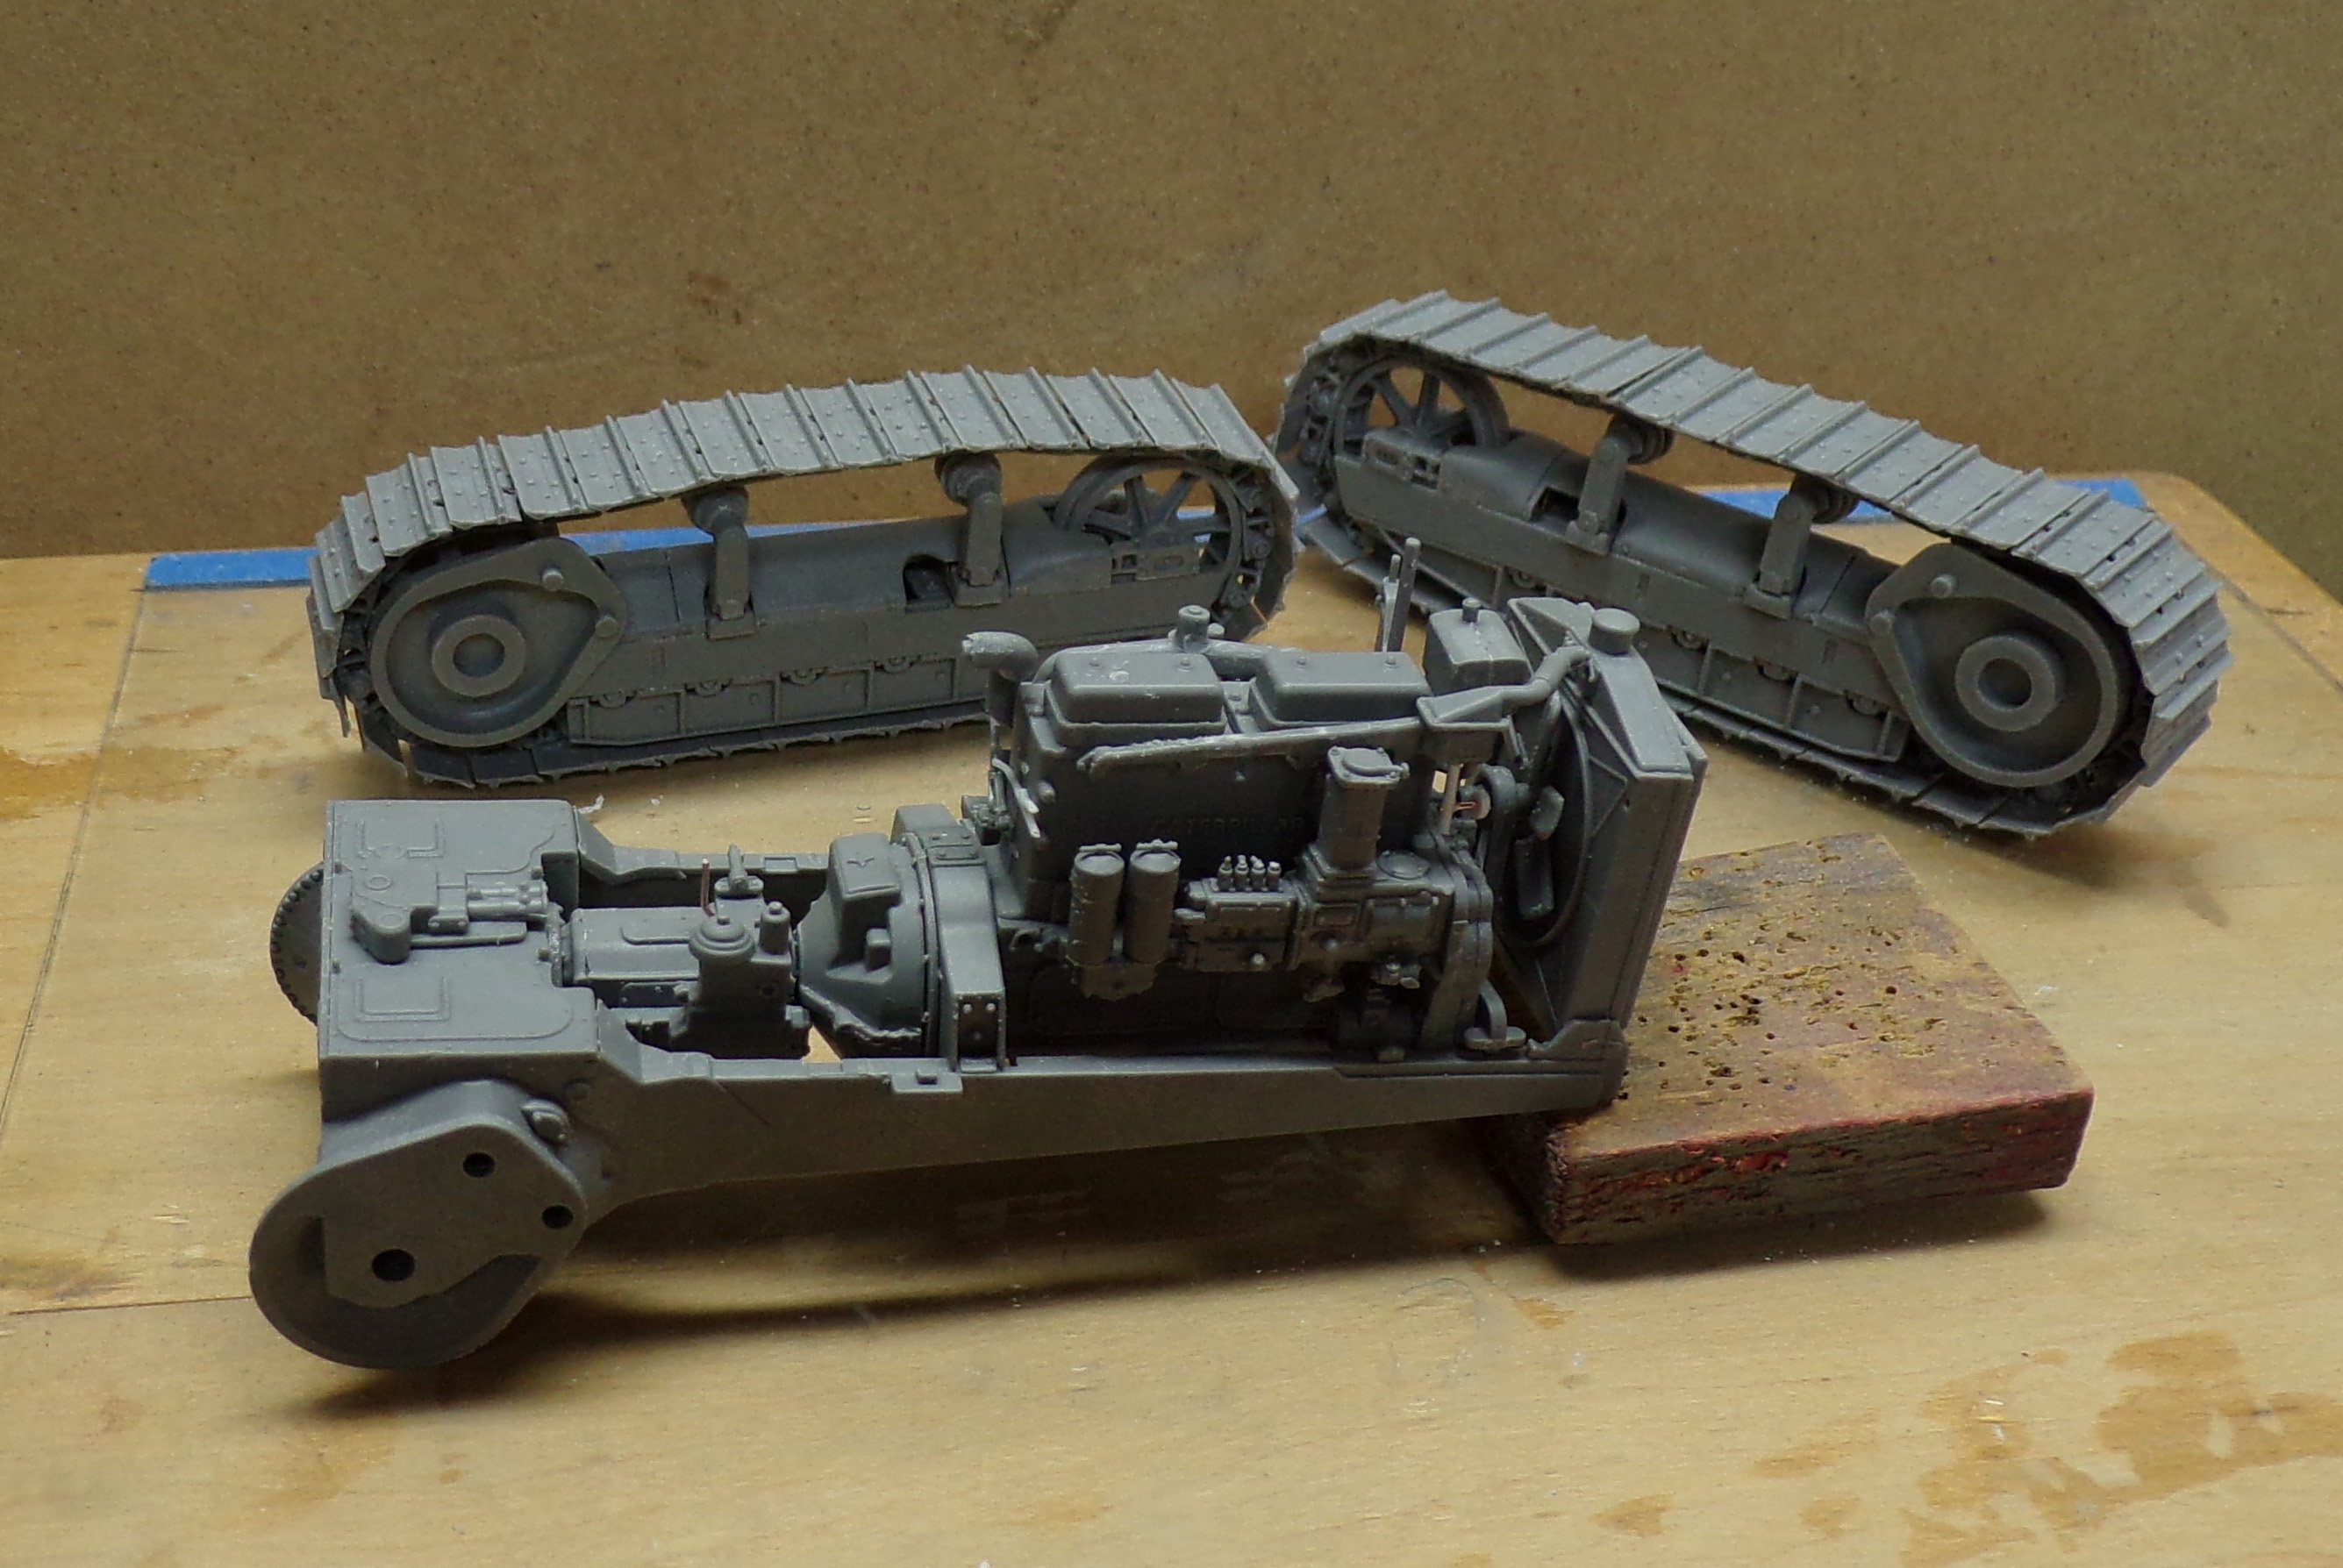
A couple more photos of the engine. Finally got it mostly done and to the point where I could work on the next pieces of the puzzle. The frame where the engine sits includes two side frames and the housing for the drive train that goes to the sprockets of the tracks. While the instructions suggest that the radiator and engine should be glued together and then the whole thing put into the frame, I decided otherwise. The radiator only mounts in one place so I did that first. Then the engine was set in. The side frames needed a bit of carving away in a couple of spots to allow the engine mounts to sit firmly. Next is to paint the engine and frames separately so that there won't be any unnecessary paint buildup. It's almost a waste to put so much into the portion of the model that will never be seen but that's the way it is supposed to go together. Some of the pieces were so small, I substituted craft wire and small Evergreen stock. When the engine gets painted it will be hilighted with various shades to show off some of the more prominent pieces, some oil stains and dirt.
-
untilIPMS Syracuse Presents SYRCON 38 at the American Legion at 5575Legionnaire Drvie, Cicero, NY 13039. For more details, contact Pierre Salazar at 315-314-0042, or email him at pierre.g.salazar@gmail.com, or visit the club website at www.ipmssyracuse.com/. This year's theme is America 250 - any subject with a US flag, National Insignia or 'USA' on it. All are welcome, and we hope you join us.
-

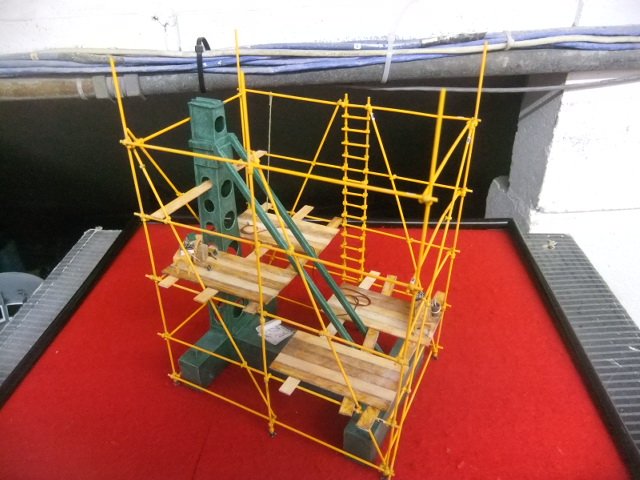
This week at MADDOG 1/48 CANADIAN SUBSIDIARY plant ( WEEK # 121) !
Jmarc replied to Jmarc's topic in Photos: On the Bench
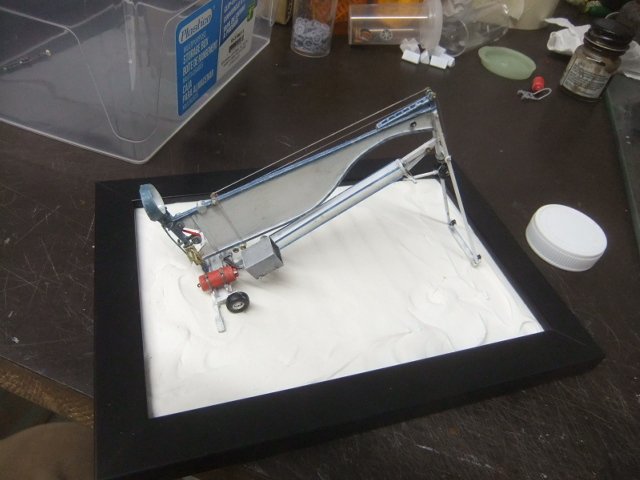
UPDATE 121 .. # 1 LOCKHEED C-121 CONSTELLATION X 2 (ID MODEL + MODIFICATION et ADDITION) Si vous désirez voir le montage intégrale visitez ce lien Google https://photos.app.goo.gl/GZvfX8dsdnYnsQ2W7 (JUN 26) Cette semaine j'ai compléter l'engravure de base a l'exception des joint d'ailes et j'ai donner une couche de primeur sur le fuselage ! # 2...HYBRIDE du Rockwell B-1 (REVELL + MODIFICATION MAISON) Vous pouvez voir le montage intégrale ,qui es la phase 2 du projet B-1 a cette adresse GOOGLE : https://photos.app.goo.gl/4ZgnFw8YhpzmVC2e9 (JUN 26) Cette semaine j'ai fait un 'wash' sur le panneau avant et continuer le travaille sur le panneau arrière de la première baie a bombe ! # 3 NORTH AMERICAN T-6 TEXAN + HARVARD IV (OCCIDENTAL + rajout + SCRATCH) si vous désirez voir le montage intégrale de ce projet visitez ce lien Google https://photos.app.goo.gl/Hk6hkr5HVKEz8rpk8 Si vous désirez voir les accessoires du COMMONWEALTH d'époque que j'ai compléter a date visitez ce lien Google https://photos.app.goo.gl/cUvwmpNq1bJuf5fg6 Si vous désirez voir les accessoires de l'USAF d'époque que j'ai compléter a date visitez ce lien Google https://photos.app.goo.gl/3rja9QxB7kiJn1Ar5 (JUN 26) Cette semaine j'ai pris une pause sur ce projet ! # 4 BATEAU DE SECOURS 36 PIEDS des GARDE-CÔTE AMÉRICAIN 'PHASE 1' (GLENCOE) si vous désirez voir le montage intégrale de ce projet visitez ce lien Google https://photos.app.goo.gl/EfNcXnQDo6g2vL5B7 Si vous désirez voir les projets maritime que j'ai compléter a date , visitez ce lien Google https://photos.app.goo.gl/cpC5Q6puZkJTQ2mHA (JUN 26) Cette semaine j'ai pris une pause sur ce projet ! # 5 THUNDEBIRD # 1 (RV 3D MODEL + SCRATCH) si vous désirez voir le montage intégrale de ce projet visitez ce lien Google https://photos.app.goo.gl/LtNegNPPJRSkRgCS9 Si vous désirer voir les autre projet des sentinelle de l'air que j'ai compléter, suivez ce lien GOOGLE : https://photos.app.goo.gl/okA4CsS4uB1a2j4C9 (JUN 26) Cette semaine j'ai pris une pause sur ce projet ! # 6 Échelle d'AÉRONEF ( SCRATCH ) Si vous désirez voir le montage intégrale visitez ce lien Google https://photos.app.goo.gl/Gz2YHHwy2TXDJk2X6 Si vous désirez voir les autre échelle du projet visiter ce lien Google: https://photos.app.goo.gl/9z7EkUgQwYuFf2gq7 (JUN 26) Cette semaine j'ai pris une pause sur ce projet ! # 7 EXTINCTEUR DE PISTE (SCRATCH) Si vous désirez voir le montage intégrale visitez ce lien Google https://photos.app.goo.gl/Y2BkkJvw4mR3SLxW6 Si vous désirez voir les autre projet complet a date visiter ce lien Google: https://photos.app.goo.gl/3b6jqYtkF1di2G7X6 (JUN 26) Cette semaine j'ai débuter le travaille sur le réservoir de lextincteur ! # 8 TOUR DE CONTRÔLE de la 2ième guerre USAF / RCAF /RAF (SCRATCH) Si vous désirez voir le montage intégrale visitez ce lien Google https://photos.app.goo.gl/EDPMz39B4kw1T87h8 (JUN 26) Cette semaine j'ai pris une pause sur ce projet ! # 9 WILLY'S M.38A1 ( REVELL /SCRATCH ) Si vous désirez voir le montage intégrale visitez ce lien Google https://photos.app.goo.gl/dy1R6XffJWBcEuGd7 (JUN 26) Cette semaine j'ai pris une pause sur ce projet ! # 10 CURTISS R3C X 2 ( TESTORS/HAWK et FINE MOLD + MODIFICATION + RAJOUT ) Si vous désirez voir le montage intégrale visitez ce lien Google https://photos.app.goo.gl/b5dyg3cvrWvwW2Sh6 (JUN 26) Cette semaine j'ai pris une pause sur ce projet ! # 11 VÉHICULE DE PISTE 'NITROGEN' DE l'USAF /US NAVY (VERLINDEN + RAJOUT ) Si vous désirez voir le montage intégrale visitez ce lien Google https://photos.app.goo.gl/9RuFuF8BLn7jZSyC6 (JUN 26) Cette semaine j'ai pris une pause sur ce projet ! # 12 BARRE DE REMORQUAGE ( SCRATCH ) Si vous désirez voir le montage intégrale visitez ce lien Google https://photos.app.goo.gl/EF8SynWsBcDYxBWaA Si vous désirez voir les barres du projet visiter ce lien Google: https://photos.app.goo.gl/uuWb88nXPsZZ6b128 (JUN 26) Cette semaine j'ai pris une pause sur ce projet ! # 13 SOUS-MARIN STEAMPUCK ( SCRATCH ) Si vous désirez voir le montage intégrale visitez ce lien Google https://photos.app.goo.gl/tRM7caW9YVvFC2cRA Si vous désirez voir les autre projets de science-fiction que j'ai fait a date , visitez ce lien GOOGLE : https://photos.app.goo.gl/D2FAQcJCoNhHNjkdA (JUN 26) Cette semaine j'ai pris une pause sur ce projet ! # 14 GROUPE DÉMARRAGE GPU 32A-60A de L'USAF / NAVY X 3 ( HASEGAWA + RAJOUT ) Si vous désirez voir le montage intégrale visitez ce lien Google https://photos.app.goo.gl/jscoPd9UmjAknBAf7 Si vous désirez voir la famille complète visiter ce lien Google: https://photos.app.goo.gl/ynLpcs3Ym8kZ7qpy5 (JUN 26) Cette semaine j'ai pris une pause sur ce projet ! # 15 BLOC D'ARRÊT pour AVION ( AIRFIX ) Si vous désirez voir le montage intégrale visitez ce lien Google https://photos.app.goo.gl/BCnEes6tfQgv8m1k8 Si vous désirez voir la famille complète visiter ce lien Google: https://photos.app.goo.gl/dj2gS9zupvp9RHyJ9 (JUN 26) Cette semaine j'ai peint les 2 versions et le projet es terminer ! Agrandir cette imageCliquez ici pour la voir à sa taille originale. # 16 TRÉTAUX / VÉRINS (STEPH 3D + TAMIYA ) Si vous désirez voir le montage intégrale visitez ce lien Google https://photos.app.goo.gl/aeiXdPUDC7PSnQC28 Si vous désirez voir la famille complète visiter ce lien Google: https://photos.app.goo.gl/58cuSaS7f8uoTxZg7 (JUN 26) Cette semaine j'ai pris une pause sur ce projet ! # 17 CHARIOT POUR SOUDEUR ( SCRATCH ) Si vous désirez voir le montage intégrale visitez ce lien Google https://photos.app.goo.gl/iGVSvWir8sg43txT8 Si vous désirez voir l'intégrale de tout les chariots que j'ai monter visitez ce lien Google https://photos.app.goo.gl/2L9QLMteXAC9Tpfi7 (JUN 26) Cette semaine j'ai pris une pause sur ce projet ! # 18 CERF-VOLANT PERKINS ( SCRATCH ) Si vous désirez voir le montage intégrale visitez ce lien Google https://photos.app.goo.gl/4kkPVPiqHJQ7Hhve7 (JUN 26) Cette semaine j'ai pris une pause sur ce projet ! # 19 AVRO TRIPLAN 109 et 1910 ( SCRATCH + PYRO/LIFE-LIKE + ADDITIONS ) Si vous désirez voir le montage intégrale visitez ce lien Google https://photos.app.goo.gl/qwfv7No6ubHRtMwv5 (JUN 26) Cette semaine j'ai apposer les décalques qu'ALEX m'as gracieusement fait sur la tour de course ! Agrandir cette imageCliquez ici pour la voir à sa taille originale. # 20 CAMION CITERNE WHITE 3000 ( REVELL + MODIFICATION MAISON +ADDITIONS ) Si vous désirez voir le montage intégrale visitez ce lien Google https://photos.app.goo.gl/i715ZWtipf74jUdx9 (JUN 26) Cette semaine j'ai pris une pause sur ce projet ! # 21 KNIGHT TWISTER ( LINDBERG + ADDITIONS ) Si vous désirez voir le montage intégrale visitez ce lien Google https://photos.app.goo.gl/PHiSWZwEPTxCbNr77 (JUN 26) Cette semaine j'ai pris une pause sur ce projet ! # 22 SHELBY 289 COBRA 1964' ( MONOGRAM +ADDITIONS ) si vous désirez voir le montage intégrale de ce projet visitez ce lien Google: https://photos.app.goo.gl/8bhwuSpJLFZJMJCQ9 Si vous désirez voir les autre projets automobile que j'ai compléter ce lien Google https://photos.app.goo.gl/Ax8ci1D4S77NG6z49 (JUN 26) Cette semaine j'ai pris une pause sur ce projet ! Agrandir cette imageCliquez ici pour la voir à sa taille originale. # 23 100 manière d'utiliser un BARIL (MODIFICATION ET RAJOUT ) Si vous désirez voir le montage intégrale visitez ce lien Google https://photos.app.goo.gl/Ze7YYgvxUDA8Naus5 Si vous désirez voir l'intégrale de tout les chariots que j'ai monter visitez ce lien Google https://photos.app.goo.gl/5UeLM52YQGuDq4iu6 (JUN 26) Cette semaine j'ai pris une pause sur ce projet ! # 24 NAVETTE STAR TREK ''NEXT GENERATION' (SCRATCH ) Si vous désirez voir le montage intégrale visitez ce lien Google https://photos.app.goo.gl/UECshHgpHyfRTFHJA (JUN 26) Cette semaine j'ai pris une pause sur ce projet ! # 25 BOEING X-20 DYNA-SOAR (COLLECT-AIR + MODIFICATION) Si vous désirez voir le montage intégrale visitez ce lien Google https://photos.app.goo.gl/Rjsjms9BhTrbnhYDA Si vous désirez voir les autre projet de l'exploration spatiale, visitez ce lien https://photos.app.goo.gl/ov2R8HFSA26iDpms5 (JUN 26) Cette semaine j'ai pris une pause sur ce projet ! Agrandir cette imageCliquez ici pour la voir à sa taille originale. # 26 WESTLAND WASP et SCOUT (FUJIMI +MODIFICATION) Si vous désirez voir le montage intégrale visitez ce lien Google https://photos.app.goo.gl/g9FmoRJ2xbynscfk6 (JUN 26) Cette semaine j'ai pris une pause sur ce projet ! # 27 GLOBE AIRCRAFT KD5G (LONE STAR + MODIFICATION) Si vous désirez voir le montage intégrale visitez ce lien Google https://photos.app.goo.gl/Dn4kXVxU8bZLAAiT6 Si vous désirez voir les autre drones que j'ai fait a date , visiter ce lien GOPOGLE: https://photos.app.goo.gl/mjGm69hDKYaDuFNX6 (JUN 26) Cette semaine j'ai pris une pause sur ce projet ! # 28 HMCS MAGNIFICIENT CL-21 (MAGGIE) (SCRATCH) Si vous désirez voir le montage intégrale visitez ce lien Google https://photos.app.goo.gl/sn9TYRzgtaaH59SS9 (JUN 26) Cette semaine j'ai continuer le contour des fenêtres du poste de contrôle ! # 29 Rampe de lancement d'avion AMÉRICAINE des année 30' x 2 (SCRATCH) Si vous désirez voir le montage intégrale visitez ce lien Google https://photos.app.goo.gl/D25zxsL3wP291ZC7A (JUN 26) Cette semaine j'ai pris une pause sur ce projet ! #30 GRUE (scratch) Si vous désirez voir le montage intégrale de ca projet ,visitez ce lien Google https://photos.app.goo.gl/cgW6TEAvwo8EzHeLA Si vous désirez voir l'intégrale de tout les grues que j'ai monter visitez ce lien Google https://photos.app.goo.gl/SehjntSHwSmthSJeA (JUN 26) Cette semaine j'ai pris une pause sur ce projet ! Agrandir cette imageCliquez ici pour la voir à sa taille originale. # 31 M.101 155mm HOWITHZER (REVELL + MODOFICATION) Si vous désirez voir le montage intégrale de ca projet ,visitez ce lien Google https://photos.app.goo.gl/j9zACnyqSE92mr8AA (JUN 26) Cette semaine j'ai pris une pause sur ce projet ! Agrandir cette imageCliquez ici pour la voir à sa taille originale. #32 RYAN M-2 'NYP' SPIRIT of ST-LOUIS' (REVELL + MODIFICATION) Si vous désirez voir le montage intégrale de ca projet ,visitez ce lien Google https://photos.app.goo.gl/UzuqEs2r9dzmnS26A (JUN 26) Cette semaine j'ai pris une pause sur ce projet ! #33 SOUS-MARIN ALLEMAND TYPE VIIc (TRUMPETER + additions) Si vous désirez voir le montage intégrale de ca projet ,visitez ce lien Google https://photos.app.goo.gl/EZKenssCafCXix326 Si vous désirez voir les projets maritime que j'ai compléter a date , visitez ce lien GOOGLE : https://photos.app.goo.gl/cpC5Q6puZkJTQ2mHA (JUN 26) Cette semaine j'ai continuer le détaille du plafond du poste des torpilles ! #34 TRANSPORTEUR DE MOTEUR (scratch) Si vous désirez voir le montage intégrale de ca projet ,visitez ce lien Google https://photos.app.goo.gl/BWyDyqfBqveZD5KJ7 Si vous désirez voir l'intégrale de tout les chariots moteur que j'ai monter visitez ce lien Google https://photos.app.goo.gl/93sejuPAqSxXRx5i8 (JUN 26) Cette semaine j'ai pris une pause sur ce projet ! #35 DC-3 'QUEBECAIR' + USN CRASHER (TRUMPETER / MONOGRAM+DÉTAILLES) Si vous désirez voir PLUS ,visitez ce lien Google https://photos.app.goo.gl/fboWMBcWTJfoddNk7 (JUN 26) Cette semaine j'ai pris une pause sur ce projet ! #36 Petit NIC NAC ...(STEPH 3D ) Si vous désirez voir le WIP sur ce projet ,visitez ce lien Google https://photos.app.goo.gl/yicnkV5hrMBWAF2X8 Si vous désirez voir l'intégrale de tout ls projet fabriquer a date , visiter ce lien Google : https://photos.app.goo.gl/rfzZLVmFwvrRSDby9 (JUN 26) Cette semaine j'ai peint, fait le 'WASH' et DRY-BRUSH , en plus de débuter les dernier de la section moteur de la 2ième souffleuse ! #37 QUAD US ANTI-AÉRIEN 'numéro 2' (BANDAI + RAJOUT) Si vous désirez voir PLUS ,visitez ce lien Google https://photos.app.goo.gl/qwChK5eBm8n7bbNv8 (JUN 26) Cette semaine j'ai pris une pause sur ce projet ! *****#38 BOEING IM-99A BOMARC (REVELL + MODIFICATION) Si vous désirez voir PLUS ,visitez ce lien Google https://goo.gl/photos/WFvokRh5FtQNzAZN9 (JUN 26) Cette semaine j'ai pris une pause sur ce projet ! #39 DFW-28 FLOH au 1/48 (EDIUARD + MODIFICATION et ADDITION) Si vous désirez voir PLUS ,visitez ce lien Google https://photos.app.goo.gl/oh57EPPNx9Dc3zHY8 (JUN 26) Cette semaine j'ai pris une pause sur ce projet ! Agrandir cette imageCliquez ici pour la voir à sa taille originale. #40 TRANSPORTEUR DE BOMBE MODERNE X 4 (KINETIC + RAJOUT ) Si vous désirez voir le montage intégrale de ca projet ,visitez ce lien Google https://photos.app.goo.gl/HfvkLVehVjJdncd79 Si vous désirez voir l'intégrale de tout les chariots a BOMBE que j'ai monter visitez ce lien Google https://photos.app.goo.gl/wYLd6QKwBgtBFiVX8 (JUN 26) Cette semaine j'ai pris une pause sur ce projet ! #41 DUESENBERG SJ 1934 ( REVELL + MODIFICATION) Si vous désirez voir le montage intégrale visitez ce lien Google https://photos.app.goo.gl/9pWWaD1kvGqyj1YR6 (JUN 26) Cette semaine j'ai pris une pause sur ce projet ! #42 PLANEUR BLOHM und VOSS BV-40 (CZECH MDL + MODIFICATION) Si vous désirez voir le montage intégrale visitez ce lien Google https://photos.app.goo.gl/e88YDzggc7LLqTQD9 (JUN 26) Cette semaine j'ai pris une pause sur ce projet ! https://photos.app.goo.gl/e88YDzggc7LLqTQD9 #43 'COMPAS 'ACCESSOIRES DE PISTE DE LA LUFTWAFFE (VERLINDEN / MODIFICATION) Si vous désirez voir le montage intégrale visitez ce lien Google https://photos.app.goo.gl/MKL1CAi1jTKQQ3DB9 (JUN 26) Cette semaine j'ai pris une pause sur ce projet ! #44 'BEECHCRAFT V-35 BONNANZA X 3 (MINICRAFT + MODIFICATION) Si vous désirez voir le montage intégrale visitez ce lien Google https://photos.app.goo.gl/TzAbqAvgnsuSq48J6 Si vous désirez voir l'intégrale de tout les avions civile que j'ai monter visitez ce lien Google https://photos.app.goo.gl/R5EibRLDyihRmC6i6 (JUN 26) Cette semaine j'ai pris une pause sur ce projet ! #45 SIKORSKY CH-53 (REVELL + MODIFICATION et ADDITION) Si vous désirez voir le montage intégrale visitez ce lien Google https://photos.app.goo.gl/fcstz7ivAP54tfuM6 Si vous désirez voir les autre hélicoptère que j'ai fait a date, visiter ce lien Google https://photos.app.goo.gl/a53KFY5v9WWjf3m8A (JUN 26) Cette semaine j'ai pris une pause sur ce projet ! # 46..LOCKHEED CC-130H HERCULE (ITALIERIE/TESTOR + MODIFICATION MAISON) Lien Google du montage complet du projet... https://photos.app.goo.gl/Q5VtD6YwwVXy6AB56 Si vous désirez voir le montage du EC-130V 'COAST GUARD',visitez ce lien : https://photos.app.goo.gl/2wy8EWppRhetHj5i6 Si vous désirez voir le montage du simulateur de vol du CC-130H , visitez ce lien : https://photos.app.goo.gl/D9CggoapvQP5559y7 (JUN 26) Cette semaine j'ai pris une pause sur ce projet ! Agrandir cette imageCliquez ici pour la voir à sa taille originale. #47 MACROSS VF-1S/A (HASEGAWA + ADDITION et MODIFICATION) Si vous désirez voir le montage intégrale visitez ce lien Google https://photos.app.goo.gl/1W6Eu6c7EvJeyLGT6 (JUN 26) Cette semaine j'ai continuer le détaille sur les ailes ! #48 DASSAULT FALCON 10 et 20 (HASEGAWA / HELLER + ADDITION et MODIFICATION) Si vous désirez voir le montage intégrale visitez ce lien Google https://photos.app.goo.gl/GPfcCBncmJ1B2RrL6 (JUN 26) Cette semaine j'ai débuter le travaille sur le panneau de contrôle de la version '10' ! #49 BELL 47/ OH-13 SIOUX X 3 (ITALIERIE + ADDITION et MODIFICATION) Si vous désirez voir le montage intégrale visitez ce lien Google https://photos.app.goo.gl/3RZzExGqEXg9jJQZ9 Si vous désirez voir les autre hélicoptère que j'ai fait a date, visiter ce lien Google https://photos.app.goo.gl/a53KFY5v9WWjf3m8A (JUN 26) Cette semaine j'ai pris une pause sur ce projet ! Agrandir cette imageCliquez ici pour la voir à sa taille originale. #50 MULE VICKER MARK II X 2 (SKUNK WORK + RAJOUT + MODIFICATION ) Si vous désirez voir le montage intégrale visitez ce lien Google https://photos.app.goo.gl/RRKv4V7pVJsVYSNw6 (JUN 26) Cette semaine j'ai pris une pause sur ce projet ! #51 CURTISS ORIENTOR (SCRATCH ) Si vous désirez voir le montage intégrale visitez ce lien Google https://photos.app.goo.gl/dKksw3FPupiBtX2H9 (JUN 26) Cette semaine j'ai pris une pause sur ce projet ! #52 PERSONNAGE de piste aérienne des année 20 Si vous désirez voir le montage intégrale visitez ce lien Google https://photos.app.goo.gl/D29eeLc1PCsz8oHV9 (JUN 26) Cette semaine j'ai pris une pause sur ce projet ! #53 BELL SK-5 HOOVERCRAFT (PROJET SCRATCH ) Si vous désirez voir le montage intégrale visitez ce lien Google https://photos.app.goo.gl/VxmemrUusiBQkSYk7 (JUN 26) Cette semaine j'ai pris une pause sur ce projet ! #54 BOMBE AMÉRICAINE de l'USAF de la 2ième guerre (MOULAGE INCONNUE ) Si vous désirez voir le montage intégrale visitez ce lien Google https://photos.app.goo.gl/bNurWQT5GWHwrTfW8 Si vous désirez voir la bombe 'LITTLE JOE' visitez ce lien Google https://photos.app.goo.gl/r9yVxdLhmuPajvfk7 Si vous désirez voir la bombe 'FAT ALBERT' visitez ce lien Google https://photos.app.goo.gl/amLV9DyNnGyDSdoQ8 Si vous désirez voir les bombes américaine visitez ce lien Google https://photos.app.goo.gl/fD5LGMTWPoYo5ZFMA (JUN 26) Cette semaine j'ai débuter le projet par nettoyer les pièces et débuter la peinture ! #55 RELIANCE-MERCURY RM-450 (PROJET SCRATCH ) Si vous désirez voir le montage intégrale visitez ce lien Google https://photos.app.goo.gl/81Ss4qzmHJz5DZDX9 Si vous désirez voir les autre MULES que j'ai compléter par le passer visiter ce lien GOOGLE : https://photos.app.goo.gl/JA5BEALfqg1uYJUj6 (JUN 26) Cette semaine j'ai pris une pause sur ce projet ! #57 Personnel de la WEHMACHT (TAMIYA + ADDITION) Si vous désirez voir le montage intégrale visitez ce lien Google https://photos.app.goo.gl/5e8s3a5uCK1AEMjx6 (JUN 26) Cette semaine j'ai pris une pause sur ce projet ! Agrandir cette imageCliquez ici pour la voir à sa taille originale. #58 M.274 MULE X 2 (SCRATCH) Si vous désirez voir le montage intégrale visitez ce lien Google https://photos.app.goo.gl/8qYybRij7m9u62D57 (JUN 26) Cette semaine j'ai pris une pause sur ce projet ! #59 FIESELER FI-103 (V-1) (TAMIYA / MPM /KIT BASHING /MODIFICATION) Si vous désirez voir le montage intégrale visitez ce lien Google https://photos.app.goo.gl/ncHPm4vnPMM7k2vb7 (JUN 26) Cette semaine j'ai pris une pause sur ce projet ! #60 AIRSPEED HORSA (CONTRAIL) Si vous désirez voir le montage intégrale visitez ce lien Google https://photos.app.goo.gl/QxCswc5kyL3d86x57 (JUN 26) Cette semaine j'ai pris une pause sur ce projet ! Agrandir cette imageCliquez ici pour la voir à sa taille originale. #61 AÉROGLISEUR GREKOV MOBILE (SCRATCH) Si vous désirez voir le montage intégrale visitez ce lien Google https://photos.app.goo.gl/fy7WJSXdxUcPZWyo9 (JUN 26) Cette semaine j'ai pris une pause sur ce projet ! #62 MISSILE SOL / AIR SAM-2 (CALIBRE+ MODIFICATION + ADDITIONS ) Si vous désirez voir le montage intégrale visitez ce lien Google https://photos.app.goo.gl/qA2uKyxG2Xf3m6TG7 (JUN 26) Cette semaine j'ai pris une pause sur ce projet ! # 63 INDIAN 841 ( PROPAGANDA / MODICICATION ) si vous désirez voir le montage intégrale de ce projet visitez ce lien Google: https://photos.app.goo.gl/55wxcbTzaWsEfGnq9 (JUN 26) Cette semaine j'ai pris une pause sur ce projet ! #64 CANADAIR CL-13 SABRE x 4 ( ACADEMY + HASEGAWA + REVELL GERMANY +MODIFICATION et ADDITIONS ) Si vous désirez voir le montage intégrale visitez ce lien Google https://photos.app.goo.gl/ez3SmBLB1xWbbJyy6 (JUN 26) Cette semaine j'ai pris une pause sur ce projet ! #65 De HAVILLAND DHC-3 / CC-123 OTTER ( HOBBYCRAFT + MODIFICATION et ADDITIONS ) Si vous désirez voir le montage intégrale visitez ce lien Google https://photos.app.goo.gl/PpZETKoZ1fWPctAp7 (JUN 26) Cette semaine j'ai pris une pause sur ce projet ! #66 TRAILEUR de la RAF 2ième guerre ( AIRFIX) Si vous désirez voir le montage intégrale visitez ce lien Google https://photos.app.goo.gl/5xhTRk5HpUGRgUWB8 Si vous désirer voir tout les traileurs que j'ai fait a date , visitez ce viens GOOGLE https://photos.app.goo.gl/H8rqhA5NMeZsUwvn7 Si vous désirez voir tout les projets WHIPPET que j'ai fait a date, visiter ce lien Google https://photos.app.goo.gl/gA5BdcKTXMbV5RoT7 (JUN 26) Cette semaine j'ai pris une pause sur ce projet ! #67 WAGON BLINDER NORDISTE 32 PDR de la guerre de sécession Américaine X 2 ( SCRATCH ) Si vous désirez voir le montage intégrale visitez ce lien Google https://photos.app.goo.gl/hw64ady2T4H4HFPi9 (JUN 26) Cette semaine j'ai pris une pause sur ce projet ! Agrandir cette imageCliquez ici pour la voir à sa taille originale. #68 PROJET AIM-9 ( HASEGAWA + MODIFICATION +SCRATCH ) Si vous désirez voir le montage intégrale visitez ce lien Google https://photos.app.goo.gl/daqH2y8XEopeFrgz8 (JUN 26) Cette semaine j'ai pris une pause sur ce projet ! #69 BALLON INTREPID guerre de sécession AMÉRICAINE (AMT + BORAX +MODIFICATION+ADDTIONS) Si vous désirez voir le montage intégrale visitez ce lien Google https://photos.app.goo.gl/TAgDxcdjcsydho629 (JUN 26) Cette semaine j'ai pris une pause sur ce projet ! # 70 HELICOPTÈRE VICTORIENNE (SCRATCH) Si vous désirez voir le montage intégrale visitez ce lien Google https://photos.app.goo.gl/GHGp6c6ZF2AmNoaVA (JUN 26) Cette semaine j'ai pris une pause sur ce projet ! # 71 PROJET JOHANESS WHINKLER WH-1 (SCRATCH) Si vous désirez voir le montage intégrale visitez ce lien Google https://photos.app.goo.gl/Yc58ucMgKUSPj99e9 Si vous désirez voir les autre projet de l'exploration spatiale, visitez ce lien https://photos.app.goo.gl/ov2R8HFSA26iDpms5 (JUN 26) Cette semaine j'ai pris une pause sur ce projet ! # 72 Projet SPITFIRE (TAMIYA / FUSION / ICM) Si vous désirez voir le montage intégrale visitez ce lien Google https://photos.app.goo.gl/SL3WtQjEWr2cnCqw9 Si vous désirez voir les accessoires du COMMONWEALTH d'époque que j'ai compléter a date visitez ce lien Google https://photos.app.goo.gl/cUvwmpNq1bJuf5fg6 (JUN 26) Cette semaine j'ai continuer le travaille de détaille sur le moteur MERLIN ! # 73 KENWORTH FREIGHTLINER K-123 ( AMT + ADDITIONS + MODIFICATION ) Si vous désirez voir le montage intégrale visitez ce lien Google https://photos.app.goo.gl/oYRg2CwgFxg4PW6N9 (JUN 26) Cette semaine j'ai pris une pause sur ce projet ! # 74 SUD-OUEST SO-9000 TRIDENT 'MAQUETTE D'ESSAIE ' ( KIT BASHING ) Si vous désirez voir le montage intégrale visitez ce lien Google https://photos.app.goo.gl/p4zKPbQSAhqMBBkZ6 (JUN 26) Cette semaine j'ai pris une pause sur ce projet ! # 75 HORATIO PHILLIP MULTIPLANE 1904 ( SCRATCH ) Si vous désirez voir le montage intégrale visitez ce lien Google https://photos.app.goo.gl/hwYZaYK1y5xuVnVY9 Si vous désirez voir le montage du projet antérieure d'HORATIO PHILLIP 1896 visitez ce lien Google: https://photos.app.goo.gl/jaA4HDrjKeqRLMyv7 (JUN 26) Cette semaine j'ai pris une pause sur ce projet ! # 76 PROJET SRBM PGM-11REDSONTE /JUPITER C ( GLENCOE + MODIFICATION ) Si vous désirez voir le montage intégrale visitez ce lien Google https://photos.app.goo.gl/Jhw932hbEGz7MNb6A Si vous désirez voir les projet spatiaux que j'ai fabriquer a date, visitez ce lien Google https://photos.app.goo.gl/ov2R8HFSA26iDpms5 (JUN 26) Cette semaine j'ai pris une pause sur ce projet ! # 77 COIN DE MAINTENANCE de la LUFTWAFFE ( VERLINDEN + ADDITION ) Si vous désirez voir le montage intégrale visitez ce lien Google https://photos.app.goo.gl/F1KT3Cgpr73LgbaB7 (JUN 26) Cette semaine j'ai pris une pause sur ce projet ! # 78 FORD MUSTANG 1947 ( REVELL + MODIFICATION ) Si vous désirez voir le montage intégrale visitez ce lien Google https://photos.app.goo.gl/WvtMAcgeFXRWp6Wg9 (JUN 26) Cette semaine j'ai pris une pause sur ce projet ! # 79 NORTH AMERICAN NA-64 YALE ( BELCHER + MONOGRAM + MODIFICATION ) Si vous désirez voir le montage intégrale visitez ce lien Google https://photos.app.goo.gl/FnKKnenRobnokJtSA Si vous désirez voir les accessoires du COMMONWEALTH d'époque que j'ai compléter a date visitez ce lien Google https://photos.app.goo.gl/cUvwmpNq1bJuf5fg6 (JUN 26) Cette semaine j'ai pris une pause sur ce projet ! # 80 ARMÉE FANTÔME de la 2ième guerre ( SCRATCH ) Si vous désirez voir le montage intégrale visitez ce lien Google https://photos.app.goo.gl/TS6URFADMnV78e4a8 (JUN 26) Cette semaine j'ai pris une pause sur ce projet ! # 81 SCEMA C-450 COLÉOPTÈRE ( HELLER + ADDITION ) Si vous désirez voir le montage intégrale visitez ce lien Google https://photos.app.goo.gl/5pUQhpGkry9ttPxTA (JUN 26) Cette semaine j'ai pris une pause sur ce projet ! # 82 PERSONNAGE DE PISTE AÉRIENNE DE L'OTAN' ( ESCI ) Si vous désirez voir le montage intégrale visitez ce lien Google https://photos.app.goo.gl/gT8bCmQDXbeNo7xZ8 (JUN 26) Cette semaine j'ai pris une pause sur ce projet ! # 83 HANGAR 48' RESTAURATION et RÉCUPÉRATION de pièce de MAQUETTES ( VARIÉ + SCRATCH ) Si vous désirez voir le montage intégrale visitez ce lien Google https://photos.app.goo.gl/NtNSgh1zJgx9jRSx5 (JUN 26) Cette semaine j'ai continuer le rajout des dernier détailles sur la queue du T-33 SILVER STAR ! # 84 ARMEMENT de la LUFTWAFFE de la 2ième guerre ( VARIÉ ) Si vous désirez voir le montage intégrale du dernier projet visitez ce lien Google https://photos.app.goo.gl/mTR7DFinwNL8RfuE8 Si vous désirez voir les projets compléter a date , visitez ce lien Google https://photos.app.goo.gl/jmSTXru4jU8YwAhT7 (JUN 26) Cette semaine j'ai pris une pause sur ce projet ! # 85 MIKOYAN MIG -21 ( OEZ ) Si vous désirez voir le montage intégrale du dernier projet visitez ce lien Google https://photos.app.goo.gl/wR224HtuoRLfayha6 (JUN 26) Cette semaine j'ai pris une pause sur ce projet ! # 86 MOTEUR DB-605 ( VERLINDEN) Si vous désirez voir le montage intégrale du dernier projet visitez ce lien Google https://photos.app.goo.gl/Lp7FimBsSNwL3PPL6 Si vous désirez voir les autre moteur que j'ai fait a date https://photos.app.goo.gl/QaYRGrLpudkCJYvi9 (JUN 26) Cette semaine j'ai pris une pause sur ce projet ! # 87 PROJET M.4 SHERMAN ATOMIQUE ( TAMIYA + MODIFICATION) Si vous désirez voir le montage intégrale du dernier projet visitez ce lien Google https://photos.app.goo.gl/jZjkfHXvvynWW4177 (JUN 26) Cette semaine j'ai pris une pause sur ce projet ! # 88 PROJET P-51 MUSTANG ( ACCURATE MINIATURE +TAMIYA+ MODIFICATION) Si vous désirez voir le montage intégrale du dernier projet visitez ce lien Google https://photos.app.goo.gl/WvtMAcgeFXRWp6Wg9 (JUN 26) Cette semaine j'ai pris une pause sur ce projet ! # 89 HAFFNER ROTABUGGY ( BANDAI + MODIFICATION) Si vous désirez voir le montage intégrale du dernier projet visitez ce lien Google https://photos.app.goo.gl/PnWWsMeQGt27v1cp8 (JUN 26) Cette semaine j'ai pris une pause sur ce projet ! # 90 GI AMÉRICAIN de la 2ième guerre ( TAMIYA) Si vous désirez voir le montage intégrale du dernier projet visitez ce lien Google https://photos.app.goo.gl/19A2iENxUTRMWadq6 (JUN 26) Cette semaine j'ai débuter le travaille sur 'PRIVATE GREEN Jr ! # 91 TANDEM MITRAILLEUR MAXIM ( SCRATCH ) si vous désirez voir le montage intégrale de ce projet visitez ce lien Google: https://photos.app.goo.gl/ttM6wEwiN6eiFoEB7 Si vous désirez voir les autre projet de BICYCLETTE , visitez ce lien GOOGLE: https://photos.app.goo.gl/WvWoK2tjFffL2ugh8 (JUN 26) Cette semaine j'ai pris une pause sur ce projet ! # 92 100 manière d'utiliser un BIDON LARGUABLE, SOUS-MARIN SUICIDE de la 2ième guerre JAPONNAIS ( KIT BASHING) si vous désirez voir le montage intégrale de ce projet visitez ce lien Google: https://photos.app.goo.gl/hr4WAFdrNj67h2DC9 Si vous désirez voir les autre projet d'utilisation de bidon LARGUAGE , visitez ce lien GOOGLE: https://photos.app.goo.gl/2u9k7sAsqHGBoVmx6 (JUN 26) Cette semaine j'ai pris une pause sur ce projet ! # 93 BOEING INCITUS MQ-27 / CU-169 SCAN EAGLE ( PASCAL 3D +MODIFICATION ) si vous désirez voir le montage intégrale de ce projet visitez ce lien Google: https://photos.app.goo.gl/jrWyBiNZSJHCUknZ9 Si vous désirez voir les autre drones que j'ai monté a date , visitez ce lien GOOGLE: https://photos.app.goo.gl/mjGm69hDKYaDuFNX6 (JUN 26) Cette semaine j'ai continuer le travaille sur les détaille du lanceur ! # 94 KUGELBALL ( PASCAL 3D +MODIFICATION ) si vous désirez voir le montage intégrale de ce projet visitez ce lien Google: https://photos.app.goo.gl/wDywMPcScv6KS2UX9 (JUN 26) Cette semaine j'ai pris une pause sur ce projet ! # 95 EIPPER MX-2 QUICKSILVER ULTRA LÉGER( SCRATCH ) si vous désirez voir le montage intégrale de ce projet visitez ce lien Google: https://photos.app.goo.gl/dbHgX2XLYFuQZmXE9 (JUN 26) Cette semaine j'ai pris une pause sur ce projet ! Agrandir cette imageCliquez ici pour la voir à sa taille originale. #96 TRANSPORTEUR DE BOMBE ATOMIQUE (MONOGRAM + RAJOUT ) Si vous désirez voir le montage intégrale de ca projet ,visitez ce lien Google https://photos.app.goo.gl/5xhTRk5HpUGRgUWB8 Si vous désirez voir l'intégrale de tout les chariots a BOMBE que j'ai monter visitez ce lien Google https://photos.app.goo.gl/wYLd6QKwBgtBFiVX8 (JUN 26) Cette semaine j'ai pris une pause sur ce projet ! #97 McDONNELL PHANTOM II (HASEGAWA / ACADEMY/ DB / FALCON+RAJOUT) Si vous désirez voir le montage intégrale de ca projet ,visitez ce lien Google https://photos.app.goo.gl/HM6nmTTYxGPUDxn68 Si vous désirez le montage intégrale du PHANTOM II test pour les siège MARTIN-BAKER , visitez ce lien Google https://photos.app.goo.gl/pXtj6dcDPJkTQCKZ8 (JUN 26) Cette semaine j'ai pris une pause sur ce projet ! #98 CANADAIR CL-327 GUARDIAN (TI-LIN 3D) Si vous désirez voir le montage intégrale de ca projet ,visitez ce lien Google https://photos.app.goo.gl/3QPU8Ntb4dt57CuH6 Si vous désirez voir les autre projet de CANADAIR / BOMBARDIER que j'ai fait monter visitez ce lien Google https://photos.app.goo.gl/8AF1N38gsvcykjuu8 (JUN 26) Cette semaine compléter la section du grillage , fait les pied transparent et débuter la section de reconnaissance ! #99 CANOE CANADIEN FRANCAIS (HAVOC 3D) Si vous désirez voir le montage intégrale de ca projet ,visitez ce lien Google https://photos.app.goo.gl/kWDseQrkhhF1Jx336 Si vous désirez voir les autre projet MARITIME que j'ai monter visitez ce lien Google https://photos.app.goo.gl/cpC5Q6puZkJTQ2mHA (JUN 26) Cette semaine j'ai débuter les détaille manquant sur la paroi extérieure ! #100 RÉPARATION ÉCLAIR (HASEGAWA ) Si vous désirez voir le projet originale ,visitez ce lien Google https://photos.app.goo.gl/VLLchQ2kDDN1dUXz6 (JUN 26) En fouillant sue mes tablettes de projets terminer, j'ai accrocher la bouteille de pillule ou il étais ranger et es tomber par terre..cette semaine j'ai fait la réparation et il es de retour sur sa tablette pris une pause sur ce projet ! # 1 .....Much-up de bois du ARROW MACH 2 (HOBBYCRAFT + MODIFICATION ) si vous désirez voir le montage intégrale de ce projet visitez ce lien Google: https://photos.app.goo.gl/g8WdXTZL322tF4tC8 (JUN 26) Cette semaine j'ai continuer le travaille sur la nacelle ! # 2...JIG D'ASSEMBLAGE DU AVRO CF-105 ARROW (PROJECT SCRATCH) Voici le lien Google pour le montage complet du projet (c'es la phase 2) https://photos.app.goo.gl/yvWuXnog7tdSwKUv6 (JUN 26) Cette semaine j'ai pris une pause sur ce projet ! # 3 MOULE MAÎTRESSE (kITBASHING +SCRATCH ) si vous désirez voir le montage intégrale de ce projet visitez ce lien Google ' Phase 3 ': https://photos.app.goo.gl/y7fd6KMxL1xMLm9q7 (JUN 26) Cette semaine j'ai terminer les dernier détaille sur le JIG d'assemblage des ailes du ARROW il ne reste plus qu'a le coller en place ! # 4 MOTEUR IROQUOIS du AVRO CF-105 ARROW (KIT BASHING ) si vous désiré voir le montage intégrale de ce projet visitez ce lien Google https://photos.app.goo.gl/X3iHnipkT9JkoJ6c6 (JUN 26) Cette semaine j'ai pris une pause sur ce projet ! # 5 AVRO C.102 JETLINER (3D + SCRATCH) si vous désirez voir le montage intégrale de ce projet visitez ce lien Google : https://photos.app.goo.gl/uvk6ymGqZHgpWDaR9 (JUN 26) Cette semaine j'ai continuer le travaille dans la baie du train avant,sabler le joint principale et lui es rajouter du 'putty' J'ai réaliser qu'au endroit ou la résine a délaminer qu'il es apparu une bosse , une CHACHA en vue ! # 6 Site d'information du CF-105 ARROW ( STEPH 3D+SCRATCH) si vous désirez voir le montage intégrale de ce projet visitez ce lien Google https://photos.app.goo.gl/f845jHqMwpWEytk28 (JUN 26) Cette semaine j'ai débuter le travaille sur 'YTAR LA MOP', militaire Canadien ! # 7 PROPOSITION d'AVRO POUR UNE CROSSE D'ARRÊT POUR LE CF-105 ARROW MACH 2 (SCRATCH) Si vous désirez voir le montage intégrale visitez ce lien Google https://photos.app.goo.gl/qrJMQNNF6sb1K5A27 (JUN 26) Cette semaine j'ai pris une pause sur ce projet ! # 8 CAMION CITERNE WHITE 3000 ( REVELL + MODIFICATION MAISON +ADDITIONS ) Si vous désirez voir le montage intégrale visitez ce lien Google https://photos.app.goo.gl/bfBNEiSFUtnGAKAo6 (JUN 26) Cette semaine j'ai pris une pause sur ce projet ! # 9 AVRO C.104/1 et 104/1T ( REVELL + MODIFICATION MAISON ) Si vous désirez voir le montage intégrale visitez ce lien Google https://photos.app.goo.gl/89TgFWzqzKY6KcjE6 (JUN 26) Cette semaine j'ai pris une pause sur ce projet ! # 10 Proposition d'AVRO pour un M.48 propulser par une TURBINE OURANDA OT-4 ( TAMIYA + MODIFICATION MAISON ) Si vous désirez voir le montage intégrale visitez ce lien Google https://photos.app.goo.gl/V7RSHtDRPyrAevqG7 (JUN 26) Cette semaine j'ai du faire la réparation suite au transport et continuer l'assemblage des roues de traction ! # 11 MUCK-UP en bois du CF-100 (HOBBYCRAFT + MODIFICATION ) Si vous désirez voir le montage intégrale visitez ce lien Google https://photos.app.goo.gl/tribTTd9p4e2A8TC6 (JUN 26) Cette semaine j'ai pris une pause sur ce projet ! # 12 AVRO 606 (SCRATCH + KIT-BASHING ) Si vous désirez voir le montage intégrale visitez ce lien Google https://photos.app.goo.gl/EGmGEp6D8ZWGrVUE7 (JUN 26) Cette semaine j'ai pris une pause sur ce projet ! # 13 AVRO (DTV) Delta Test Véhicule (SCRATCH ) Si vous désirez voir le montage intégrale visitez ce lien Google https://photos.app.goo.gl/T12kYYwxQBwQAhKT7 (JUN 26) Cette semaine j'ai pris une pause sur ce projet ! # 14 Maquette de soufflerie du AVRO ARROW ( PL 3D + SCRATCH) Si vous désirez voir le montage intégrale visitez ce lien Google https://photos.app.goo.gl/K9BV1WFJfrRCSVrD7 (JUN 26) Cette semaine j'ai pris une pause sur ce projet ! #15 SITE D'ESSAIS du moteur 'VIPER' du SILVERBUG Si vous désirez voir le montage intégrale visitez ce lien Google https://photos.app.goo.gl/a4U68zGFD4hUm1m88 (JUN 26) Cette semaine j'ai pris une pause sur ce projet ! #16 Les 'STATION' de la section du cockpit du AVRO CF-105 ARROW MK,I Si vous désirez voir le montage intégrale visitez ce lien Google https://photos.app.goo.gl/BWHJXPkhFD22g7kx9 (JUN 26) Cette semaine j'ai pris une pause sur ce projet ! #17 Les JIG de MONTAGE de la section de l'HABITACLE du AVRO CF-105 ARROW MK-I (SCRATCH) Si vous désirez voir le montage intégrale visitez ce lien Google https://photos.app.goo.gl/jpjF39WWVzNkuKhu6 (JUN 26) Cette semaine j'ai pris une pause sur ce projet ! Agrandir cette imageCliquez ici pour la voir à sa taille originale. #18 AVRO PHANTOM SEDAN CRUISER "PHASE 1' ( SCRATCH) Si vous désirez voir le montage intégrale visitez ce lien Google https://photos.app.goo.gl/e4uSaSGtLcia4srt9 (JUN 26) Cette semaine j'ai pris une pause sur ce projet ! #19 AVRO CF-105 'ZERO LENGHT' PROPOSAL ( SCRATCH) Si vous désirez voir le montage intégrale visitez ce lien Google https://photos.app.goo.gl/yQRicdP8mnJkjR57A (JUN 26) Cette semaine j'ai pris une pause sur ce projet ! #20 CANADAIR CL-20 VELVET GLOVE ( SCRATCH) Si vous désirez voir le montage intégrale visitez ce lien Google https://photos.app.goo.gl/S7SfZ4qFXr2D3BNS9 (JUN 26) Cette semaine j'ai pris une pause sur ce projet ! # 21 SITE D'ESSAIE DES MOTEURS CHEZ AVRO CANADA ( SCRATCh ) Si vous désirez voir le montage intégrale visitez ce lien Google https://photos.app.goo.gl/PYDhJAFY2nohQvieA (JUN 26) Cette semaine j'ai pris une pause sur ce projet ! #22 SIMULATEUR DE VOL DU AVROCAR ( SCRATCH) Si vous désirez voir le montage intégrale visitez ce lien Google https://photos.app.goo.gl/Qy86TXs2uK4S1rCh6 (JUN 26) Cette semaine j'ai continuer le travaille sur les ordinateurs ! #23 Le JIG des CONTRÔLE DE VOL du CF-105 ARROW ( SCRATCH)[/size] Si vous désirez voir le montage intégrale visitez ce lien Google https://photos.app.goo.gl/eipgknjEFCaDqceUA (JUN 26) Cette semaine j'ai pris une pause sur ce projet ! # 24 AVRO CANADA 'AUTOCAR TRUCK ' TURBO ( AMT + ADDITIONS + MODIFICATION ) Si vous désirez voir le montage intégrale visitez ce lien Google https://photos.app.goo.gl/1DBFTAzUfU3X7BhR7 (JUN 26) Cette semaine j'ai pris une pause sur ce projet ! Agrandir cette imageCliquez ici pour la voir à sa taille originale. # 25 CANADAIR CL-54 SPARROW ( KIT BASHING + SCRATCH ) Si vous désirez voir le montage intégrale visitez ce lien Google https://photos.app.goo.gl/kVKJAxEQyUXkmT8G6 (JUN 26) Cette semaine j'ai pris une pause sur ce projet ! # 26 AVRO 'Y1' OMEGA ( SCRATCH ) Si vous désirez voir le montage intégrale visitez ce lien Google https://photos.app.goo.gl/ERhUtBqwV9pthSRx7 (JUN 26) Cette semaine j'ai pris une pause sur ce projet ! # 27 PROJET PRATT and WHITNET J-75 ( HOBBYBOSS + SCRATCH ) Si vous désirez voir le montage intégrale visitez ce lien Google https://photos.app.goo.gl/b7GP6JHzXR1hRAydA (JUN 26) Cette semaine j'ai pris une pause sur ce projet ! # 27 EMPLOYÉE d'AVRO CANADA ( STEPH 3D ) Si vous désirez voir le montage intégrale visitez ce lien Google https://photos.app.goo.gl/nmSZrGimois7RV9c7 (JUN 26) Cette semaine j'ai débuter le travaille sur 'E ZOUCH ' employé # 5345 ! # 28 CF-100 CANUCK MODÈLE DÉVALUATION ( TAMAYA + 3D ) Si vous désirez voir le montage intégrale visitez ce lien Google https://photos.app.goo.gl/WvtMAcgeFXRWp6Wg9 (JUN 26) Cette semaine j'ai pris une pause sur ce projet ! # 29 JIG D'ESSAIE des TRAIN d'atterrissage du AVRO CF-105 AROW ( SCRATCH ) Si vous désirez voir le montage intégrale visitez ce lien Google https://photos.app.goo.gl/1DoGhdoFsbYFat7N7 (JUN 26) Cette semaine j'ai pris une pause sur ce projet ! Si vous désirez voir tout les projet d'AVRO CANADA au 1/48 que j'ai compléter présentement , visiter ce lien Google: https://photos.app.goo.gl/FpZs5m3ic3c3eL329 Suite de mes aventures dans le monde de la maquette et d'AVRO CANADA la semaine prochaineeeeeeeeeeeeeeeeee ! Bon visionnement ! Jmarc PS ...Si vous désirez voir les saison antérieure visitez ces lien Googles : Ceux de la saison 2025 (166 projects) https://photos.app.goo.gl/zKmRkgK19W2fPoin7 Ceux de la saison 2024 (103 projects) https://photos.app.goo.gl/4d3DYFCkVLL64imq8 Ceux de la saison 2023 (100 projects) https://photos.app.goo.gl/Wbzocz4nrbgcPuAQ6 Ceux de la saison 2022 (148 projects) https://photos.app.goo.gl/WniLxX42pzCF6JYH9 Ceux de la saison 2021 (110 projects) https://photos.app.goo.gl/d89Abe6NeE8LJUEeA Ceux de la saison 2020 (65 projects) https://photos.app.goo.gl/piTfBCtMXvf6g5zG8 Ceux de la saison 2019 (35 projects) https://photos.app.goo.gl/wX42Q8pKRqwR7APR9 Ceux de la saison 2018 (52 projects) https://photos.app.goo.gl/SnL7aiYFfHrV5JbA8 Ceux de la saison 2017 (33 projects) https://photos.app.goo.gl/1RxEF7q89HnJUjGA6 Ceux de la saison 2016 (33 projects) https://photos.app.goo.gl/299uiMnC7C2PDaABA Ceux de la saison 2015 (33 projects) -
Guideline Publications Guideline Publications is the UK's leading publisher of modeling and hobby-related magazines. With a world-class portfolio of titles and an international Social Media presence, Guideline Publications has a dedicated readership that is constantly expanding into new areas. This English language book, Warpaint 152, Junkers Ju 86, is authored by Daniel Kowalczuk with scale drawings by Sam Pearson. The latest Guideline’s Warpaint series, 152, was published in 2026. A digital edition will soon be available. News on Guideline’s publications can be found on Facebook. View the full review
-
Background and Historical NotesManufacturer’s Product DescriptionStudebaker US6-U3 in German Service View the full review
-
Guideline Publications Guideline Publications is the UK's leading publisher of modeling and hobby-related magazines. With a world-class portfolio of titles and an international Social Media presence, Guideline Publications has a dedicated readership that is constantly expanding into new areas. This English language book, Warpaint 152, Junkers Ju 86, is authored by Daniel Kowalczuk with scale drawings by Sam Pearson. The latest Guideline’s Warpaint series, 152, was published in 2026. A digital edition will soon be available. News on Guideline’s publications can be found on Facebook. View the full review
-
HI ! Here another project I have completed in the past , if you like to vierw more pics, just follow this link: https://photos.app.goo.gl/FwAUKo6UHKx1ixt86 Enjoy ! Jmarc
-
For the fourth week of the F-35C I installed the weapons bays and nose gear bay into the lower fuselage. I then built up the tail hook and installed it as well. Next I started on the engine. Since I am using the ResKit engine I needed to cut off a section of the kit engine from the exhaust side. The resin engine pieces were then painted and weathered. I then assembled and painted the intakes. The kit intakes went together very well and it was easy to hide the seams of the two halves. There were some mold marks that needed to be cleaned up on the inside of them but they were not too bad to smooth out. I am now working on the main landing gear bays. Just like the nose gear bay these lack details which I will scratch build the details. Another thing I noticed in the reference photos are the large placards on the main struts. Neither the kit decals nor the Furball aftermarket decals have them so I will need to make the decals for them. You can see all the photos and details from the start at: https://davidsscalemodels.com/build-log/1-48-f-35c-vfa-86-sidewinders/
-
This week just off the bench in 1/48 scale ( update # 125)....
Jmarc replied to Jmarc's topic in Photos: On the Bench
Hi , here a pic of the projects I completed this week..it's in 1/48 scale WWII RAF SPITFIRE WHEL CHUCK (AIRFIX) https://photos.app.goo.gl/BCnEes6tfQgv8m1k8 AVRO CF-105 ARROW OTHER WING ASSEMNLY JIG IN CONSTRUCTION (SCRATCH) https://photos.app.goo.gl/y7fd6KMxL1xMLm9q7 Like to view what I have done so far in 2026 season , just follow this Google link : https://photos.app.goo.gl/dJwnAmhVD15JPt9w8 Like to see more of my previous completed projects in 1/48 scale ..................... Like to see what I have completed so far this season 2025 (143 projects) , just follow this GOOGLE link: https://photos.app.goo.gl/zKmRkgK19W2fPoin7 Like to see what I have completed so far this season 2024 (103 projects) , just follow this GOOGLE link: https://photos.app.goo.gl/4d3DYFCkVLL64imq8 Like to see what I have completed in 2023 season (100 projects) , just follow this GOOGLE link: https://photos.app.goo.gl/Wbzocz4nrbgcPuAQ6 Like to see what I have completed in 2022 season (148 projects). just follow this Google link: https://photos.app.goo.gl/WniLxX42pzCF6JYH9 Like to see what I have completed in 2021 season (110 projects). just follow this Google link: https://photos.app.goo.gl/d89Abe6NeE8LJUEeA Like to see what I have completed in 2020 season (65 projects) ,just follow this Google link : https://photos.app.goo.gl/piTfBCtMXvf6g5zG8 Like to see what I have completed in 2019 season (35 projects) ,just follow this Google link : https://photos.app.goo.gl/wX42Q8pKRqwR7APR9 Like to see what I have completed in 2018 season (52 projects) ,just follow this Google link : https://photos.app.goo.gl/SnL7aiYFfHrV5JbA8 Like to see what I have completed in 2017 season (33 projects) ,just follow this Google link : https://photos.app.goo.gl/1RxEF7q89HnJUjGA6 Like to see what I have completed in 2016 season (33 projects) ,just follow this Google link : https://photos.app.goo.gl/299uiMnC7C2PDaABA Like to see what I have completed in 2015 season (33 projects) ,just follow this Google link : https://photos.app.goo.gl/e9kY3Gg1D3fxECtC9 Enjoy !
-
Despite the issues, you are doing a tremendous job on this MiniAaaargh kit! Nice work on the tracks and the engine almost looks good enough to drop some fuel in it and fire it up. Keep it going, it looks like you've got this now.