Navairfan
-
Posts
55 -
Joined
-
Last visited
-
Days Won
5
Recent Profile Visitors
2,470 profile views

-
HI, Gil - is it possible the white bars were left off in an attempt to make the national insignia less visible when seen from above? I know that grey was sometimes aded the to the white in the wing-top national insignia to tone it down and make it less vibrant. I'd like to see Eduard's references win this, too. I also have a vague memory of a similar blue-bordered national insignia without white bars that came in the old Monogram 1/48 B-26 Marauder kit. When I built that kit way-back-when, I remember thinking it must have been a printing mistake.
-
Thanks, Gil! I'm looking forward to more of your posts on that amazing scratch-built Martin torpedo bomber you're working on.
-
Thanks very much, Mark, for your kind words. All I can see are my mistakes, but overall, I'm pretty happy with how it turned out.
-
Gil, all I can do is shake my head in admiration at your skills as a modeler. Starting with nothing but an idea, you're able to create such masterpieces. Simply incredible work.
-
For my next project, I chose the 1/48 Tamiya kit of the Douglas F4D-1 Skyray, colloquially known as the 'Ford'. Like many, I was surprised (and elated!) when in 1998 Tamiya released a kit of this relatively obscure late-fifties Navy aircraft. But I've always loved the look of this jet, with its' sleek, futuristic lines. The Skyray, and its' contemporary, The Vought F7U Cutlass, were perhaps the most radical aircraft designs to enter full production. It's a shame that engine problems (with the Cutlass) and control/stability issues (with the Skyray) prevented these innovative designs from realizing their full potential. For a jet with a short service career, there are a number of excellent references. The ones I used were: Warpaint Series No. 117, Douglas F4D/F-6 Skyray & F5D Skylancer, By Tony Butler; Killer Rays - Story of the Douglas F4D Skyray and F5D Skylancer, by Mark Frankel; Naval Fighters Number 13 - Douglas F4D Skyray, by Steve Ginter; US Naval Air Superiority - Development of Shipborne Jet Fighters 1943-1962, by Tommy Thomason. I also purchased Modelers Airguide 20, Douglas F4D Skyray, by Any Evans, and I must say, for the price, it was a huge disappointment. It's beautifully printed, on high-quality paper, but with just 38 pages, and with only one or two photos on most pages, there isn't much bang for your buck. And none of the photos have captions. You'd think a publication geared specifically toward modelers would have photos or drawings of the cockpit and other details, and at least have captions for the photos, but nope. This was my first purchase of an Airmark/Modelers' Airguide publication, so I don't know if this is typical of their products. But for $30, I felt cheated after buying it. Construction began with the cockpit. I used the Cutting Edge resin F4D cockpit set, which is an improvement over the kit parts, especially the cockpit coaming and instrument panel. I assembled and painted both the kit cockpit and the resin set, just in case I had issues fitting the resin cockpit in the fuselage. Both cockpits were airbrushed Model Master Dark Gull Grey, with side consoles painted Tamiya Semi-Gloos Black, and details picked out with dry-brushing and colored pencils. The instrument panels were detailed with individual instrument decals by Airscale. To be clear, once painted, the kit cockpit, which comes with the original Douglas ejection seat, looks fine. But it's very simplified compared to the real thing, and is missing a lot of details, mainly in the instrument panel coaming. The kit coaming is featureless, with just a hole in the top for the gunsight reflector glass. The actual coaming is open on top, through which you can see the back of the instrument panel, and the top of the gunsight mechanism and reflector. The Cutting Edge set replicates this very nicely. Late in their service careers, many F4D's had the Douglas-designed ejection seat replaced by a Martin Baker Mk V seat. The jet I was building had this upgrade, so I substituted the factory seat with a proper Martin Baker Mk V seat I had in my spares box. It was airbrushed Tamiya Acrylic NATO Black, with cushions various shades of green and drab, and seatbelts painted light grey. The ejection seat pull handles were from a pre-painted set by Eduard. Before closing up the nose halves, I glued a lead fishing weight in the tip of the nose to keep the kit on its gear. The kit engine exhaust is simplified, and lacks an afterburner nozzle. I added a photo-etched flame holder from an Eduard detail set, and used a spare exhaust nozzle from a Revell F-18 Super Hornet to fashion an afterburner nozzle.The rear fuselage and exhaust shroud and nozzle were sprayed Tamiya Titanium Sliver. I then over-sprayed the nozzle and exhaust interior with Tamiya Metallic Grey. There is no intake ducting, so I just painted everything inside white and moved on. The landing gear was assembled as per instructions, and detailed with brake and hydraulic lines made of wire. They were sprayed Tamiya Acrylic White, and gloss-coated with Future. A wash of Tamiya black Panel Line Accent Color was applied, which really popped out the nice detail on the struts and wheel hubs. Like its' cousin, the Douglas A-4 Skyhawk, the Skyray was designed with leading edge slats, which deployed automatically based on dynamic air pressure. On all Skyhawks, the area under these slats was painted Insignia Red. But on the Skyray, photos indicate this wasn't usually the case. Very few squadrons had red under the slats. The few photos I could find of Fords in the markings I wanted to use seemed to indicate that the area under the slats was painted Gull Grey, instead of Red, so that how I painted mine. The drop tanks were painted white, with Tamiya Semi-Gloss Black noses. This color is a good match with the black on the Cutting Edge decals I used. The kit also provides a NavPac, a pod containing VHF navigation and low-frequency marker-beacon gear. It was painted white, with a radome tan nose section. This pod was carried only when squadrons were land-based, and were usually not used when deployed aboard a carrier. Once the nose section was glued to the upper and lower fuselage halves, the topside was sprayed with some of the last of my dwindling supply of Model Master Acryl Flat Gull Grey, and the underside was left in Tamiya white Fine Surface Primer. The underside primer was polished with a cloth to give it a nice glossy sheen. There were a few seams that needed filling and sanding on the leading edges of the wings. The nose radome and fin tip was sprayed Tamiya Semi Gloss Black, and the anti-glare panel was masked off and sprayed Tamiya NATO Black. Skyrays had the leading edges of their wings and pylons finished in Corroguard, a metallic grey-ish protective coating, so these areas were masked off and sprayed Tamiya Titanium Silver. The vertical fin, however lacked this coating. Once painting was complete, the landing gear, tanks, pylons, Sidewinders and NavPac were attached. The distinctive yellow and black 'barber-pole' markings on the drop tank refueling probe were made by first spraying the probe Tamiya Semi-Gloss Black, then wrapping a thin strip of masking tape around the probe, followed by spraying it Tamiya Flat Yellow. The kit provides three markings schemes: two Marine Fords, from VMF (AW) 114 and 115, and a Navy jet with the very elaborate markings of VF(AW)-3, the Blue Nemesis. Instead, I went the aftermarket route and chose a jet in the eye-catching scheme of VF-162, The Hunters, Bureau Number 134757. My references had several photos of this jet during various periods of its attachment to VF-162. The decals came from several sources: most of the markings, including the black with yellow stars decals on the elevons and rudder, came from Cutting Edge Decals sheet #48089, F4D Skyray Pt 1. The national insignias, intake warnings, and stencils came from SuperScale sheet #48336. I used very few of the stencils, because all the photos in my references showed little to no stenciling. Since I included the NavPac on my model, I had to alter the decals slightly to reflect when the squadron was land-based at Cecil Field, Florida in 1960, before it deployed aboard USS Intrepid for three cruises. To do this, I had to change the nose number from 1xx-series to 2xx series, and change the air wing code letters from AF to AH. An AeroMaster letters and numbers sheet provided the necessary markings to make the changes. Like all my model aircraft, I like to display them with an open canopy, to show off the detail. The kit is designed to be built with a closed canopy, but fortunately, it's an easy job to pose it open. The Cutting Edge cockpit set comes with the hydraulic cylinder used to open and close the canopy, so the only real difficulty is in placing it properly. If the Cutting edge instructions are correct, this cylinder is slightly right of centerline, but I could find no photos to conform this. I also added the vertical metal bars seen inside each side panel of the canopy, and a compass at the upper right edge of the canopy. This was made of scrap plastic, with a decal instrument placed on the front. Two rearview mirrors were also added to each side of the canopy bow. The boarding ladder came from one of the 1/48 Hasegawa A-4 Skyhawk kits I have in my stash. It was modified to look more like those used on the Skyray by shortening it, adding wheels and other details to match pictures in my references. It was painted Tamiya Red, and dry-brushed with Tamiya Flat Aluminum paint, then weathered with Tamiya dark grey Panel Line Accent color. The ladder was then attached to the model with white glue. Tamiya's 1/48 F4D-1 Skyray is an outstanding kit despite its'age, with precise fit and sensible engineering. The only real drawback is a lack of intake ducting. With care, it builds easily into a beautiful replica of this radical, delta-winged Navy interceptor.

-
Brilliant work, Gil! I have the old 1/48 Monogram AV-8B in the stash, but having seen your build, I'm seriously considering getting this kit.
-
My latest effort is the 1/48 Hobby Boss FJ-4 Fury. The kit has recessed panel lines and rivet detail, and average cockpit detail. Overall shapes and outlines appear accurate, save for one glaring error: the rear fuselage, between the trailing edge of the wings and the horizontal stabilizers, had a very prominent "dip" that shouldn't be there. A review of this kit in Bert Kinzeys' Detail & Scale book on the FJ-4 has instructions on how to correct this error, but I decided to live with it as is. Wing fold joints are included, but you must cut the wing tips apart yourself. Overall, parts fit is good, with a little filler needed at the wing roots and at spots along the fuselage and nose. The kit decals provide markings for two Marine jets, from VMF-451 'Warlords', and VMF-232 'Red Devils', but the blue in the VMF-451 markings are way too light. Hobby Boss offers kits of both the FJ-4 and FJ-4B, but you can build either variant from either kit. If you build an FJ-4, be sure to sand off the rear-most speed brake door on each fuselage half, and use the nose gear door without the antenna fairing. My references for this build were: Squadron/Signal Publications No. 103, FJ Fury in Action; Naval Fighters No. 25, North American FJ-4/4B Fury, by Steve Ginter; and the excellent FJ Fury in Detail & Scale, Part 2: FJ-4 and -4B Variants, by Bert Kinzey. Another valuable online source of photos and information was this web page on Replica in Scale: https://replicainscale.blogspot.com/search?q=fj-4 I wasn't happy with the barely-there kit instrument panel detail and how the cockpit consoles were represented, so I used an aftermarket cockpit set from AMS Resin. The kit seat is good, but lacks cushions and belts. The AMS resin seat wasn't that much better, but it did have a seat cushion, belts, and oxygen hose molded in. The kit has nicely detailed sidewall parts, but I couldn't get them to fit with the resin cockpit set. The AMS set also includes a detailed part for the area under the rear of the canopy, for which Hobby Boss provides nothing. The cockpit parts were airbrushed Model Master Acryl Dark Gull Grey, then details were hand-painted, and attached to the fuselage half. The AMS set also included a exhaust piece with flame holder, but it didn't fit well so I used the kit exhaust, and a length of styrene tube with the flame holder glued to the end to give the exhaust pipe some depth . The intake trunk fit pretty well but still needed sanding and putty to eliminate seams. The nose intake ring lacks the approach light at the bottom, so a section was cut from the intake and three small holes drilled, and painted Tamiya clear red, amber, and green. The cutout for the lights was then filled with Micro Krystal Klear. I ended up doing a lot of sanding around the intake to smooth everything out. Before closing up the fuselage halves, I added several large fishing weights to keep the model from being a tail-sitter. The fuselage speed brakes can be posed open, and have good detail inside, but I glued mine shut. The fit here was poor. The prominent vents on each fuselage side were too thick, so they were sanded down to paper-thinness, glued on place and faired in with Vallejo putty. The openings to these vents are also shaped incorrectly, but I didn't try to correct them. Airframe assembly went smoothly. Minor gaps at the wing root, nose and fuselage were filled with Vallejo putty, and Mr. Dissolved Putty. Wing fences are molded onto each wing, and were sanded to thin them to a more accurate scale thickness. Parked FJ-4's usually have a nose-up stance. The kit nose gear strut is a little short, so I added a one-eighth inch section of styrene rod to the top of the strut, and replaced the compressed torque links with a photo-etched one from my spares box. The nose gear fork was cut away and repositioned turned to the right. I added wire brake lines to the kits' main gear struts, and painted all the struts Tamiya Titanium Silver. Most of my reference photos showed that the main gear doors were often open when the jet was parked, but the kit doors had no detail on the insides. I used very thin sheet styrene cut to fit inside each main door, and cut lightening holes in them based on the photos I had. I also added rivets with a riveting tool along the door edges for added detail. One painted and highlighted with Tamiya panel line wash, they looked much better. All the gear bays were painted white, then the details highlighted with Tamiya black panel line wash. North American usually painted the entire inner surface of their landing gear doors red, but careful study of photographs indicated that Reserve jets had white inner gear doors, outlined in red. The landing light in the smaller nose gear door was painted Chrome Silver, and a wire added to the back of this light. The kits' wingtip pitot probe was too thick and inaccurate, so I built a new one with lengths of styrene rode and wire. The FJ-4 series has three fuel dump vents: one on each wingtip trailing edge, and another just under the fairing above the rudder. The wingtip vents are molded solid, so they were drilled out and sanded to shape. The tail dump pipe was recreated with a small piece of styrene rod drilled out and glued in place, then painted red. A small white position light was also added to the rear of the vertical fin fairing just above the rudder. I also added a missing vent on the left side of the upper fuselage, behind the canopy. The kit includes two drop tanks, two Sidewinders, and six Bullpup air-to-ground missiles, but the FJ-4 never carried Bullpups. The FJ-4 had long legs for a fighter, and therefore didn't usually carry drop tanks, either, so I left these off as well. I should point out here that the Navy flew the FJ-4B attack version, while the Marines flew the FJ-4 fighter version. Reserve squadrons often flew a mix of both types. I primed the model for painting with Tamiya White Fine Surface Primer. The paint scheme I chose was that of a Navy/Marine Reserve jet based at NAS Memphis in 1962. It was in the standard Gull Grey over White undersurfaces and control surfaces, but with the entire nose, tail, and forward half of the wings painted Florescent Orange. I used Model Master acrylic Flat Gull Grey for the topside color, Tamiya White Primer for the underside color, and Model Master Acryl Florescent Red (which is actually Orange) for the high-visibility color areas. Leading edges of the wings and stabilizers were sprayed Titanium Silver as well. After painting was complete, I gave the entire jet a coat of Future Floor Polish for a gloss coat, then applied the decals. No decal sheets existed for the jet I was making, but fortunately they are easily scrounged. The '6M' tail code, wing code, bureau number, and aircraft number came from AeroMaster and SuperScale letter and number sheets from my decal catalogs. The Navy/Marine Reserve service designator came from an old Testor F2H Banshee kit. The rest of the markings came from AeroMaster sheet #14193, 'Furies of The Fleet in Color, Pt. 2'. Once all the markings were applied, a final coat of Mr. Super Clear Matt sealed the decals. The final step was attaching the canopy, which led to the trickiest part of the build. Under the rear section of the FJ-4/4B canopy is a cylindrical object which isn't identified in any of my references, but I do recall reading somewhere that it's an oxygen regulator. A black coiled cable, resembling an old telephone cord, runs from this 'regulator' to the rear of the ejection seat. The cord is stretched taught when the canopy is open. It's very visible in photographs, so I recreated the cord by wrapping thin copper wire around a small drill bit, spraying it black, and attaching it to the 'regulator', which was then glued to the underside of the canopy. When dry, the canopy was then attached to the model. The Hobby Boss 1/48 Fury kits are a mixed bag: beautiful, crispy-molded and engraved parts that are flash-free with good fit, but with sub-par cockpit detail and a large 'dip' on each side of the rear fuselage that shouldn't be there. Still, a little extra detailing and work will reward you with a fine model of this very capable Navy fighter of the 1950's.
-
Just.....wow. You've given us yet another example of scale modeling at its' very finest. I have a 1/48 Wings vac-formed kit of the Douglas BT-1, but haven't worked up the courage to tackle it yet.
-
Both of these are beautifully done. Bravo, Sir!
-
Thanks very much, Ward!
-
Thank you, Mark. I really appreciate your comments.
-
Thanks very much for your kind words, Gil. I've been in awe of your scracthbuilt masterpieces for years. And going down the rabbit hole is exactly what happened on this build!
-
My latest build is an extensive reworking of the old 1/72 Monogram HU-16D Albatross. First issued in 1957, this kit is a true classic, and represents the later HU-16D version, with the taller vertical fin and extended wings. I remember building this kit in my basement sometime in the early 1970's, when I was around ten or eleven years old. It was the first model I spray-painted, using a rattle-can of Testors silver. (Anyone remember watching Flight from Ashia, featuring HU-16's from the Air Rescue Service?) For a kit that is old enough to be eligible to receive Social Security benefits, the fit is good, though I did need to putty and sand the seams on the nose, fuselage, and wing/fuselage joint. Typical for Monogram, the shapes and dimensions look spot-on. I can't vouch for their accuracy, but the 1/48 scale plans of the Albatross provided in Warpaint Series No. 92 match up very well with the kit parts. The major drawbacks are a complete lack of interior detail, toy-like working landing gear, and the airframe is covered with raised rivets that are way oversized. Before starting, I had intended for this to be an easy, nostalgic, out-of-the box build. But I soon decided to at least sand off all the rivets. Then, I decided I wanted the rear crew door open, which necessitated scratch-building at least part of the rear crew compartment. Then I convinced myself that it wouldn't be that much harder to open the hatches over the pilots' seats, which called for scratch-building the entire cockpit. Lastly, I decided I just couldn't live with the kits' over-scale, working landing gear, either. So much for an easy, nostalgic, out-of-the-box build. I was now facing a lot of work, most of it scratch-built. Fortunately, there are some excellent references for the Albatross that are readily available: Steve Ginter's Naval Fighters No. Eleven, Grumman HU-16 Albatross; Warpaint Series No. 92, Grumman HU-16 Albatross; Grumman Albatross: A History of the Legendary Seaplane, by Wayne Mutza, and the old, reliable Squadron/Signal Publications HU-16 Albatross in Action. All were essential in scratch-building the interior details and improving the landing gear. I began by scratch-building the rear cabin. The layout of and equipment used in the HU-16 rear compartment varied greatly, depending on the branch of service and mission. Since I was building a Navy search and rescue plane, I chose a cabin lay-out with two seats and three bunks - nothing else would be visible. I found two suitable seats in my spares box, and added armrests made of wire and thin styrene rod. The bunks were made of very thin sheet styrene, with styrene rod framework. Photos show the rear cabin walls and ceiling on many HU-16's were covered in cloth padding, but I chose the easy route and used styrene strips and rod to replicate the ribs and stringers inside the rear fuselage cabin. The rear cabin bulkhead has two side-by-side doors, one leading to the auxiliary power unit, and the other to the toilet. I scribed the doors into the sheet styrene bulkhead, and added a small porthole window to each door and filled them with Micro Krystal Klear. Rolled-up tissue paper, painted yellow, represents a life raft stored against the aft bulkhead. I also used styrene rod and other small styrene pieces to replicate the hinge of the emergency escape hatch on the starboard side of the rear cabin. The kit rear cabin windows fit very poorly. I cut away as much excess plastic from the windows as I could, and cemented them in place, and used clear canopy glue to fill in several big gaps in the windows. Once completed, the rear crew cabin was sprayed Tamiya NATO Green. Not much of any of this detail can be seen through the open rear cabin hatch, but it's satisfying knowing it's there. The cockpit pushed my meager scratch-building skills to the limit. The flight deck on the HU-16 has a deep recessed walkway between the seats, and it was quite a trick to get the dimensions and positions of the flight deck and all the bulkheads correct. After multiple attempts, I finally got something that was somewhat accurate, and also fit in the fuselage. The pilot and co-pilot seats came from a 1/72 Minicraft B-24, which were heavily modified and detailed with styrene strip and rod, and finished with 3D printed seat belts and harnesses. The instrument panel, made from layers of sheet styrene, was detailed with 1/72 scale instrument decals. I robbed control columns from a 1/72 C-47 kit, which closely matched those used in the HU-16. The avionics and radio racks behind the pilot's seat was made with styrene sheet for shelves, and rod for braces. The radios and other avionics boxes were scrounged from the spares box. A radio operator's seat and table were also scratch-built. I made the overhead center console with a section of a 1/48 TBM Avenger center instrument panel, filed and sanded to shape.The overhead hatches above the pilots' seats were cut away, and new ones made from sheet styrene. I rolled them against a hobby knife handle to give them the proper curved appearance. Before closing up the fuselage halves, I added several ounces of lead fishing weights to the nose to prevent it from being a tail-sitter. This kit is very tail-heavy, so when you think you have enough weight, add at least half again as much. Once closed up, I cemented the windshield in place, but the fit here was terrible. I shimmed and filled as best I could, but fit is sloppy, and looks it. The kit includes a boarding ladder, which doubles as a rear stand to keep the model from sitting on its tail, but it's inaccurate in size and shape. I scratch-built a new one, based on a drawing in the Naval Fighters book, and sprayed it Tamiya Titanium Silver. My references showed that most HU-16D's had an additional anti-collision light added to the base of the fin, just below the leading edge of the horizontal stabilizer. I recreated it with a clear tail light scrounged from the spares box, cemented in place, and faired into the spine with putty. In the process of gluing the fuselage halves together I inadvertently pressed on and broke loose two of the round cabin windows. I scrounged my spares boxes and came up with a section of clear sprue the same diameter as the windows. I cut two sections a quarter-inch long, polished one end of each, and pushed them in place with clear canopy glue. They wound up looking better than the kit windows. The two UHF antennas on either side of the vertical fin were molded solid, so they were removed and replaced with wire bent to shape. Two small tail lights at the base of the rudder were drilled out, painted silver, and filled with tiny drops of Micro Krystal Klear. The outrigger floats had tie-down rings added to the rear of each float, made with thin wire and super-glued in place. The kit engines come molded into the cowls, and are very poor representations of the Wright R-1820 radials. I ordered Reskit resin replacements for the engines, and once painted, they look terrific. Exhaust pipes on the rear of each cowling were cut away and replaced with small sections of styrene rod, with the ends hollowed out. The kit props have excellent hub detail and the blades needed just some trimming and removal of some mold lines. I detailed the wheel wells by adding additional ribs and stringers made of styrene strip, plus some wires for hydraulic lines and some scrap pieces for actuators and pumps. The kit landing gear is designed to retract, but the parts are way over-scale. I purchased a white metal gear set from Scale Aircraft Conversions, but it was designed for a different kit. Making it fit the Monogram wing and fuselage was a real trick. The main struts are too short, so spacers made of sections of the kit struts were added to the gear wells in the underside of the wings. The nose gear well was completely scratch-built, boxed in with sheet styrene and detailed with styrene strips and pieces from the spares box. To get a more accurate nose gear strut, the hinged part of the kit strut was grafted onto the lower section of white metal strut. The grossly inaccurate kit wheels were replaced with a much nicer resin set from Reskit. The wing, which comes in five pieces and is 16" long when assembled, was strengthened by adding a brass rod spar. The main gear wells in the upper wings were detailed with ribs made of styrene strips. The wingtip lights were molded solid, so they were cut away, filled with Micro Krystal Klear, and painted Tamiya clear red and green. I decided to finish the kit in the markings of a US Navy search and rescue plane based at Midway Island in the mid-1960's. The upper fuselage was sprayed Tamiya Gloss White. The tail planes, bottom of the hull, and wing were sprayed Model Master Acryl Gloss Engine Grey. The outrigger floats, wing tips, rear fuselage stripes, and center upper wing section were sprayed Tamiya Lemon Yellow, which looked brighter and more accurate than Chrome Yellow. The high-visibility yellow fuselage stripe and wing areas were bordered with stripes sprayed Tamiya semi-gloss black. Once painted, I sprayed the model with a coat of MicroGloss. Decals came from several sources: national insignia, service designators, prop warning stripes, and anti-glare panel decals came from Print Scale sheet #72-136. An ancient Micro Scale sheet, #72-184, provided the upper wing walkway, bureau numbers, and upper wing 'RESCUE' marking. The 'MIDWAY' station designator on the tail fin was a custom decal made by Above & Below Scale Graphics. I wasn't satisfied with the color of the Print Scale or Micro Scale wing walkway, so I painted over the Micro Scale walkway with a lighter and more accurate (to my eye) shade of grey. The RESCUE arrows and the small decals on the external wing tanks came from my decal catalogs. Another coat of MicroGloss sealed the decals. The final step was making antenna wires with thin transparent nylon thread. Like all of my models, once on the shelf all I can see are the mistakes, but I'm still pleased with the results. For a kit that was first issued almost 70 yeas ago, it still builds up nicely and with some extra work, it can make a fine model of this important and often-overlooked aircraft.
-
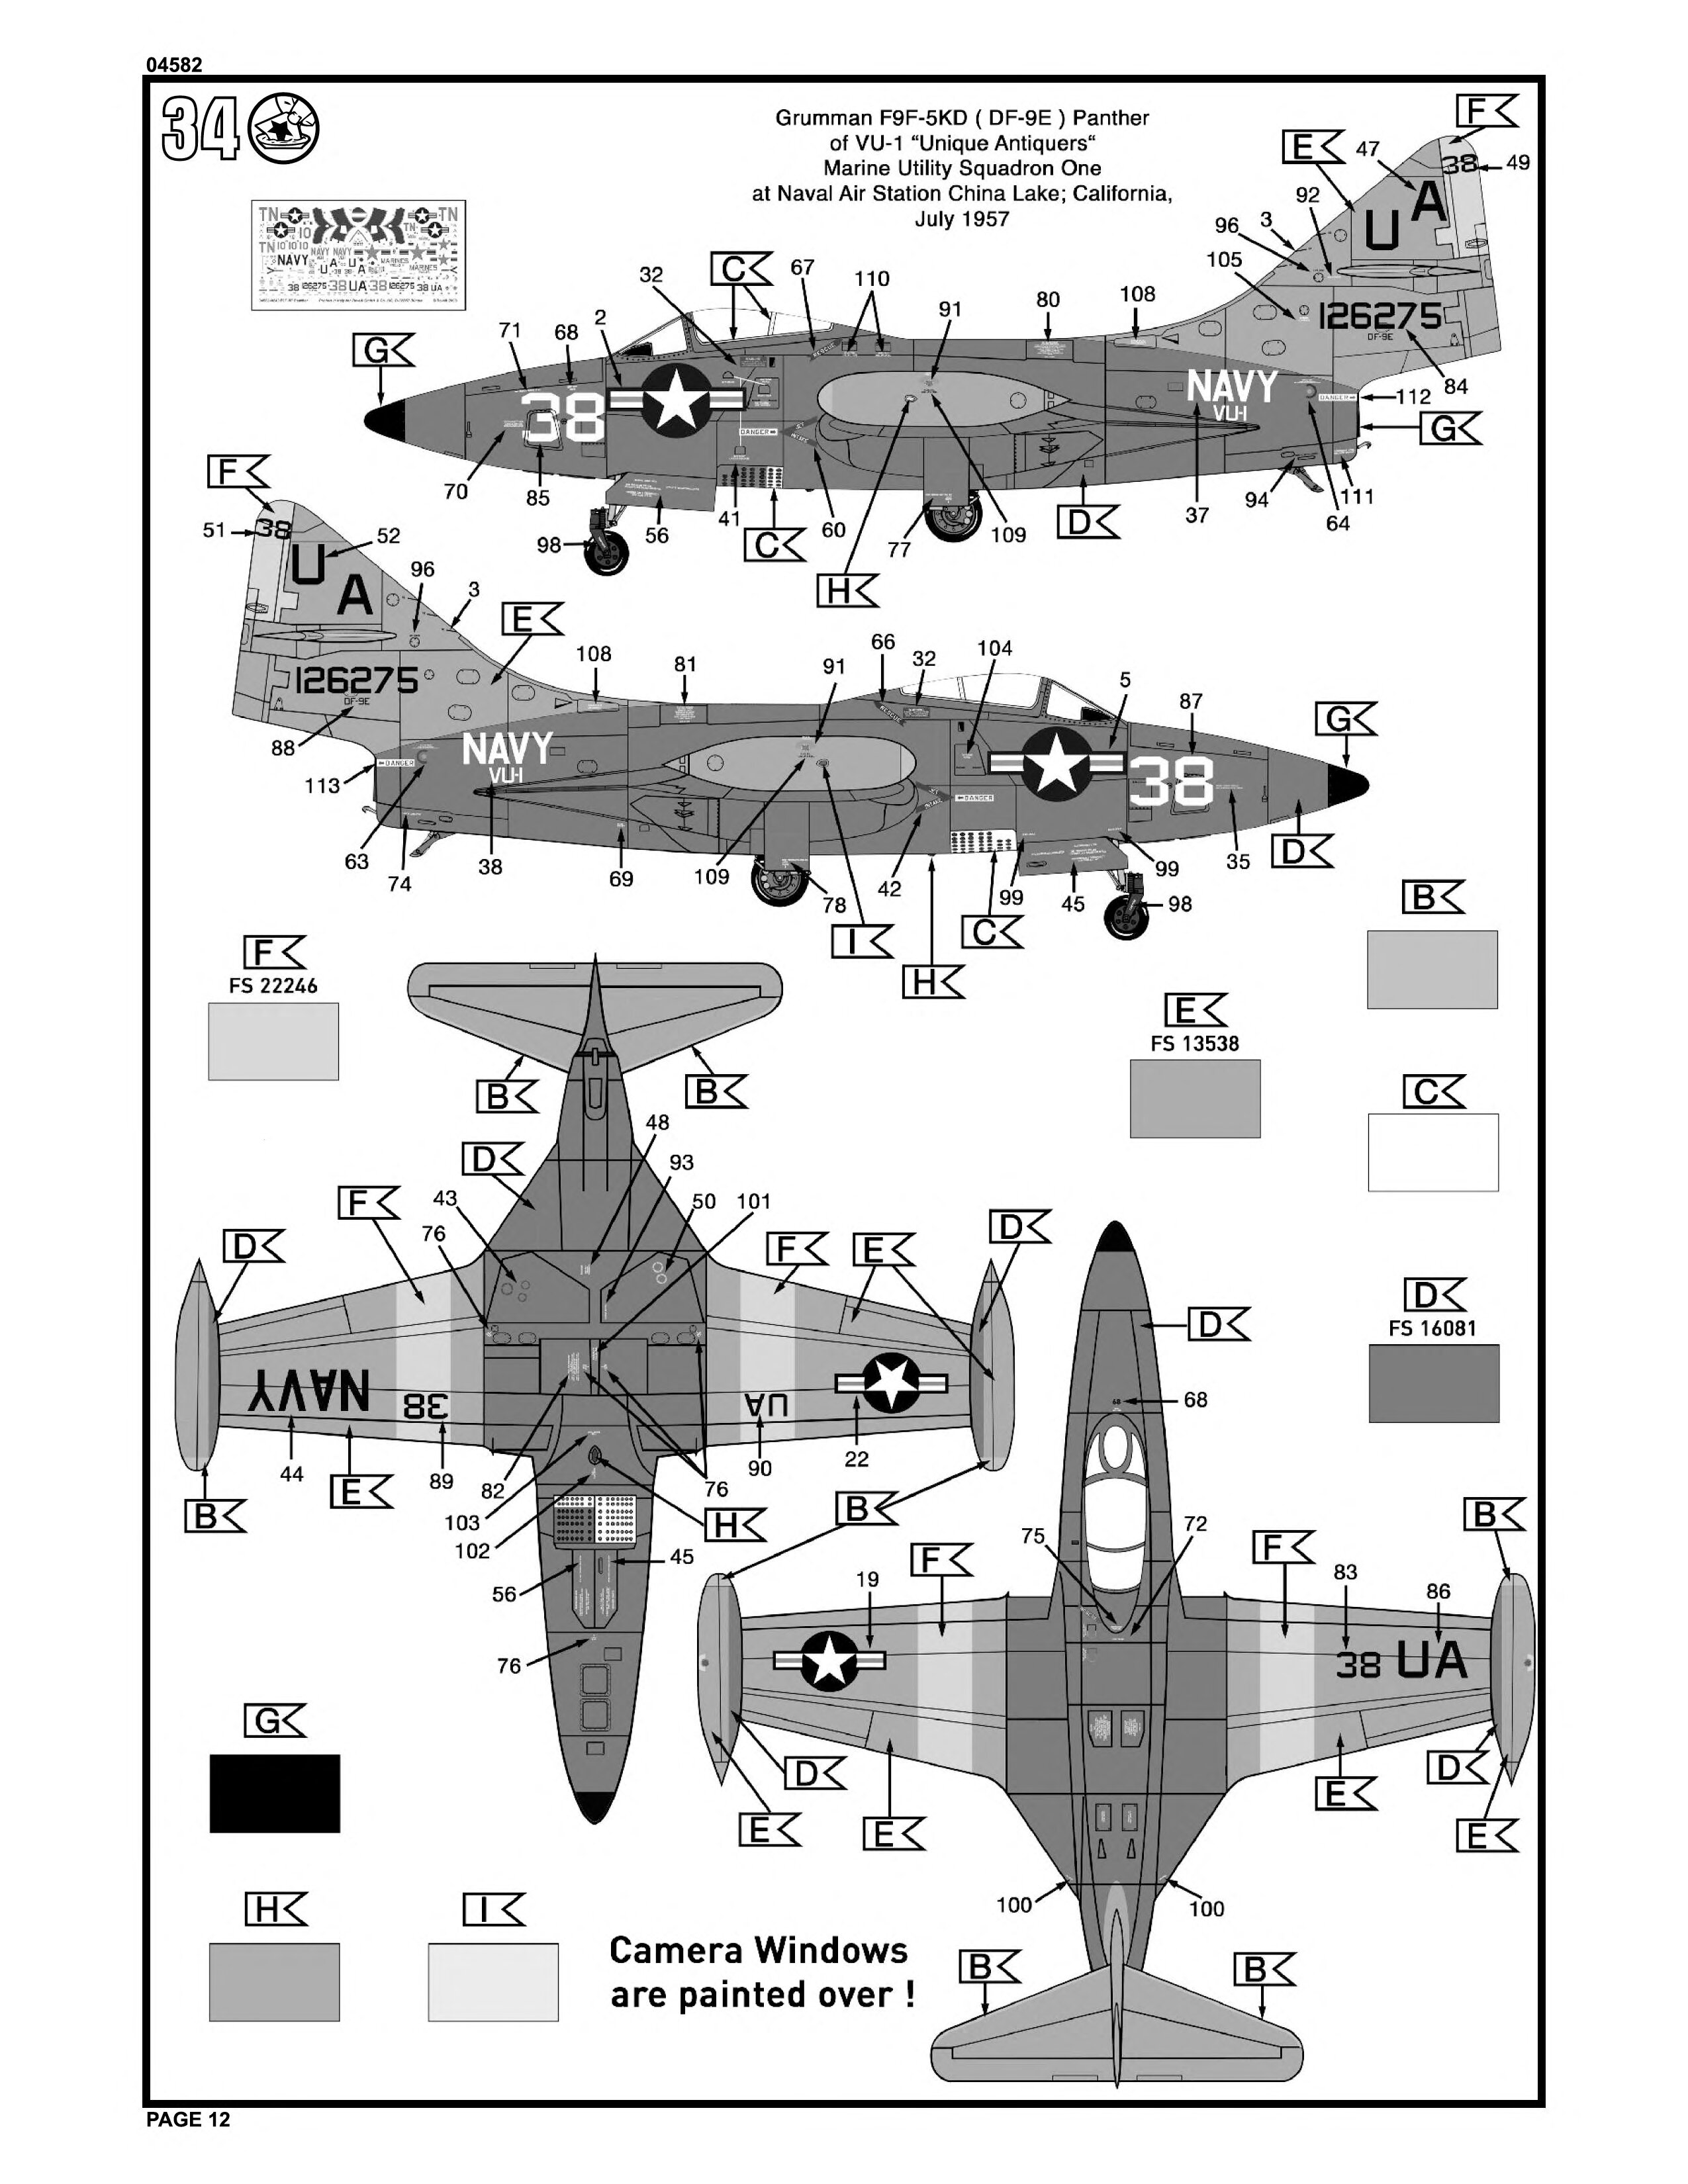
Hi, everyone. I'm looking for a set of decals that came in the Revell Germany boxing of the old Monogram 1/48 F9F-5P Panther. It's the markings for VU-1. If anyone has these decals, I'll be glad to buy them from you. Thanks!
-
Beautifully done! I have that kit in the stash - any construction difficulties?