SkyKing
-
Posts
546 -
Joined
-
Last visited
-
Days Won
30
Content Type
Profiles
Forums
Events
Everything posted by SkyKing
-
I recently purchased some decals from a well-known decal designer who specializes in decals for sci-fi subjects. They are beautifully printed and in perfect register, and I would not hesitate to recommend them to anyone. However, the instructions for these decals contain this claim: "A known fact is that you can apply lacquer over enamel, but not enamel over lacquer." This "known fact" was not known to me. In fact, it contradicts everything I have ever read or learned about lacquers and enamels in over 60 years of building models. The rule has ALWAYS been acrylic (water-based) over enamel over lacquer but not the reverse. The instructions also state "Using an enamel clear coat such as Krylon or Rust-o-leum may cause damage to the decal." I've never known anyone who uses Krylon or Rust-o-leum on their models and wouldn't recommend them in the first place. I questioned him about this and was told: "I've been making decals for over 17 years and early on those who used Krylon Enamel sprays found it ate their decals. They use it because it was cheap and it ruined their finish and they had to repaint their kits. The only cause we could determine was that it was the enamel. At that time I spoke to a friend of mine who did autobody work. He told me that the rule was lacquer could go over anything, but not enamel." I've never heard of this "rule." I suggested to him that an auto body specialist was not necessarily the best person to ask about painting plastic models, and that his "known fact" may result in some damaged models and some unfortunate and unwarranted criticism of his decals when a novice modeler sprays a model which has been painted with enamels with an incompatible lacquer clear coat. I also suggested that he correct his "known fact," advise modelers to use paint products intended for plastic models, and eliminate any reference to DIY spray paints. Comments, anyone?
-
Frederic Hultberg, proprietor of Fotocut, and known by his email signature, "oletcherfred," died last September at age 70. In association with the late Harry Woodman, Fred developed sheets of photoetch details for World War I aircraft models in the 1970s, and expanded the line to include photoetch details in other scales for specific models as well as sets of generic photoetch products. http://www.burgessandtedescofuneralhomes.com/book-of-memories/2707681/Hultberg-Fredric/obituary.php
-
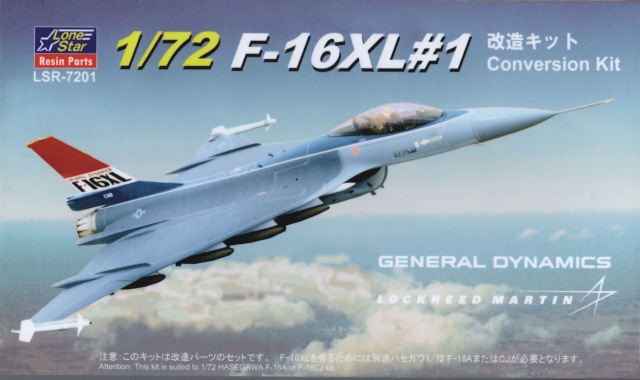
See attachment (Photobucket not working today). There was also a conversion kit for the 2-seater. Both released about 2008 according to Scalemates. Both 1/72. Click on thumbnail to see larger version of box art.

-
"Chrome" finishes should always be applied over a gloss black base, but should be applied so that they are a bit transparent and NOT completely opaque. It is the transparency and black base coat that gives the chrome finish its chrome look. If you don't believe this, try a test. When your lovely chrome finish suddenly looks like nothing more than high-quality silver paint, you've gone too far.
-
Wanted: Fonderie Miniature Nord 1500 Griffon II 1/72
SkyKing replied to SkyKing's topic in Wanted/For Sale (public)
Thanks for the confirmation. I have the FM Gerfaut II but am looking for the Griffon II to add to my delta wings collection. The only alternatives seem to be a pricey resin kit or scratchbuilding. -
This is said to be FM kit number 7201, but was it ever produced? I recall seeing the 1/48 kit by Fonderie Miniature but not the 1/72 version.
-
Kitty Hawk 1/48 Su-17 M3/M4 Fitter Box Art
SkyKing replied to dmorrissette's topic in Coming Attractions
Let's hope it's more accurately shaped than their Banshee. What a kludge that is! -
As the person who started this thread, I feel obligated to respond to Nick's comment. My original suggestion was in no way meant to demean the contributions of the volunteer members of the Reviewer Corps or Eric's work as web developer, and I resent your attempting to change the subject of this discussion so as to imply that I or anyone else was accusing them of "lousy service." As to your comment that "the time they spend providing these services is time they cannot spend building models," I would point out that we ALL have limits on our time, and including the scale (something the reviewer must do anyway) in the review title would save time for readers of the reviews, whether we build in that scale or not. And as Eric has pointed out, that change can be easily made. P.S. Talk just fine does Yoda. Perfectly understandable he is. Beef have I not, but Star Trek I prefer.
-
Thanks. Re: Shapeways I've learned you need to order whatever part you want in the best configuration - ultra fine detail (or whatever they are calling it now) to not have the obvious grow lines. It's more $$ but to me it's worth it not to have to spend all that extra time sanding the lines away. I saw a recent tutorial on YouTube where the guy uses acetone vapors to "melt" the lines away from a part grown with abs. But until I try it, or see someone else besides the guy on the vid try it, I wouldn't recommend putting an expensive piece in with the acetone. I have those Shapeways parts as well, and although it's been a while since I looked at them (and the kit), I don't recall seeing any lines in the parts. This is a great tutorial on building that kit. I'll be following further progress with interest.
-
I was not aware AMT made a 1/32 Avanti. I am now!
-
I recommend Tamiya's liquid cements as well. Testors liquid is also good. There's also a liquid cement made by Faller, a German model railroad company. It's sold in a squeeze bottle with a metal tube nozzle. It's thicker than most liquid cements but not as thick as tube glue, and I find it ideal for cementing wings to fuselages and other major joints. You can usually find it at hobby shops that specialize in model railroads. I also endorse Duke Madddog's suggestion to attend his Hobby Day. Forums like this are good, but you can learn far more about model building by joining an IPMS chapter and soliciting advice from the members.
-
I'd suggest starting by reading the kit instructions and studying them thoroughly, then following them. It should be obvious what should be done first. Use a marker or pen to mark through the part numbers as you install them. That'll help you remember what you've done as well as help you build in a logical sequence. For example, you can't glue the fuselage halves together and glue the canopy on then expect to install the cockpit. It's not rocket science.
-
So we're slaves to an automated database? Ridiculous. How hard would it be to put the scale field first? And why is it necessary to include "kit" when all aftermarket parts such as Quickboost, Pavla, Aries, etc., are for a KIT! So then the title would be, to use your examples: 1/48 P-51B/C/D Mustang Propeller w/Tool by Quickboost for Tamiya
-
Would the members of the Reviewer Corps kindly put the SCALE of the kit/aftermarket part/decal in the review title? It is somewhat aggravating to click on a review of something that sounds interesting and then start to read it only to find that the item is not applicable to my preferred scale. This does not sound like too much to ask.
-
All your Future questions answered here: http://www.swannysmodels.com/TheCompleteFuture.html
-
Those appear to be Italeri releases, not Hasegawa!
-
Ooh! Shiny!
-
You can also use clear enamel/acrylic. Paint it on canopy edges with a fine brush then stick canopy in place.
-
Nice job. I wish you could put the Hodgepodge photoetch back in production, especially the generic stuff. Very handy it was!
-
Speaking for myself, that's a great idea! Even consolidating the separate parts into one thread when the build is complete would be great. Then it can be saved for future reference as a web page which can be opened in any browser.
-
Got mine today.
-
Neil Gaunt, founder/proprietor/chief designer of Aircraft in Miniature, manufacturer of the forthcoming Cessna 310 kit, has asked me to post this message: "I am reading so much about our first DH86 kit that I would like to put the record straight. "It was produced in the mid to late 1990s, and was a vacformed fuselage with resin flying surfaces, metal detail parts and silkscreen printed decals. The masters were made by Roger Hardy who started the Rug Rat range. We have always used heavy (2mm) polystyrene for the large models and so used our standard material. As a result, the corners never formed sharply, and it was always unsatisfactory. We stopped production of this kit around 2002 or 3. "I have read stories about the fuselage halves being different lengths, but we never received a complaint, and I could not see any difference. We are also asked about costs - material prices are rocketing. Brass has increased by 50% in the last five years and metal up 20% in the last two months. And so it goes on. "We are currently working on the new DH 91 Albatross kit, and if it proves a commercial success the intention is to produce a new all resin DH 86 with full interior in the usual format, i.e. resin model, metal detail parts, and silkscreen decals. "I have frequently been told that our DH 66 Hercules is the best kit we have done, so will see if we can better it!"
-
These are just the masters for the resin parts. Detail parts (landing gear, props) will be metal, and cabin top/windows will be vac-formed. Decals will be included, but I don't know details as yet. I myself am working on a decal sheet for Sky King's "Songbird." I've been promised a kit when they are ready, and I will be posting a detailed review. The Albatross will have full cockpit and cabin detail. The cabin windows are intended to be glazed with liquid glazing. Decals will be for "Fortuna" of Imperial Airways.
-
Masters for Cessna 310B/U-3A in both 1/72 and 1/48: A close-up of the 1/72 masters: A close-up of the 1/48 masters: Masters for the de Havilland DH.91 Albatross in 1/72: Kits will be available from Hannant's in due course. Having assisted in the design of the 310B kit, I am very pleased at the appearance of the masters. What you see in the photos are masters for the resin parts. Details (landing gear, props, cabin seats, etc.) will be metal, and the cabin will be vacformed clear. The Albatross will come with decals for Imperial Airways, while the 310 will be issued in two versions. One will be a civil aircraft with Sabena and Rhodesian civil decals, while the other will be a U-3A with 3 different USAF schemes including a U-2 chase plane.
-
As would I! And I'll add my thanks for your past work on behalf of the Society.