Stikpusher
-
Posts
985 -
Joined
-
Last visited
-
Days Won
75
Content Type
Profiles
Forums
Events
Everything posted by Stikpusher
-
The AK Aluminum is very convincing for the NMF. You have built another beauty! 👍🏻👍🏻
-
That turned out beautifully! All you need is a similar scale U-Boat and you would have the pair from The Enemy Below. 😉
-
Mark, those are some great additions.... especially the tools.
-
Excellent work! I really like how all your paint work turned out.
-

Slovak Gustav! 1/72 Tamiya Messerschmitt Bf-109G-6.
Stikpusher replied to 66Foxtrot's topic in Aircraft
Great work on your Gustav 66F. Hard to believe that is 1/72. 🤔 -
Thanks Mark. Sorry to see that you were unable to make the Zoom session today. I’m looking forward to seeing your Braille Scale B-4 kit when you get around to it. Today was session 2 of the 12 hour challenge. I deviated a bit from the instructions and concentrated on the tracked bogie units for the carriage. Between clean up of flash and ejector pin marks and the high parts count of the two units, that area took about 1 hour longer than I had thought, but I was still able to get them completed. I also build the spade assembly for the trail. Then of course I had to test fit all of the assemblies completed so far… Next month I should be able to get assembly completed, then painted, and call this beast done…. Then it will be the most impressive looking artillery piece on my towed artillery shelf.
-
So the day before yesterday at AZ AMPS, we had our meeting and another continuation of the estate sale of a local modeler who passed on late last year. All proceeds from sales are donated to Wounded Warrior Foundation, as that was the guy’s favorite charity. So, for a good cause, I picked up these items…. This one is maybe about 30% started… This one was barely started, maybe 5% at most… this really nice crew set… and this base, of which I had recently been looking for something along these lines… plus a few odds and ends that really aren’t worth taking photos of…
-
These online purchases arrived last week… for my 1/48 air forces One can never have too many Roundels or Squadron Codes… and these gorgeous 3-D printed TERs of the type used by F-16s finally came in from Ukraine…
-
Thanks Robert. The Trumpeter kit was a bit more expensive than my budget allowed when I bought this one. This one does have me questioning myself for putting this one forward for a 12 hour build candidate.
-
Yes, it’s that time of year again. No not some silly game of grown men chasing a ball up and down a wooden floor. But it’s time for the annual So Cal AMPS 12 Hour build challenge. Yes, build a model from start to finish in three monthly four hour sessions during online Zoom meetings. Last month we presented our three candidate kits for the participants to vote on. This kit is what my fellow members voted for me to build- a 1/35 Eastern Express kit of the Soviet B-4 203mm Howitzer. The tracked carriage really gives it a look all its’ own. During today’s first four hour session, I was able to get most of the carriage base completed, All of the breech and barrel assembly completed And I was able to get a good portion of the gun cradle assembled And of course, I had to test fit it all together Next month we will have the next session and I should have most of the basic assembly completed…
-
Looks good Ron. You can never go wrong with a Matilda.
-
Mark I thought you already had built one of those Japanese Torpedo Boats before… 🤨 Not that double ups or second helpings aren’t allowed… 😏
-
So here we go, construction has begun! I had some folks over on Armorama point out to me some corrections needing to be made so here we go. As usual with most armor kits, this one started with the suspension and running gear. I have not yet closed up the motorization holes, but that is easy to do at this point. All the road wheels, the sprockets, and idler wheels are all removable due to their poly caps. I just put ‘em all on for this photo. Using Vodnik’s site as reference, I started dealing with the biggest goof on this kit in my eyes, the shape of the rear hull plate and cut off the box like side portions of that part. A bit of sanding and other trim work on the upper hull and I had the area looking much more accurate. And again following Vodnik’s guidance, I scratched up the rear spaced armor plates that go on that area. More to come in a few days….
-
1/72 P-47B Conversion of Academy's P-47D Razorback
Stikpusher replied to TheRealMrEd's topic in Aircraft
Very nice looking early Jug! -
Gorgeous build of the Shooting Star! Your NMF work is top notch. 👍🏼👍🏼
-
In honor/recognition of the 20th Anniversary of the beginning of Operation Iraqi Freedom and those who served there, I’m going to be building this kit. I’ve got a set of AM Bigfoot tracks to replace the incorrect ones that come with the kit.
-
Very nicely done! I love the insignia on top of the radome.
-
Mark, with this decal sheet, this one just moved up the “to do” ladder quite a few rungs. I had bought this E-2 off Brian Casteel, which gives you a rough idea of how many years that I’ve had the kit in my stash. Gil, I’ve got different decal sheets with most of the different Air Wing 8 USS Nimitz squadrons, at least the F-14s and A-7s in 1/48. But finding out about this company and all of their available sheets was really a pleasant surprise.
-
Many years ago, I picked up a 1/48 Kinetic E-2 from a guy at IPMS who was selling one off. I got a great deal on the kit, but I was never satisfied with the kit markings options. Recently I found out about this decal company, HADModels that made decal sheets for the aircraft in the movie The Final Countdown, including the E-2 seen in the film. So I found a set online from one of my favorite eBay stores and now I have the problem of the kit decal choice solved. now to get around to building the beast…
-
After a few months of sitting on the sidelines, I pulled this one back out and resumed construction. During the So.Cal. AMPS monthly Zoom meeting I was able to get a LOT more built on this track. I’m going to build this with the hammerhead in the stowed position. I was able to get most of the basic construction completed, although the engine deck is not glued down, only fitted in p,ace for the moment. I want to build some sort of support base for a driver’s bust/torso since that’s the easiest way to place one in there. I have trimmed down the forward hammerhead support pads a bit too much since I took the photo, so I’ll need to go back and adjust those to get the proper stowed angle. Before I trimmed them, the front sat way too high. More to come soon…
-
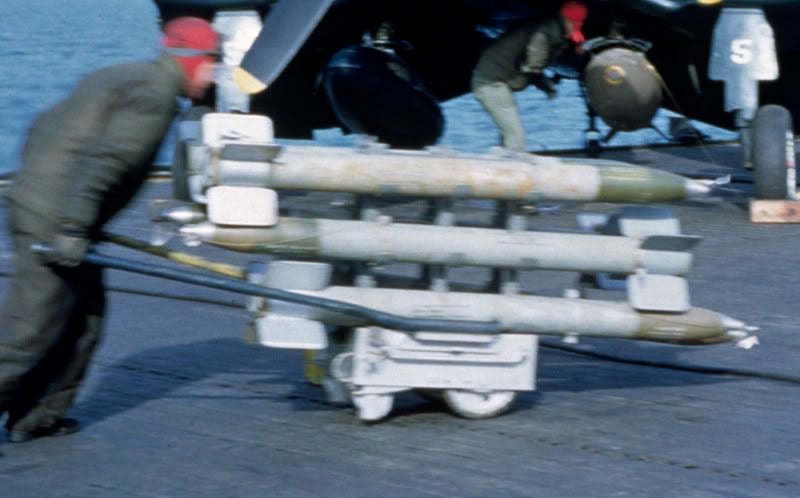
No. Actual military inert ordnance is painted blue. An inert, blue, warhead can be fitted onto a live, NMF or Gray, rocket motor for practice firing. Or if the rocket motor and warhead are both inert, they will both be painted blue. Blue has been the standard color for inert US ordnance since before WWII. here is an inert warhead rocket at Smithsonian that came from the USMC.

-
In 1/48 yes, in 1/32 no. But… ProModeler made a 1/48 decal set of markings for US WWII/Korean War ordnance, including 5” HVARs. Now if you were to get that sheet, scan it, then enlarge the appropriate percentage up to 1/32 and then print those decals for yourself…
-
That’s a very nice years worth of work. Looking forward to see what you build this year.
-
You’re quite welcome. That photo is quite real, but it most likely came from either somebody’s restored warbird, or a museum aircraft with somebody’s artistic impression of how they thought the rockets might look. I did a bit of read up on the 5” HVAR, and it turns out that the Army and Navy rockets had different electrical firing connections, so that would be another reason to have the motor casings in different colors for the ordnance armorers. Apparently there was also an adaptor kit available for the firing connections to make the Navy rockets compatible with the AAF connector wiring. I imagine that in some theaters of war, such a thing would come in useful.
-
I don’t know where they came up with that red and white scheme for the 5” HVARs. The rockets came out of the ordnance factories in standard colors with OD warheads and depending upon Navy or Army use, light gray or bare metal rocket bodies. Presumably the gray paint on Navy rockets was for corrosion prevention at sea in the damp salt air environment. Yellow stenciling is seen on the warheads, and the fuse is in bare metal. USN USAAF/USAF