PeteJ
-
Posts
1,002 -
Joined
-
Last visited
-
Days Won
63
Content Type
Profiles
Forums
Events
Everything posted by PeteJ
-
Actually it works best if you use an "Old Guy" computer!

-
Nick, are you going to Phoenix? If so, we must make it a point to share a pint! Cheers!
-
Nick, I like your distinguishing between a miniturest and an impressionist form of modeling. However I would say that we are all of the Trompe l'oiel school. We take materials and make them look like something else. That is until we take up the mill, lathe, shot bag and english wheel. For the majority of builder on this form, virtually nothing we use in modeling is the "real deal". We use paint on plastic to create the appearance of hundreds of other materials. Very little that we make actually works like the real deal and when it does we make a big deal out of it, because is it rather rare. Granted there are a few modelers out there who are the exceptions. The people who build anentire aircraft out of aluminum held in place by actual rivets. Controls that actually function and cars that run and are made entirely from metal, but these people are truly rare. You can find a lot of them at this web site. http://www.craftsmanshipmuseum.com/rooms.htm In the meantime the rest of us are trying to fool the eye. Now as to panel lines, nothing we do is truely to scale. If it were, the lines would come close to disappearing, whether it be access panels on an aircraft or shut lines on cars. But we are stuck with what our brain remembers it thinks it saw which is often a composite of distant views and close up view. When we stood next to an aircraft, we saw panel lines and that is what we remember. Up close we saw the bug splatters and oil drips and that is also in our image. Our brain builds a composite and that is what we expect to see and if we don't see it, we feel it lacks realism, whether it is true or false. This applies to every model we see. All of these various things things try to equate to what our brain tells us we saw and what we see on the table. The closer the model gets to that mental picture the better we like the model. Sometimes it is a small detail, other times it is the subtle shading of a faded paint job, but it is alway about our mental image. This is why when you spec out models, often the dimensions are off. I remember reading in S. Tamiya's book that they subtly changed the dimensions of models to accommodate the humans normal viewing perspective. His early car models looked to narrow, because they are almost always viewed from ground level. When the model is viewed from above, that is not the mental image that we normally have and they look off. Perspective is very much part of our world, but we must blend that into our build to make them "look" right. The pure technician will never make a model that "looks" right unless it is scaled up to something close to 1:1
-
Ralph, Paul Budzig has recently moved all of his videos to a single album called Scale Model Workshop on You-Tube. Here is the updated version of his video on panel lines. Great thing to watch. I don't do everything he does. I just take what I want.
-
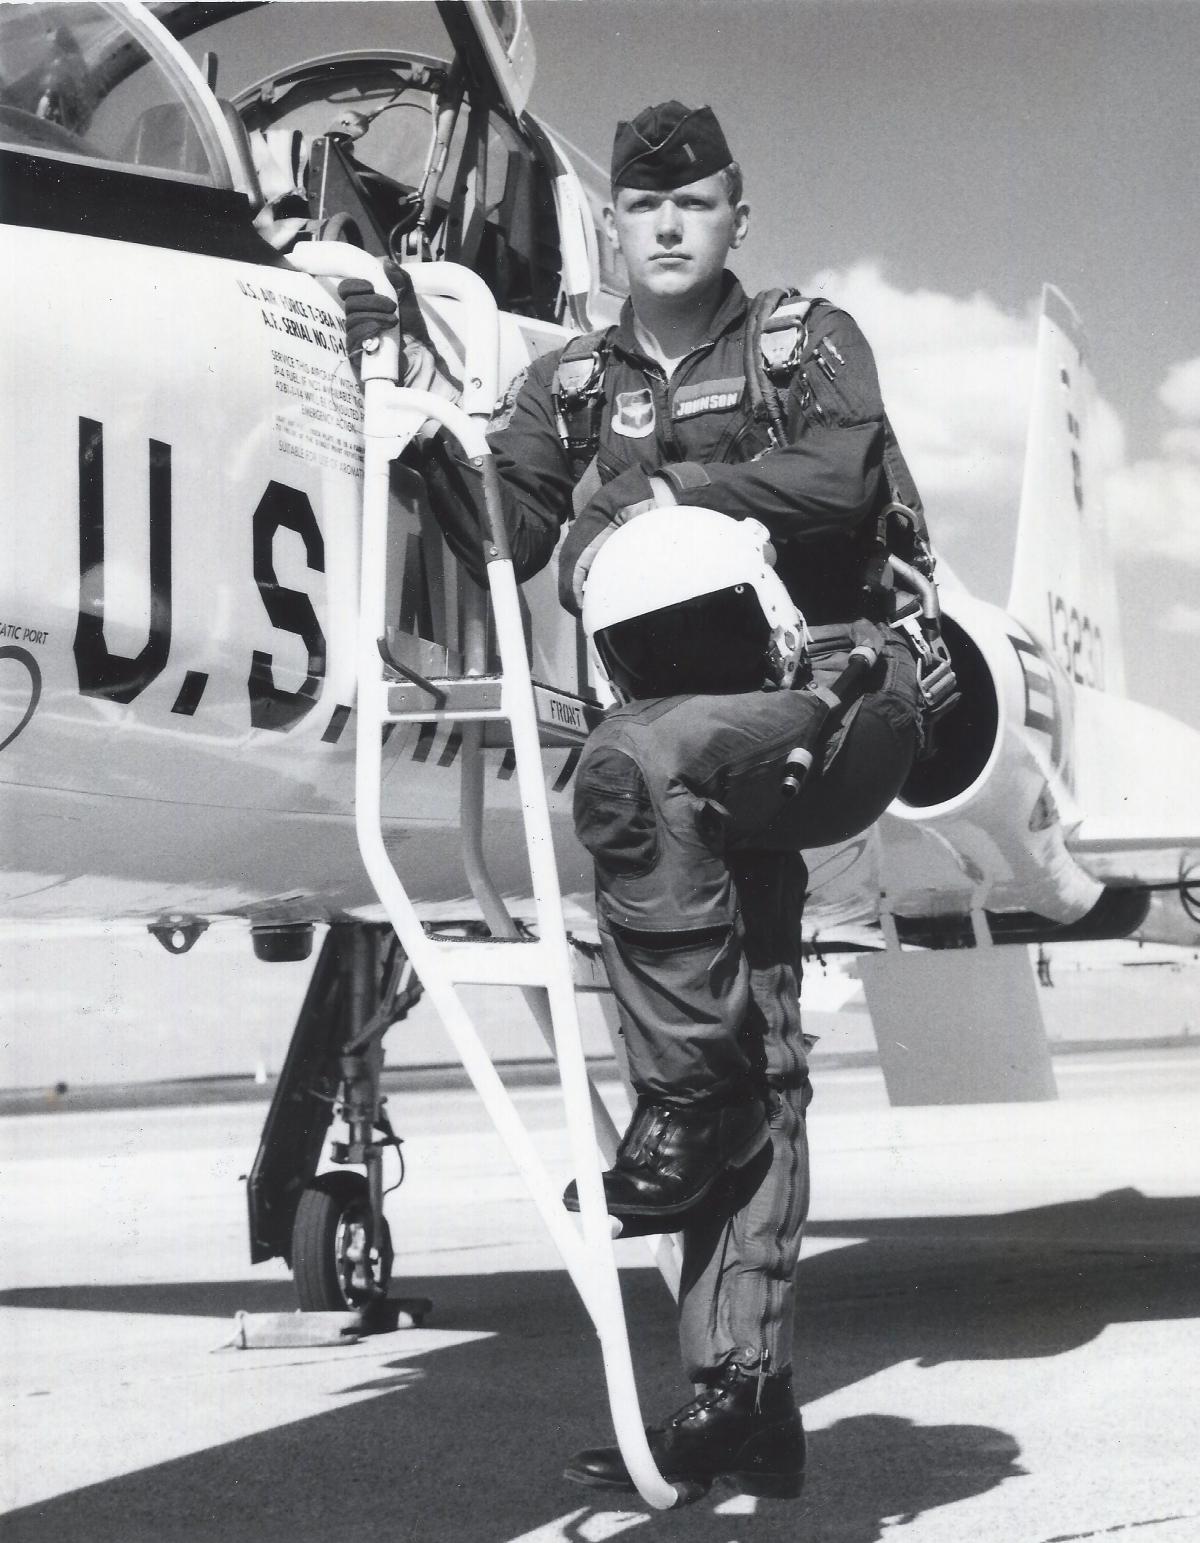
Gil, then this is me four years later. September 1973
-
This may be an interesting photo that I have from a long time ago. I believe it was taken in 1968 but it could have been a year earlier. That is me in the backseat and a good friend of mine in the front. We were on a ROTC field trip. It was taken in Tucson, Az at the repair depot. Notice the severe abuse of the paint. Now it would have been repainted before it left but I thought you all might like to see the wear and tear that SEA took on the aircraft.
-
One caution about light plastic containers. Make sure you have them vented. A very small hole or two in the lid will do. In spite of what you may think, there are significant changes in air pressure in an aircraft. Typical cabin pressure altitude is around 9,000 feet. Going up will cause the lid to pop open and if it gets resealed it will cause the case to compress. A friend had a model damaged when the lid compressed enough to crush a model. That is why I suggested the better case. They have pressure relief valves on them.
-
Well, this is not all that difficult. Rule #1 pack all your tools, glues and paints in your checked bag. None of that stuff will make it through carry on. Sharp object and flammables are a huge no no! Rule #2 when you pack up your models think about having to open them up and show them. Don't wrap them in anything as you will have to unwrap them. A good choice is a camera case with "pick and pluck" foam. Here is Pelican cases web site as and expample of the ganera of case that is easy to pack models in. These are not cheap cases, but there are similar cases that are less expensive. http://www.pelican.com/us/en/product/watertight-protector-hard-cases/medium-case/air-case/1525/ This is a web site for Pick and Pluck foam again just for example. You can get it cheaper other places. https://www.uline.com/Product/Detail/S-13719/Foam/Pick-and-Pack-Foam-Sheets-24-x-24-x-2?pricode=WB0753&gadtype=pla&id=S-13719&gclid=CjwKCAiA15vTBRAHEiwA7Snfc4z3OylMh81Gq1-5x_tjT0IxjW4LoWLbLnxxz83io2MhQrLf5qkOyxoCR9UQAvD_BwE&gclsrc=aw.ds Packing in this manner will let the TSA person know that you are a "frequent traveler" so they will respect what you say. Packing them in shabby boxes that are string wrapped with duct tape will send another message. Also "politely" advise the inspector that it is fragile! Fragile stickers on the outside will also announce this. Most will be respectful of your models if you are polite and don't disrespect them. Another thing to do and start now, is to get TSA pre approved. This gets you in the TSA special line. You become a "known" traveler and this makes them much less suspicious. The line has fewer travelers in it and the restrictions are reduce, like you don't have to take off your shoes. Because there are fewer travelers, the agents are much less stressed and will treat you better. Here is one last tip and it will be controversial to say the least. If you can afford it, fly first class. You get to board first so you will get the prefered space in the overhead. You have wider seats so the space under the seat in front of you is wider. There is more leg room so you will not be squeezed if you put your models on the floor rather than in the over head. Also your baggage gets priority handling and will be the first off the carousel at the other end. I have found that on cross country flights, if you start now, you can find first class tickets for only a little more than an economy seat in many cases. This isn't always true, but cheap first class tickets are not uncommon. It also is far less stressful to travel that way. Good luck and I'll see you in Phoenix!
-
 Just a follow up, I was in Coast on Friday to pick up some fittings for my Paasche air eraser. Took the staff about 5 minutes to hook me up with a quick release for both ends of the Paasche hose and get it connected to my Tamiya/Iwata hose. I wanted a much longer hose so I could use this thing as far away as possible from any painting that I am doing!
 -
Call these guys and ask them. Hey know everything airbrush. http://www.coastairbrush.com/ Very helpful.
-
They're not horribly expensive and this one is the "new improved" model. The media isn't cheap though. I just bought two 5 pound jars of Paasche blasting medium(one fine, one course) and they cost me $45 delivered from Amazon. But 5 pounds should last a while.
-
Well, technically Santa bought it for me, but since Santa and I use the same checking account it qualifies. For those who don't recognize it , it is a Paasche air eraser. Basically a tiny sand blaster. I am going to use it to soften the finish on some aluminum parts I am making.
-
Bob mentioned taping the decal paper to plain paper for printing and it keyed another tip I use that may be helpful. I buy 8 1/2 by 11 sheets of decal paper and cut them up to fit my 4X6 photo paper tray. Most HP printers have a secondary tray that is for photo printing single photos. This way you have less waste from the decal paper. If you use photo paper for your test print you will get a true color representation as most decal paper is slightly glossy. I don't mind wasting the 4x6 photo paper as it seems that HP always adds a package when I buy larger packs of the 8 1/2x 11 sheets. I have stacks of the stuff and almost never print the old size photos.
-
Richard, I am running the CS5 version of Photoshop and refuse to upgrade it. I was very annoyed when they went to cloud based subscription. I get use to a program that works and it seems like they change it just to make more money. I'm not going to play that game.
-
Rusty, good point! Been doing this so long that it didn't occur to me to mention it. Actually I print most of my decals on white as ink jet inks are somewhat transparent and any camouflage or color divisions under the decal with "bleed" through.
-
Sorry to hear that you are having problems. I've been making decals for years now and am loathe to tell you that specialty decal programs are really not necessary. Any picture printing and editing program will work. If you can scan or import clip art into a photo, you can make decals if you have good decal paper for you printer. With the two hours you have spent on the kit software you could probably have figured out how to do it with the photo editing software that is in Window 10. It is no different than printing photos except you need decal paper(which the kit gave you) and the instructions on how to use it. To be up front with you, I am also a hobbyist photographer and have Photoshop which is far more complex than what you need for making decals. If you want to learn photo printing, you take a tutorial on photo printing(Youtube has a ton of them) you could kill two birds with one stone, learning photo printing and decal making all in one. Both of which will save you a ton of money having someone else do it for you.
-
Model Cars Magazine? Will it Survive?
PeteJ replied to noelsmith's topic in Cars, Trucks, & Motorcycles
I have to agree with Rob about this site being a bit sleepy. This is the first site that I check in the morning and MCMs is second. I always check the "unread posts" It appears that MCW gets more post in an hour than this one gets all day. It also appears to have about 10 times the membership. I did not renew my subscription a couple of years ago, because I was very tight with money and the problems they were having getting the magazine in my mailbox anywhere on the regular schedule concerned me. I also had several friends who wrote articles and shared your experience for getting paid for their work. I subscribed several years before to support them, but as the editions became more and more erratic I really felt that I was throwing my money away. I wish them no ill, as I have always enjoyed the magazine and buy it at Barnes & Noble when I find it. I am a frequent contributor to the MCM website and find is exceptional for the most part. Very busy and full of information. If the magazine dies, I really hope the web site stays up. I wish them well but have contributed enough money to them for now. -
Anybody ever seen one of these?
PeteJ replied to DennisTennant's topic in Cars, Trucks, & Motorcycles
Dennis, this is what is typically referred as "promo" models. They were sold at the dealers and on display in smaller dealerships to show models that the dealer may not have in their inventory. To the right buyer, they can fetch a pretty significant amount of money. Yours looks to be pristine in the box which makes it very rare! Want to see some heads explode? Go over to Model Car Magazine forum and post those pics. Guaranteed you will have people falling all over themselves to buy it. -
Which hotel is the convention hotel?
-
The company is Berkshire-Hathaway and it is his favorite place to go for a burger at lunch. You may actually run into him there.
-
There us one place that is an Omaha Tradition and that is Johnny's. There are a number of "Johnny's" but only one original. You really get the old time feel in this chop house. Make a point to go if you can! http://www.johnnyscafe.com/
-
I have a trio of chemical strippers. Engine degreaser(Purple power), brake fluid and 91% alcohol. Nothing will withstand all of them and a one time bath in them will not damage plastic. My experience is that Tamiya lacquers come off best with 91% alcohol. The first two require chemical safety equipment, as a drop in the eye or on the skin will do serious damage. They require chemical resistant rubber gloves and eye protection. The alcohol is a lot more forgiving and works well on Tamiya paints, but you need the 91% version. Home Depot alcohol isn't strong enough so a quick trip to the pharmacy is called for.
-
Thanks for the clarification. Always good to get better information. So, if I understand this right, acrylic is a binder that can be used in all three types of paint. It still makes me nuts that we refer to water/alcohol based paint at "Acrylic" although I don't know what other word we would use for it. Shellac is the earliest alcohol base "paint" that I am aware of and what we refer to as "Acrylic" is definitely not a shellac. That is the excretions of the Lac bug, dried and dissolved in ethanol. I seem to recall Earl Schibe adding "acrylic" to auto paint for and extra fee.
-
Simple explanation is this. All paints are made of 3 basic components. Solids or pigments, binders and solvents or thinners. The key difference is the binders and solvents. These are the basic "glues" that make paint stick. The binder is the solid glue and the solvent dissolves it to make it liquid. Lacquer's solvents are based primarily on acetone and MEK with some other solvents thrown in. These solvents are the "hottest" and will generally dissolve almost anything. The "other" solvents and proportions are what differentiate various Lacquer thinners. The best automotive lacquer thinners have more of the expensive solvents and less acetone in them. They do a better job of dissolving the binders and pigments, but the more of these solvents the more expensive they become. This is why there is a significant difference in the price and action of auto paint shop and Home Depot lacquer thinner. Home Depot is mostly acetone. High end thinners are also more prone to attacking plastic. Enamel thinner is mostly naphtha AKA mineral spirits or paint thinner. This is a slightly less aggressive than the solvents in lacquer thinner. Depending on the mix and the lacquer, enamals it can be used over lacquer. Acrylic paints are commonly referred to as "water"based but the reality is that the primary solvent is alcohol. That is what gives acrylics that slightly "sweet" smell. Because dilute alcohol will not generally dissolve lacquers or enamels it can be used over them. Also some acrylics can be thinned with lacquer thinner. Tamiya recommends this when you want a "harder" finish. Doing this however, precludes using it this way over enamels. Now a bit about acrylic as used in paint. Acrylic correctly describes the pigments used, not the thinners. Acrylic is a synthetic pigment, not a natural mineral pigment such as titanium(white) or ocher(red) which occur naturally. Before the advent of acrylics, natural pigment came mostly from the ground and were dug up and crushed for use in paint. This word is very much misused to describe a type of paint but it has become a part of the general lexicon and as such we are kind of stuck with it. Now, what can be used over what? Alcohol based over all. Naphtha over lacquer but not alcohol and lacquer on the bottom. Having said that here comes the caveat. Because 91% alcohol used straight undiluted, will dissolve some lacquer paint, if given enough time, all of these have compatibility issues. Laid down in light coats so the solvents will evaporate quickly, they can all be used with each other. If the solvent doesn't have time to attack the layer beneath, then no issue. Lay on a thick coat and you have problems. I mentioned compatibility. This is when you get the wrinkling and the paint bubbles up. This occurs as a result of paint shrinkage as it cures. All paints shrink some as they cure. That is the nature of the beast. When you get two paints that shrink at different rates then you get the wrinkling. It is made worse because if they shrink at different rates, they also expand at different rates. When you have a cured layer and you spray a new layer down, if the old layer absorbs the new thinner it will start to expand and as the two shrink back at different rates, then you get wrinkles. There is no formula to tell you when this will or will not happen so you can only do a test shot to see. I hope this helps!
-
You need three things. An airbrush hose, the bayonet(quick connect) for your compressor and an adapter from the airbrush hose to the bayonet. Most bayonets are a common diameter but have different length parts that insert into the quick connect. Go to Sears and they should be able to hook you up with the right one or I am sure you already have one. Take it to any place nearby that sells compressor parts and they should be able to hook you up. Then call Coast Airbrush in Anaheim and tell them what you have and they should be able to get you the right hose and the adapter. For convenience, you may also want a quick connect fitting for the airbrush end of the hose, but that is up to you.