EdCarr
-
Posts
77 -
Joined
-
Last visited
-
Days Won
1
Content Type
Profiles
Forums
Events
Everything posted by EdCarr
-
OMG I love it! Great figure or bust or model or whatever you want to call it. Nice paint job! Young Frankenstein with Gene Wilder. Funny. Nice Job! 🙂
-
I really like this model as well. I think you did a great job with the panel line accent colors. They make the model look very realistic. So realistic that in fact I was a bit afraid while looking down the muzzle of the main gun of the beauty in one of your photos. Great diorama! I want to to build some of those myself. I have an idea for a Star Wars Universe landing pad for some Star Wars models I have built. I just have not put it all together yet. Great and lovely and realistic looking build, Chris! That Meng kit looks amazing! Thanks for posting it! 🙂
-
Well done! 🙂
-
Nice builds! How do you paint your camo schemes like on the Japanese Defense Forces APC's? I would like to know because I think they are topnotch and I might like to use your know-how in some of my builds as well, like on two Spitfires I have in my stash. Thanks! 🙂
-
Carlos, I am loving this build! I have not posted my only armor build thus far as yet, but I think tanks are just simply fun to build. I think it might be in the weathering. It seems that the more you make it messy and dirty, the better off it looks, lol. That being said, yes, I agree with Bradley25mm that this build is the neatest Sherman I have seen. I need (and want) to build one myself. Thanks for sharing this build of yours. I think it looks great so far! 🙂
-
Nice build! I like, too! 🙂
-
Yeah, I agree with everyone who posted. I love the camo paint scheme! I think it looks great! Also, I think it is an interesting build. The decals- not what you would normally expect from a built plastic model. 🙂
-
Despite the lack of a propeller, I think this build is beautiful. The paint scheme is great! I thought I noticed that the prop was missing, lol. I still love it, though. If you really want the propeller to paint and adhere to its engine and nacelle, why not take the time to write a letter to the manufacturer requesting the part (maybe include its number on the sprue if you still have it). They might send you one. Or, if you want, maybe make a bit of a diorama with it. Maybe the left engine and prop is being worked on by the ground maintenance crew. I don't know, just an idea. I still think the model is well done, prop or no prop, lol 🙂
-
Mark, nice build! I need to post my first finished model of the year as well. How do you like your cordless airbrush? Who is the manufacturer and what is its name? This year for sure I plan on using an airbrush. I have been using spray cans for the most part. I appreciate the history of the plane you built. Thanks for posting it in your post of this beautiful model. 🙂
-
Looks good so far. Is that Zinc Chromate or Interior Green (or something else entirely) in the wheel wells. I am asking because I have some aircraft models to build and I am wondering what you used to spray-paint the wheel wells with. I am looking forward to seeing the finished model here! 🙂
-
Carlos, I love this build! Especially the paint job. The words simple yet elegant come to mind. I too used a Sharpie paint pen in a build I finished last year (I need to post some photos of it soon). It was of a M-41 Walker Bulldog tank that disaster struck. I, being rather new to modelling again, used a napkin to sop up extra MIcro-Sol on a decal. The napkin promptly became part of the decal in a very bad way! The decal was of a white number on the side of the turret. It was in very bad shape. I purchased and used a Sharpie white-paint pen which fixed it up well enough. Man I was frettin' lol. Great work on a sleek plane. Love it! 🙂
-
Sorry, I did not see page 2 of this post and only went by page 1. Indeed, your client also wants to see the hard work of the interior details with a removable section of the top of the fuselage. Fantastic! All the hours of tedious work and the beautiful weathering and painting detail of the interior and the crew deserves to be seen in the finished build. 🙂
-
Like Stuart Mont, I have very little model-building experience, but I do have an appreciation for WWII history and the tedious work required for extreme detail. Like the Mongoose posted, I too, love the map half-off on the table in the nose interior. I started a B-17G when I was a boy, I now have the model back to finish as an adult again and that thrills me. What I have finished, though not quite to the extent that you have done, is the interior details. I believe you expressed the frustration with it in one of your posts- when the fuselage halves are glued together, who is going to be able to see all the hard work of the details? I spoke with a man while shopping for hobby supplies one day and he said he used a razor saw to cut away a section of a B-17 fuselage so he could remove it to show the interior details and still be able to place the section back so as to look whole. I do not recommend that since you have a client, but that might be a good idea for anyone else, self included, who might want to build a B-17 E/F/G with the interior detail that you are displaying with this build, which I fine to be phenomenal. Excellent work, Gil! 🙂
-
Tell me you are looking through a magnifying glass while painting the details, lol 🙂 ! Phenomenal work on the cockpit detail. I love the light weathering!
-
I really like the armored car in the diorama. Good stuff! 🙂
-
Mark, I love your builds. I especially like your camouflage paint schemes like on the Ukrainian APC (that one is kind of pixelated unique looking 🙂 ) I love the Snoopy decal on the Australian APC. However, I think your planes steal the show. That Condor is awesome as is the F-27 Friendship. Also, I really love the British double decker omnibusses, especially the one all decked out with the Wright's soap advertisement. I also think that you nail your camouflage paint schemes like on your Japanese APCs and on the Paladins (I am wondering how you paint them). All in all a very productive year it seems. Keep up the great work! 🙂
-
Carlos, fantastic work! Lovin' it all. I really like the Sopwith Camel, the camouflage paint scheme on the Chengdu F-7B, the crispness of the Zero paint scheme, and the M-47 tank overall (plus I think you nailed the machine gun on the tank very well, too). A good year I must say. 🙂
-
A TIE Interceptor Build I Completed Last Year
EdCarr replied to EdCarr's topic in Space, Sci-Fi & Fantasy
Thanks for looking and the compliment, Carlos! 🙂 -
A Boba Fett build I finished two years ago
EdCarr replied to EdCarr's topic in Space, Sci-Fi & Fantasy
Thanks, Mark! I tried my best to do so. 🙂 -
Here is the AT-ST I built almost exactly one year ago
EdCarr replied to EdCarr's topic in Space, Sci-Fi & Fantasy
Thanks for looking and for posting your compliments, guys! I will see if I can find Chewbacca, Mark. I will post a photo of him if I do. Yes, Carlos, I believe you are correct about the AT-STs also being in the Empire Strikes Back movie during the battle of Hoth. For some reason I simply associate the battle of Hoth with AT-ATs alone. -
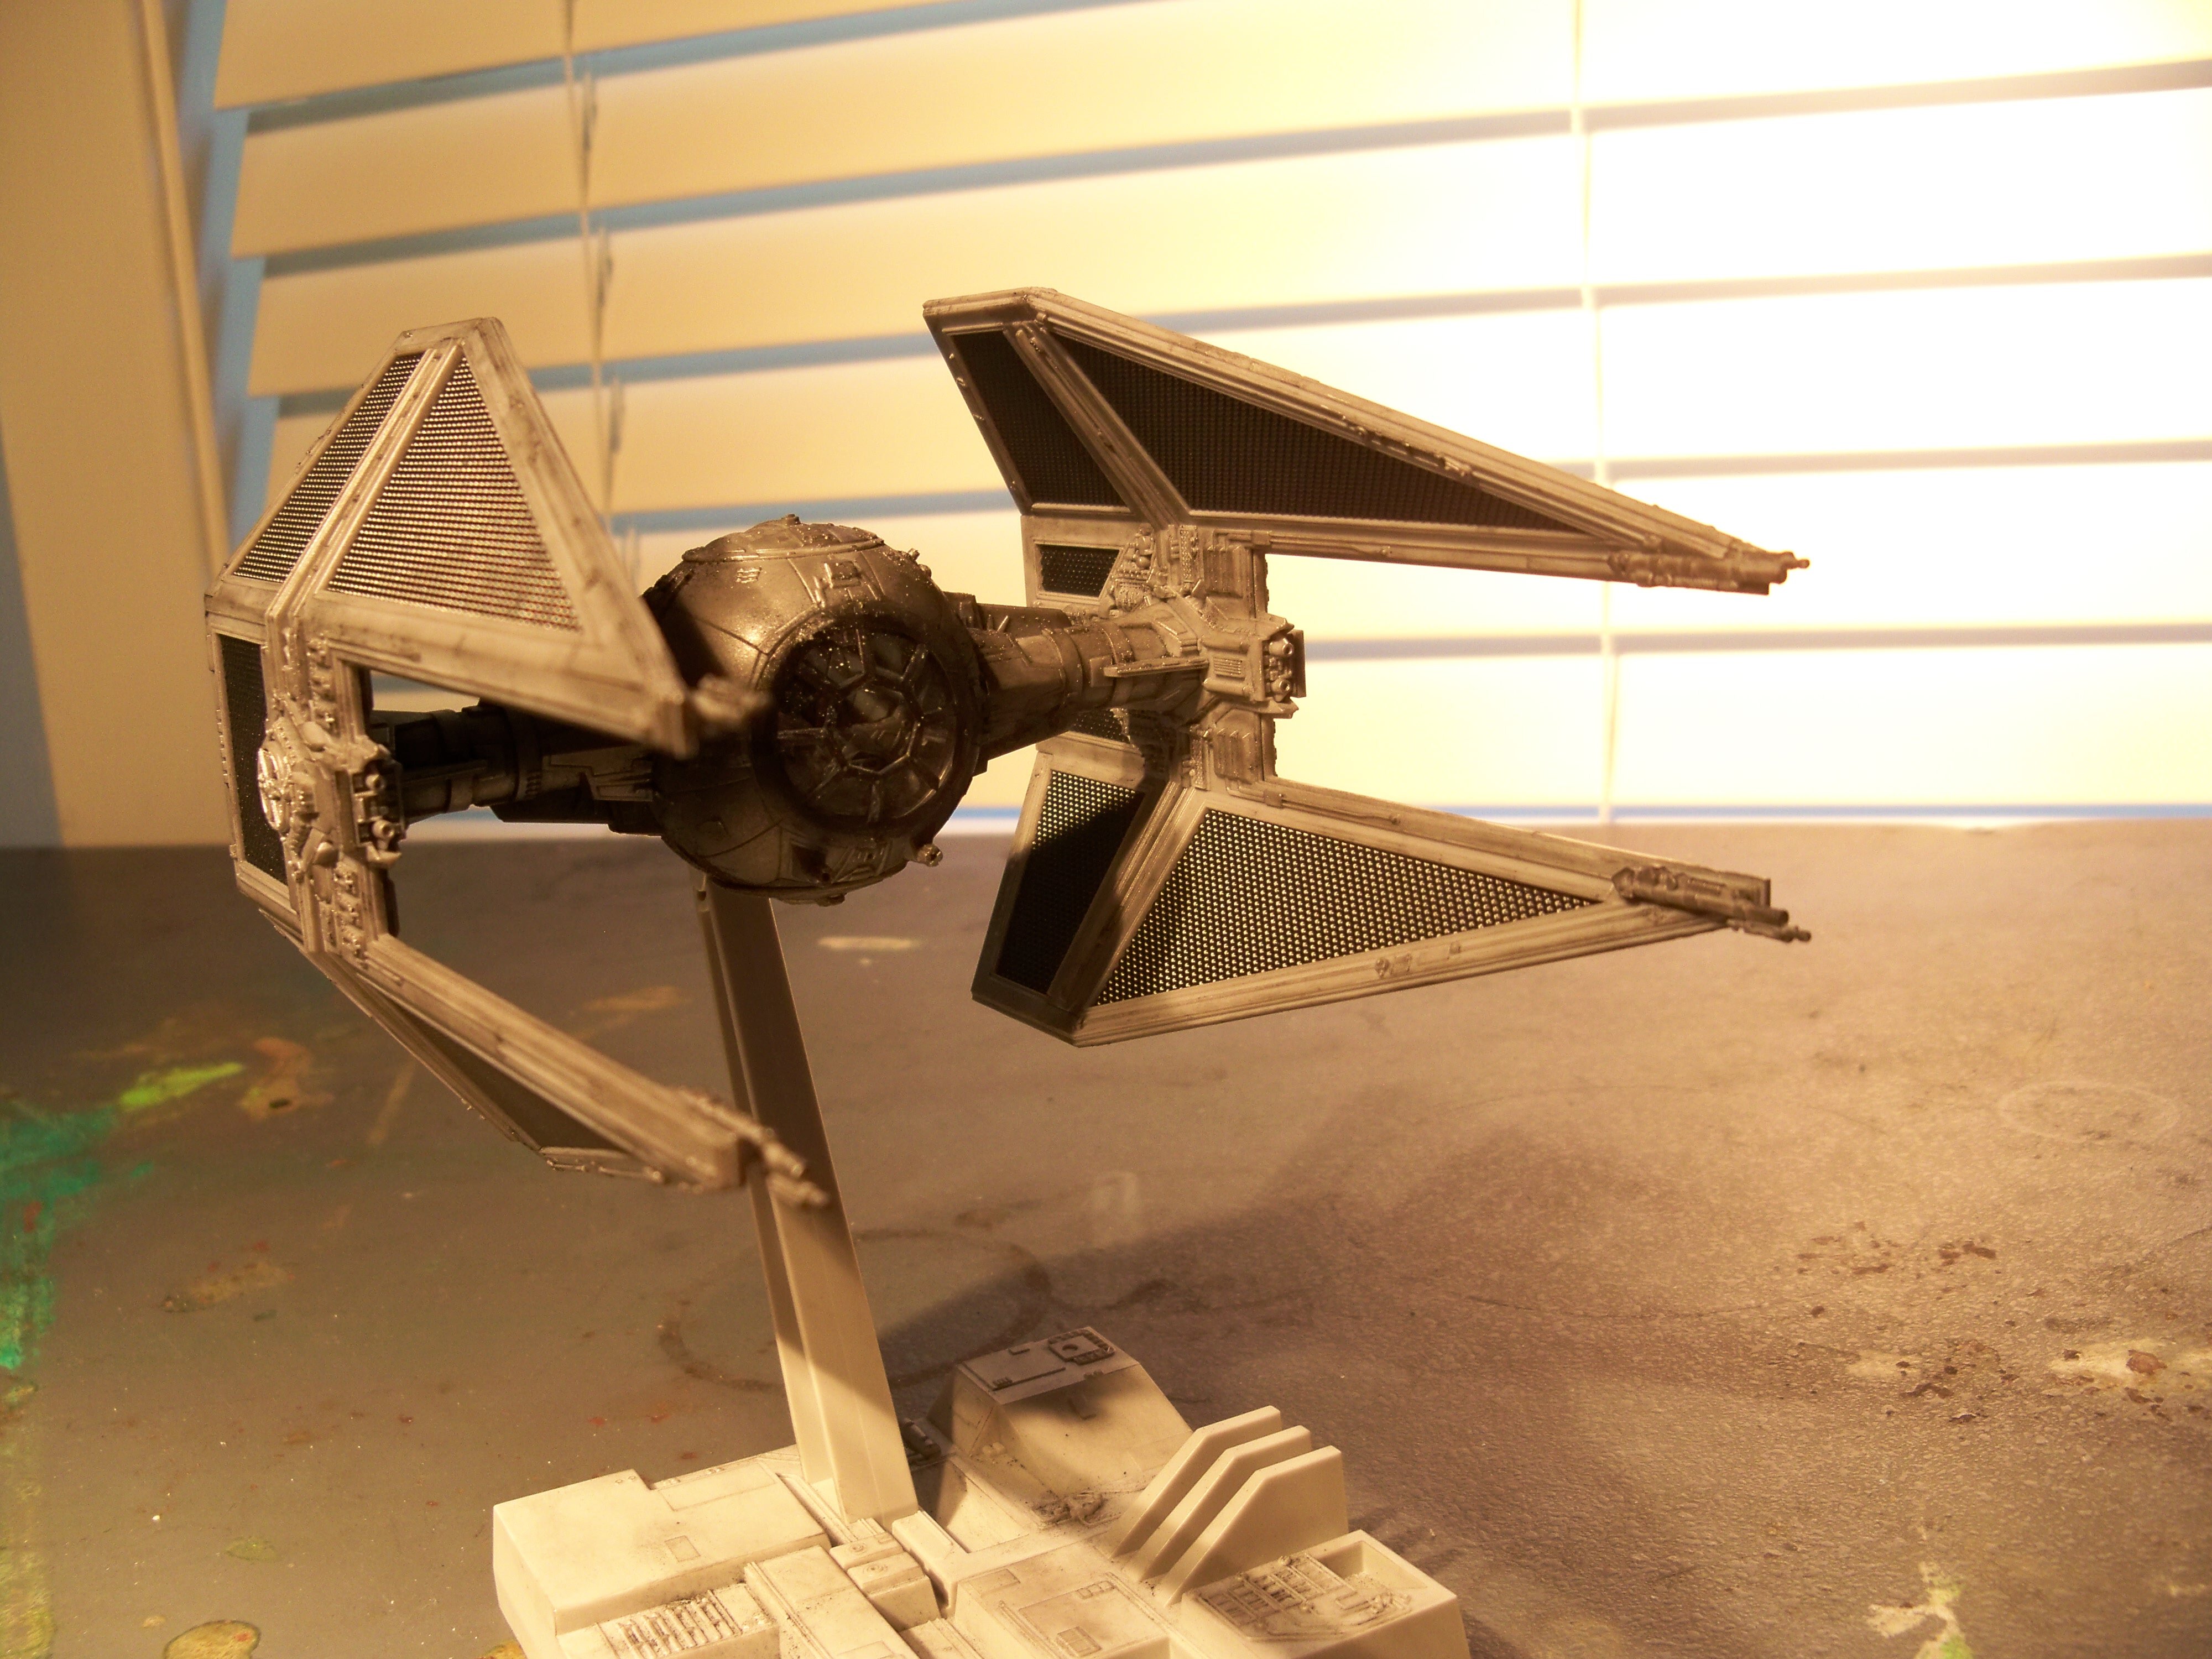
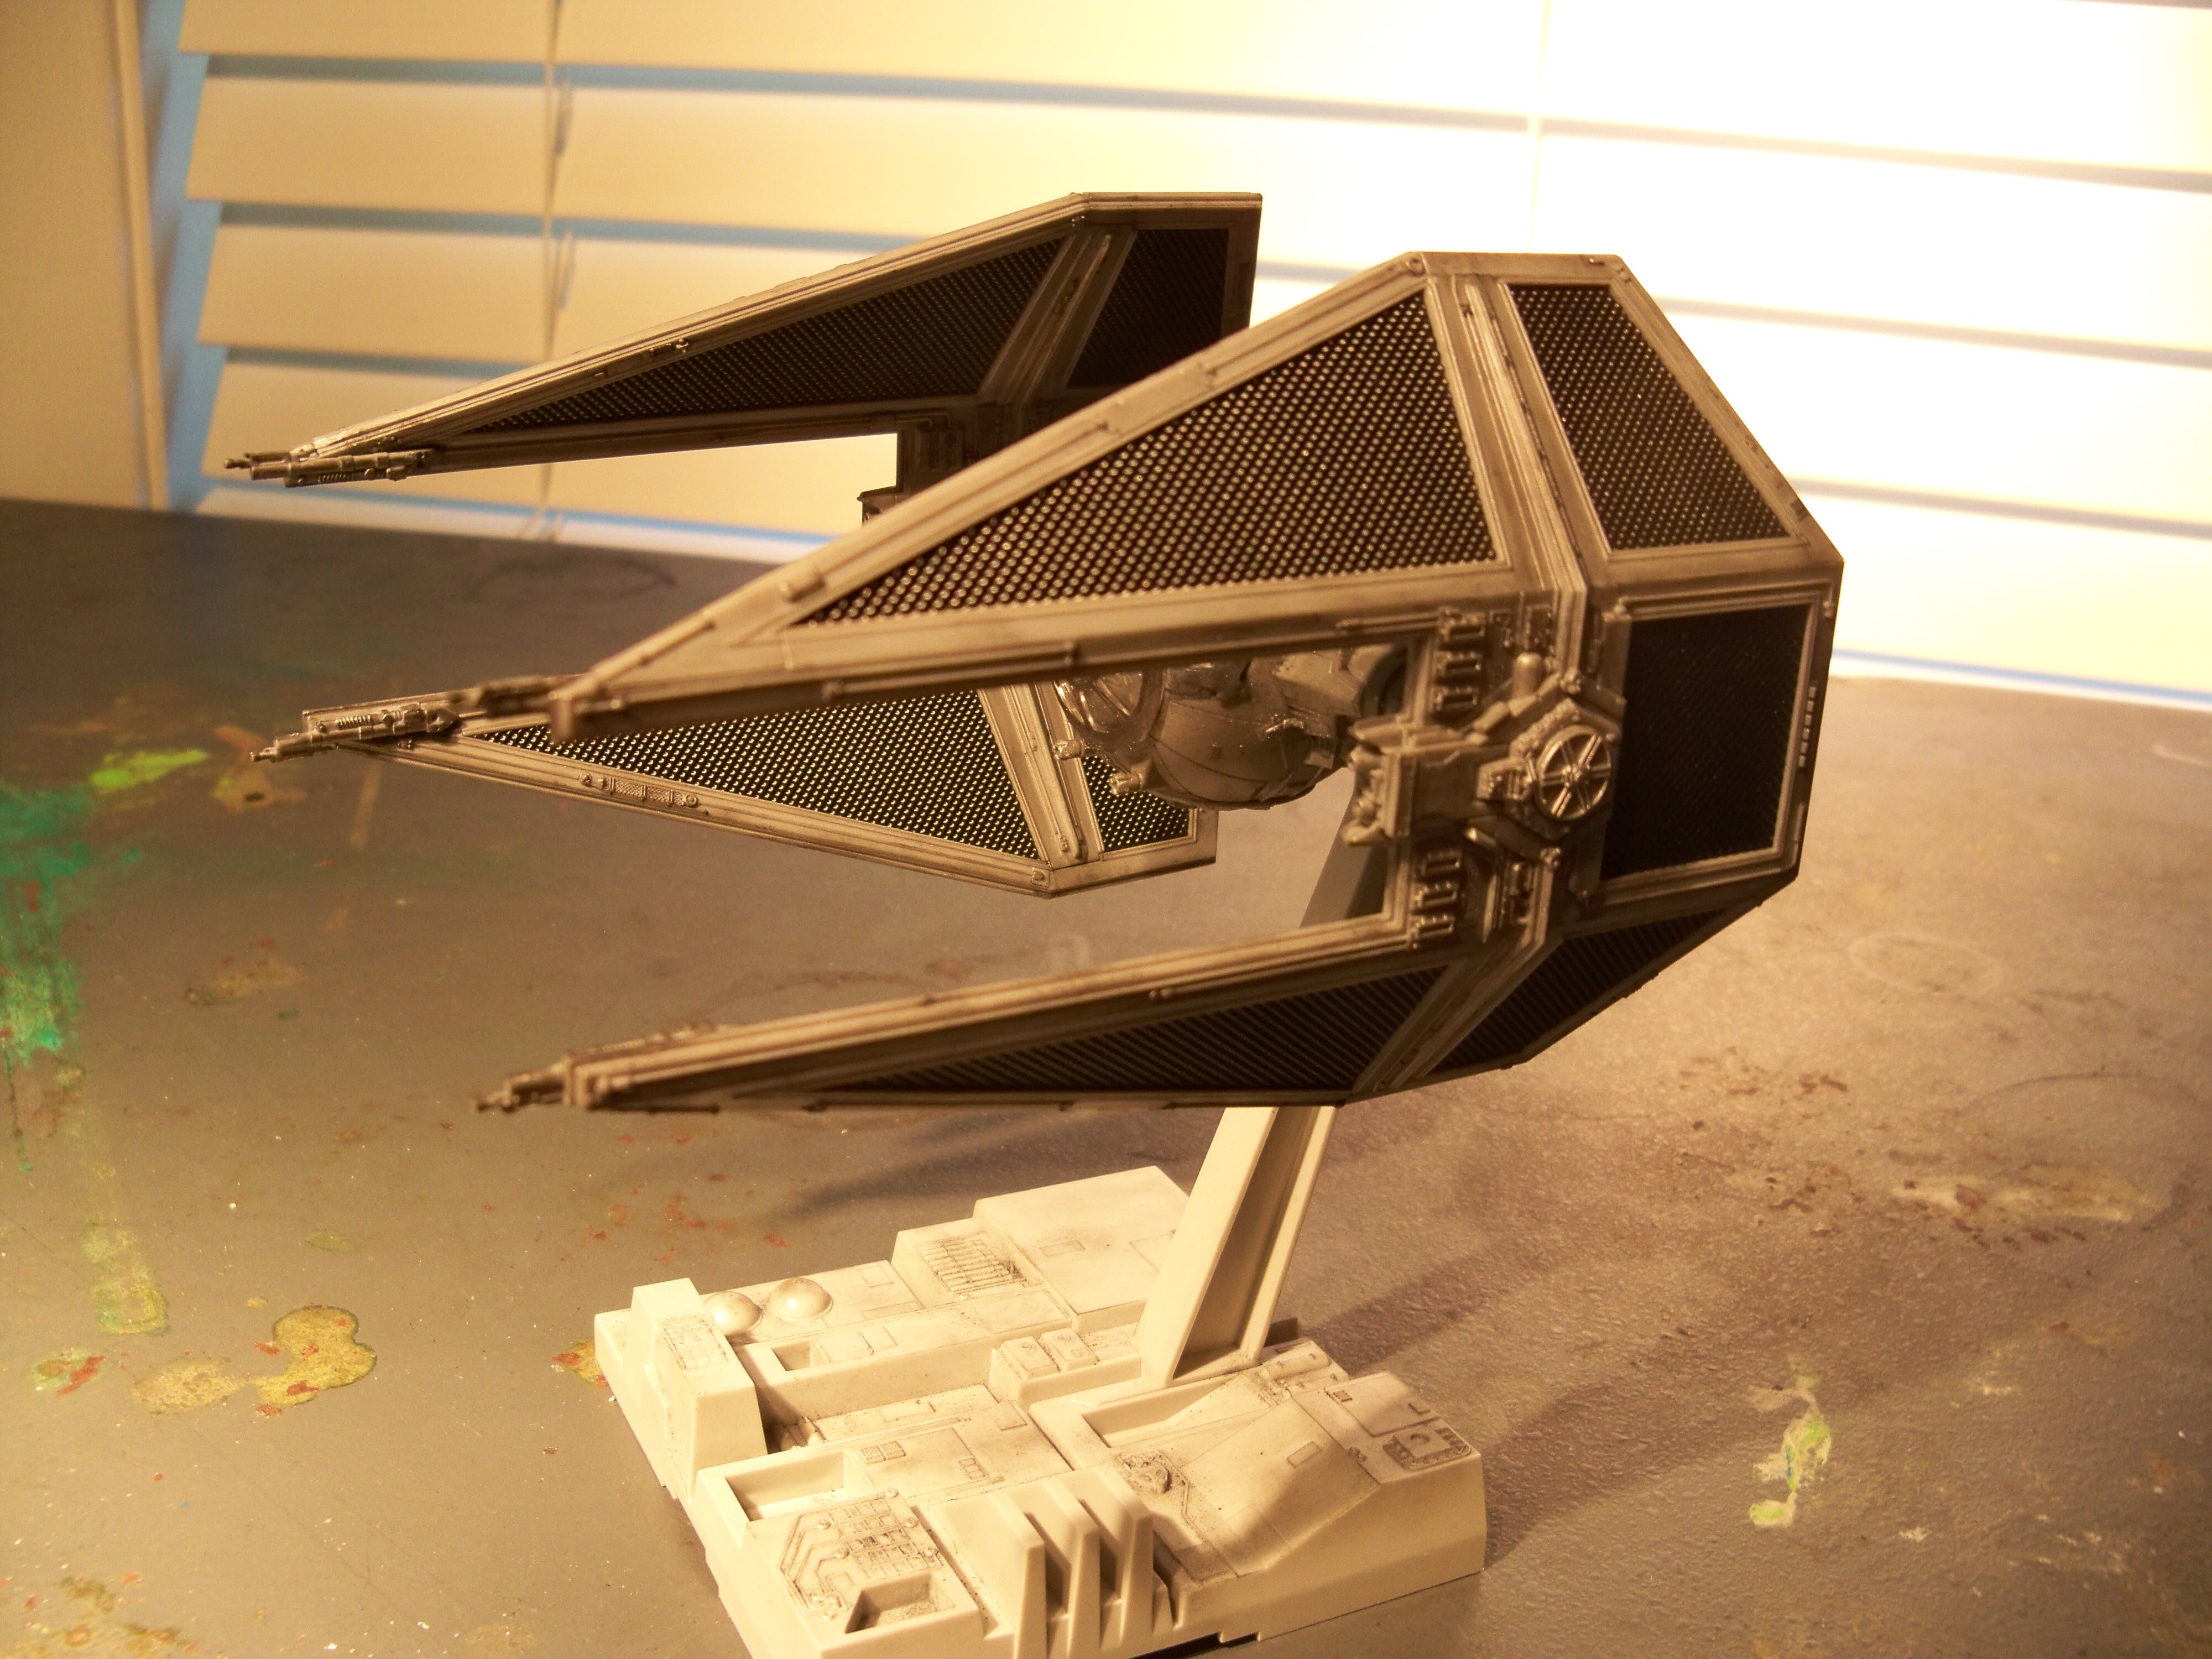
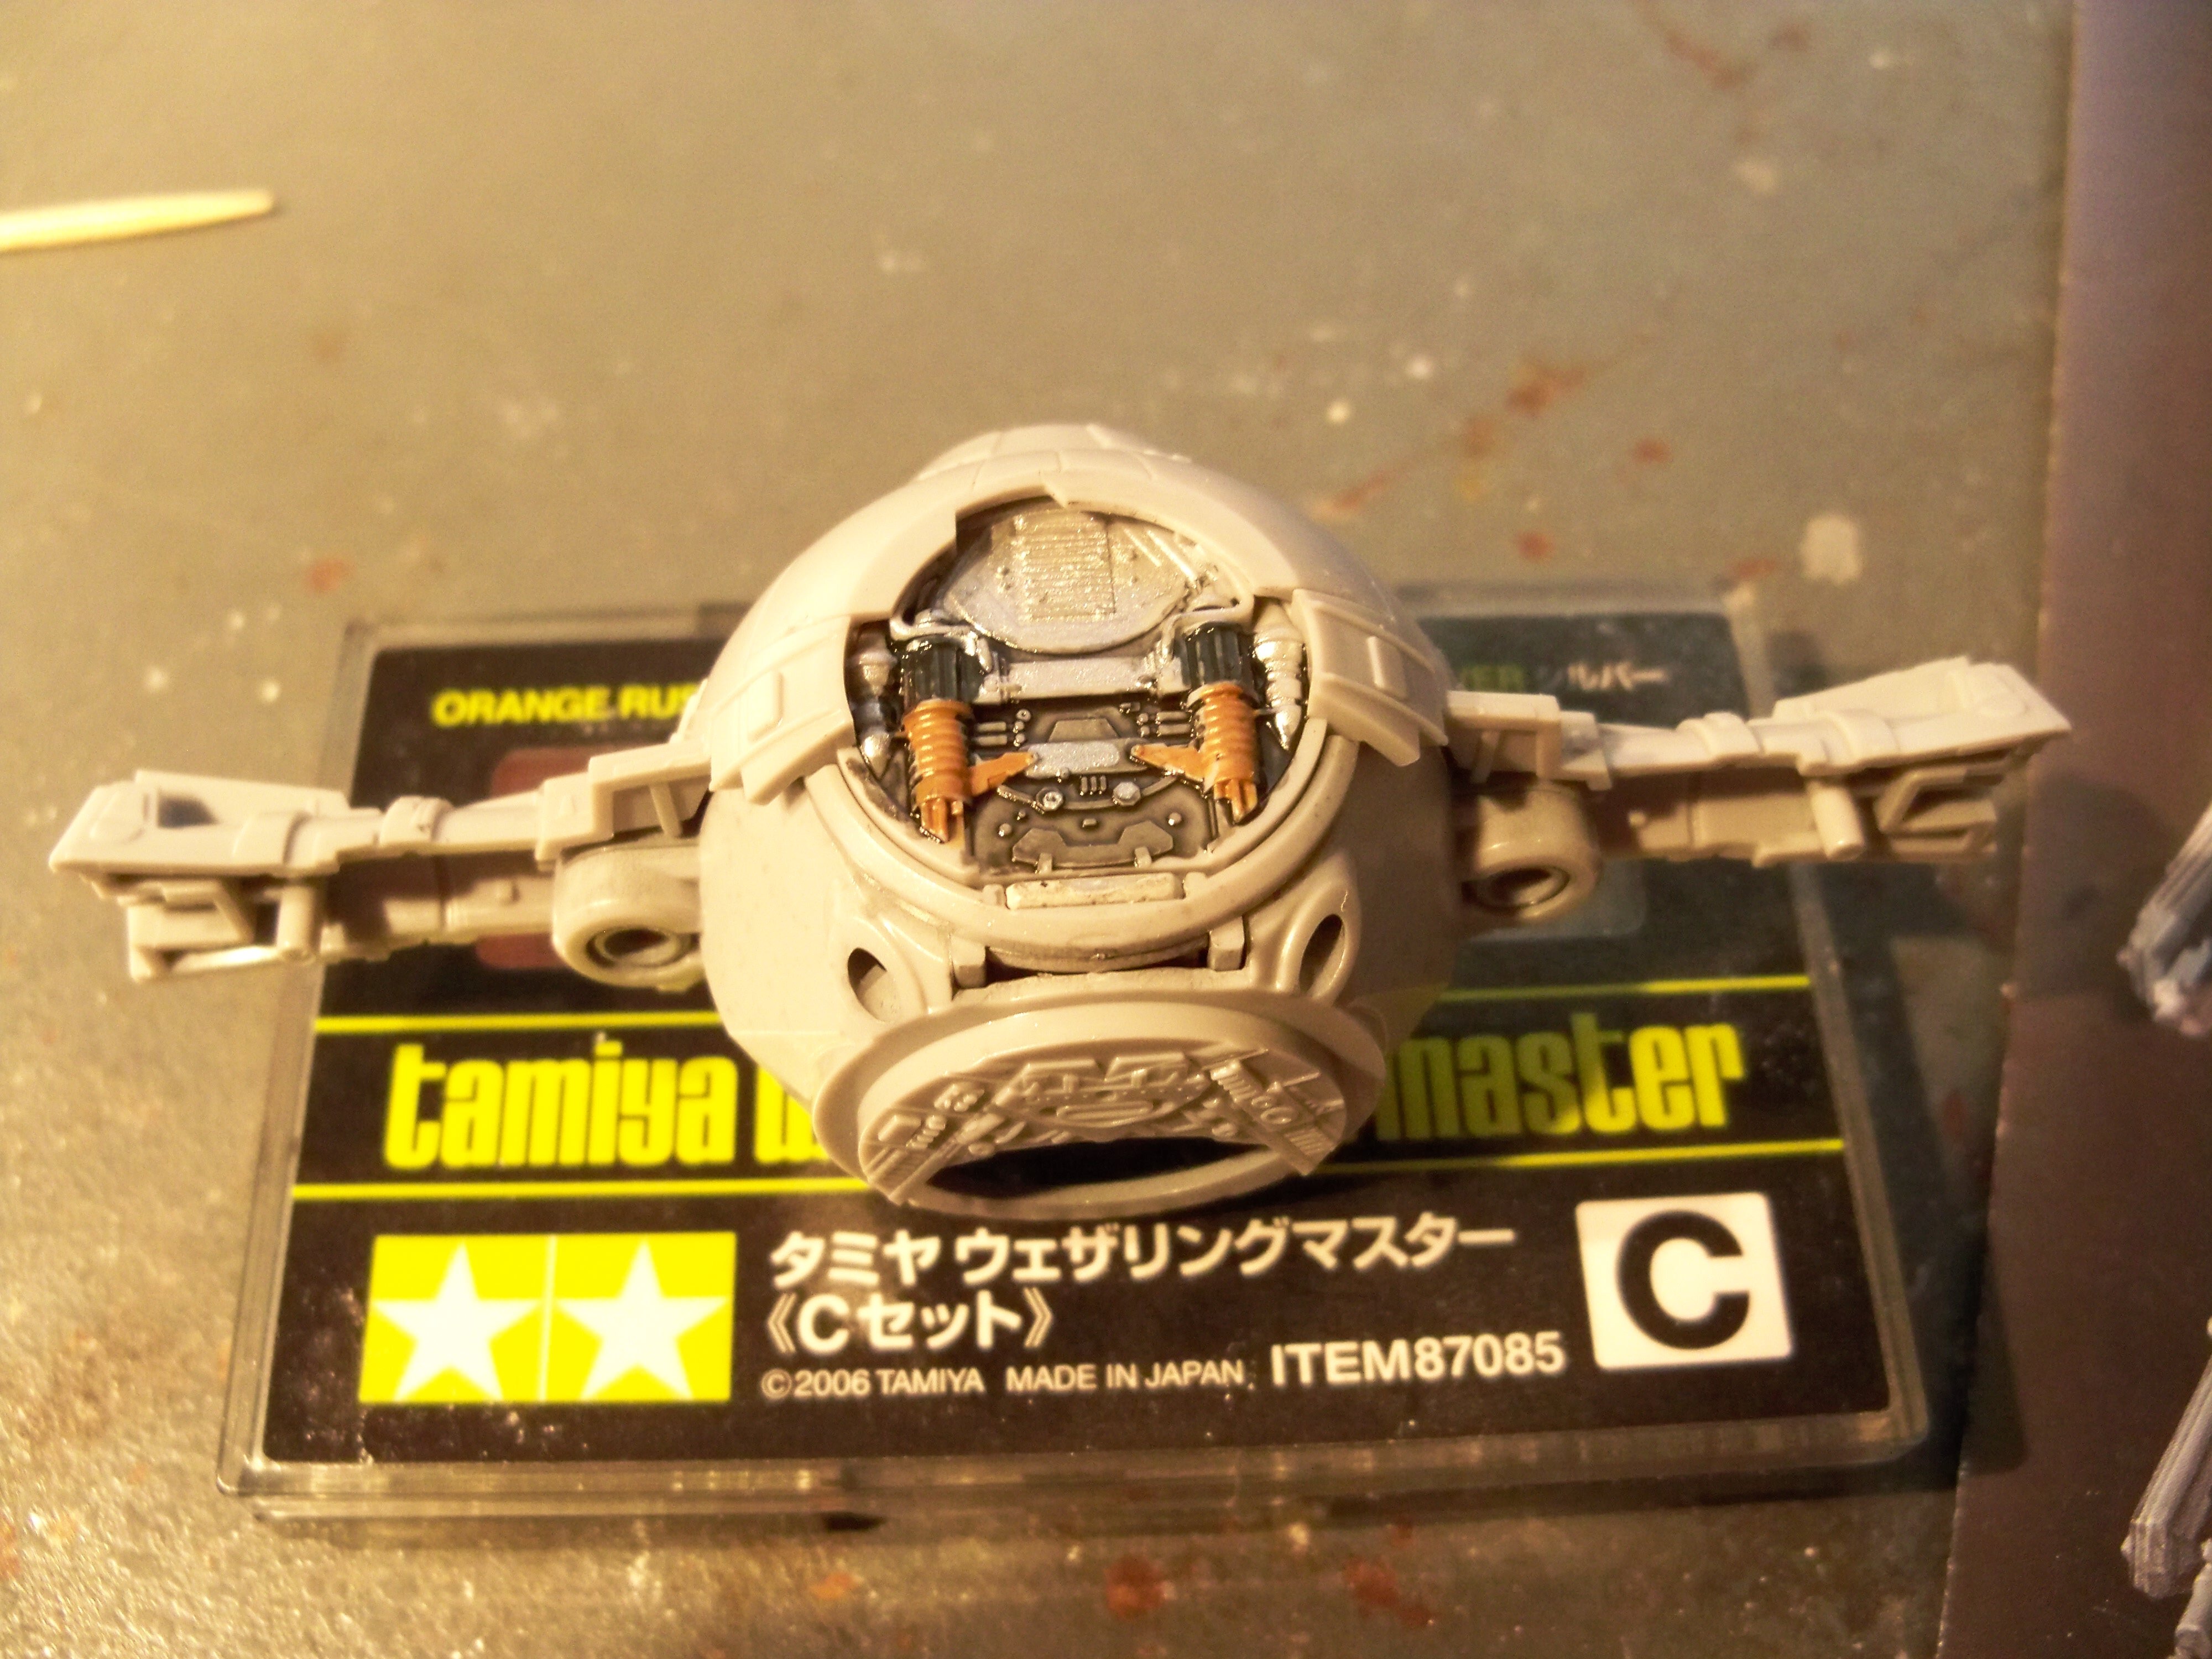
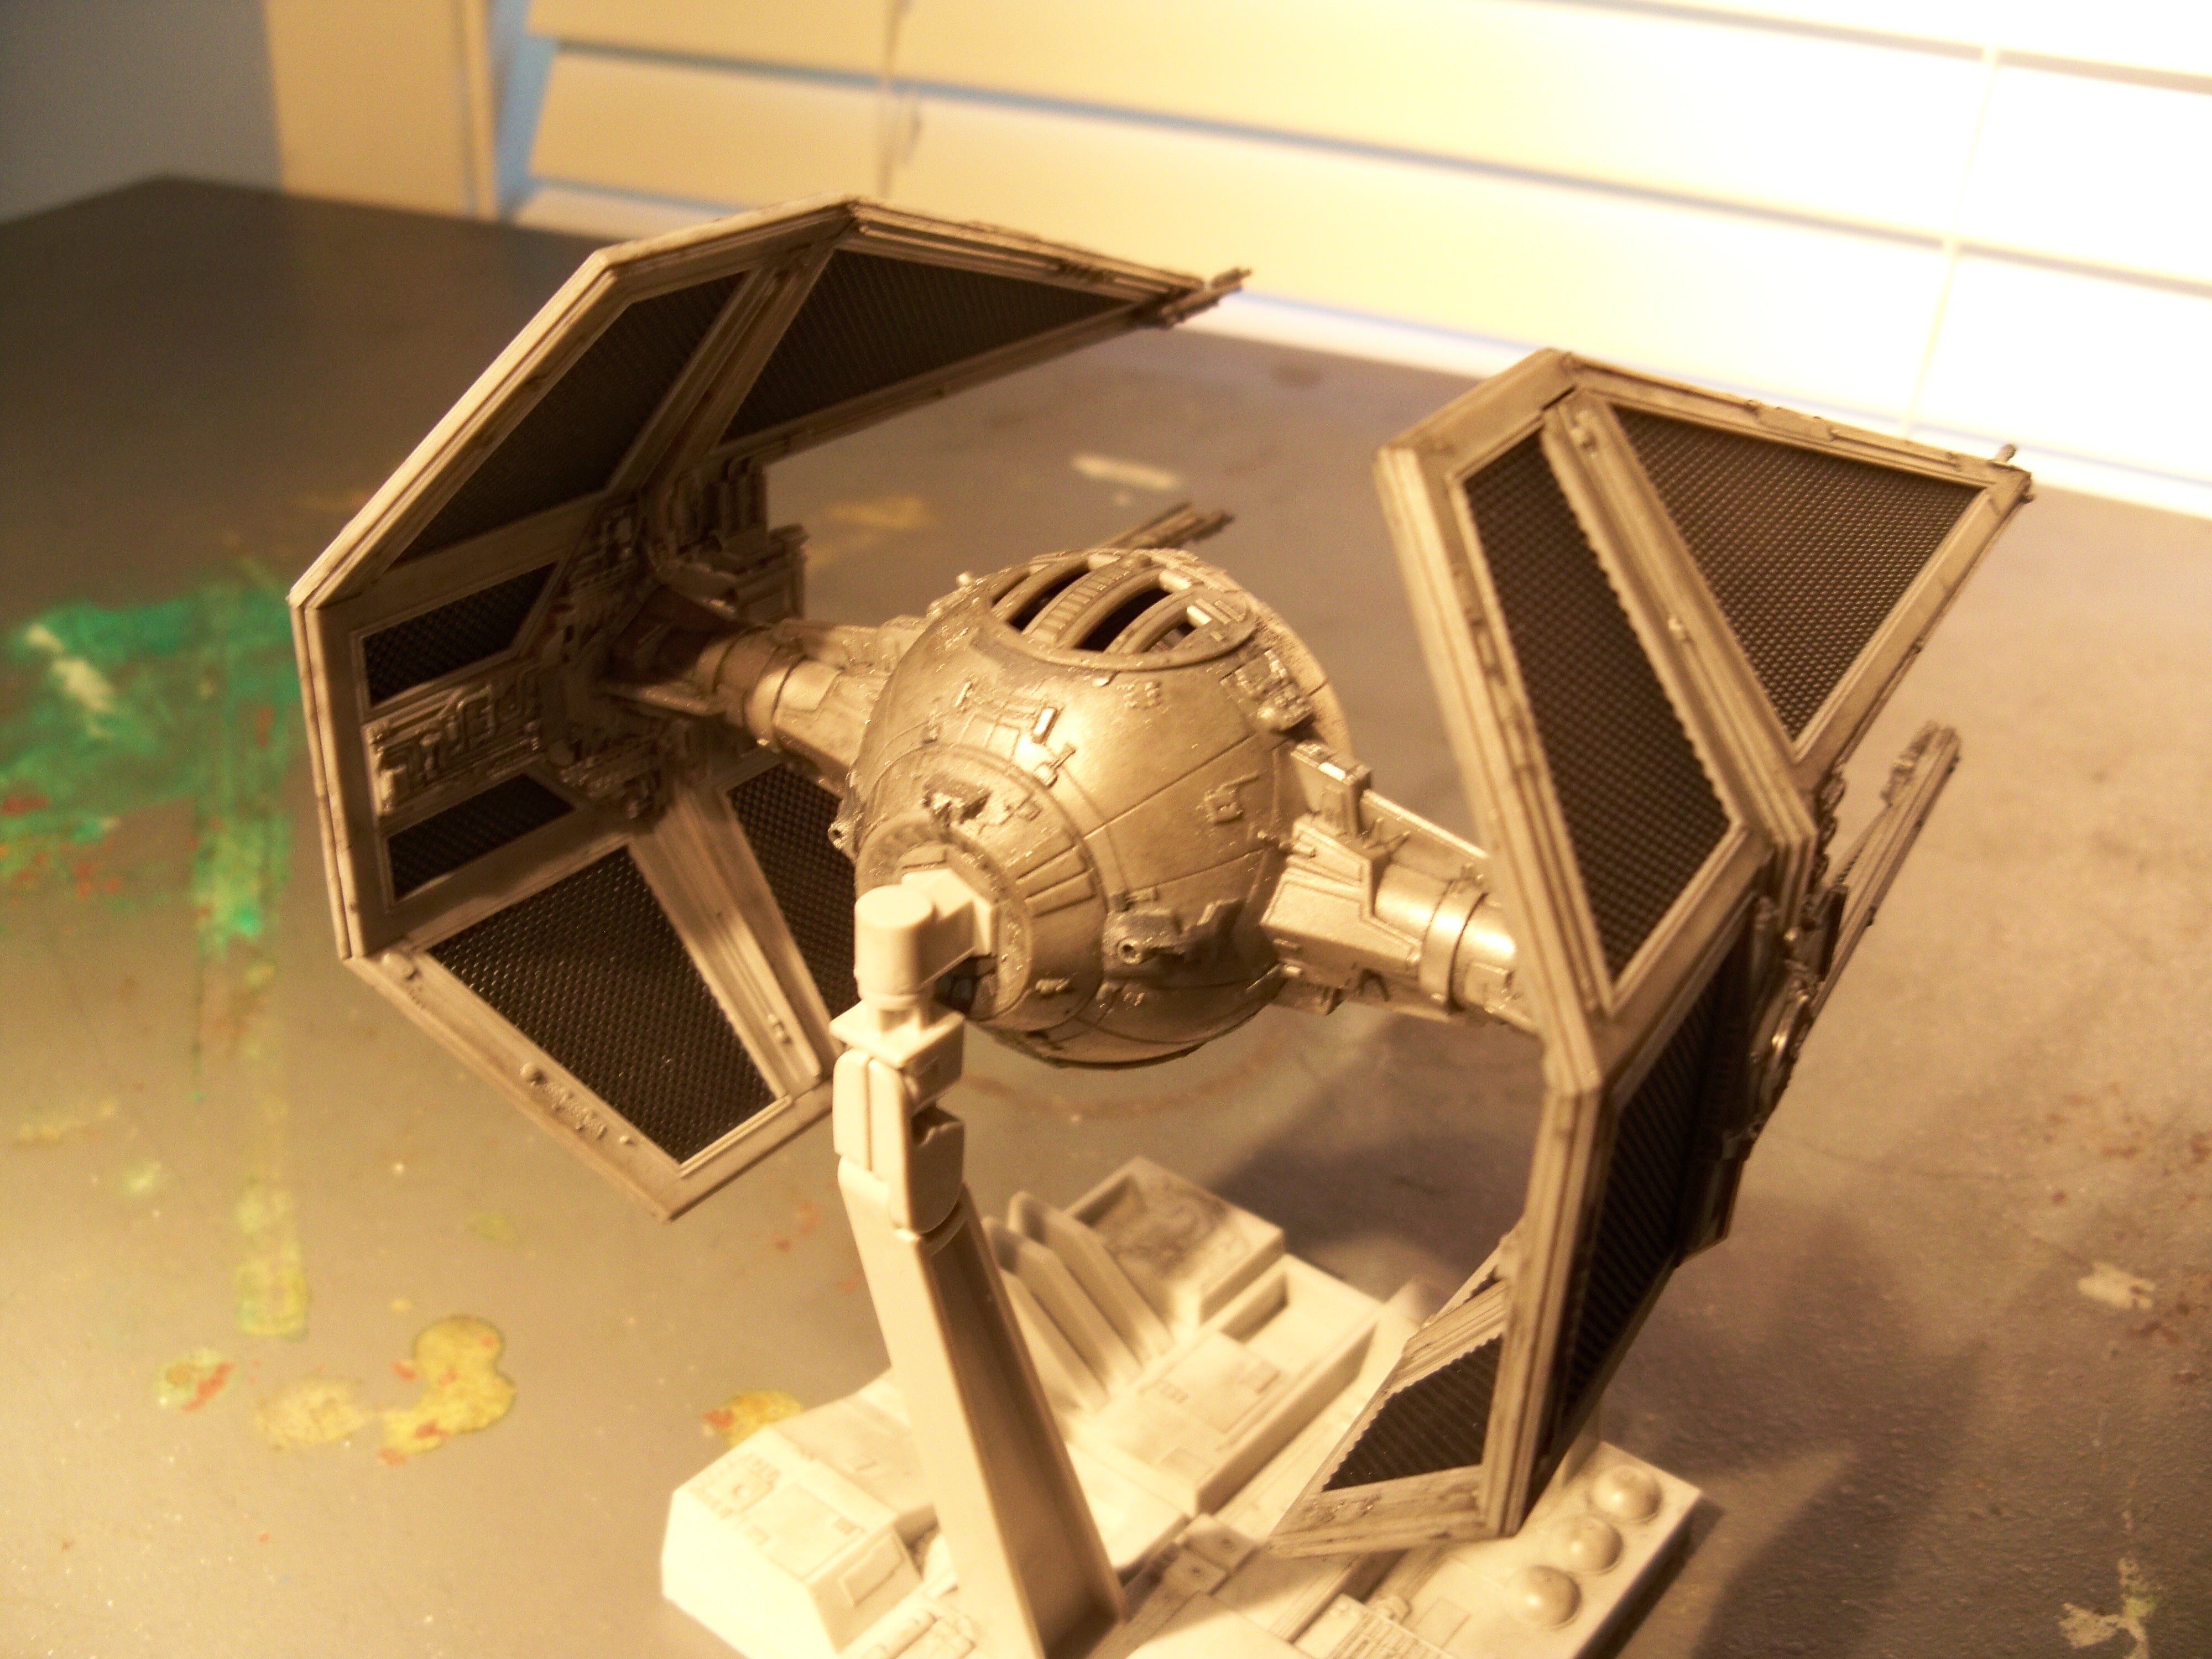
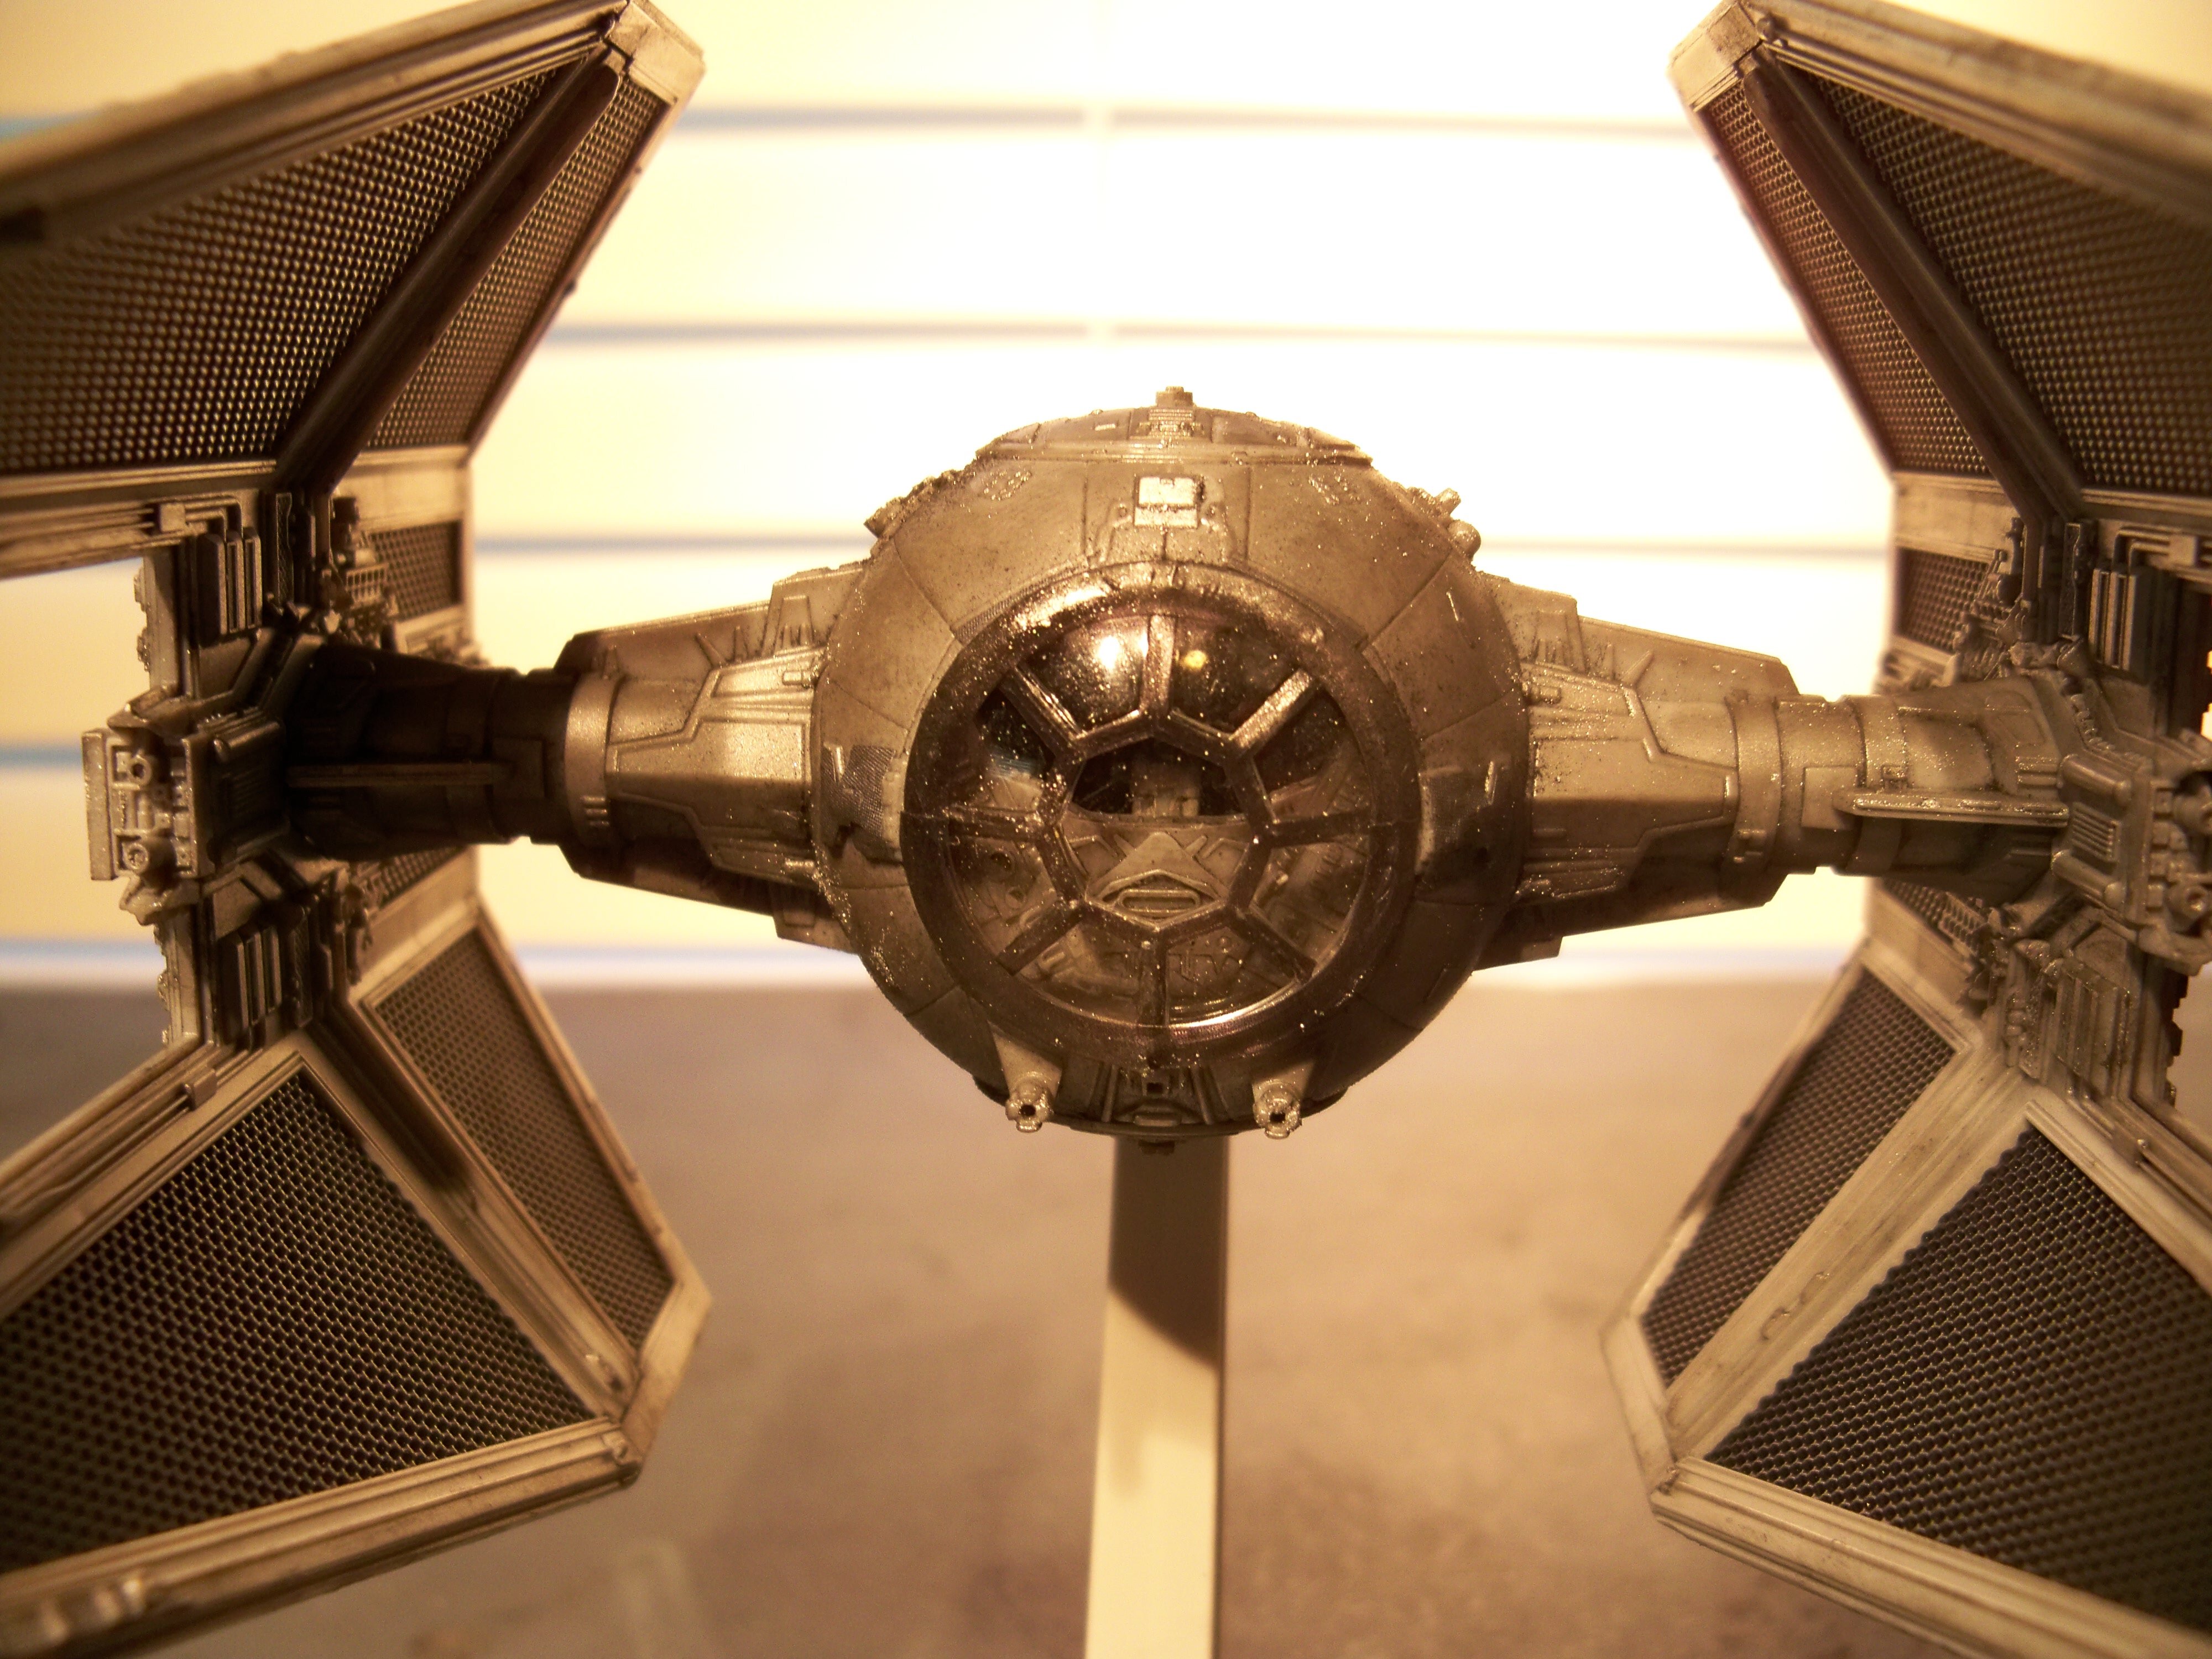
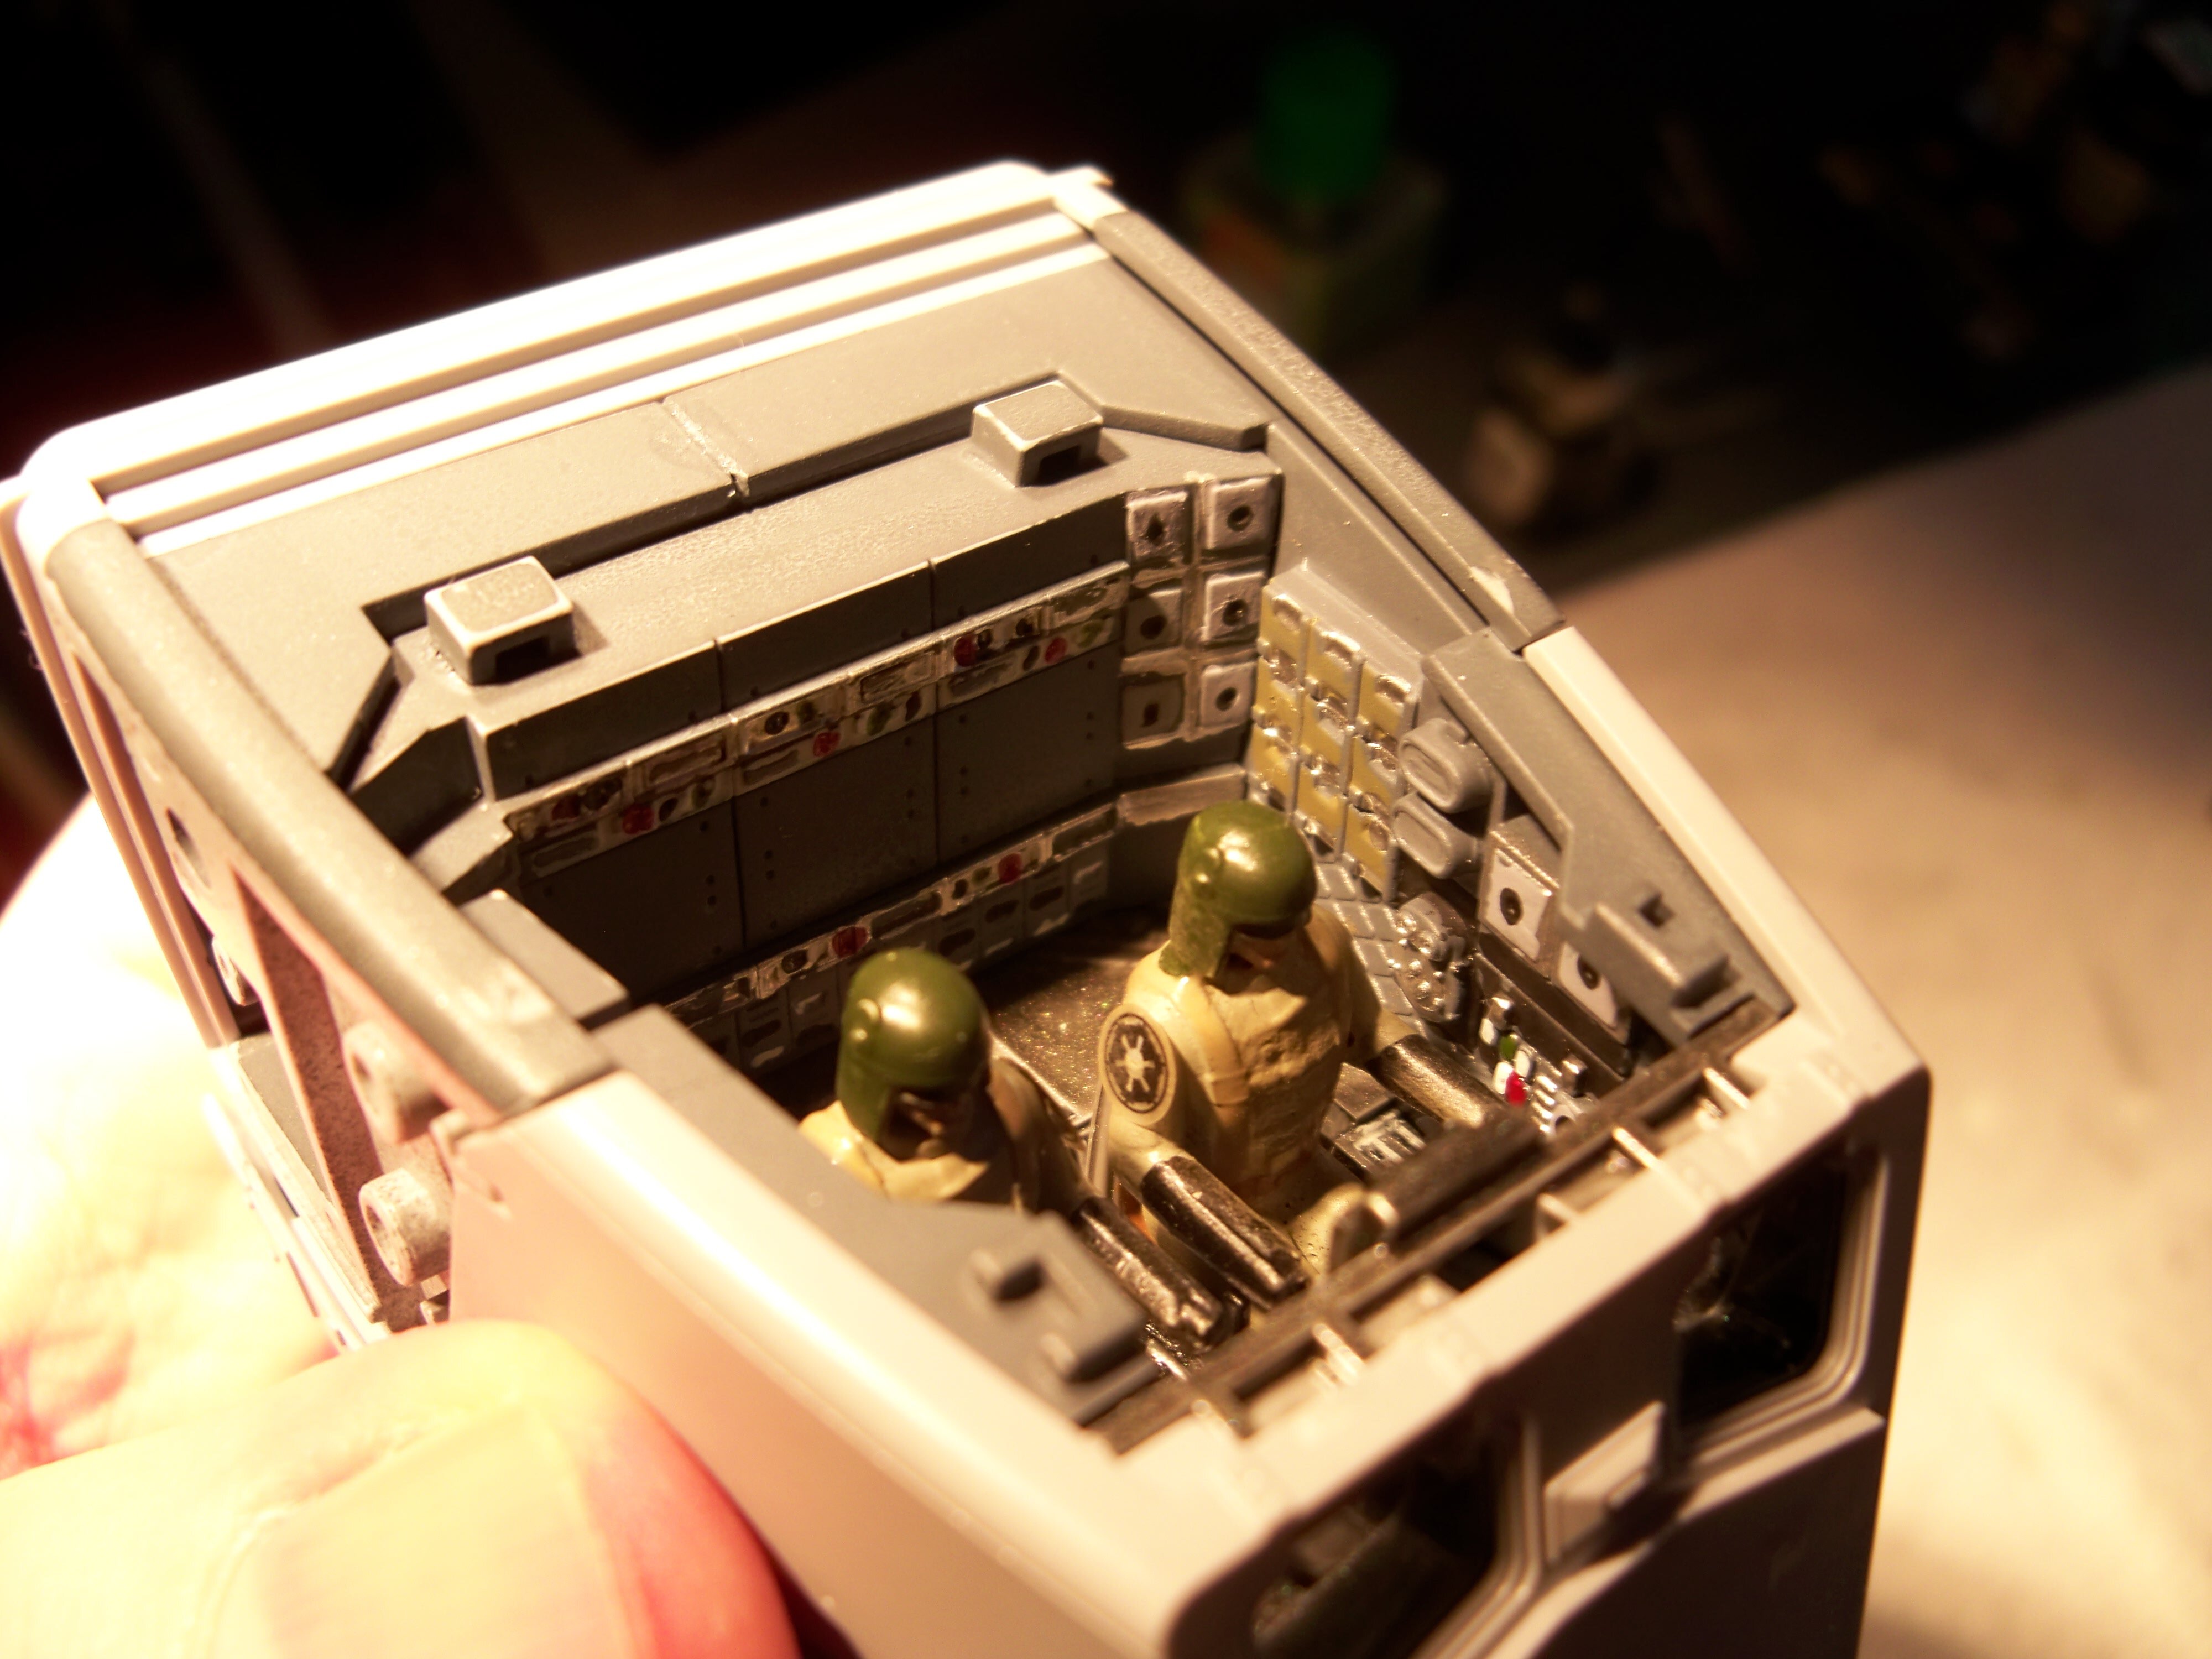
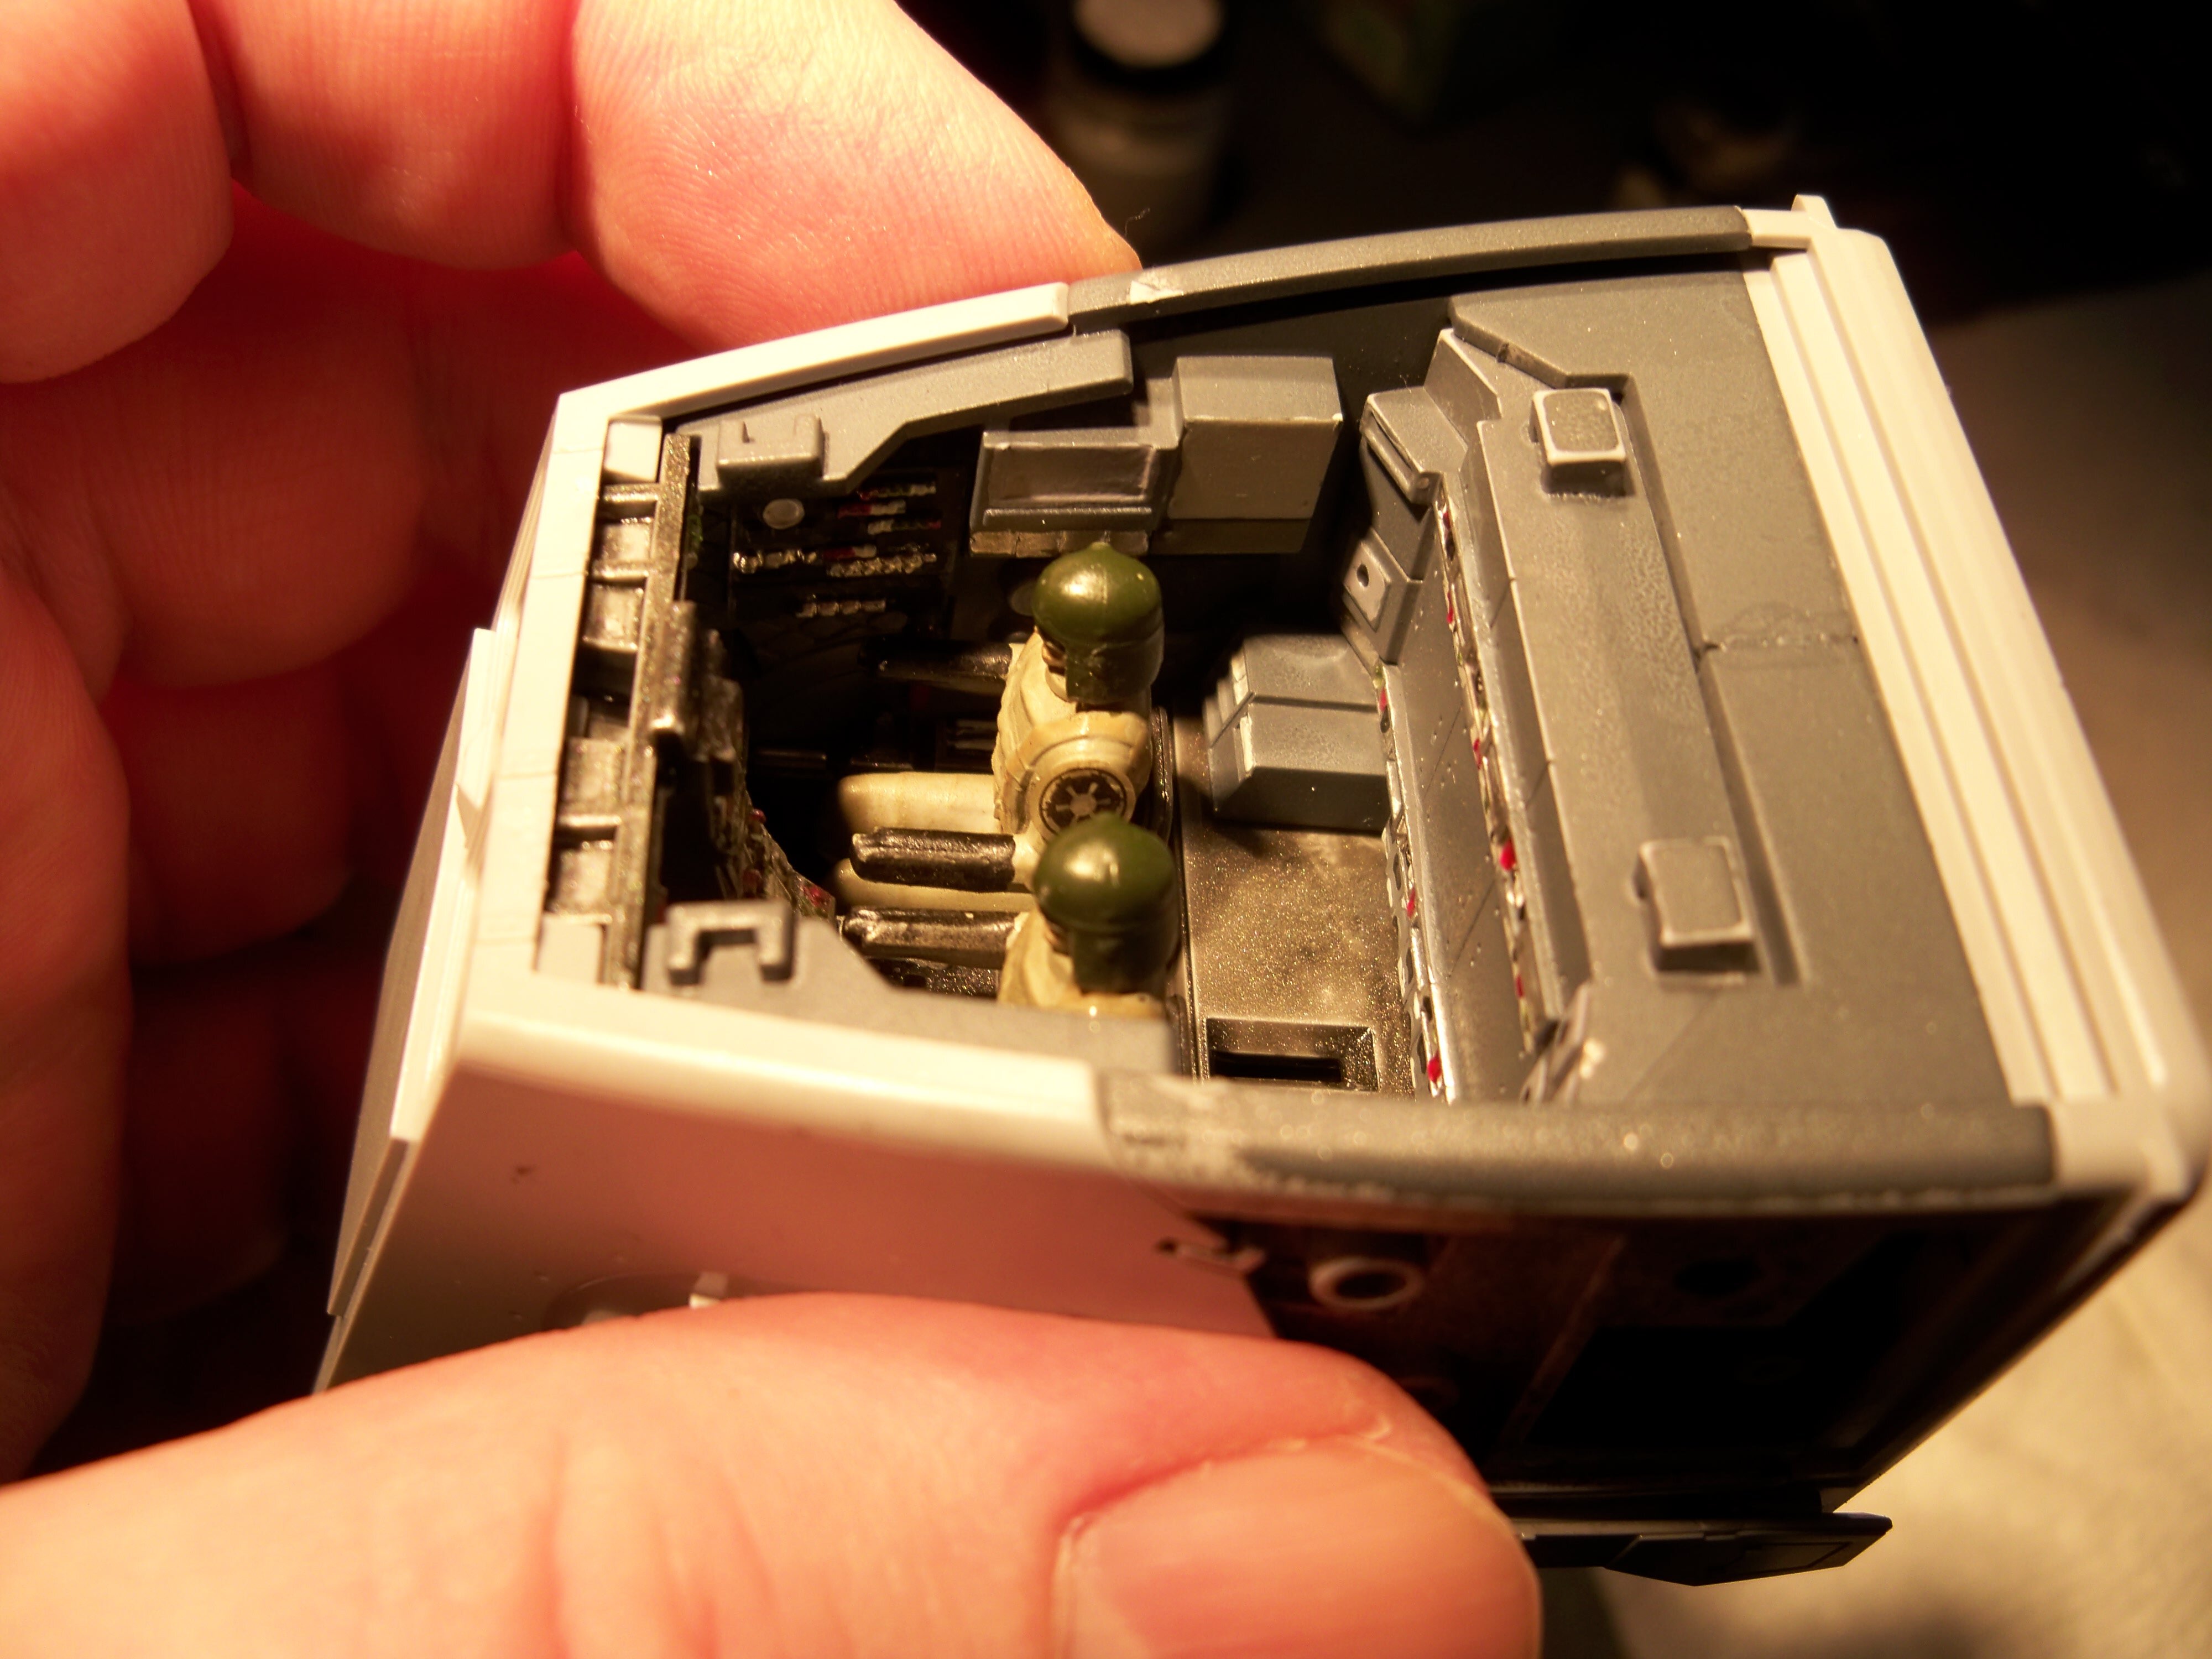
Here are a few photos of the 1/72 scale TIE Interceptor Bandai kit I built last year immediately following my AT-ST build. TIE stands for Twin Ion Engine for those who did not know. Again, that is information learned from my Star Wars fan best friend. The TIE Interceptors saw action in the Return of The Jedi Movie in which they attacked and harassed the Rebel Fleet and fighters that had gathered around the Second Death Star and the forest moon of Endor. The TIE interceptors are basically meant to represent Imperial technological improvements in their star fighter design during the time between the first, second and third Star Wars movies which are Episodes IV, V, and VI. That is what the information on the box of the Bandai kit states. The TIE Interceptor has bent wings unlike the original TIE fighters seen in the very first Star Wars movie A New Hope and much like Darth Vader's TIE fighter in the same movie. Also, the front of the wings are elongated, kind of making it appear more sleek in my opinion. I included A photo of the cockpit before I put the canopy on so one could see the pilot a little and some of the inside of the cockpit as well as my fingers and thumb once again to show the relative size of the model. Also, for reasons unknown to me, Bandai included details of the of the Twin Ion Engine, or, are they the details of the two laser guns kind of like the details of machine guns that can be found in some WWII era fighter model's wings. I say I do not know why they included the detail, because they are simply covered up with the bottom part of the center-sphere of the fighter. I have a picture of the detail and the work i put into it before covering it up with the molded plastic of the central sphere's underside. The detail- and the picture of it- is the picture included in this post of the part resting or sitting on one of Tamiya's Weathering Master Tools which is something I use quite often in detailing and weathering my models. Ok, enough rambling, here are the pics:

-
AT-ST stands for All-Terrain Scout Transport for those who did not know. My hardcore Star Wars best friend shared some of his movie knowledge with me, that is how I know what AT-ST stands for. It was seen in the Return of The Jedi movie on the forest moon of Endor. The AT-STs saw some action in the battle with the Ewoks in which Han Solo, Princess Leia, R2-D2 and C3-PO along with Chewbacca (who took control of one of the empire's AT-STs and promptly destroyed the locked doors to the shield generator) blew up the shield generator with explosive charges so the Rebel fighters from the Rebel fleet could attack and destroy the second Death Star. A Chewbacca figure is included with the model, giving the modeler the option of creating the AT-ST that was captured and then controlled by Chewie. The Chewbacca figure is molded standing up and would have to be sticking out from the cockpit. Also, a cockpit-open hatch is included for this very build option. In the movie, Han and Leia and company learn that Chewie has control of the AT-ST, much to his and her relief. The kit was completed almost exactly one year ago and was made by Bandai and is in 1/72 scale. Here are some pics. I included two of the cockpit with the roof off to see the pilots and details inside as well as to give a relative size of the model as my fingers and thumb were also included in the picture.
-
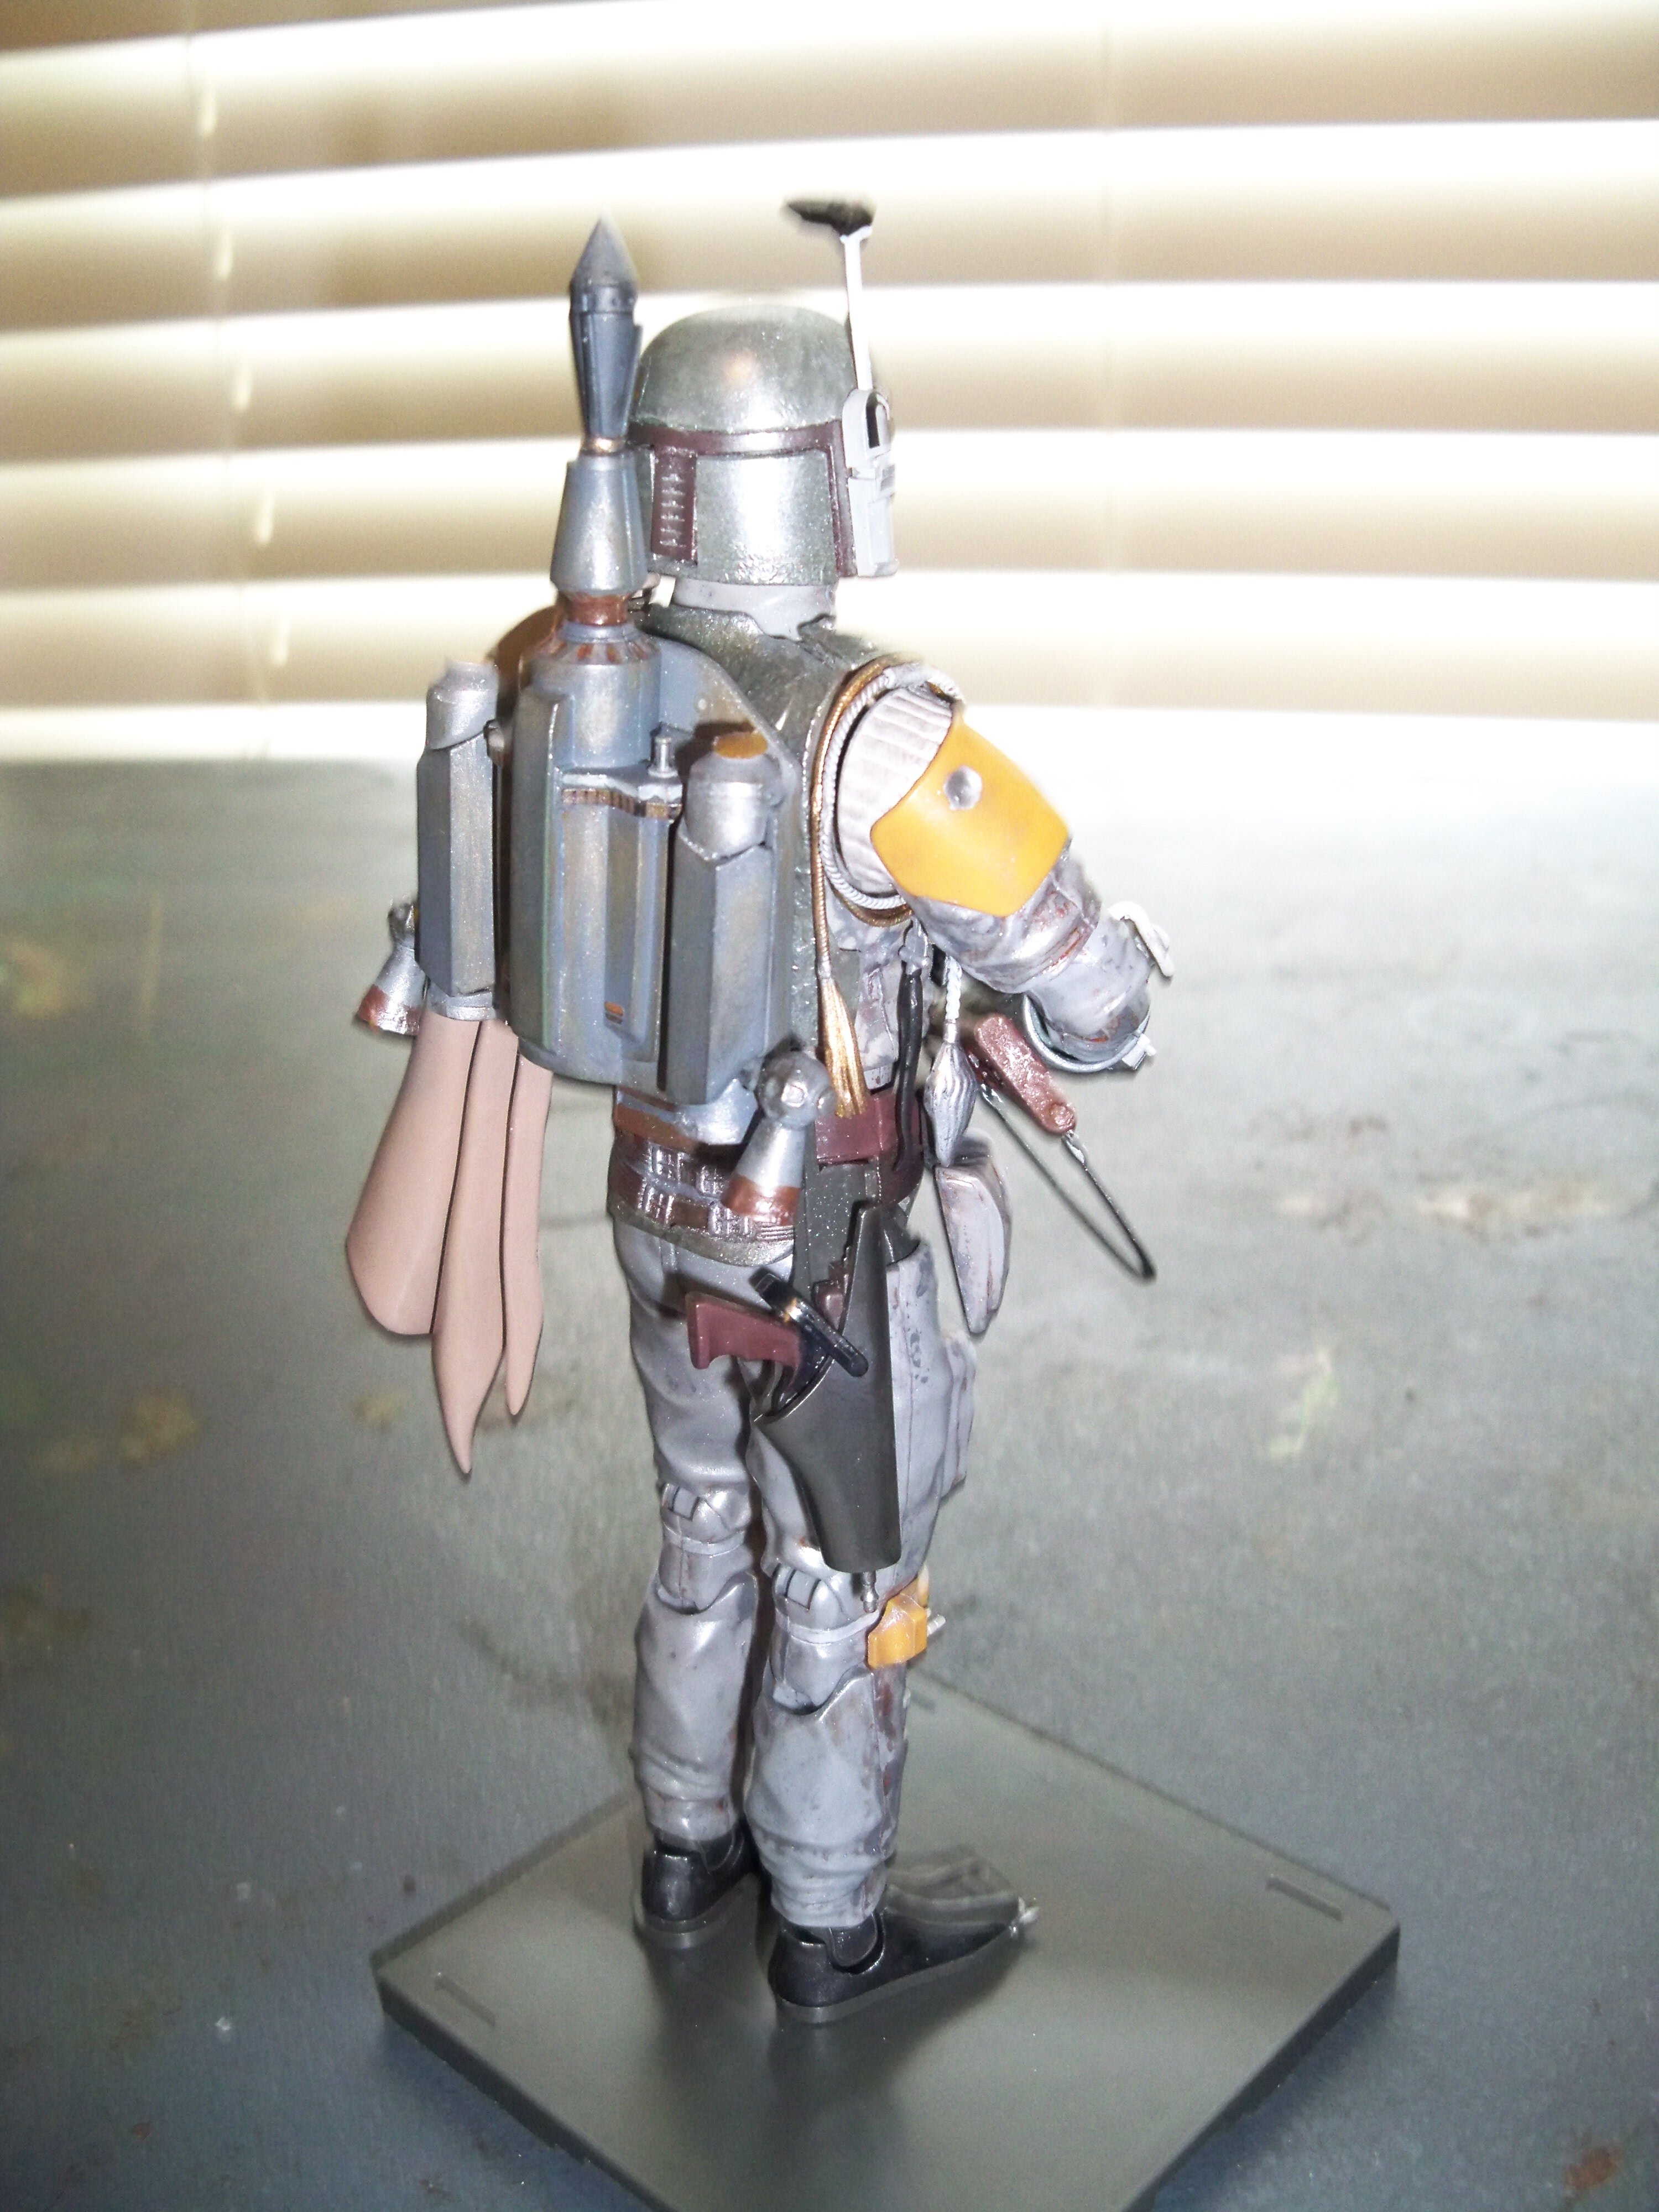
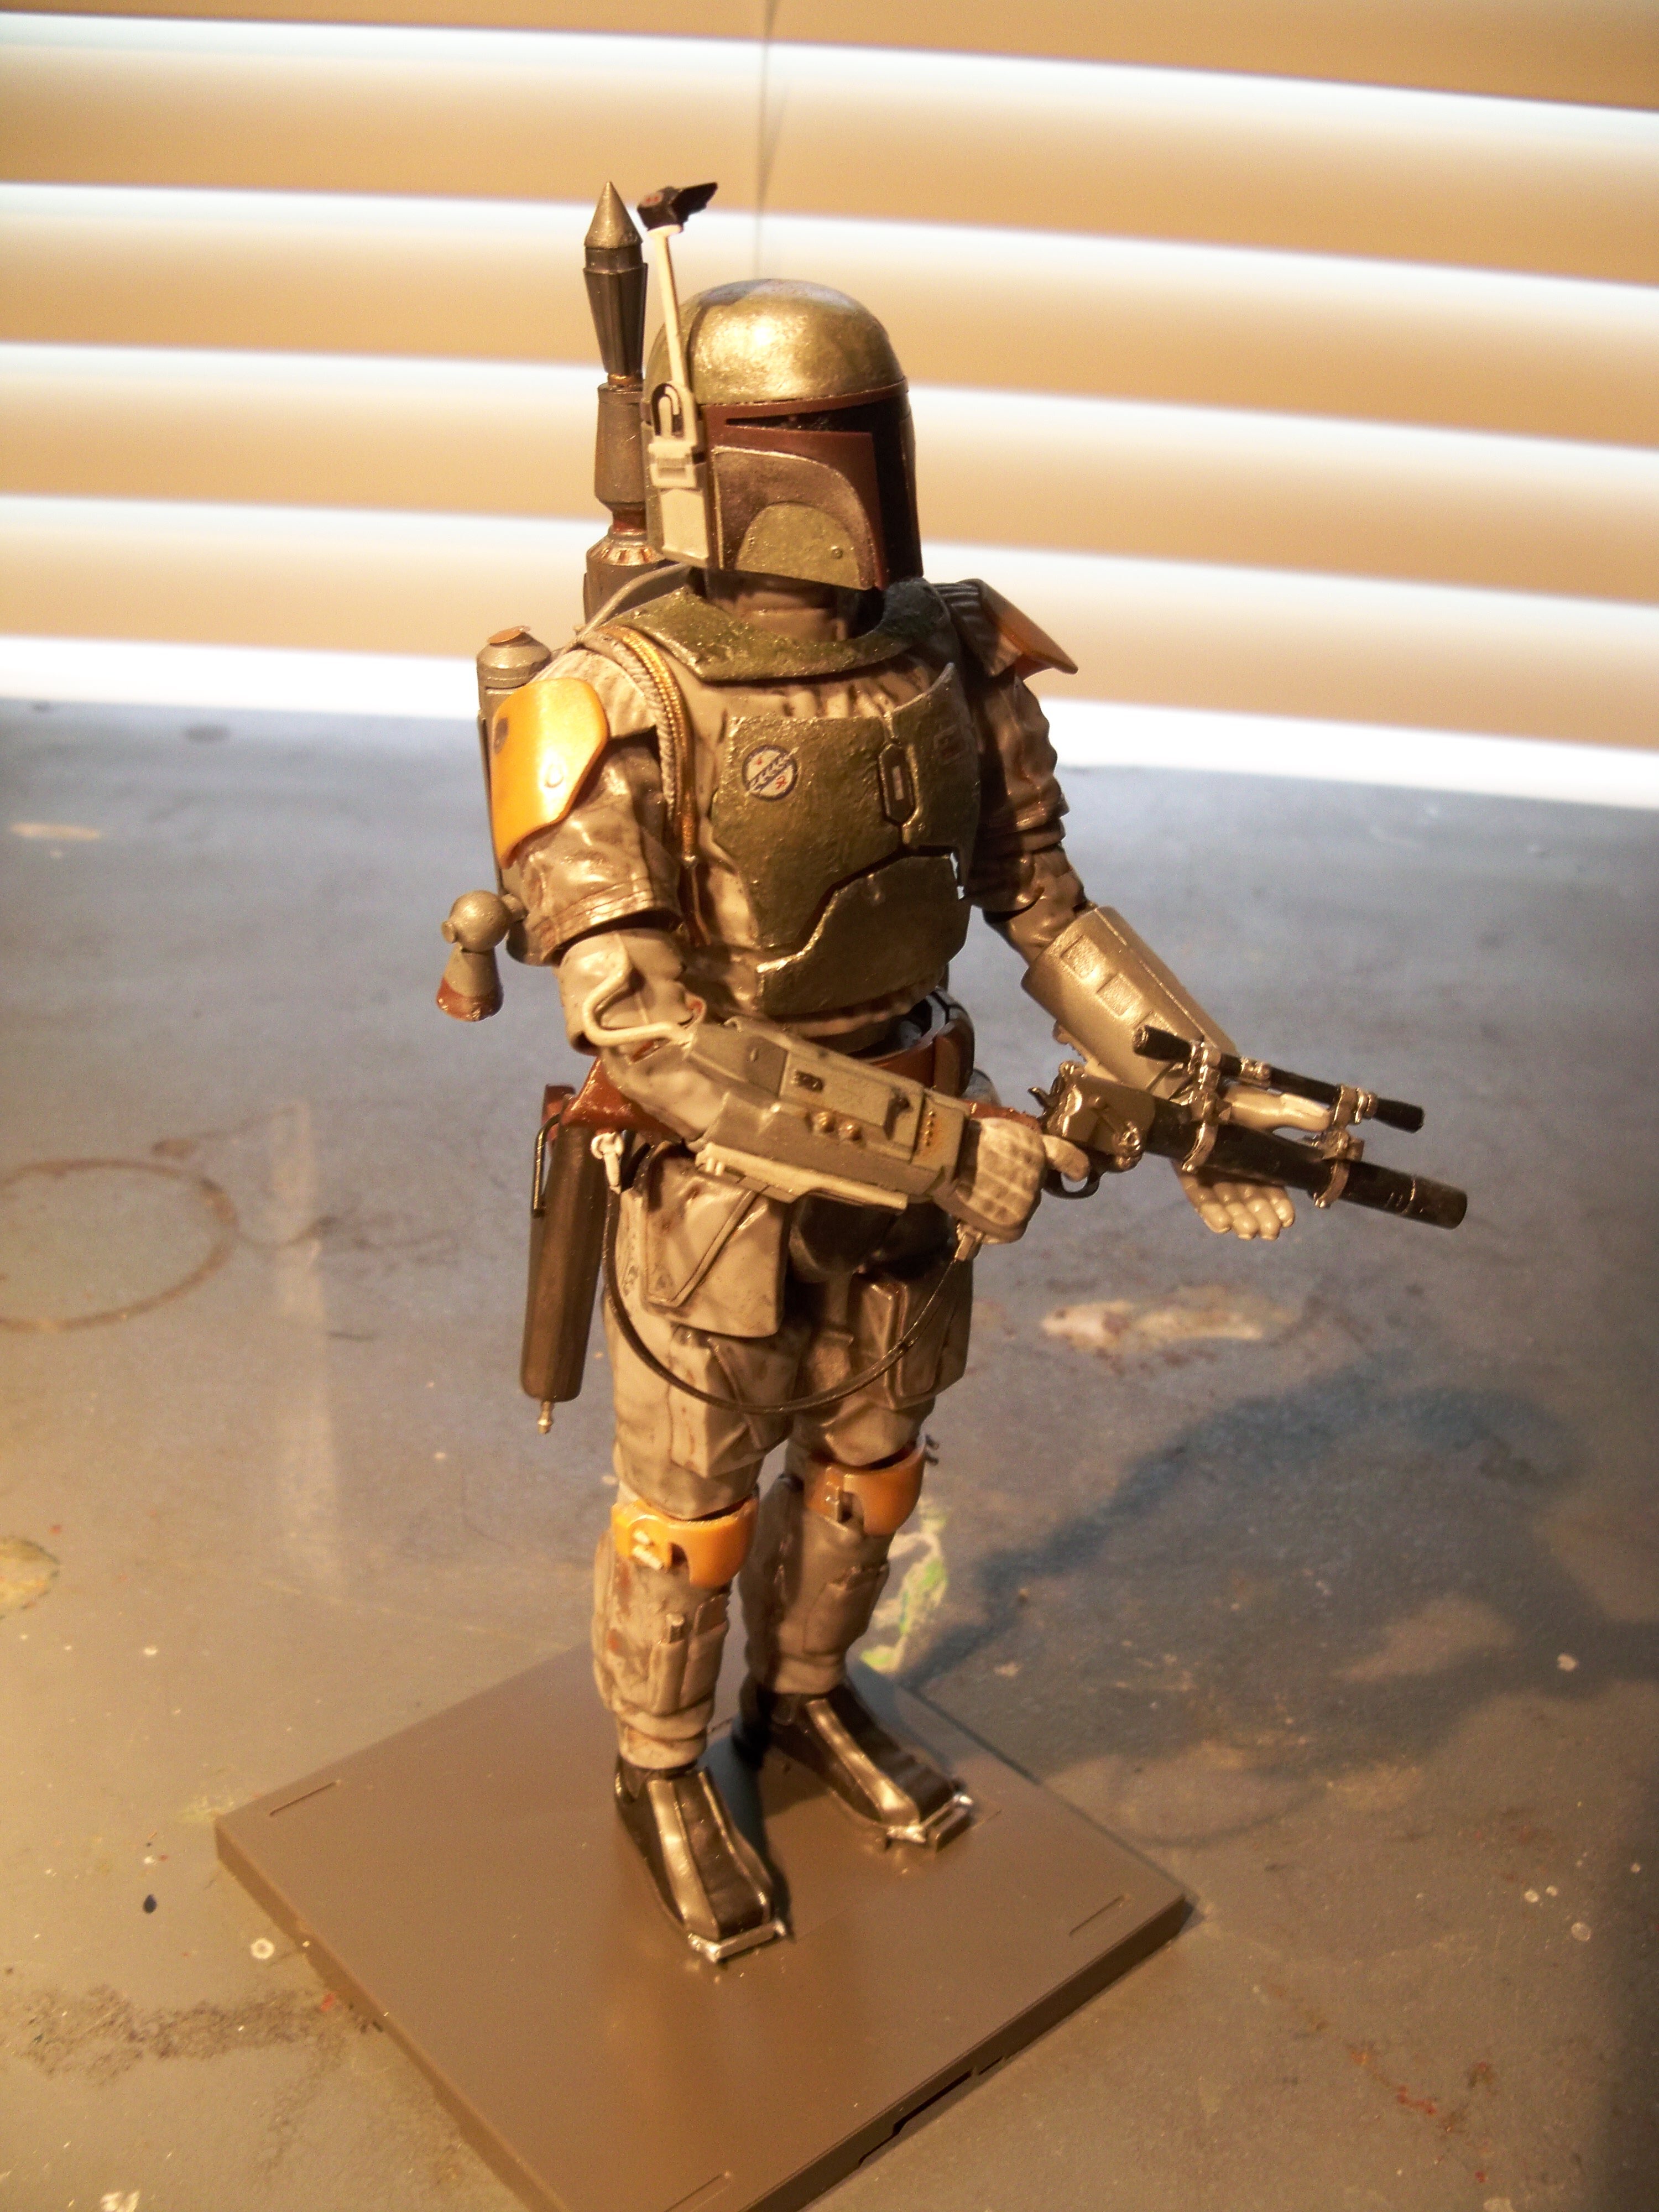
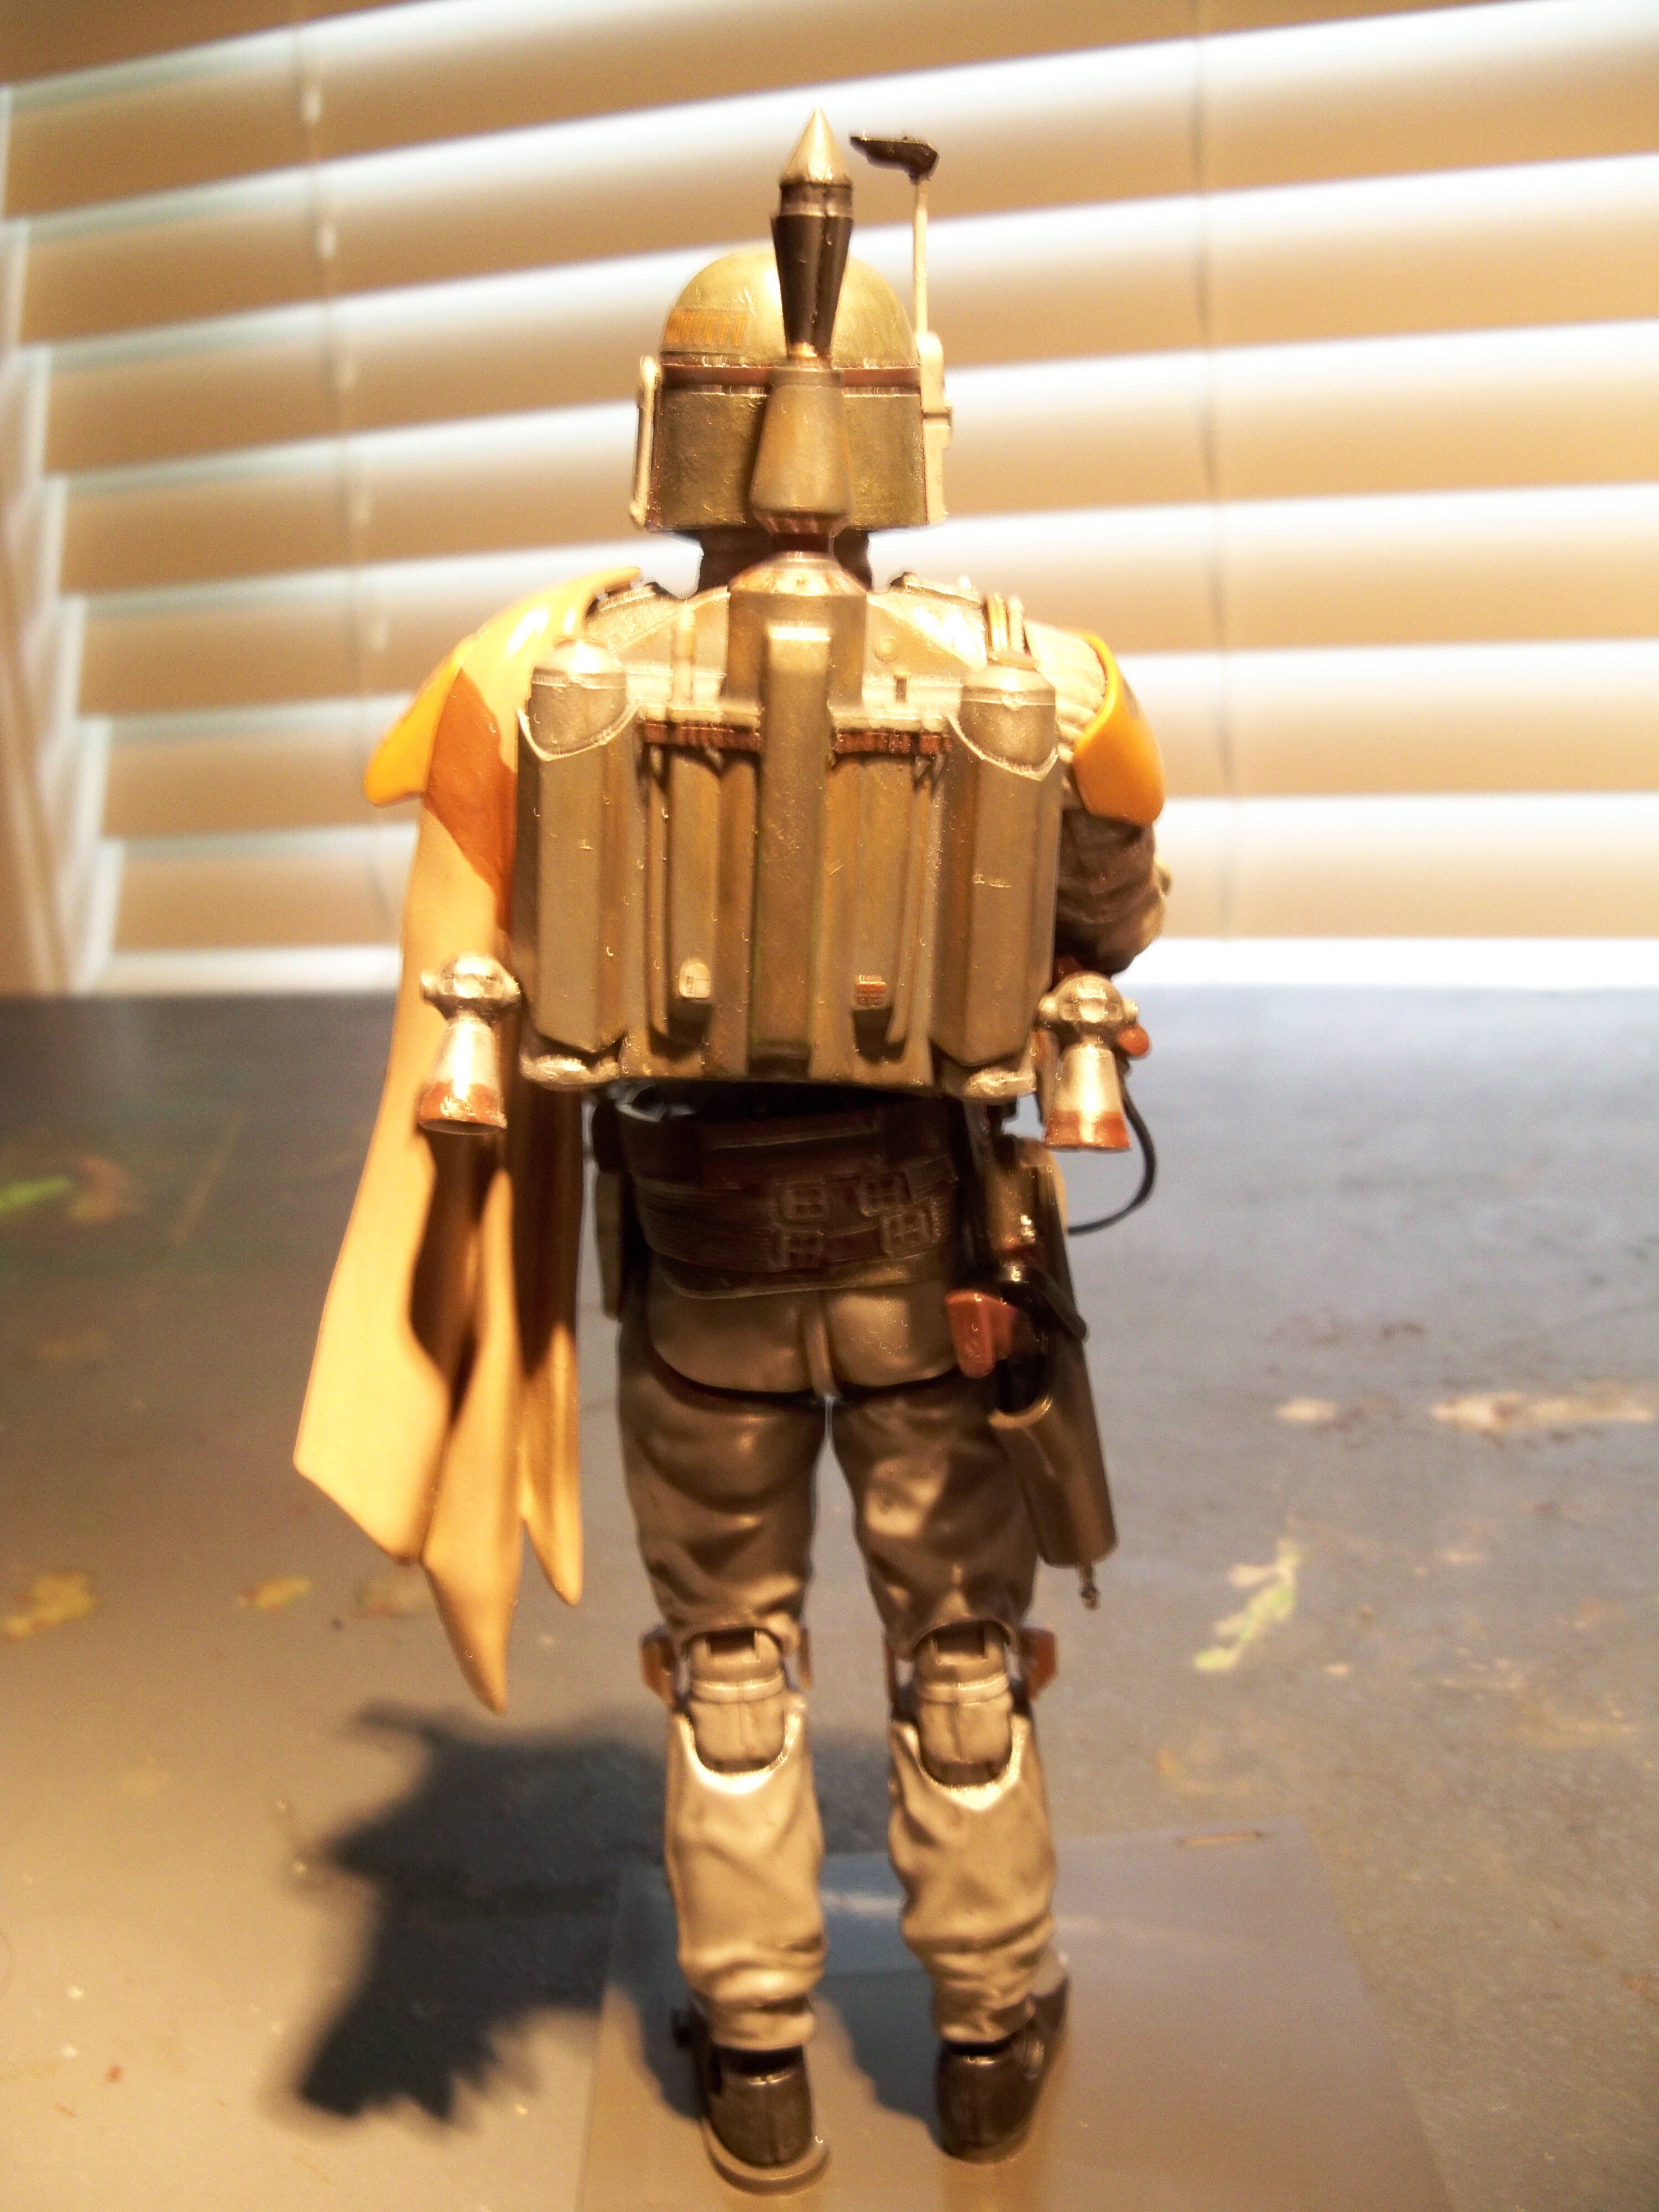
I am simply posting some pics of a build I completed two years ago. Boba Fett was completed in 2020 and my best friend who I have known since grade school provided me with the 1/6 scale Bandai kit. My friend is a huge Star Wars fan. The model is now in his care. Here are some pics of it:
-
Great builds, John. Yeah, my favorite is the Hurricane set as well. I looked at your gallery on Saturday and I am going to revisit it again for sure to look at some more of your great builds. In your gallery, (and this might be off topic) I love the B-17E with the white undersides and Brit markings. I also thought the all red P-51 was neat, as well as Dick Rutan's Voyager. I remember that thing flying around the world when I was much younger. Also, when I was much younger I had the fortunate opportunity to attend the Experimental Aircraft Association's annual fly-in in Oshkosh, Wisconsin. Lots of neat aircraft there as well as a good many warbirds. If anyone has the opportunity to go to that, I recommend it. Great stuff, John! Sorry I did not respond sooner, I was working on my Roman Warship lol. It is almost complete. Yeah, and I love that Jeep in that Airfix set as well. I have a Tamiya model of a Jeep that is wanting to be built. So many models, so little time lol!
-
Thanks for the welcome, guys! I love the "Welcome To The Team" picture, Gil. It really made me laugh. 🙂 John, I will check out your models on your website tomorrow (Saturday) most likely. Thank you for posting the address, I do look forward to checking them out. Makes me think that maybe I should get a website where I can post pictures of mine. I did not know many modelers did that. I do look forward to learning from the Masters, Mike. 🙂 I already learned a good bit about how to care for and clean one's airbrush. Even though I have built some models recently, I have been using spray cans and model paint brushes mostly. When it warms up again, in the spring or summer, I plan on doing some airbrush spray painting on some of my models. I spray painted with an airbrush some as a child and my father saved some of my unfinished models from my youth. I plan to practice spray painting on one of them and learning how to clean my airbrush. I am also considering putting a Star Wars Snow Speeder together which only requires one part to be spray painted so that would be an excellent small step into learning how to spray paint again. Maybe I will post some pictures of last year's builds soon, too. Thanks again for the warm welcome, guys, and have fun at the bench!