Ron Bell
-
Posts
1,882 -
Joined
-
Last visited
-
Days Won
179
Content Type
Profiles
Forums
Events
Everything posted by Ron Bell
-

Contact Request from Judge
Ron Bell replied to TheMongoose's topic in About the IPMS/USA National Convention
Try contacting the head ship judge or the over all head judge. They might know who the "Steves" are. -
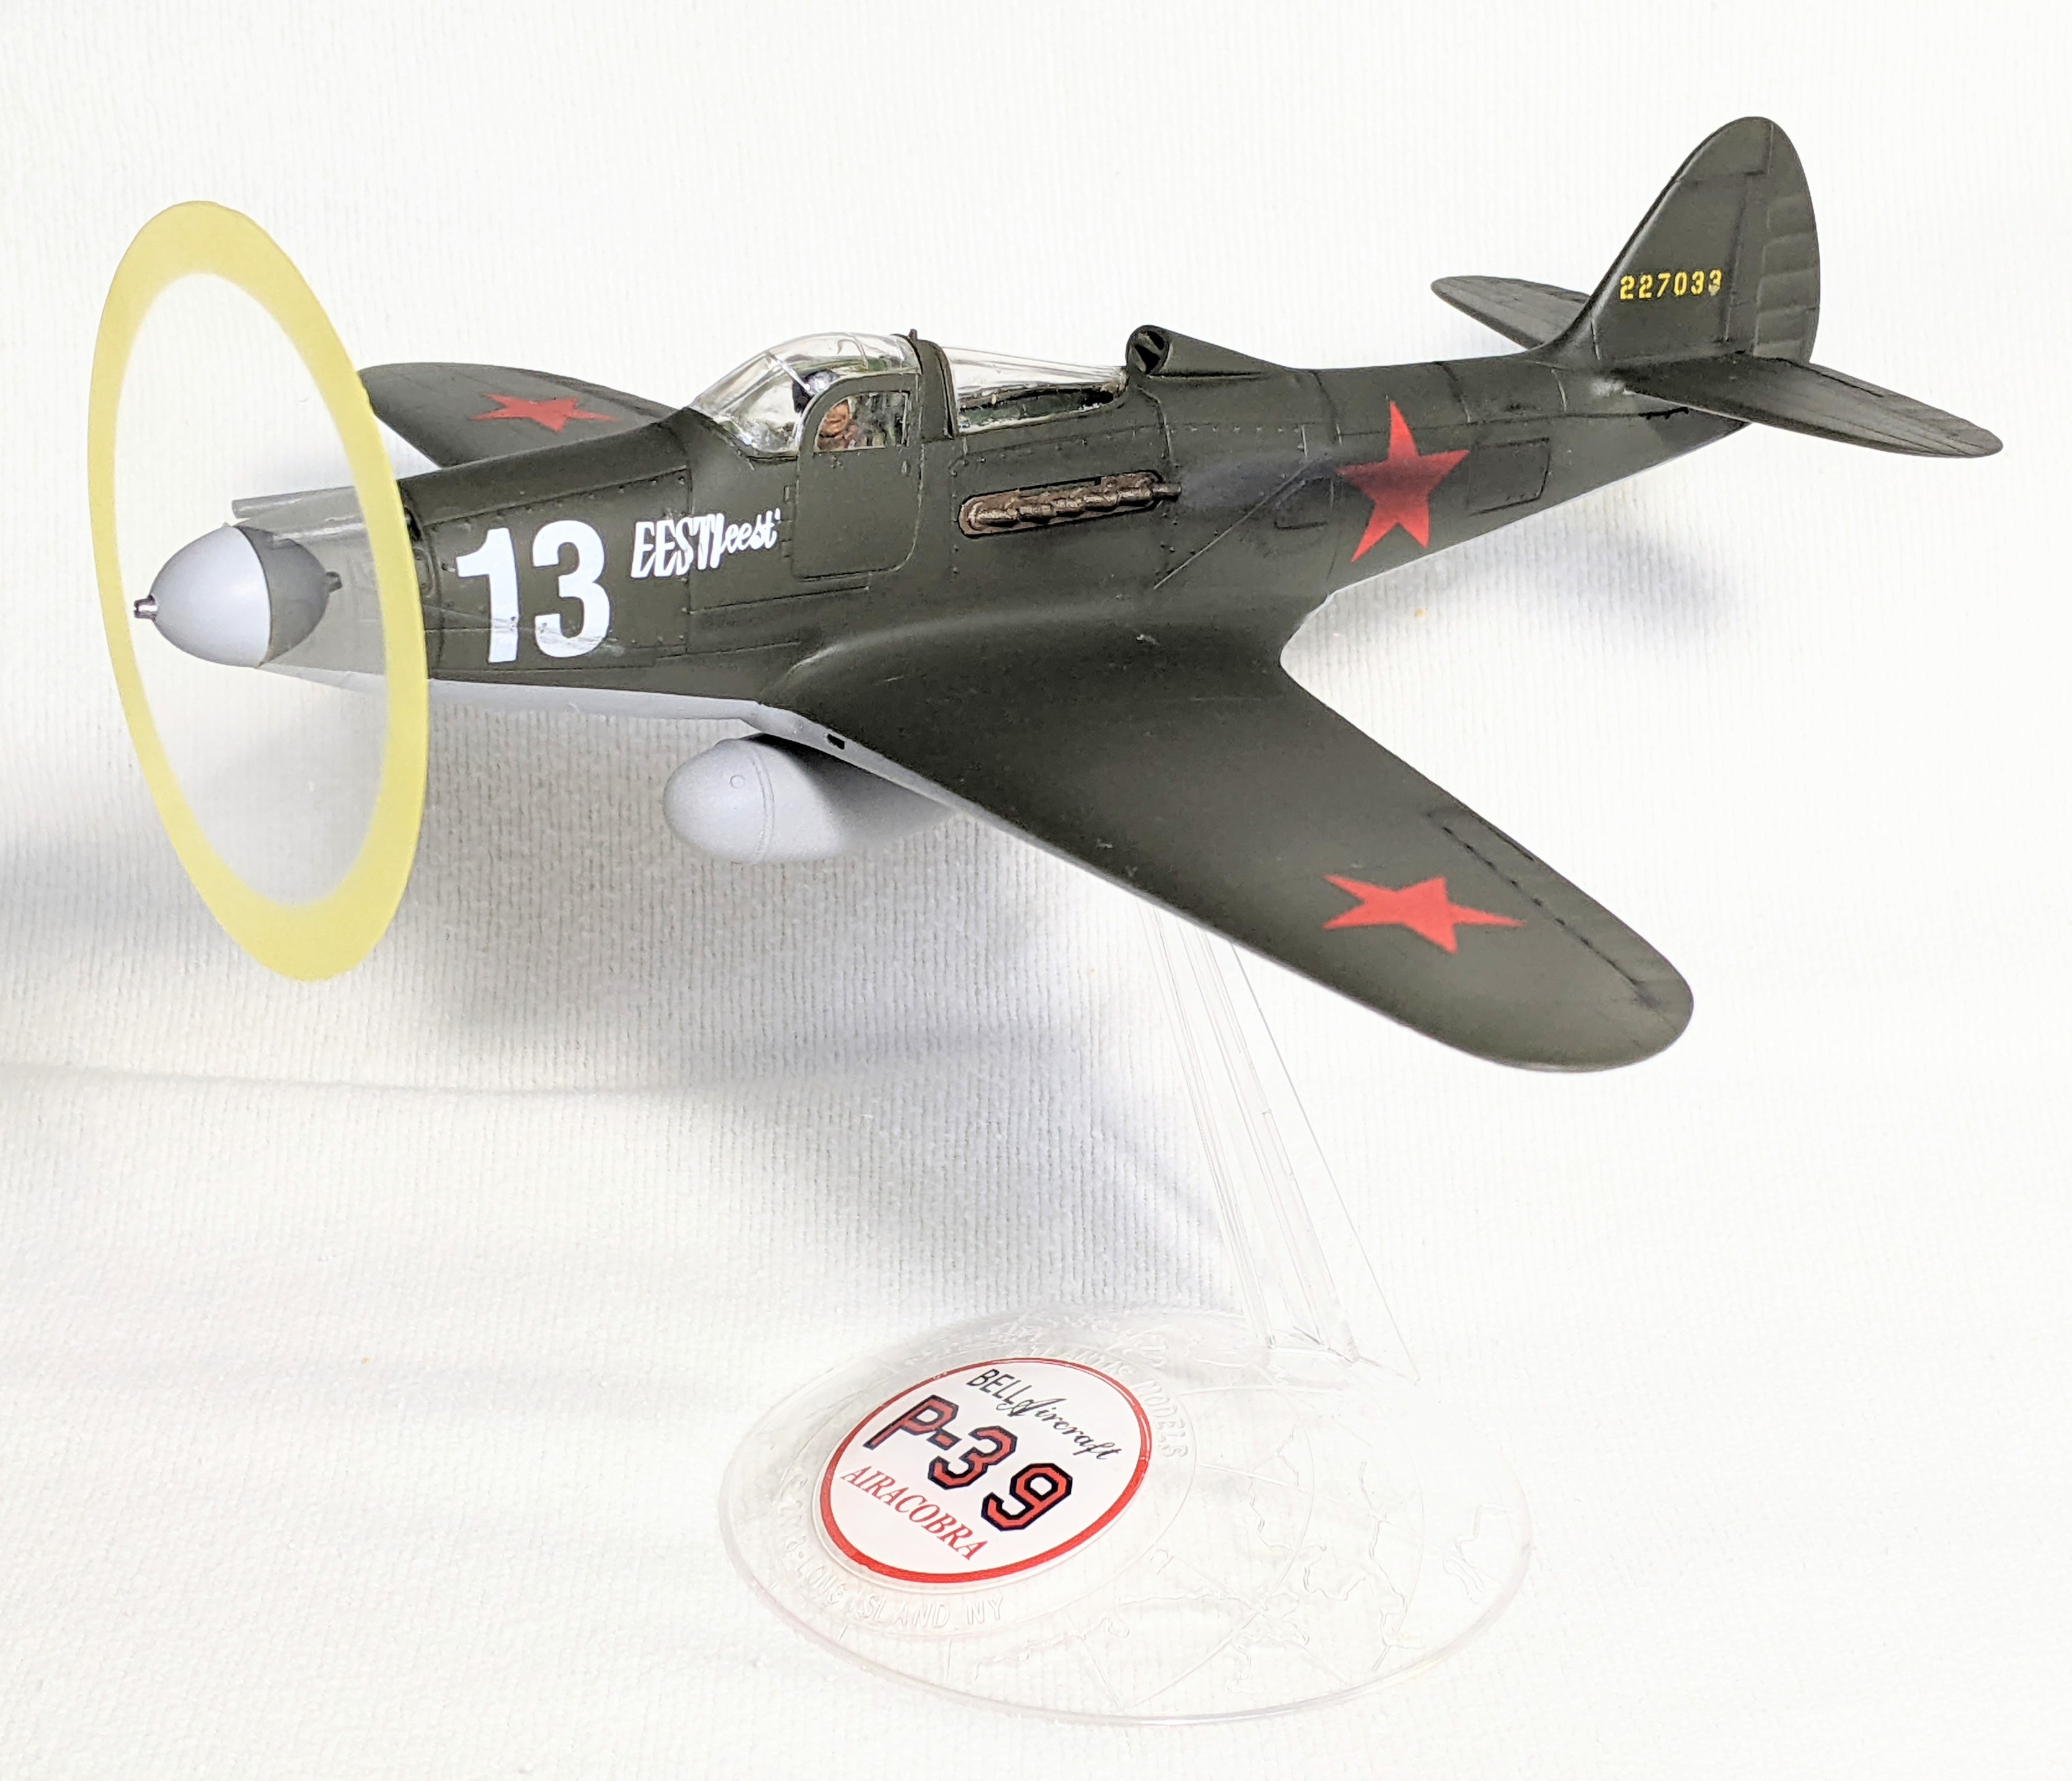
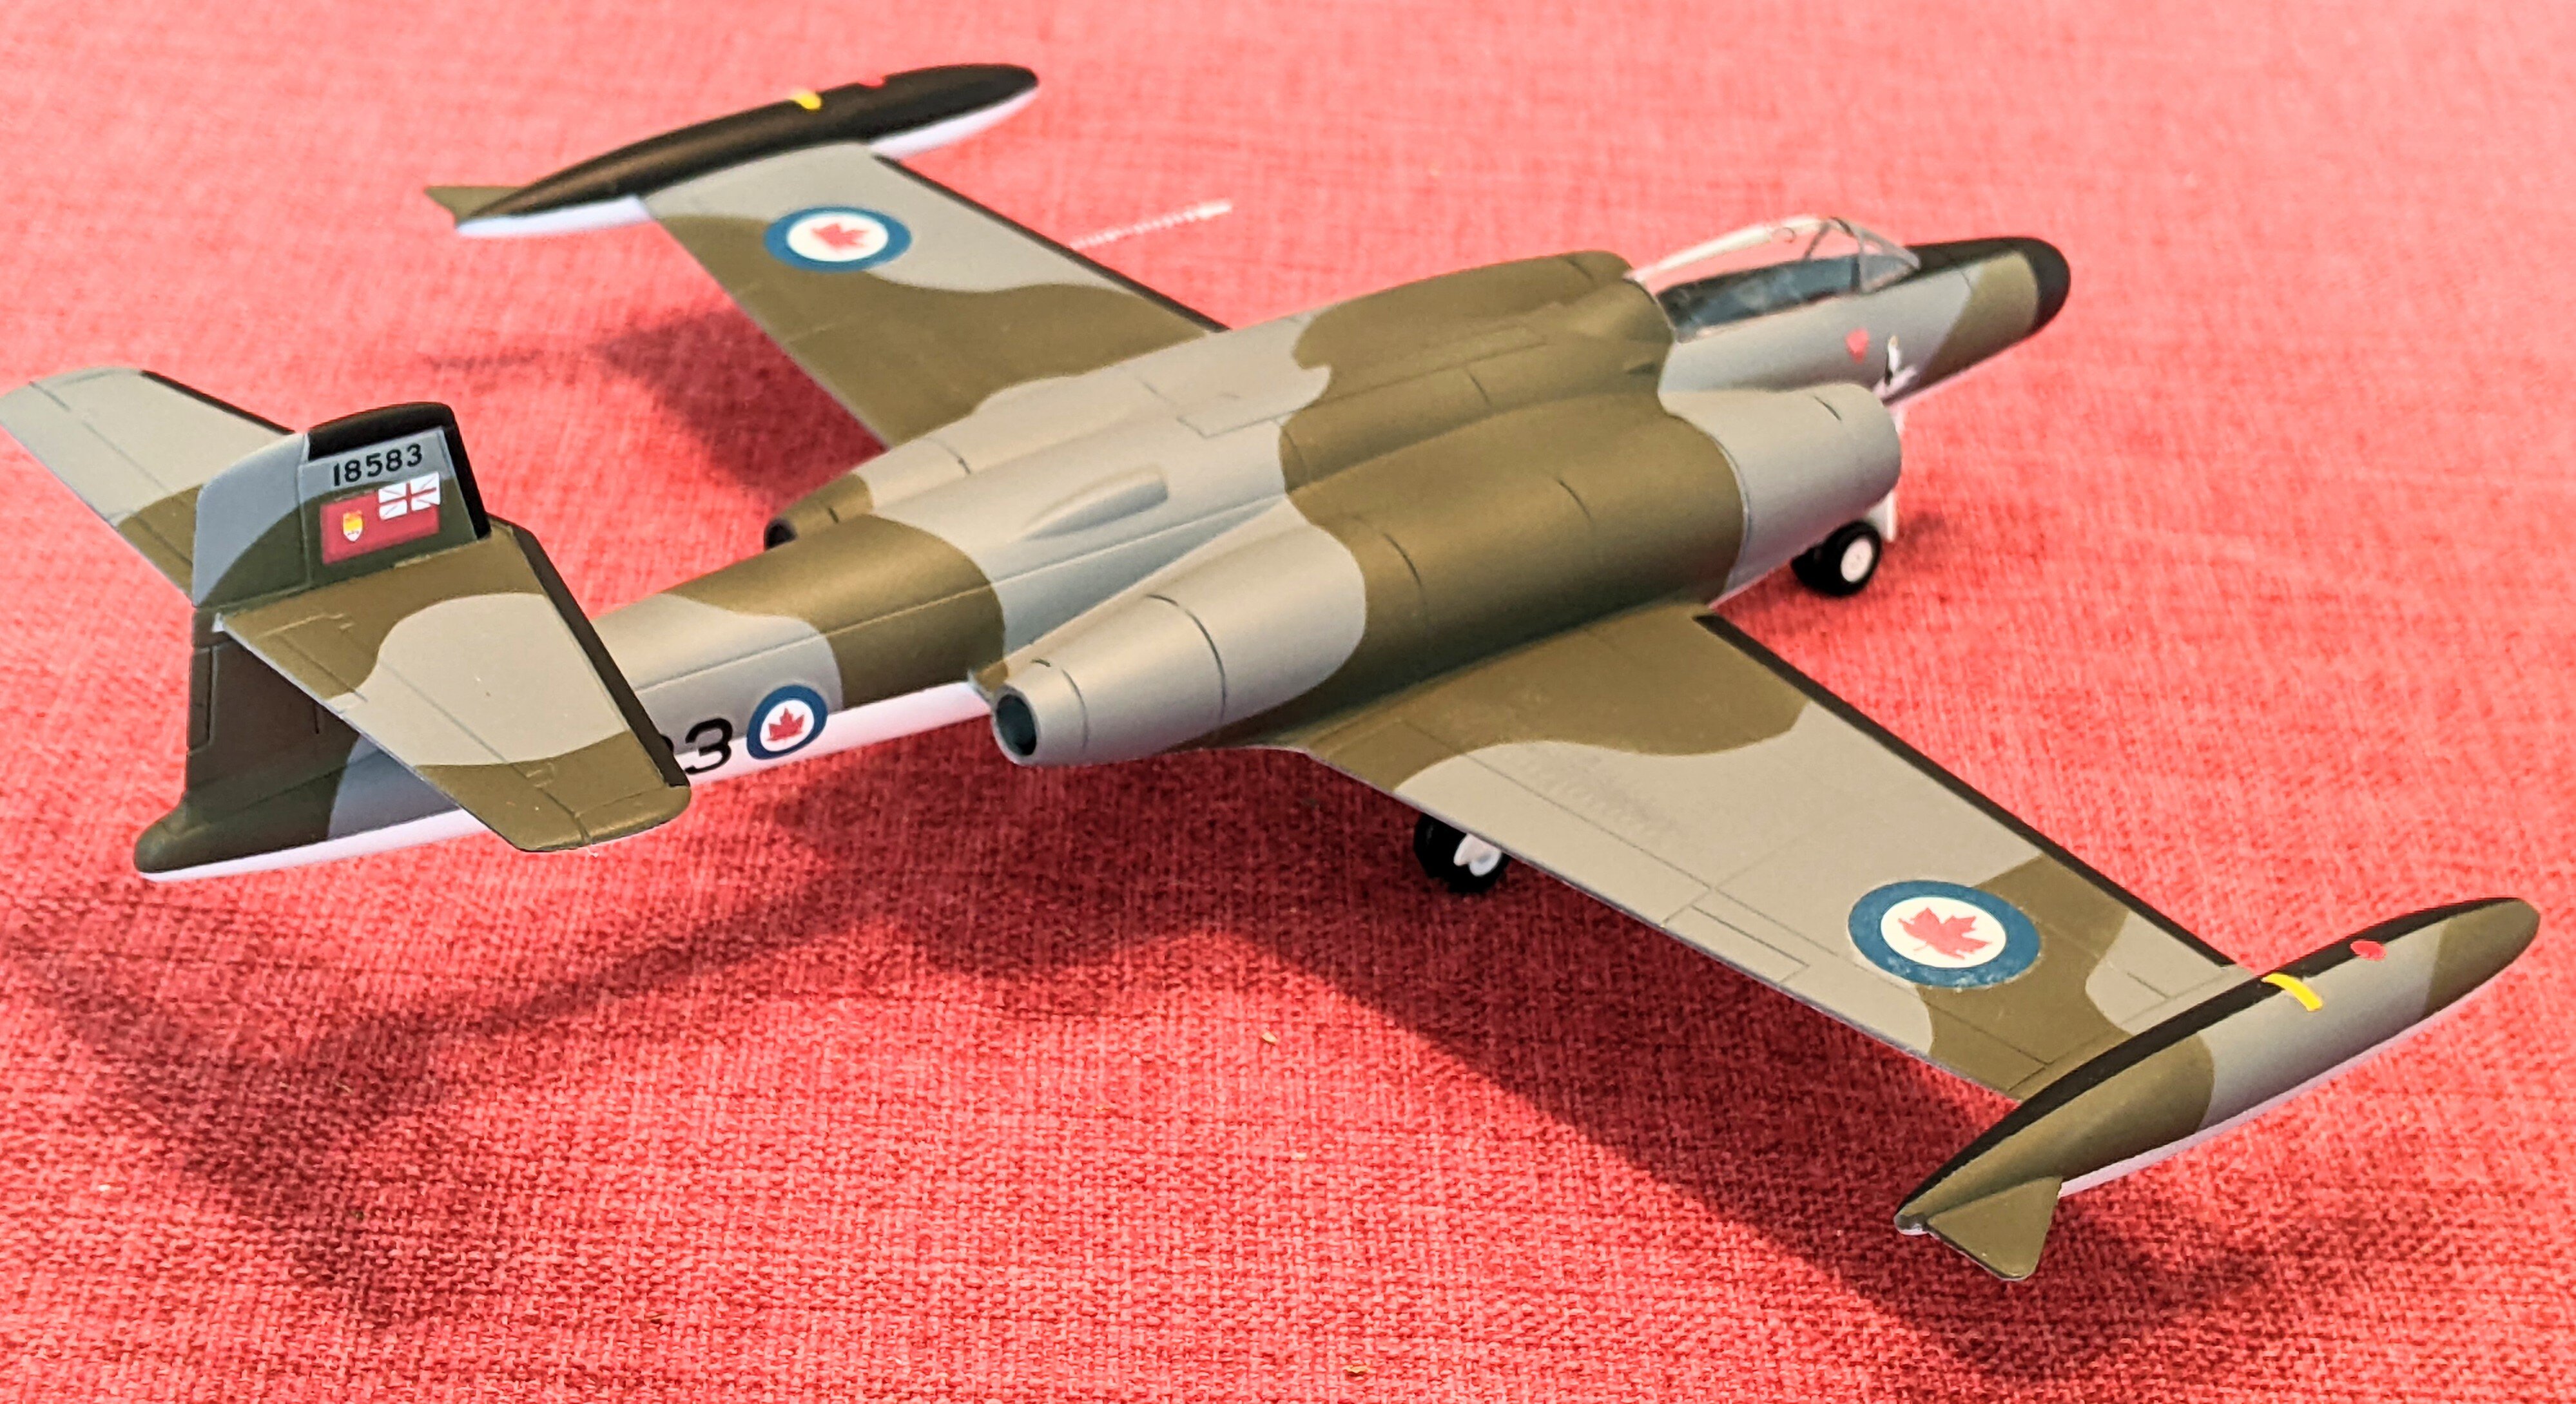
Go back to when you were a kid and modeling was really fun. The airplanes/ships/cars on your shelf gave you hours of imaginative fun as you pictured yourself in the cockpit or on the deck or behind the wheel. Here's one built like that, complete with swivel stand, courtesy of Atlantis models. The spinning prop is an addition, but that just seemed appropriate to a 'flying' airplane. It was a fun build.

-
So, who wants to host in 2024, 2025?
Ron Bell replied to philp's topic in About the IPMS/USA National Convention
Highlander, I believe all the numbers you are asking for are available from the 2nd VP in a chart that he keeps. The only one he might not have is the number of times the room block number needed to be bumped. I'd also comment on your first question with the reply any good lawyer would give, "It depends". If the venue is in a separate convention center, it might be one number or maybe might not apply at all. If it's the hotel's venue, it depends on what the cost of that venue is and how much the hotel is willing to subsidize your event. It's hard to get a real "average" as in many cases it's like comparing apples and oranges. In any case, contact the Second VP, John Bonnani, here ipmsusa2ndvp@ipmsusa.org for a copy of the chart I mentioned. If it has been kept up to date, there's a LOT of info there. -
So, who wants to host in 2024, 2025?
Ron Bell replied to philp's topic in About the IPMS/USA National Convention
Probably the single biggest problem in hosting a national convention is venue related. Our display space used vrs. our room night usage is the problem. For the number of rooms we use, the hotel venues available are too small and for the space we need, the number of room nights used is too little for the larger hotels. Number two problem is cost. Those big venues cost big bucks. For example, using just one of the smaller rooms in our local convention center costs over $10,000 a day! This is why our conventions are mostly in the second and even more often third tier convention cities. I'm guessing there are some clubs out there that would take on this task, but the lack of a suitable venue prevents it. P.S. it says I'm on the Executive Board, but I rotated off that quite a while ago now. -
His stuff is very good, but you pay for that quality.
-
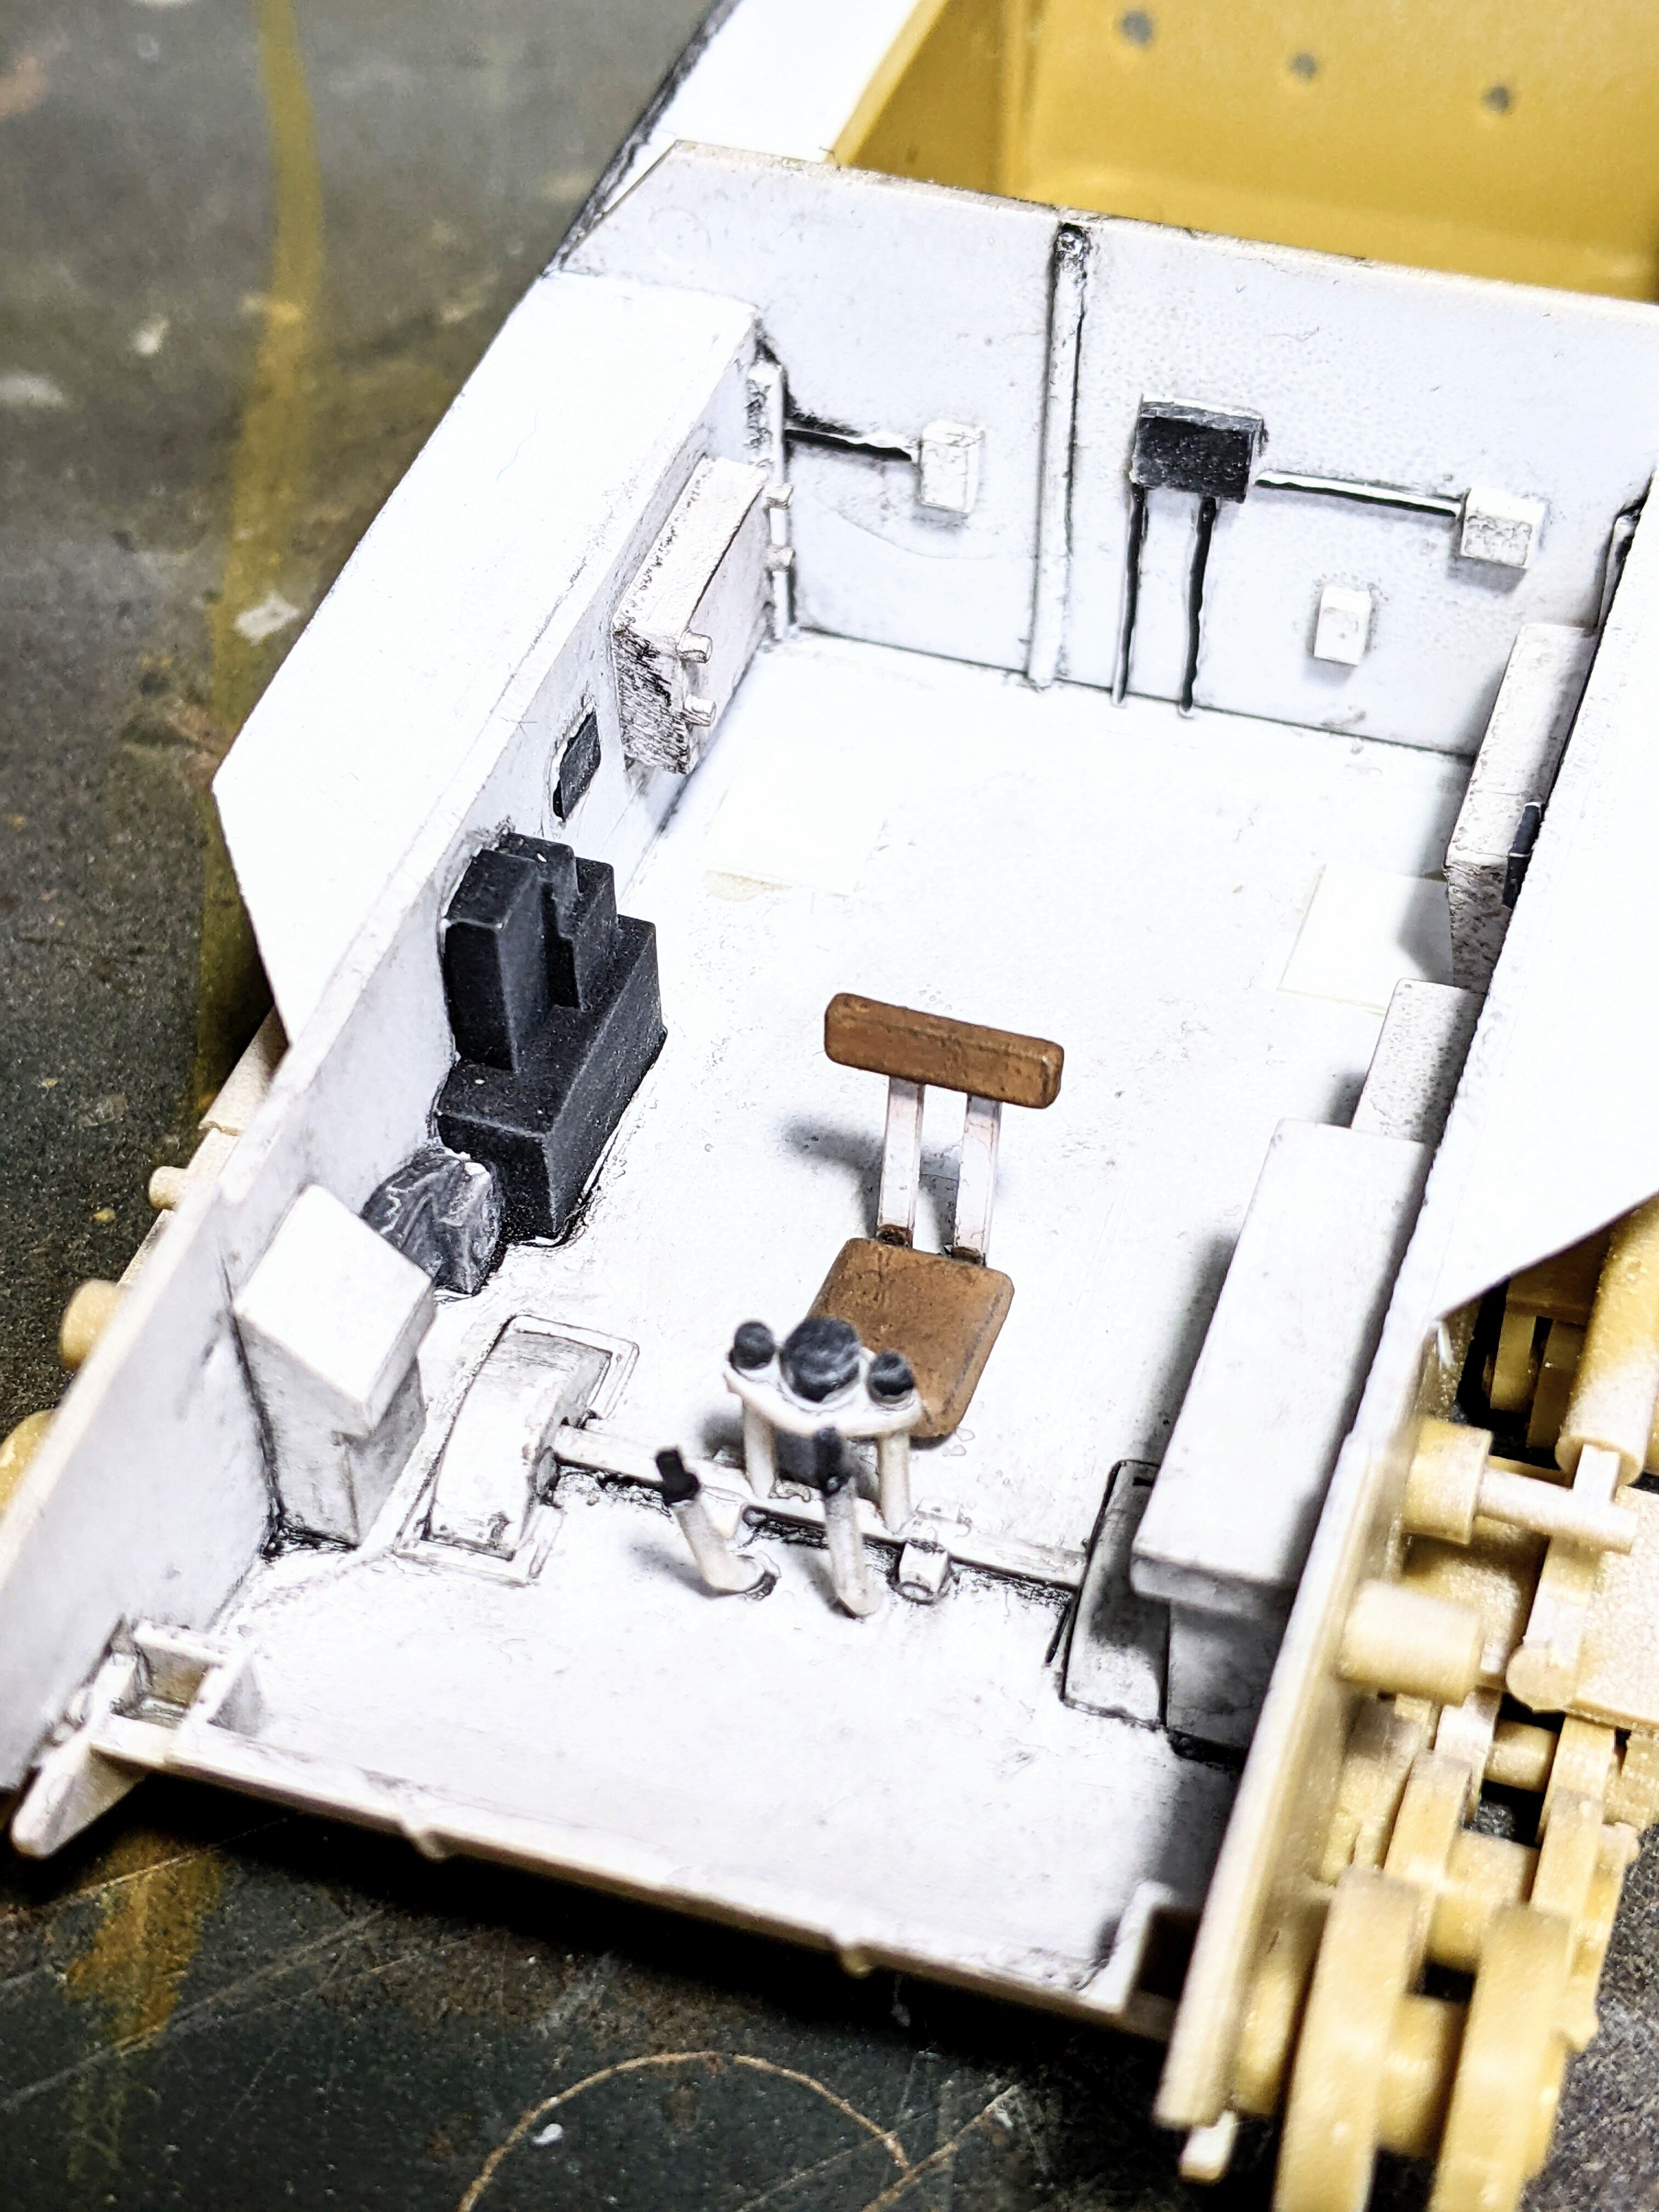
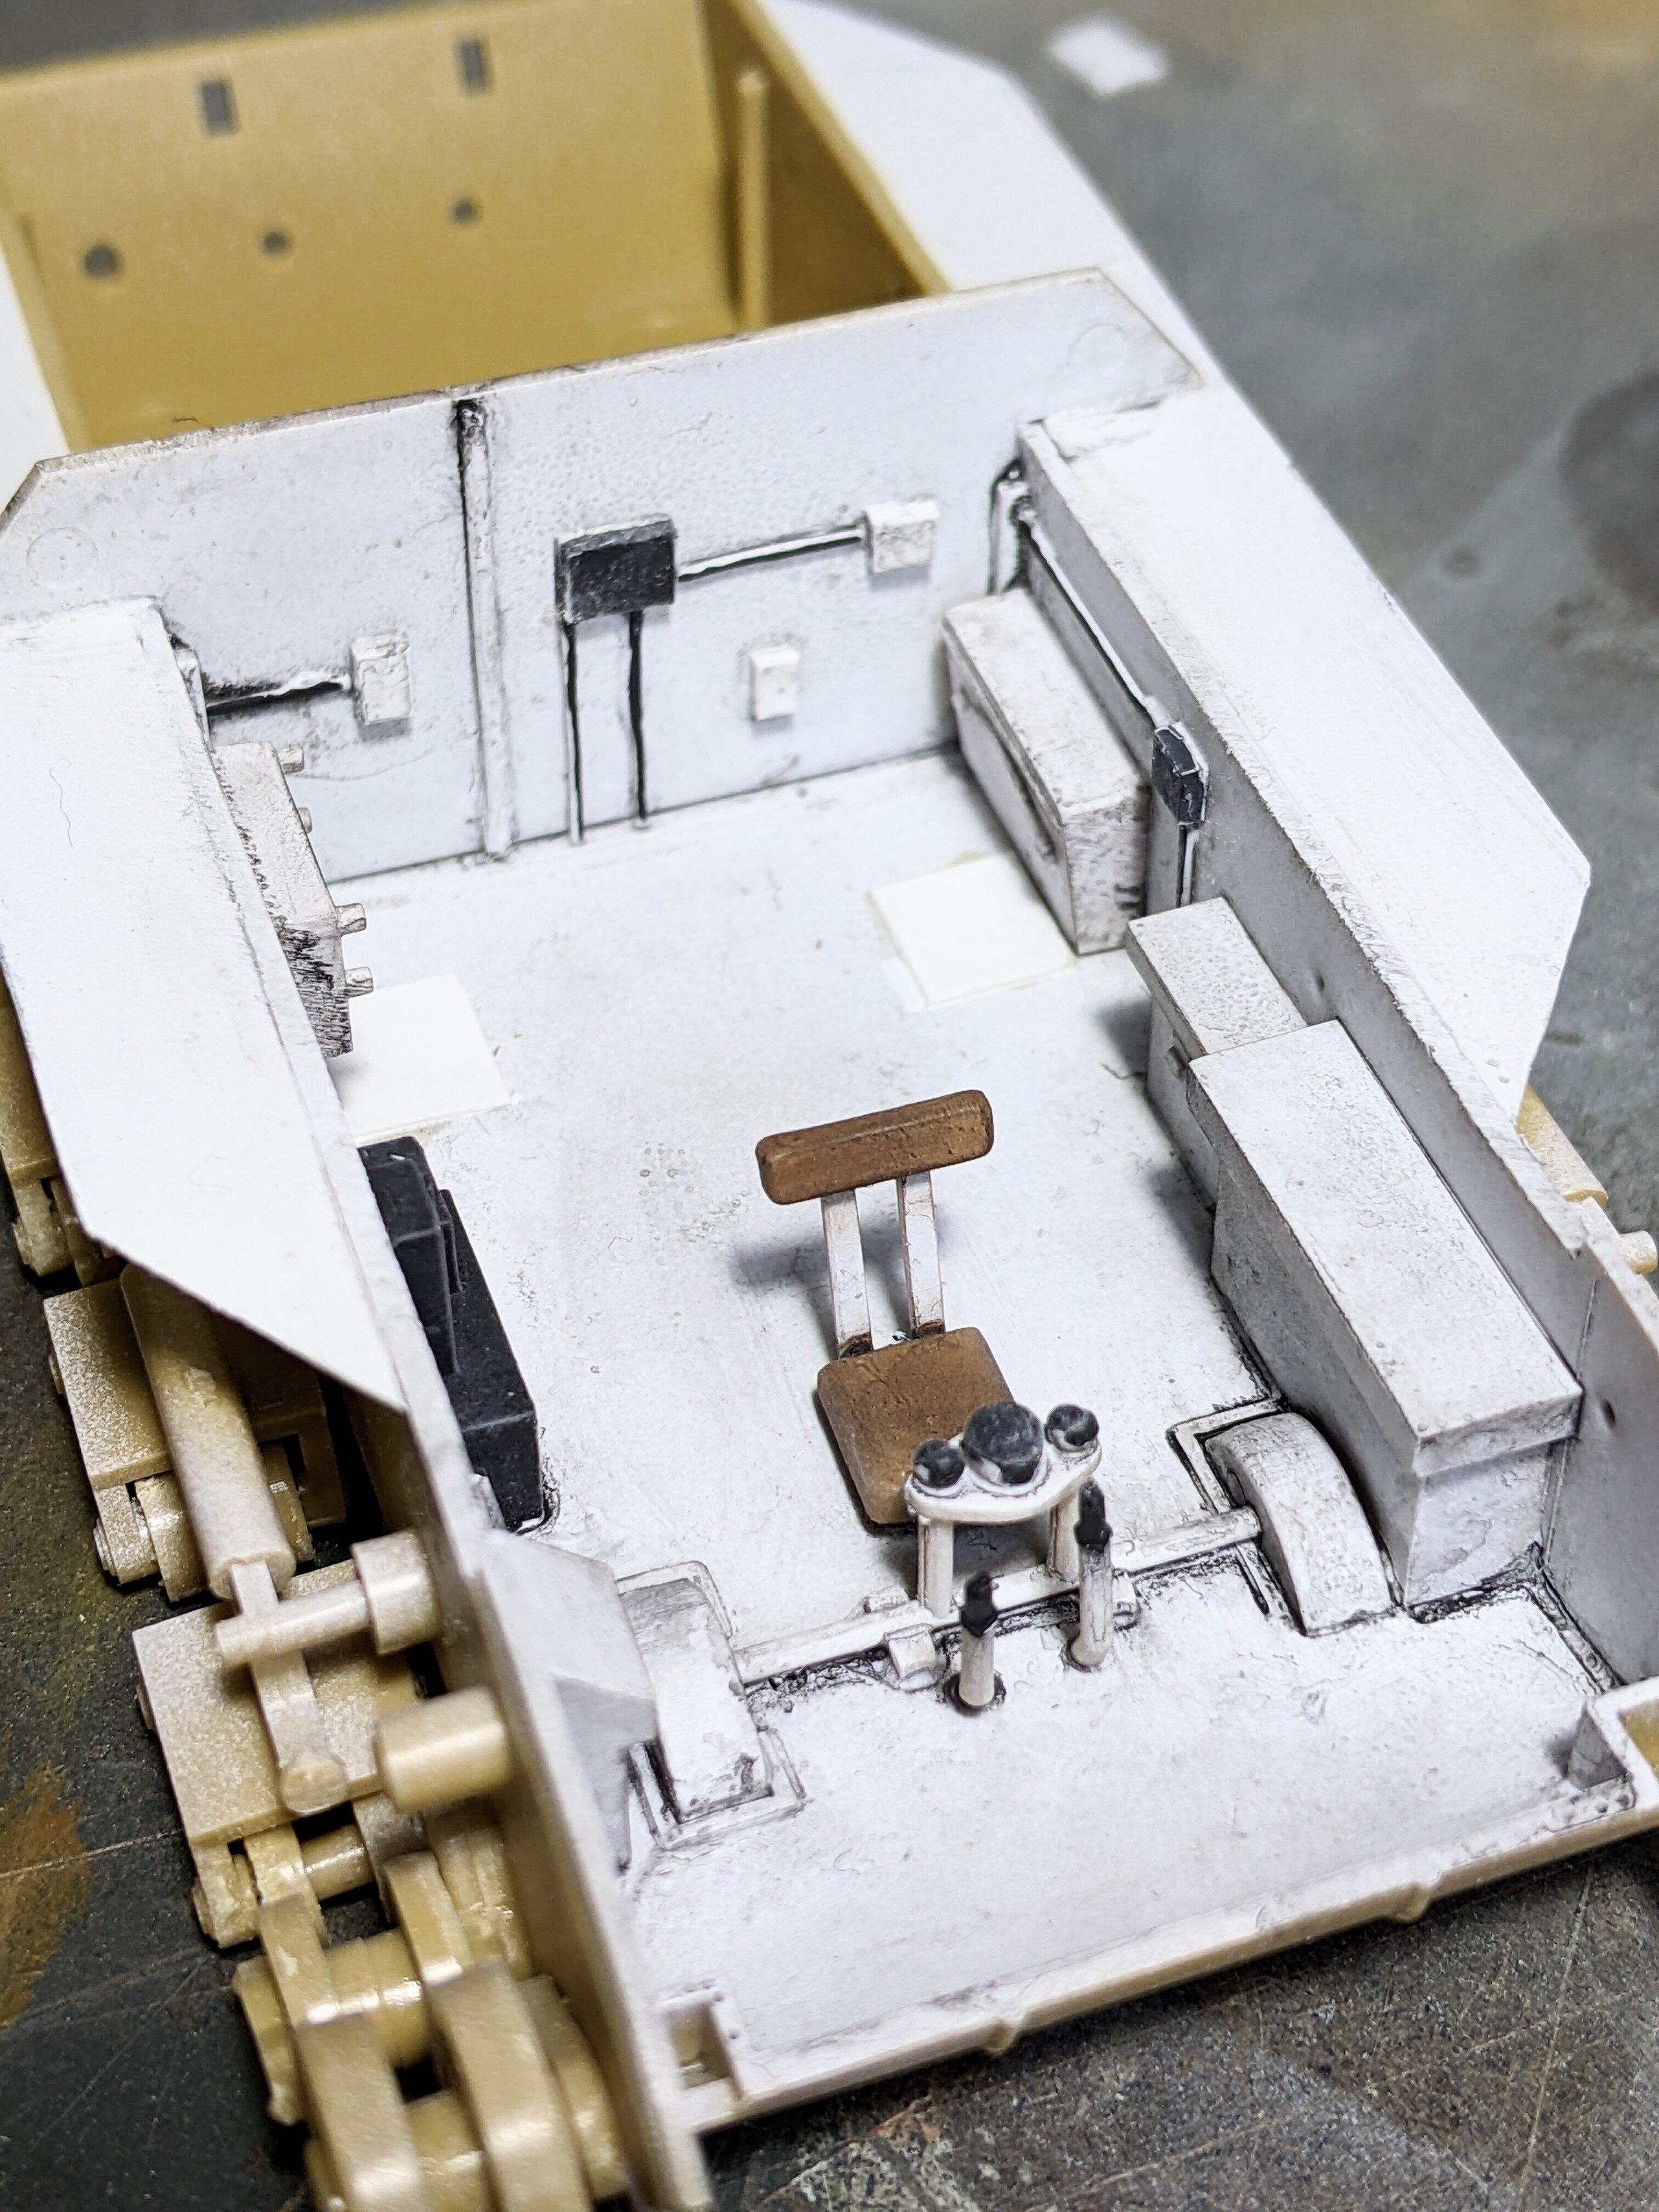
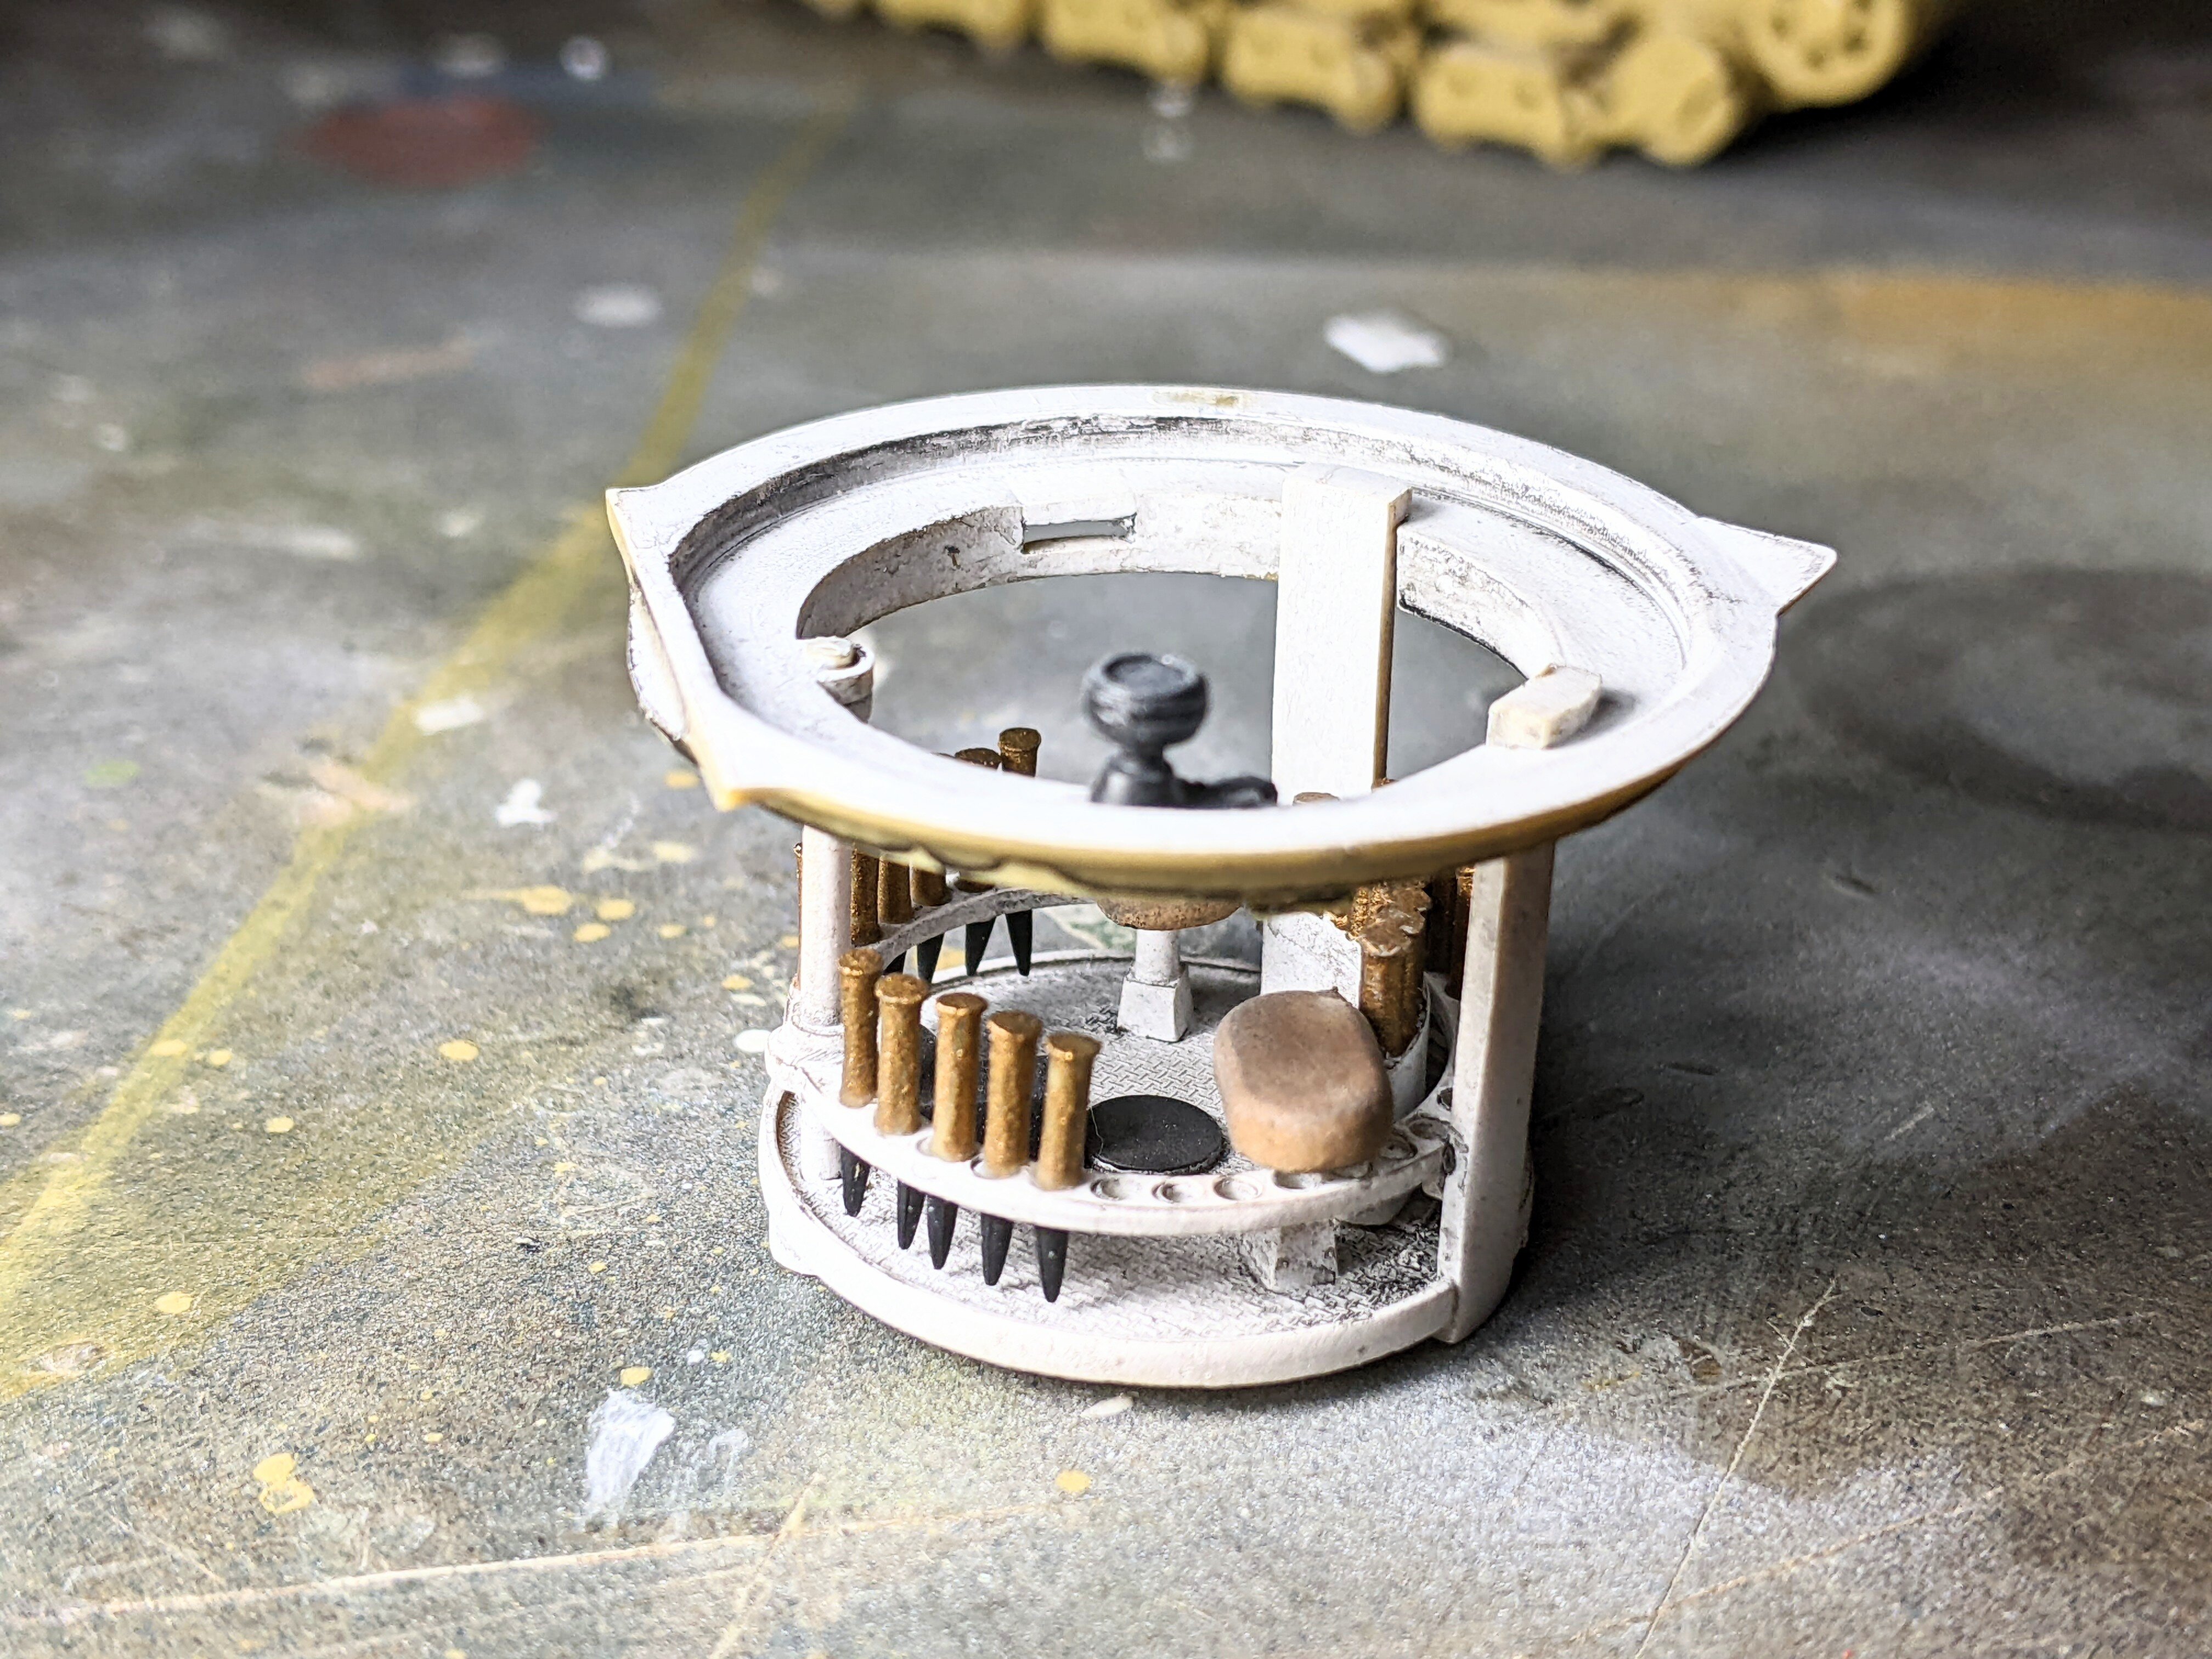
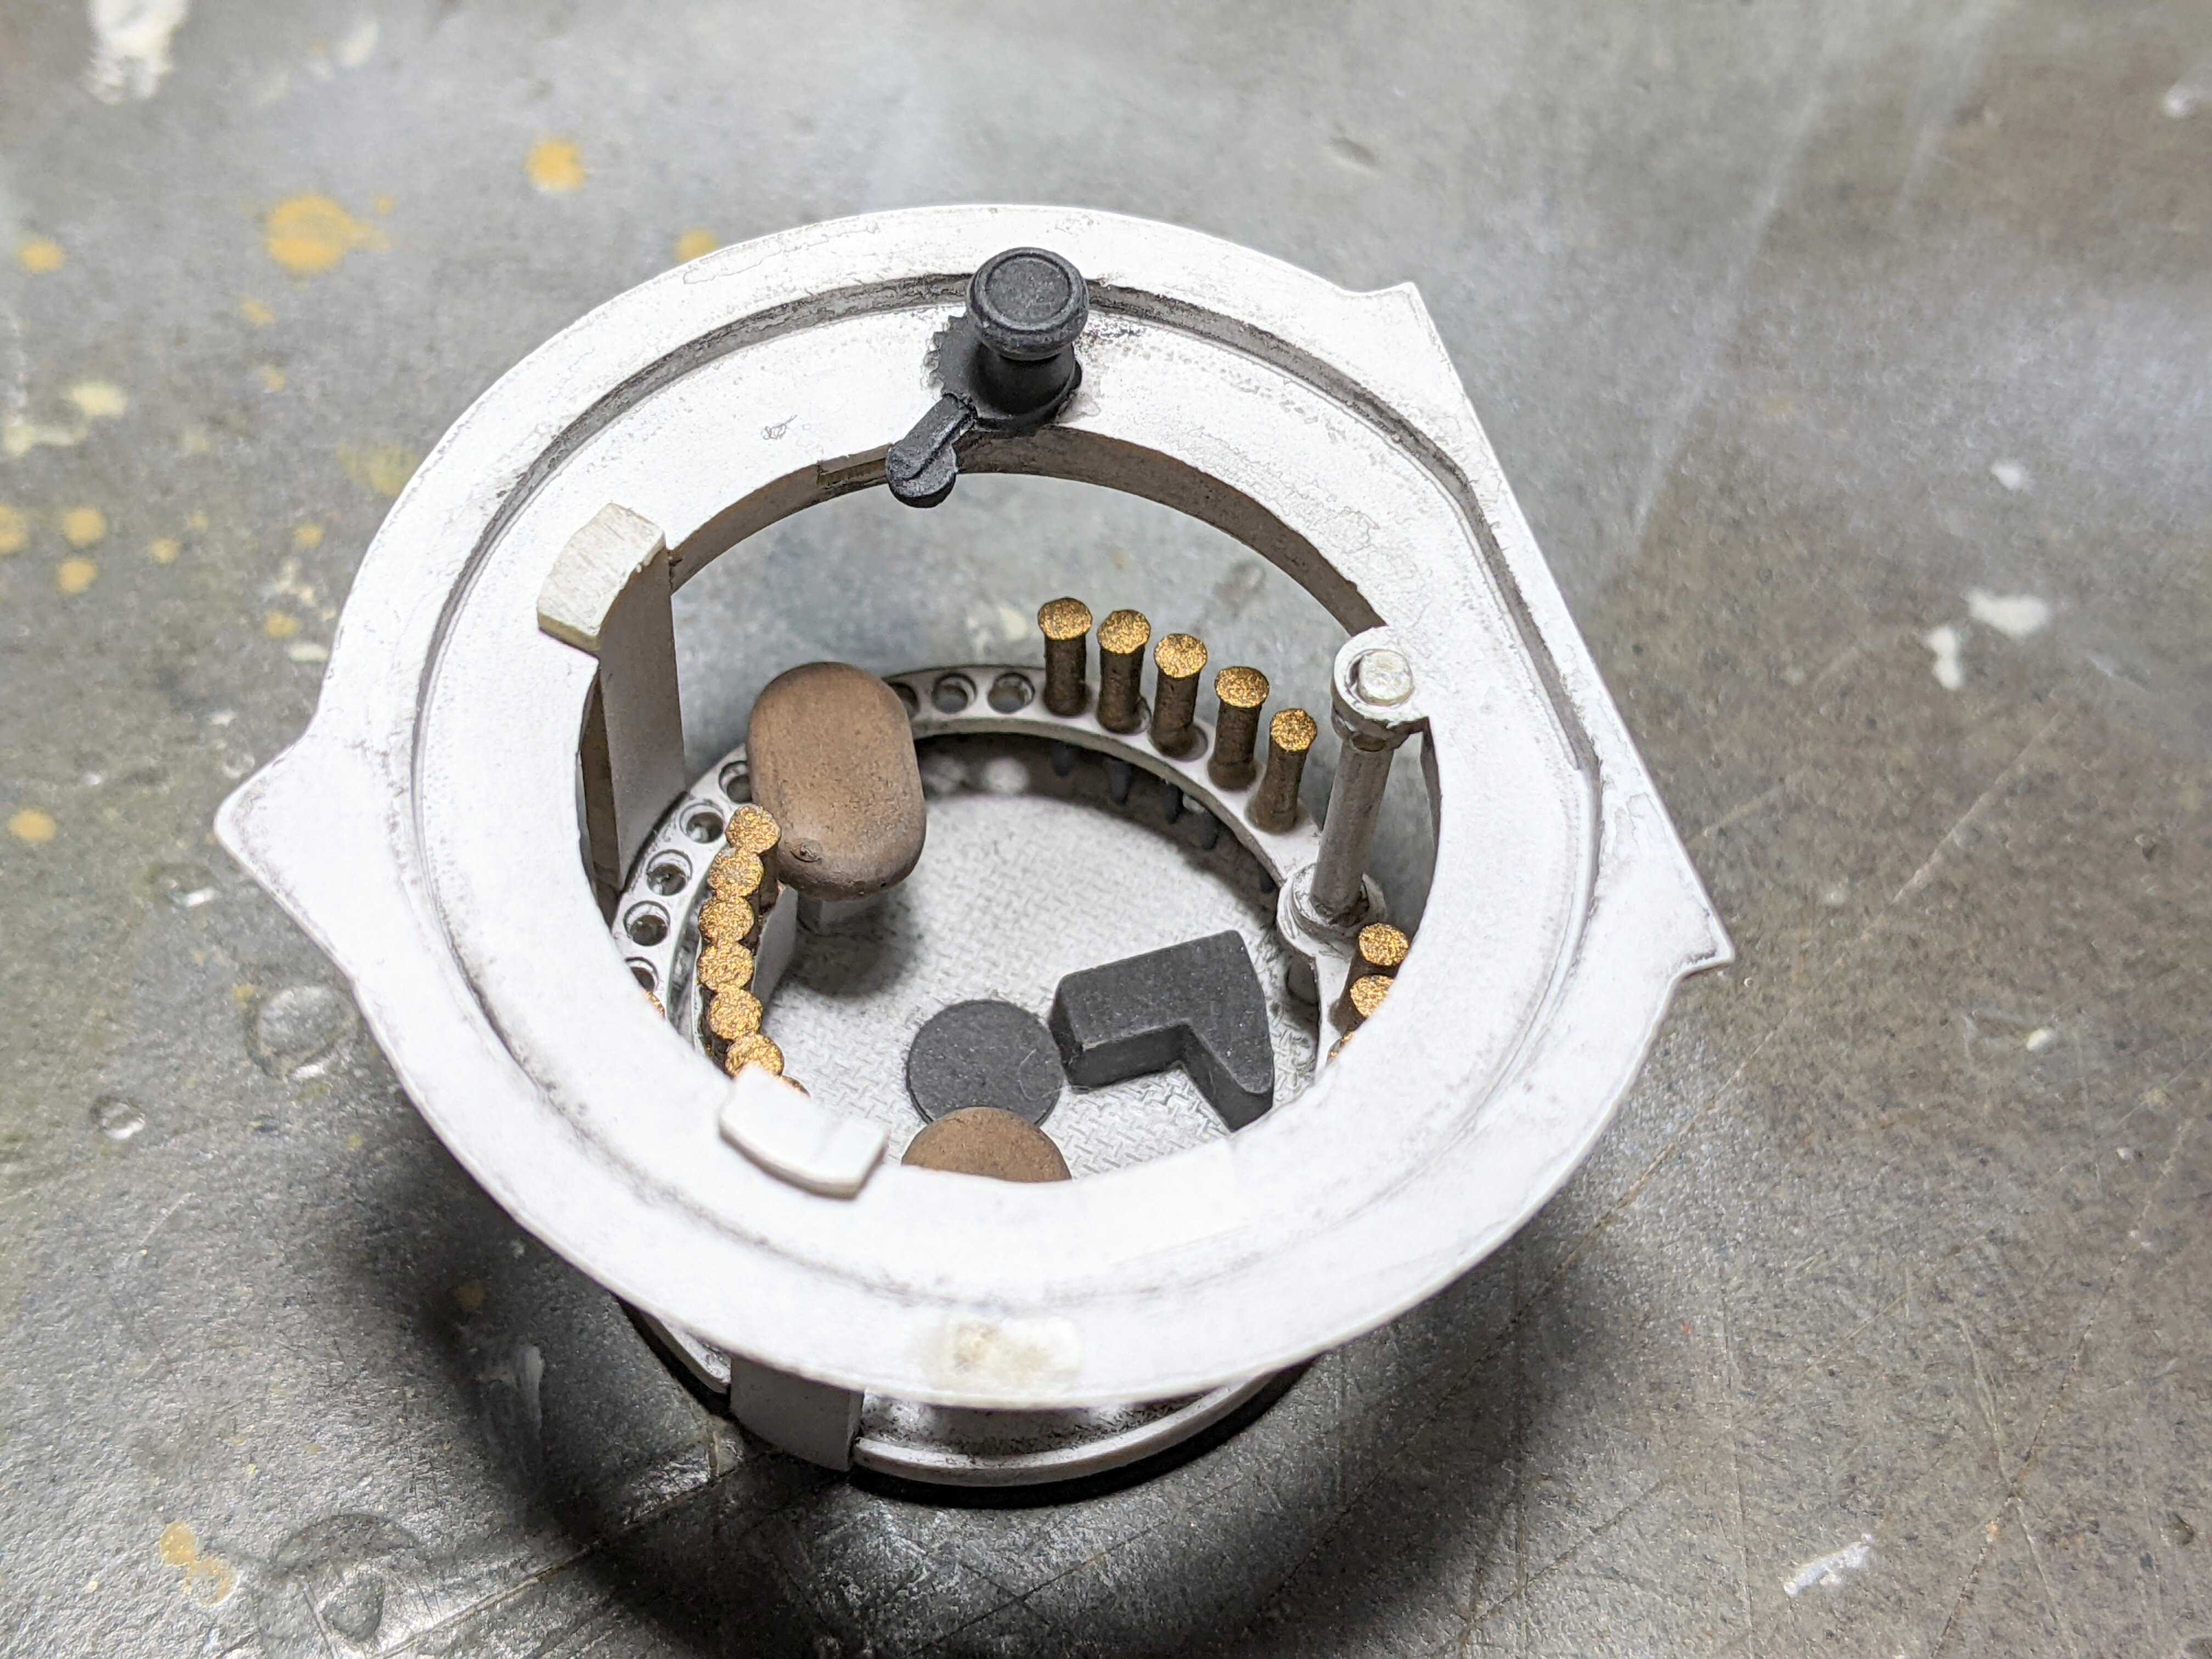
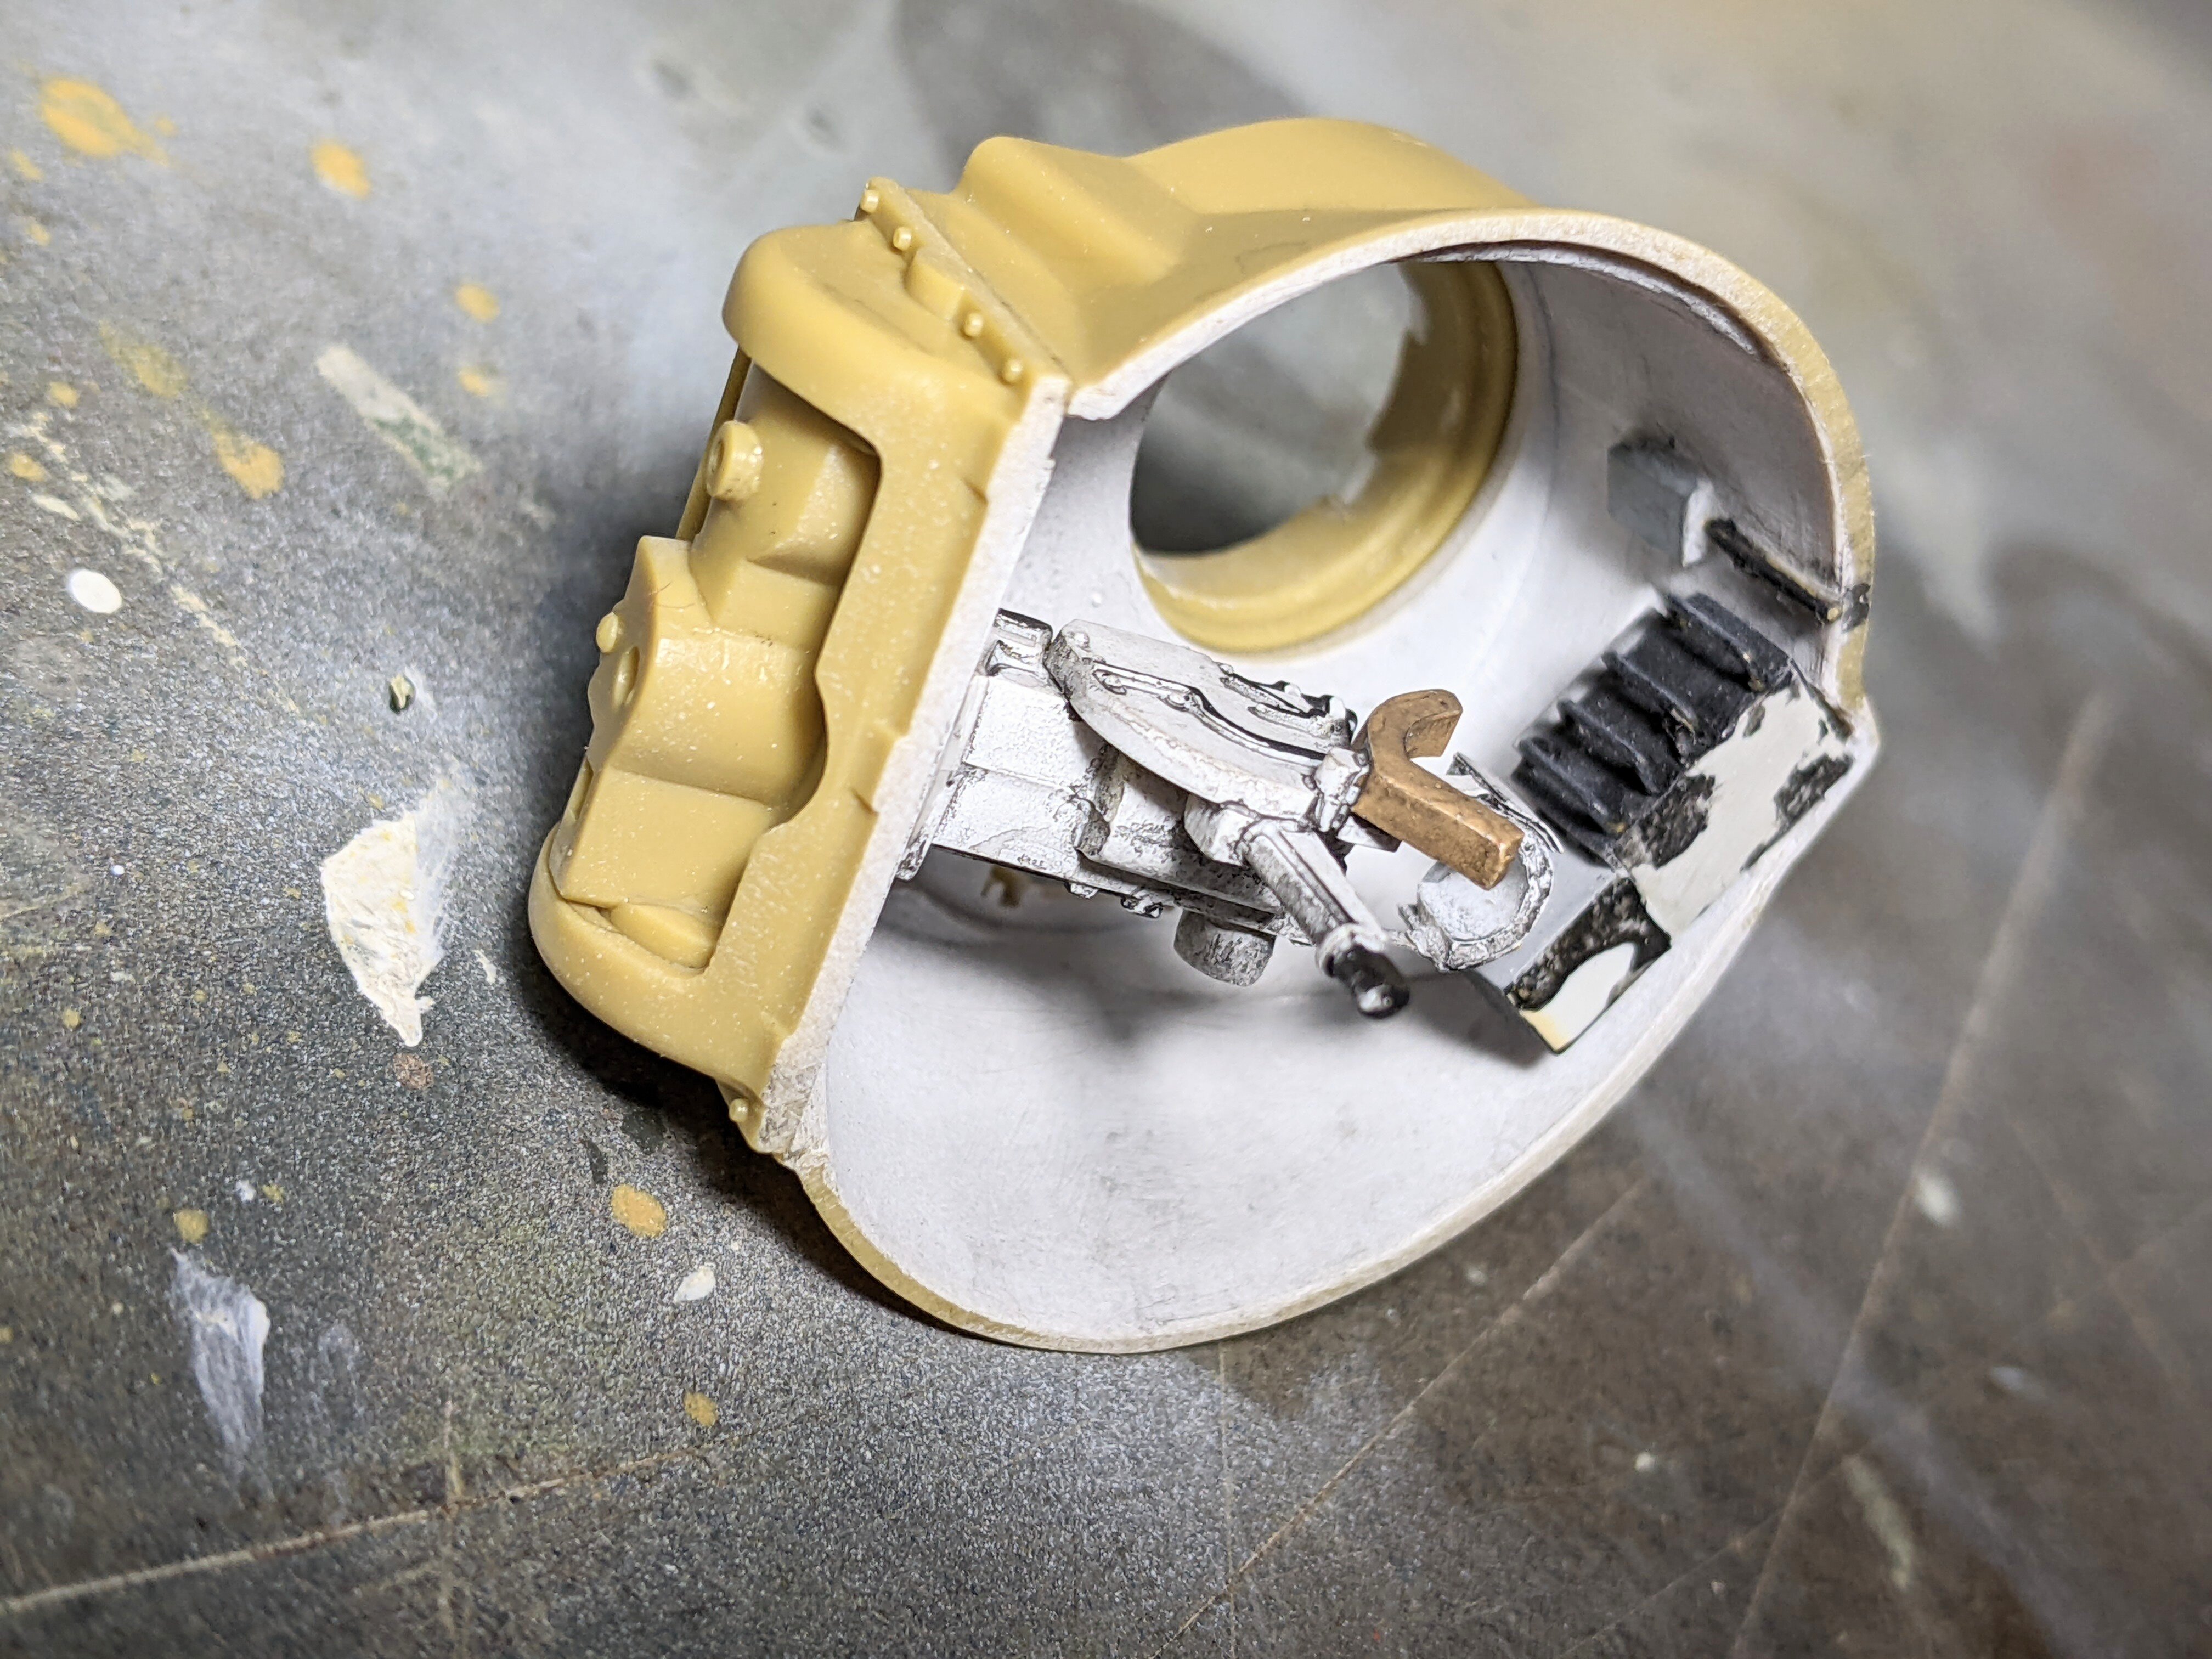
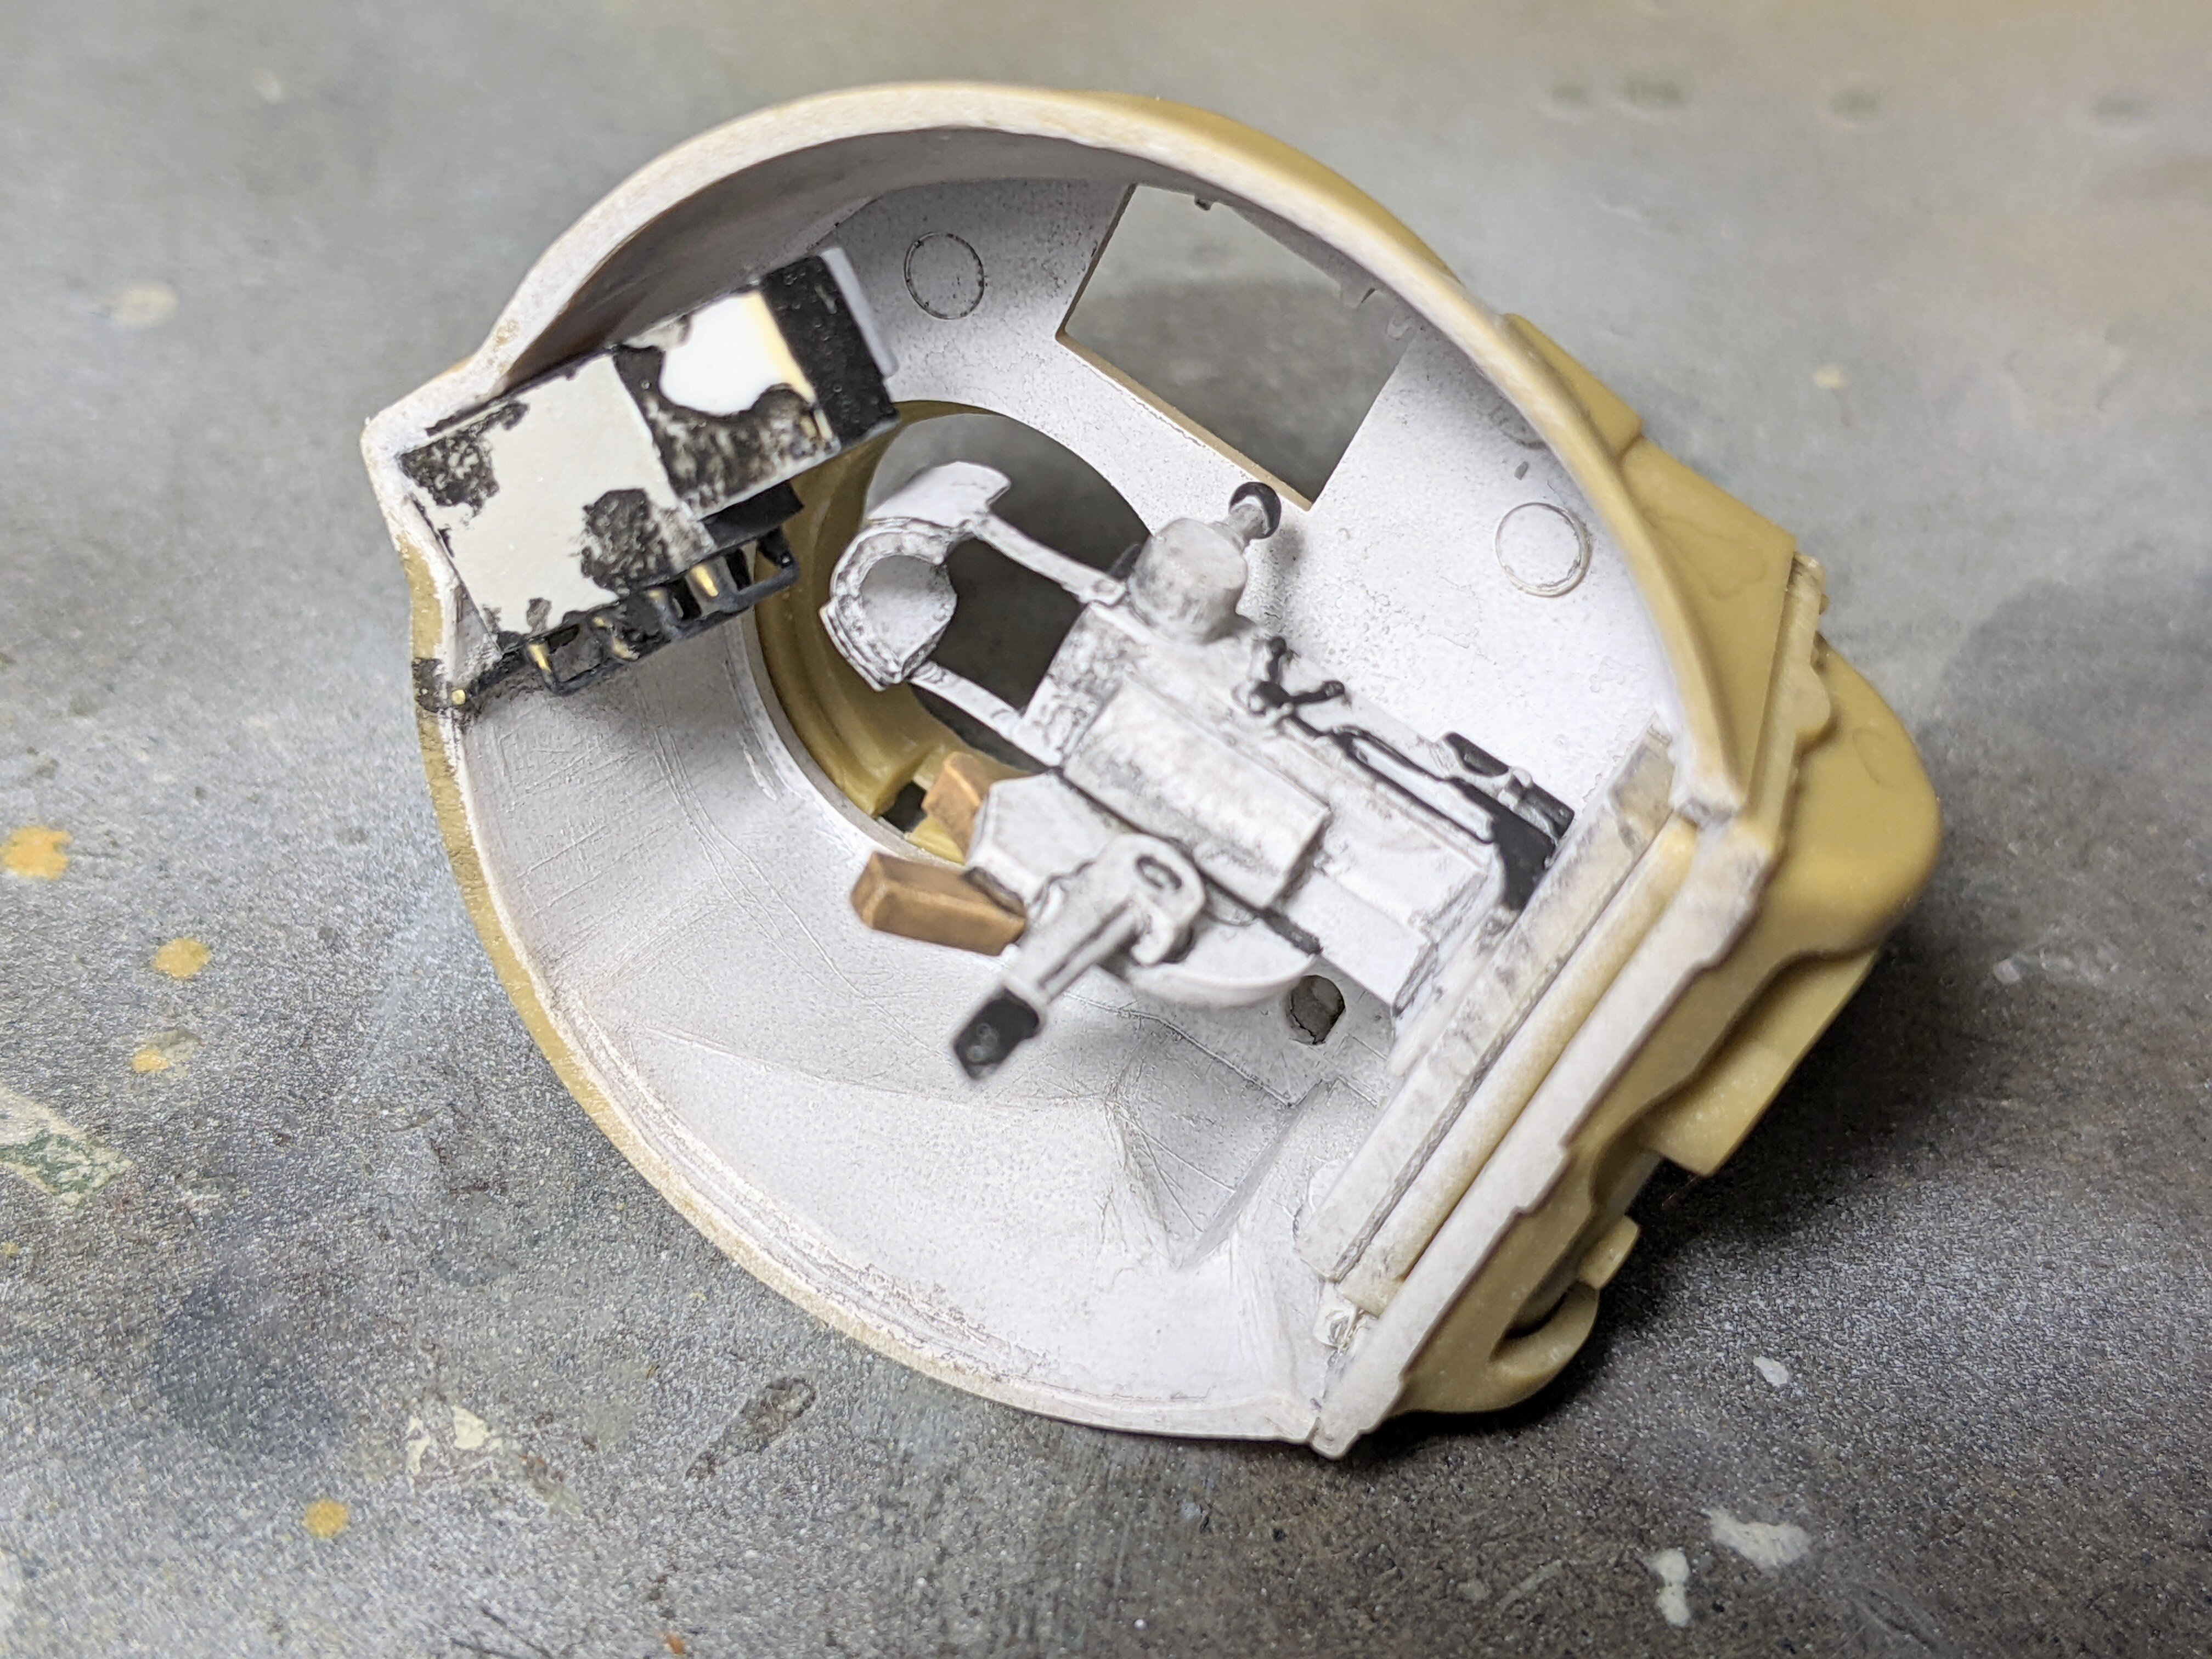
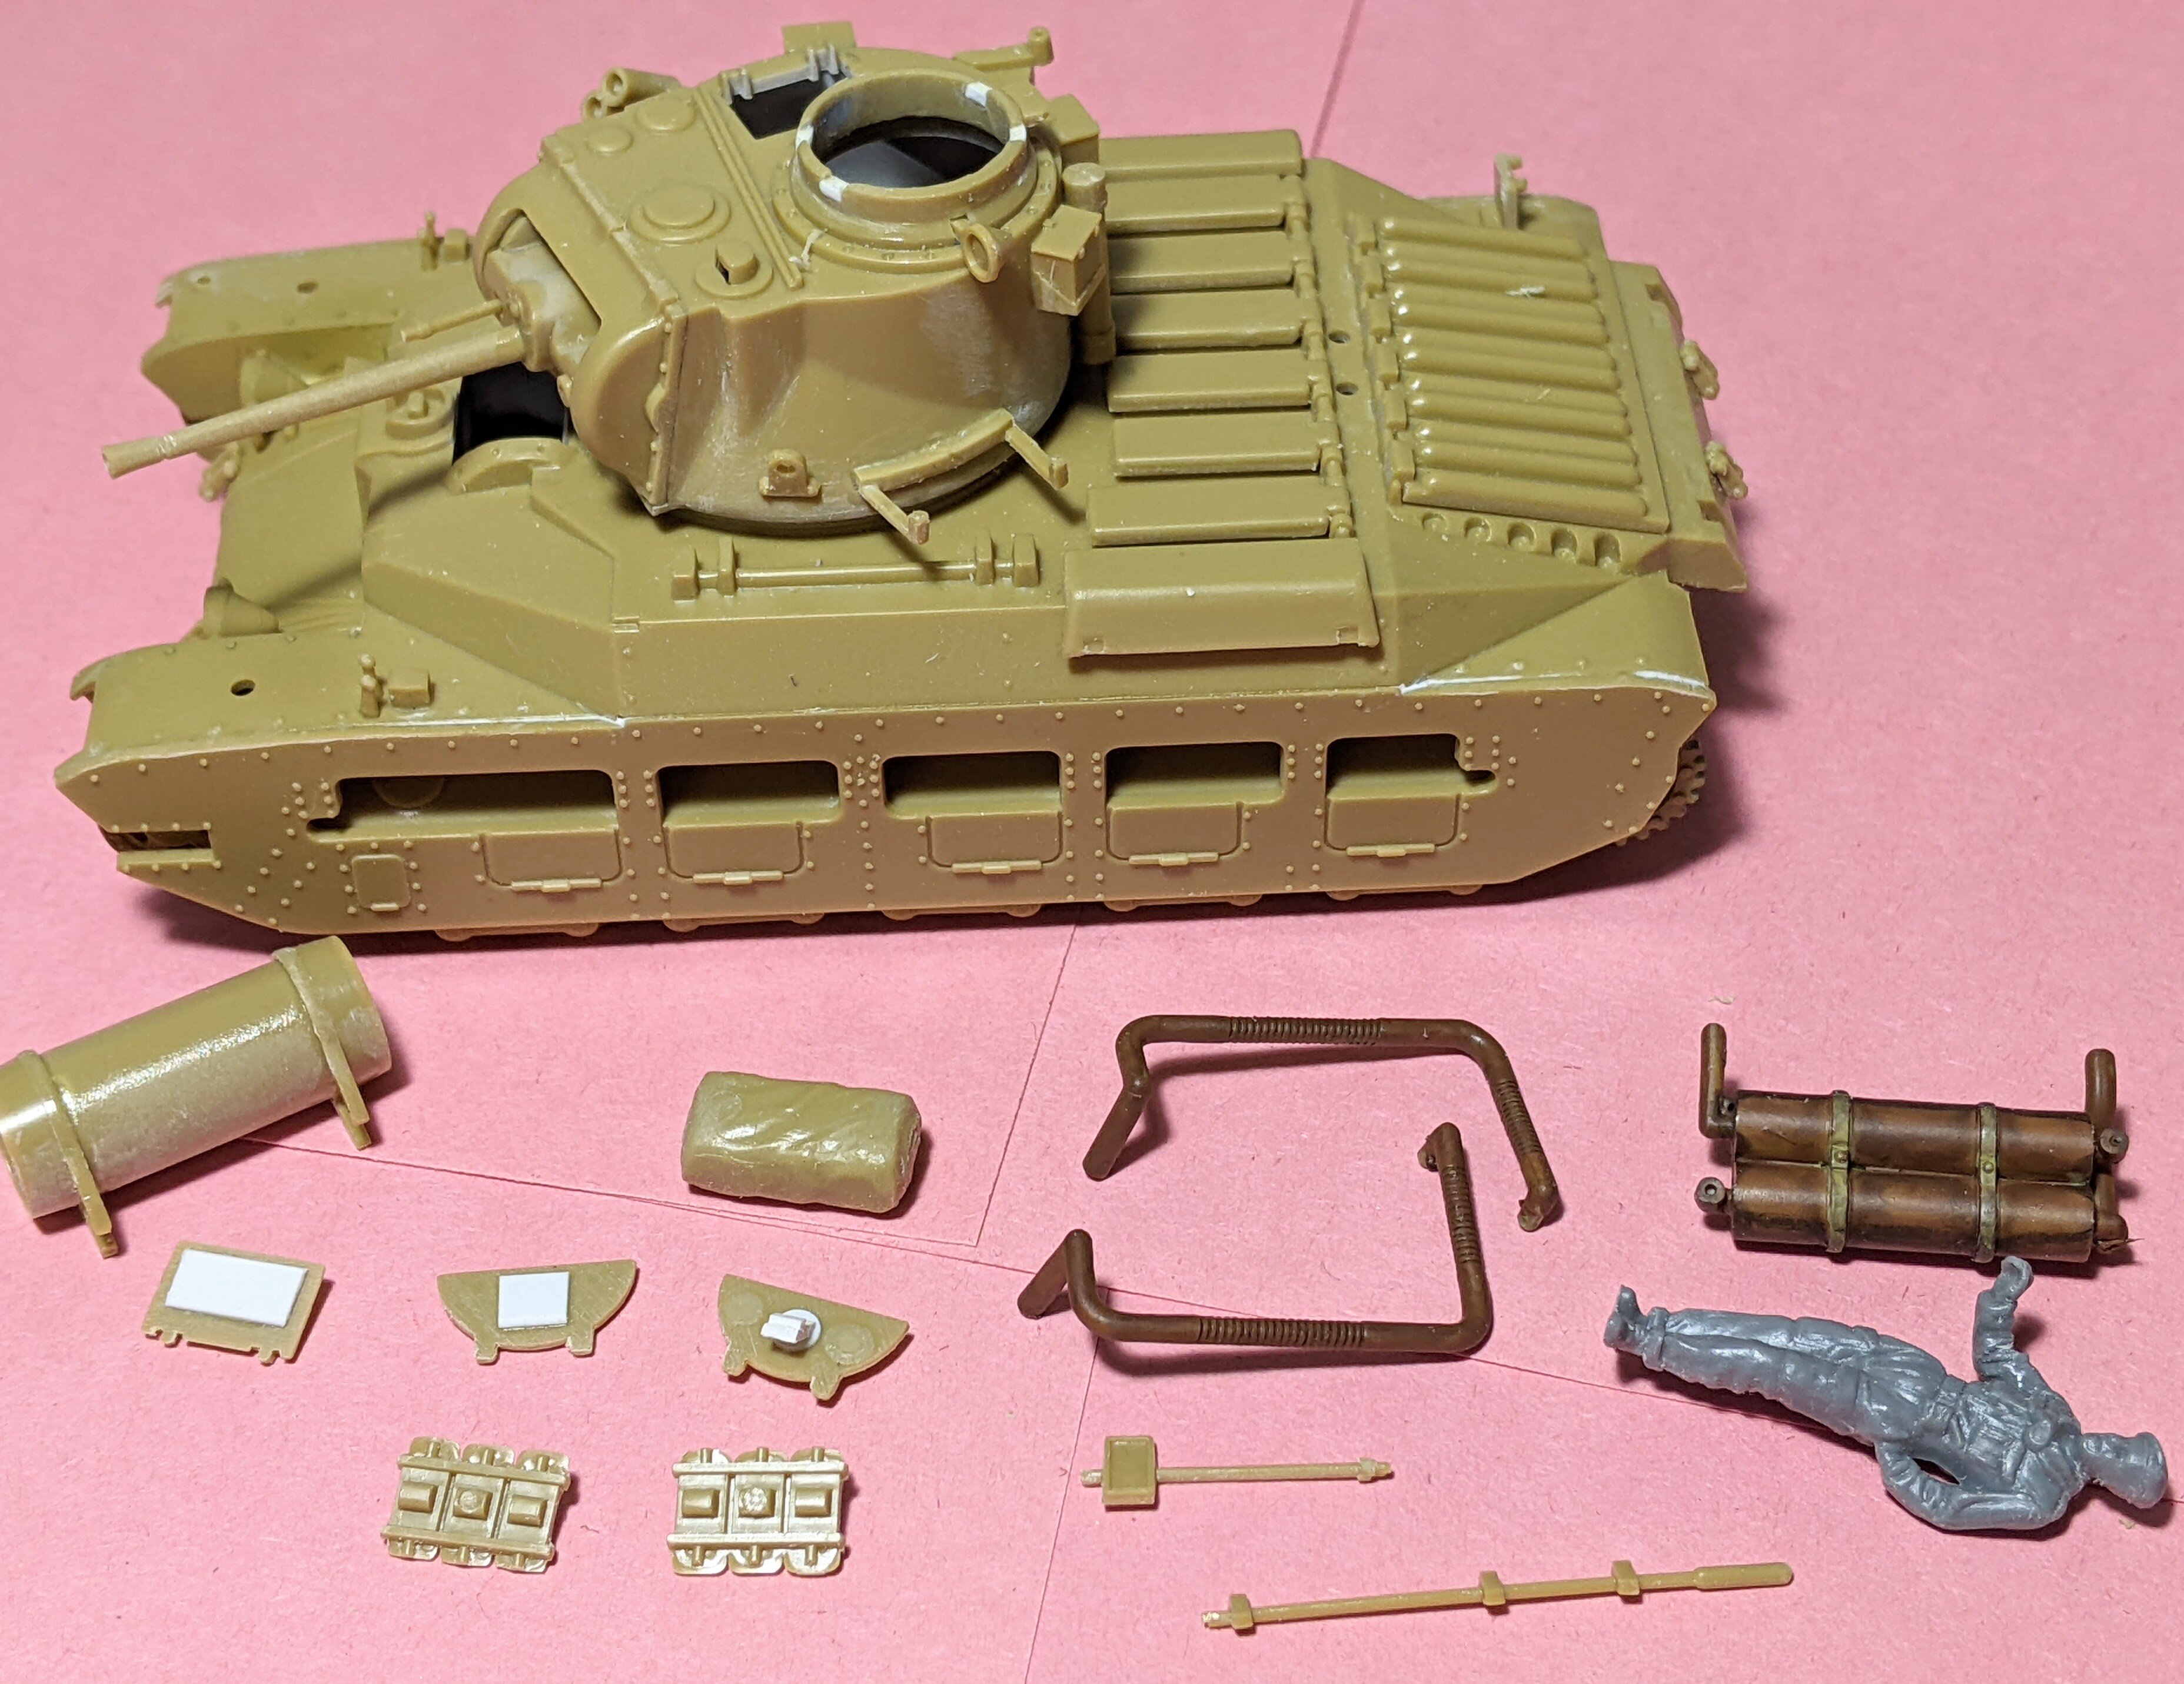
The old Bandai 1/48 armor kits were really gems at the time and still aren't all that bad. They all sported at least a minimal interior while other companies kits had nothing but old motorization brackets. This one is bound for Malta camouflage. I completed the interior with some extra "busying-up" parts added, like some more bins in the hull, some wiring a recoil guard for the main gun and I bodged together a sort of #19 radio set. The turret basket is not accurate and is actually in common with that in the Valentine kit. As a matter of fact, if you check the one in the ESCI 1/72 scale Valentine, you'll find it's also the same. But accuracy aside, again, at least there's something in there to see through the hatches I intend to leave open. In the end, it turned out pretty well for a kit that dates from 1975. The figure is from the Tamiya Humber a/c kit as there was no crew in the box when I got it. This is everything before exterior painting started, with the exception of the exhaust system. And here's the final product.
-
Military modeling at its best...in the 1970's at least. Only one missing, I think, is the Jeep pulling the Little John rocket, which was never re-released and goes for stupid money.
-
cheveuxroux, Don't know where you read that, but I checked photos on the interweb and yup, that's what it's modeled after. Very good info to have.
-
So, do you just have all that extra "stuff" in stock on hand? Most would spend months just trying to assemble all that. Great work, as usual, by the way.
-
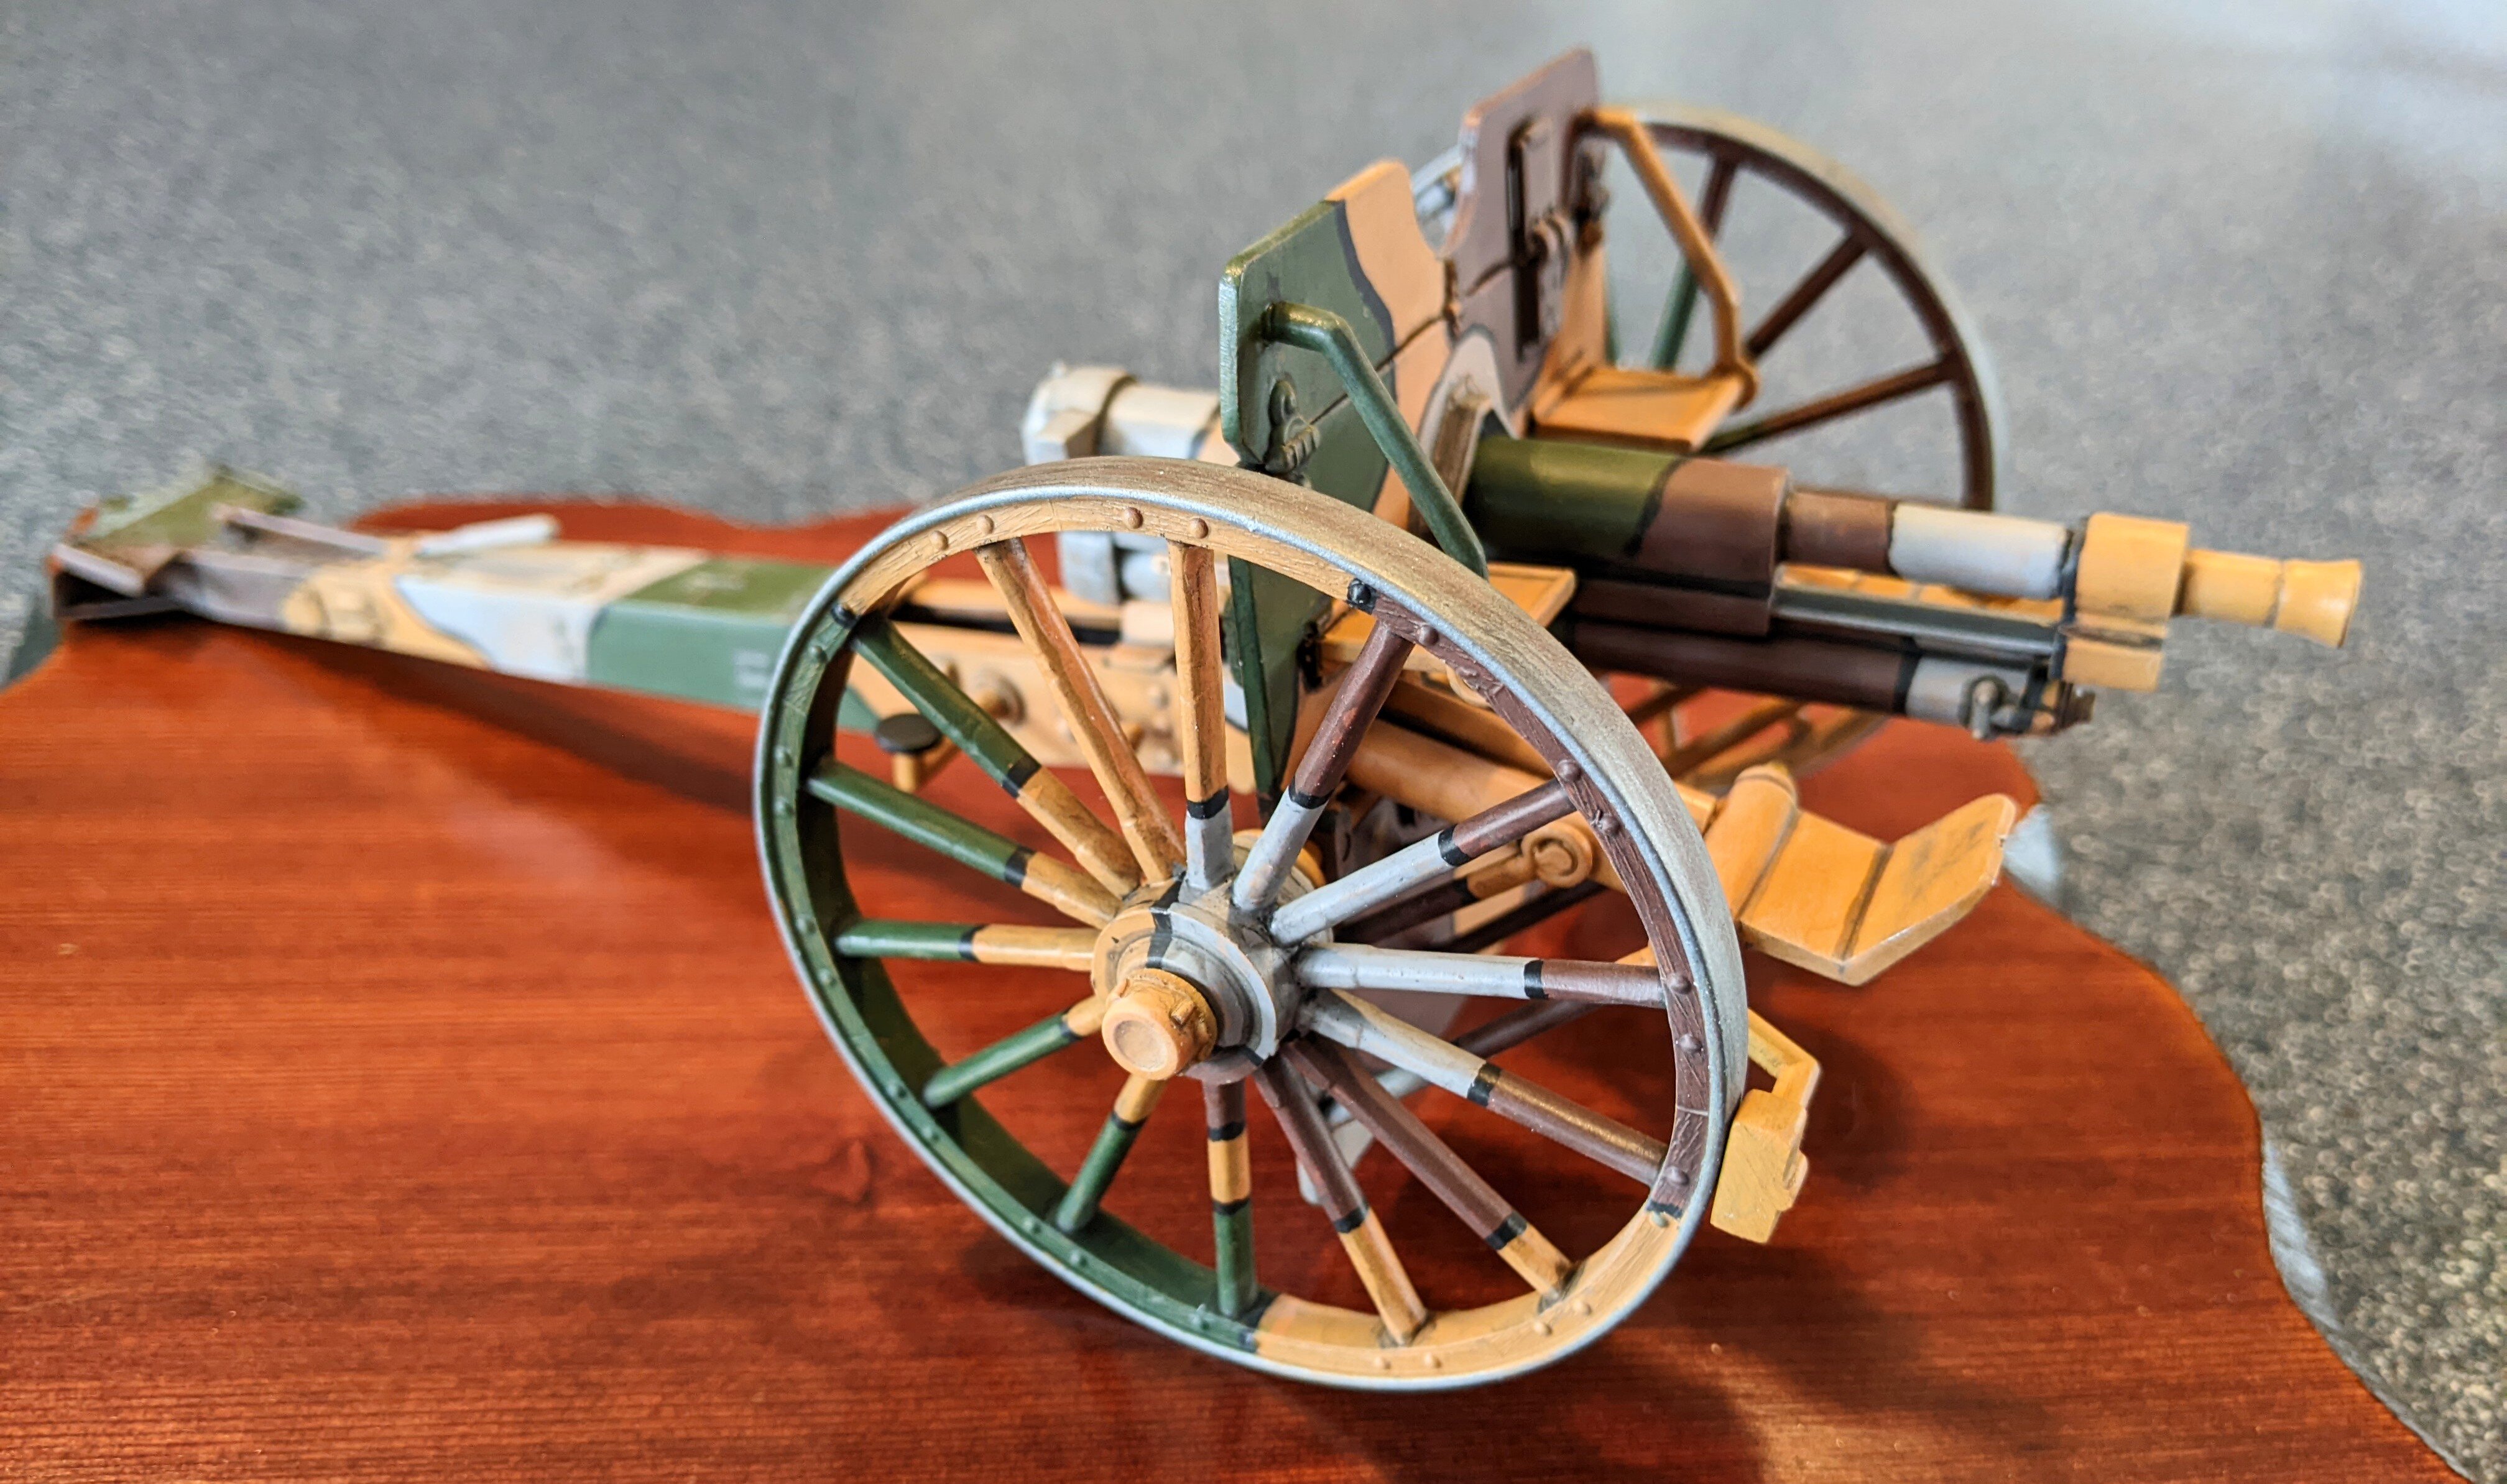
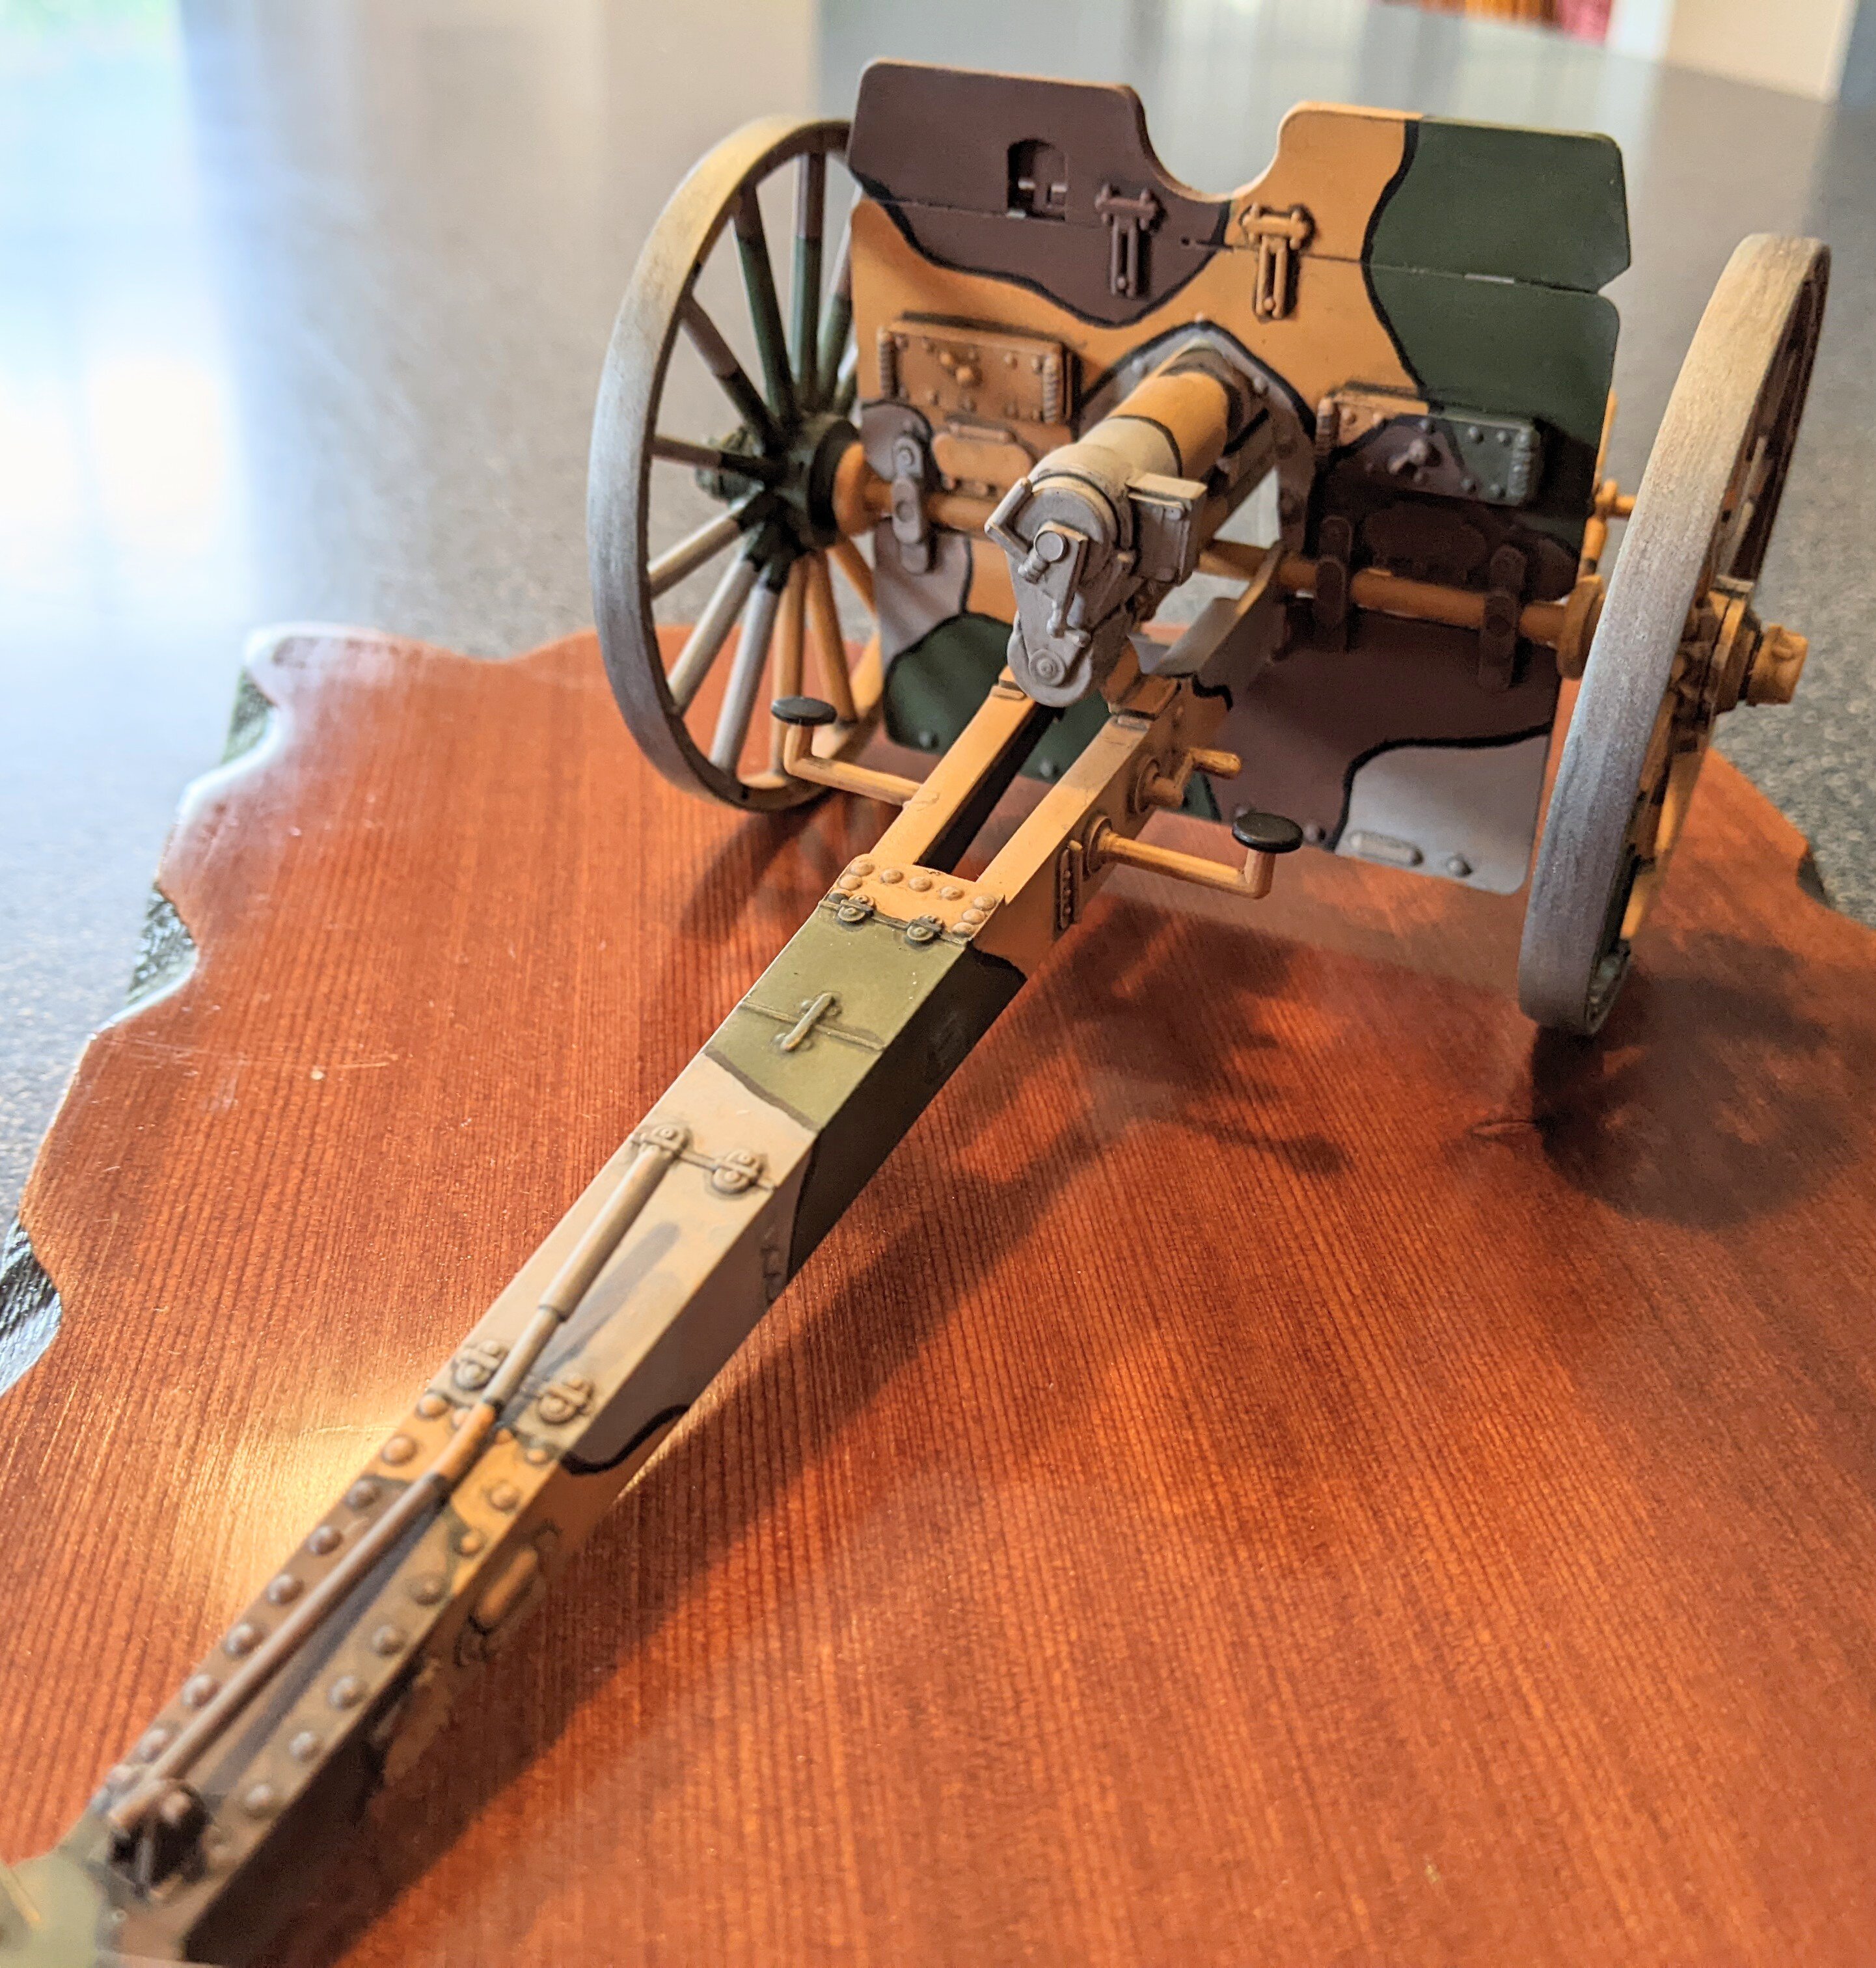
I continued with my little project of working on these old artillery kits. This is the LifeLike release of the what they call a WW I 75 mm. It bears little resemblance to a French or post war US 75 and looks more like, but not exactly like, a German WW I 77mm. It has elements of all those guns. Given that, and the fact that the mold was a mess with almost as much flash and mold seams as parts, with careful assembly and an interesting paint scheme, it can build up into a nice desk model. In the photos, if the wheels look a bit out of whack, some of that is camera distortion, but they were out of alignment. A little 'gentle persuasion" and they are better now.
-
How'd you hide the button on the top that dropped the bomb so well? 🤣 Seriously, your "basic" work is better than most peoples' best efforts.
-
Mark, let me take this moment to say that I think you are the epitome of what IPMS should be. People getting joy out of the hobby of making plastic models. Thank you. I hope you can make it to some future National Convention so we can meet in person again.
-
Who's kit was it that tested you so? I know the feeling, however. Sometimes you just want to get them done and out of the way so you can start anew with something else. But, I would guess that even with all the pains it gave you, you learned a thing or two to either do or not do on another model.
-
Mark. Scalemates says it's 1/98.
-
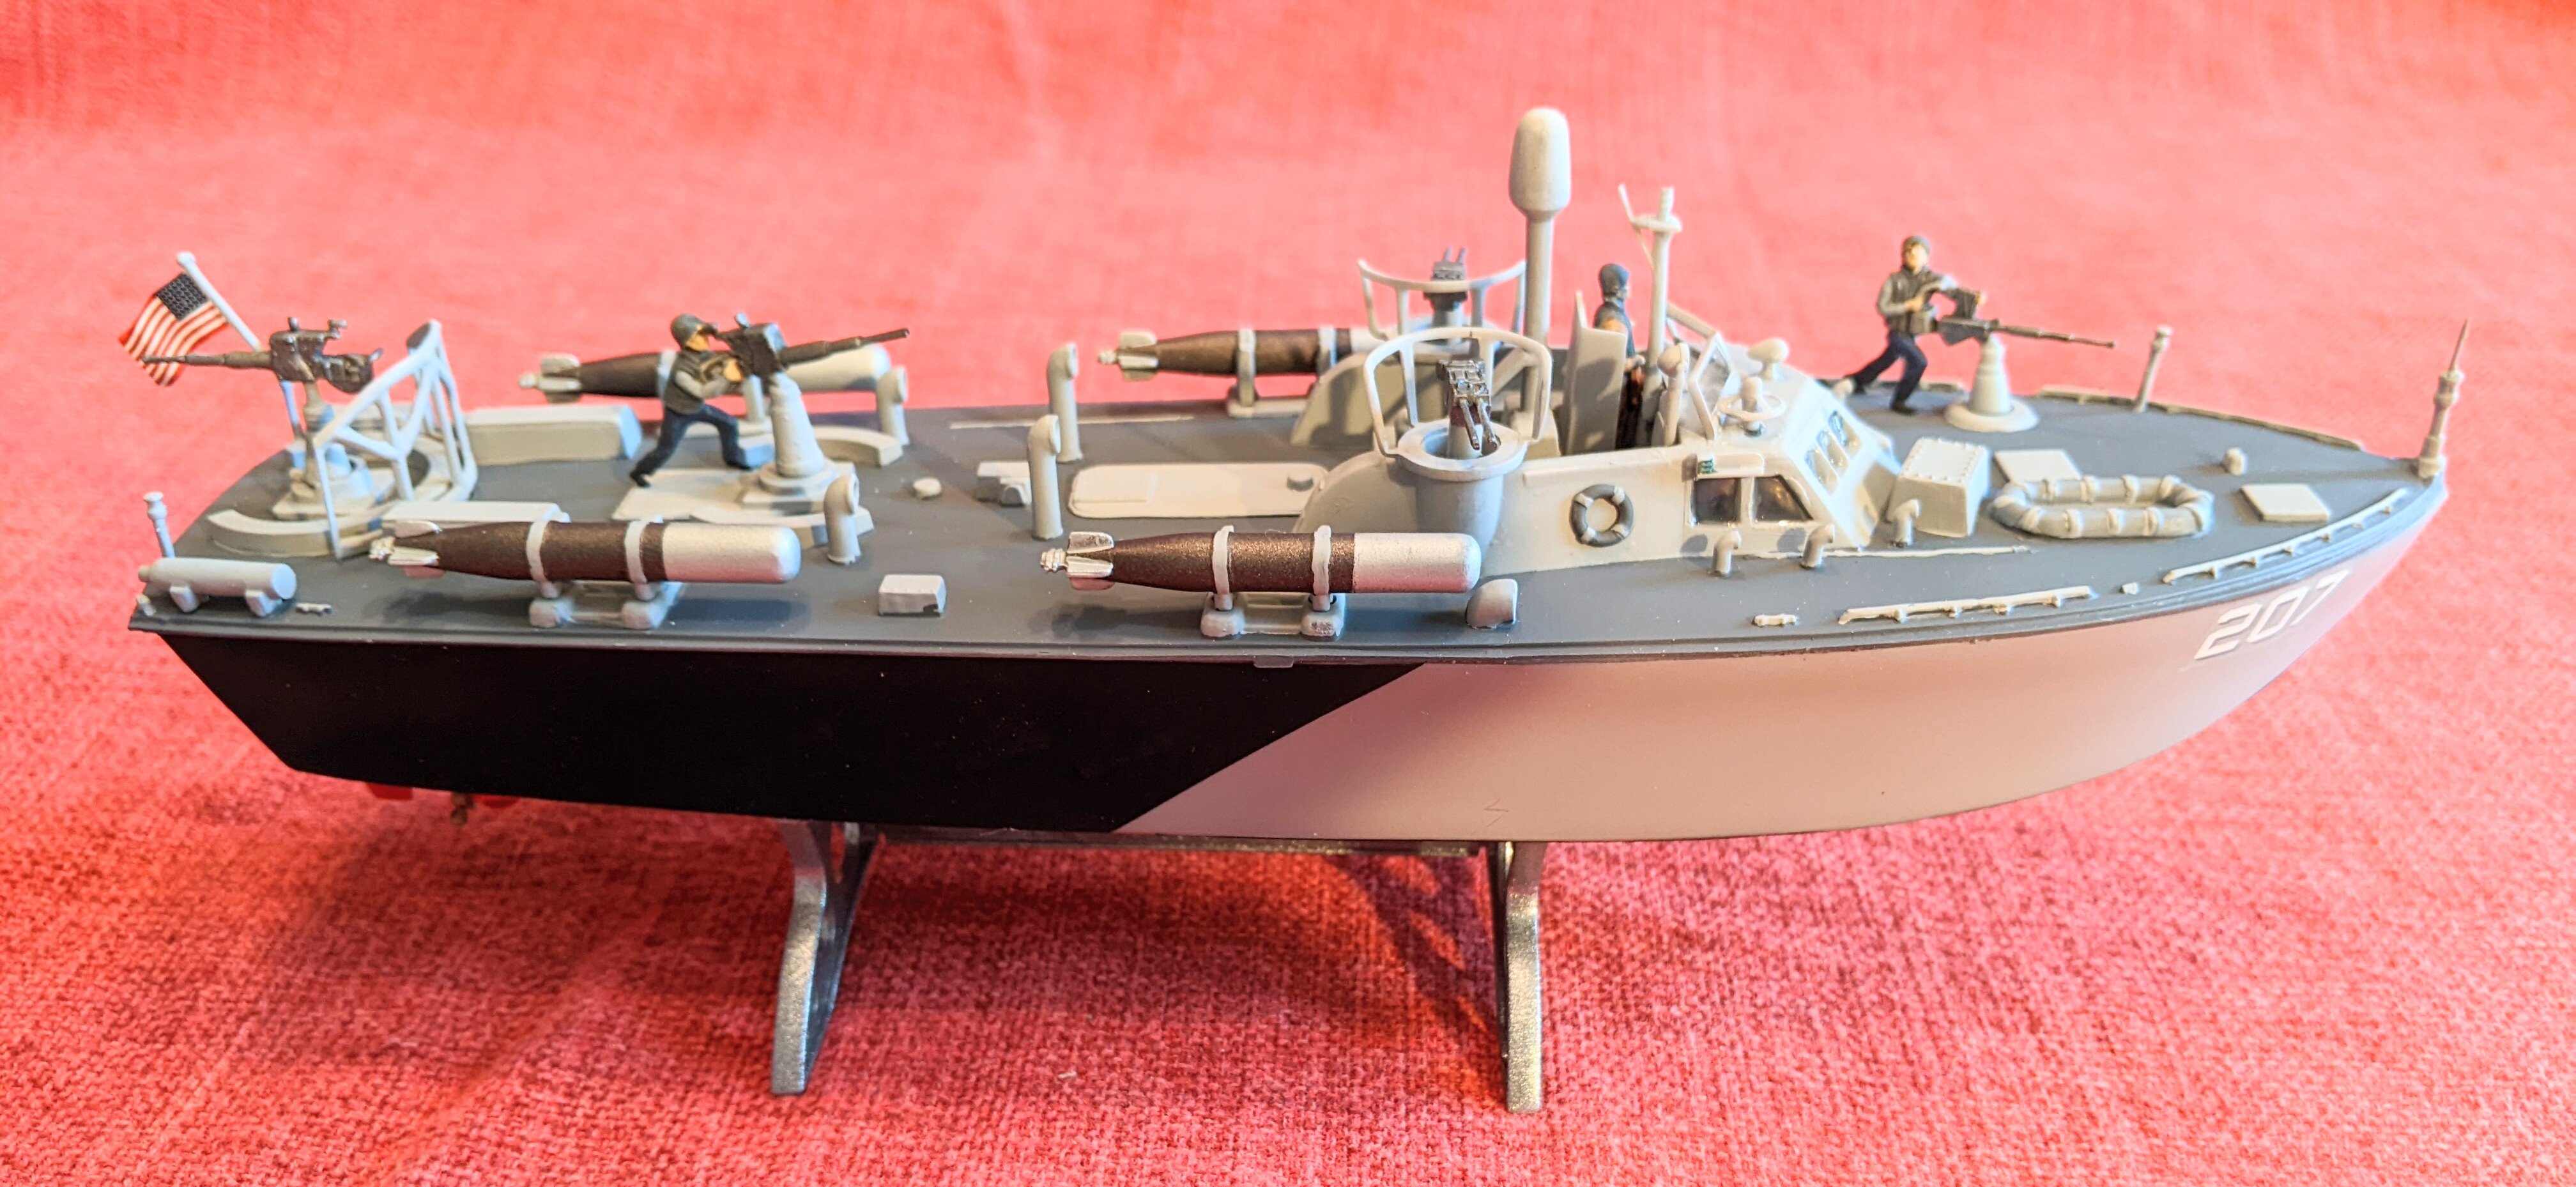
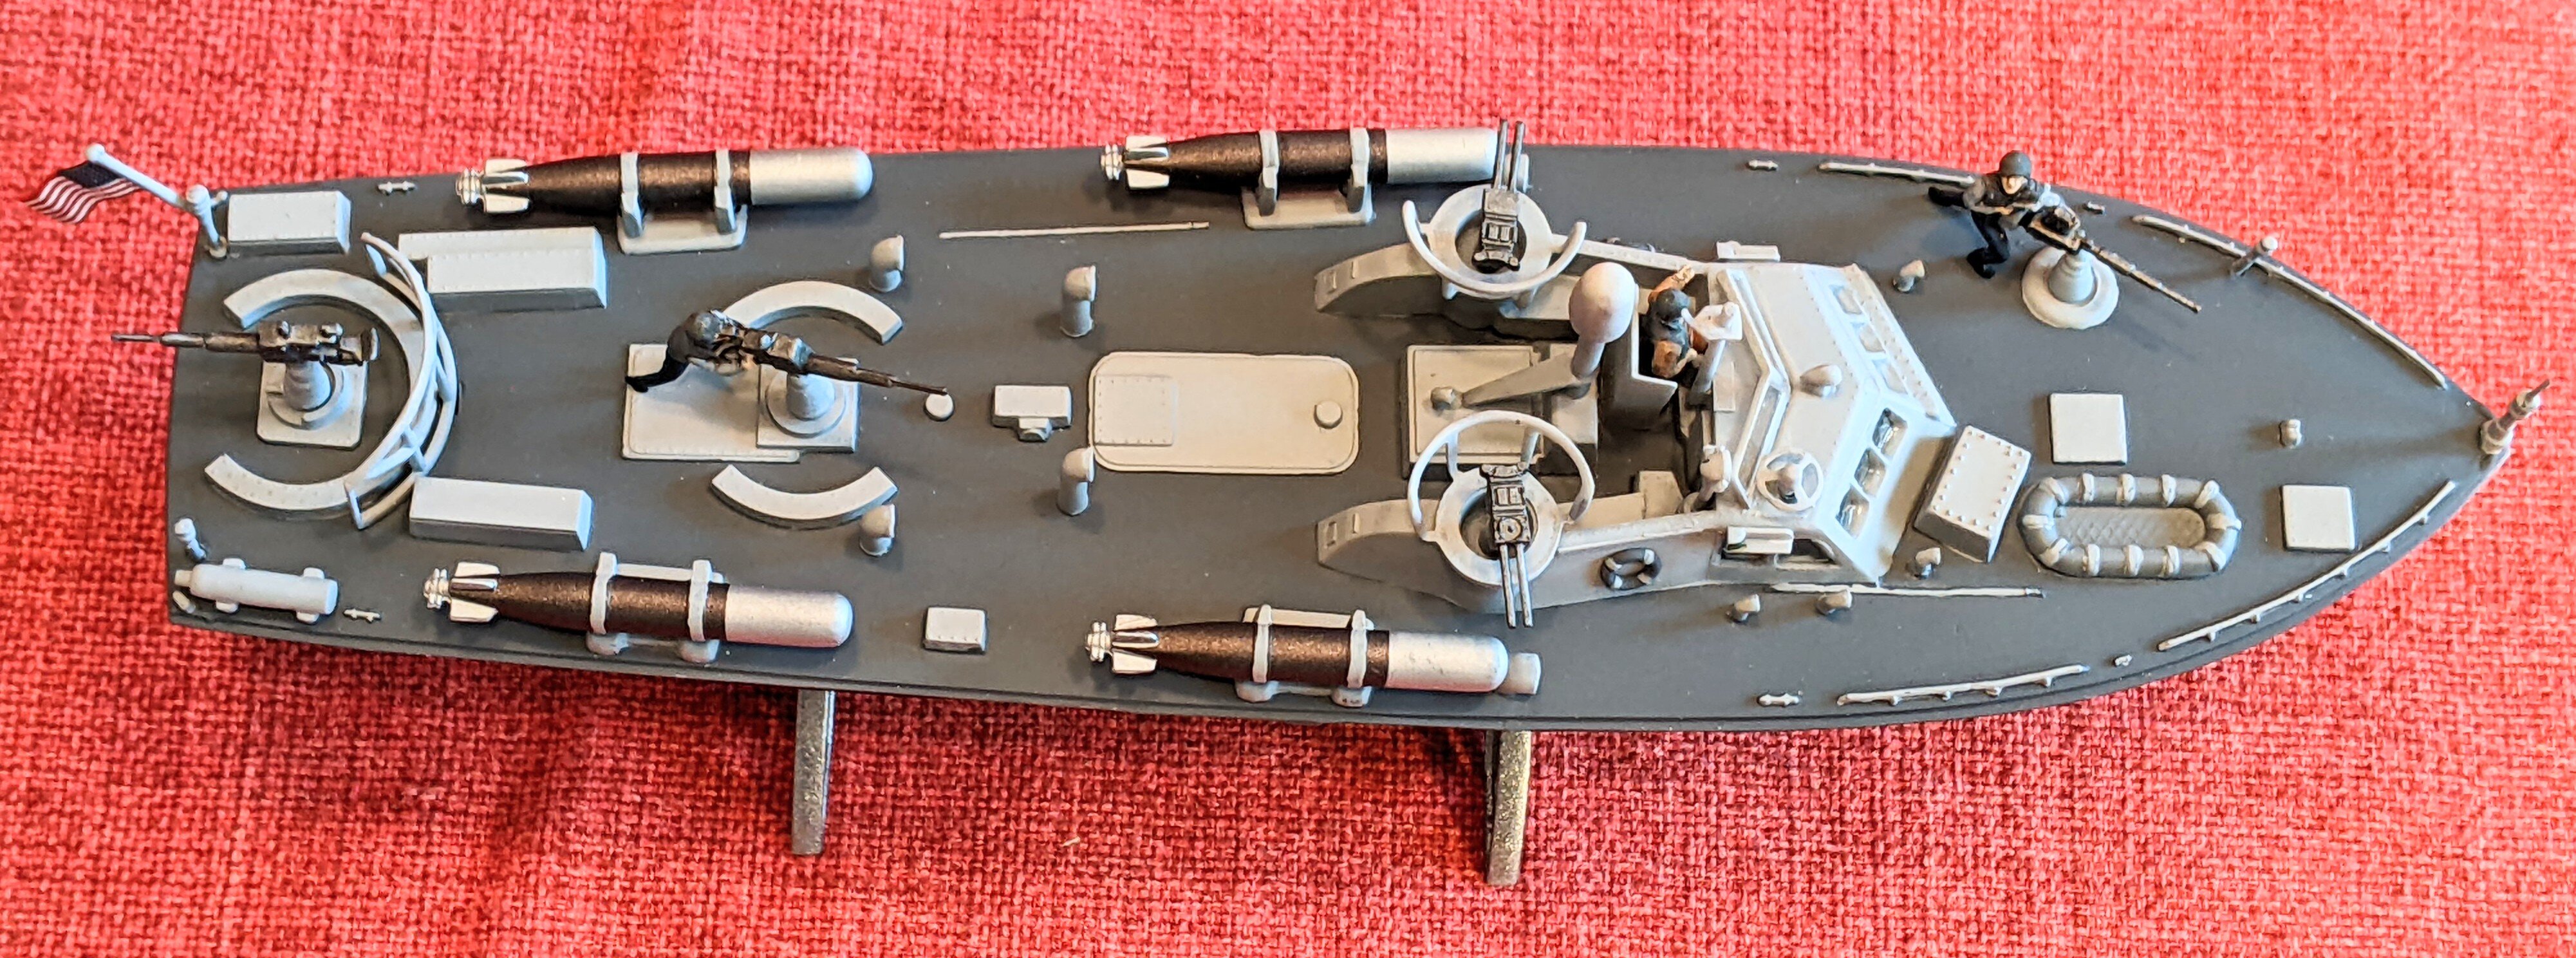
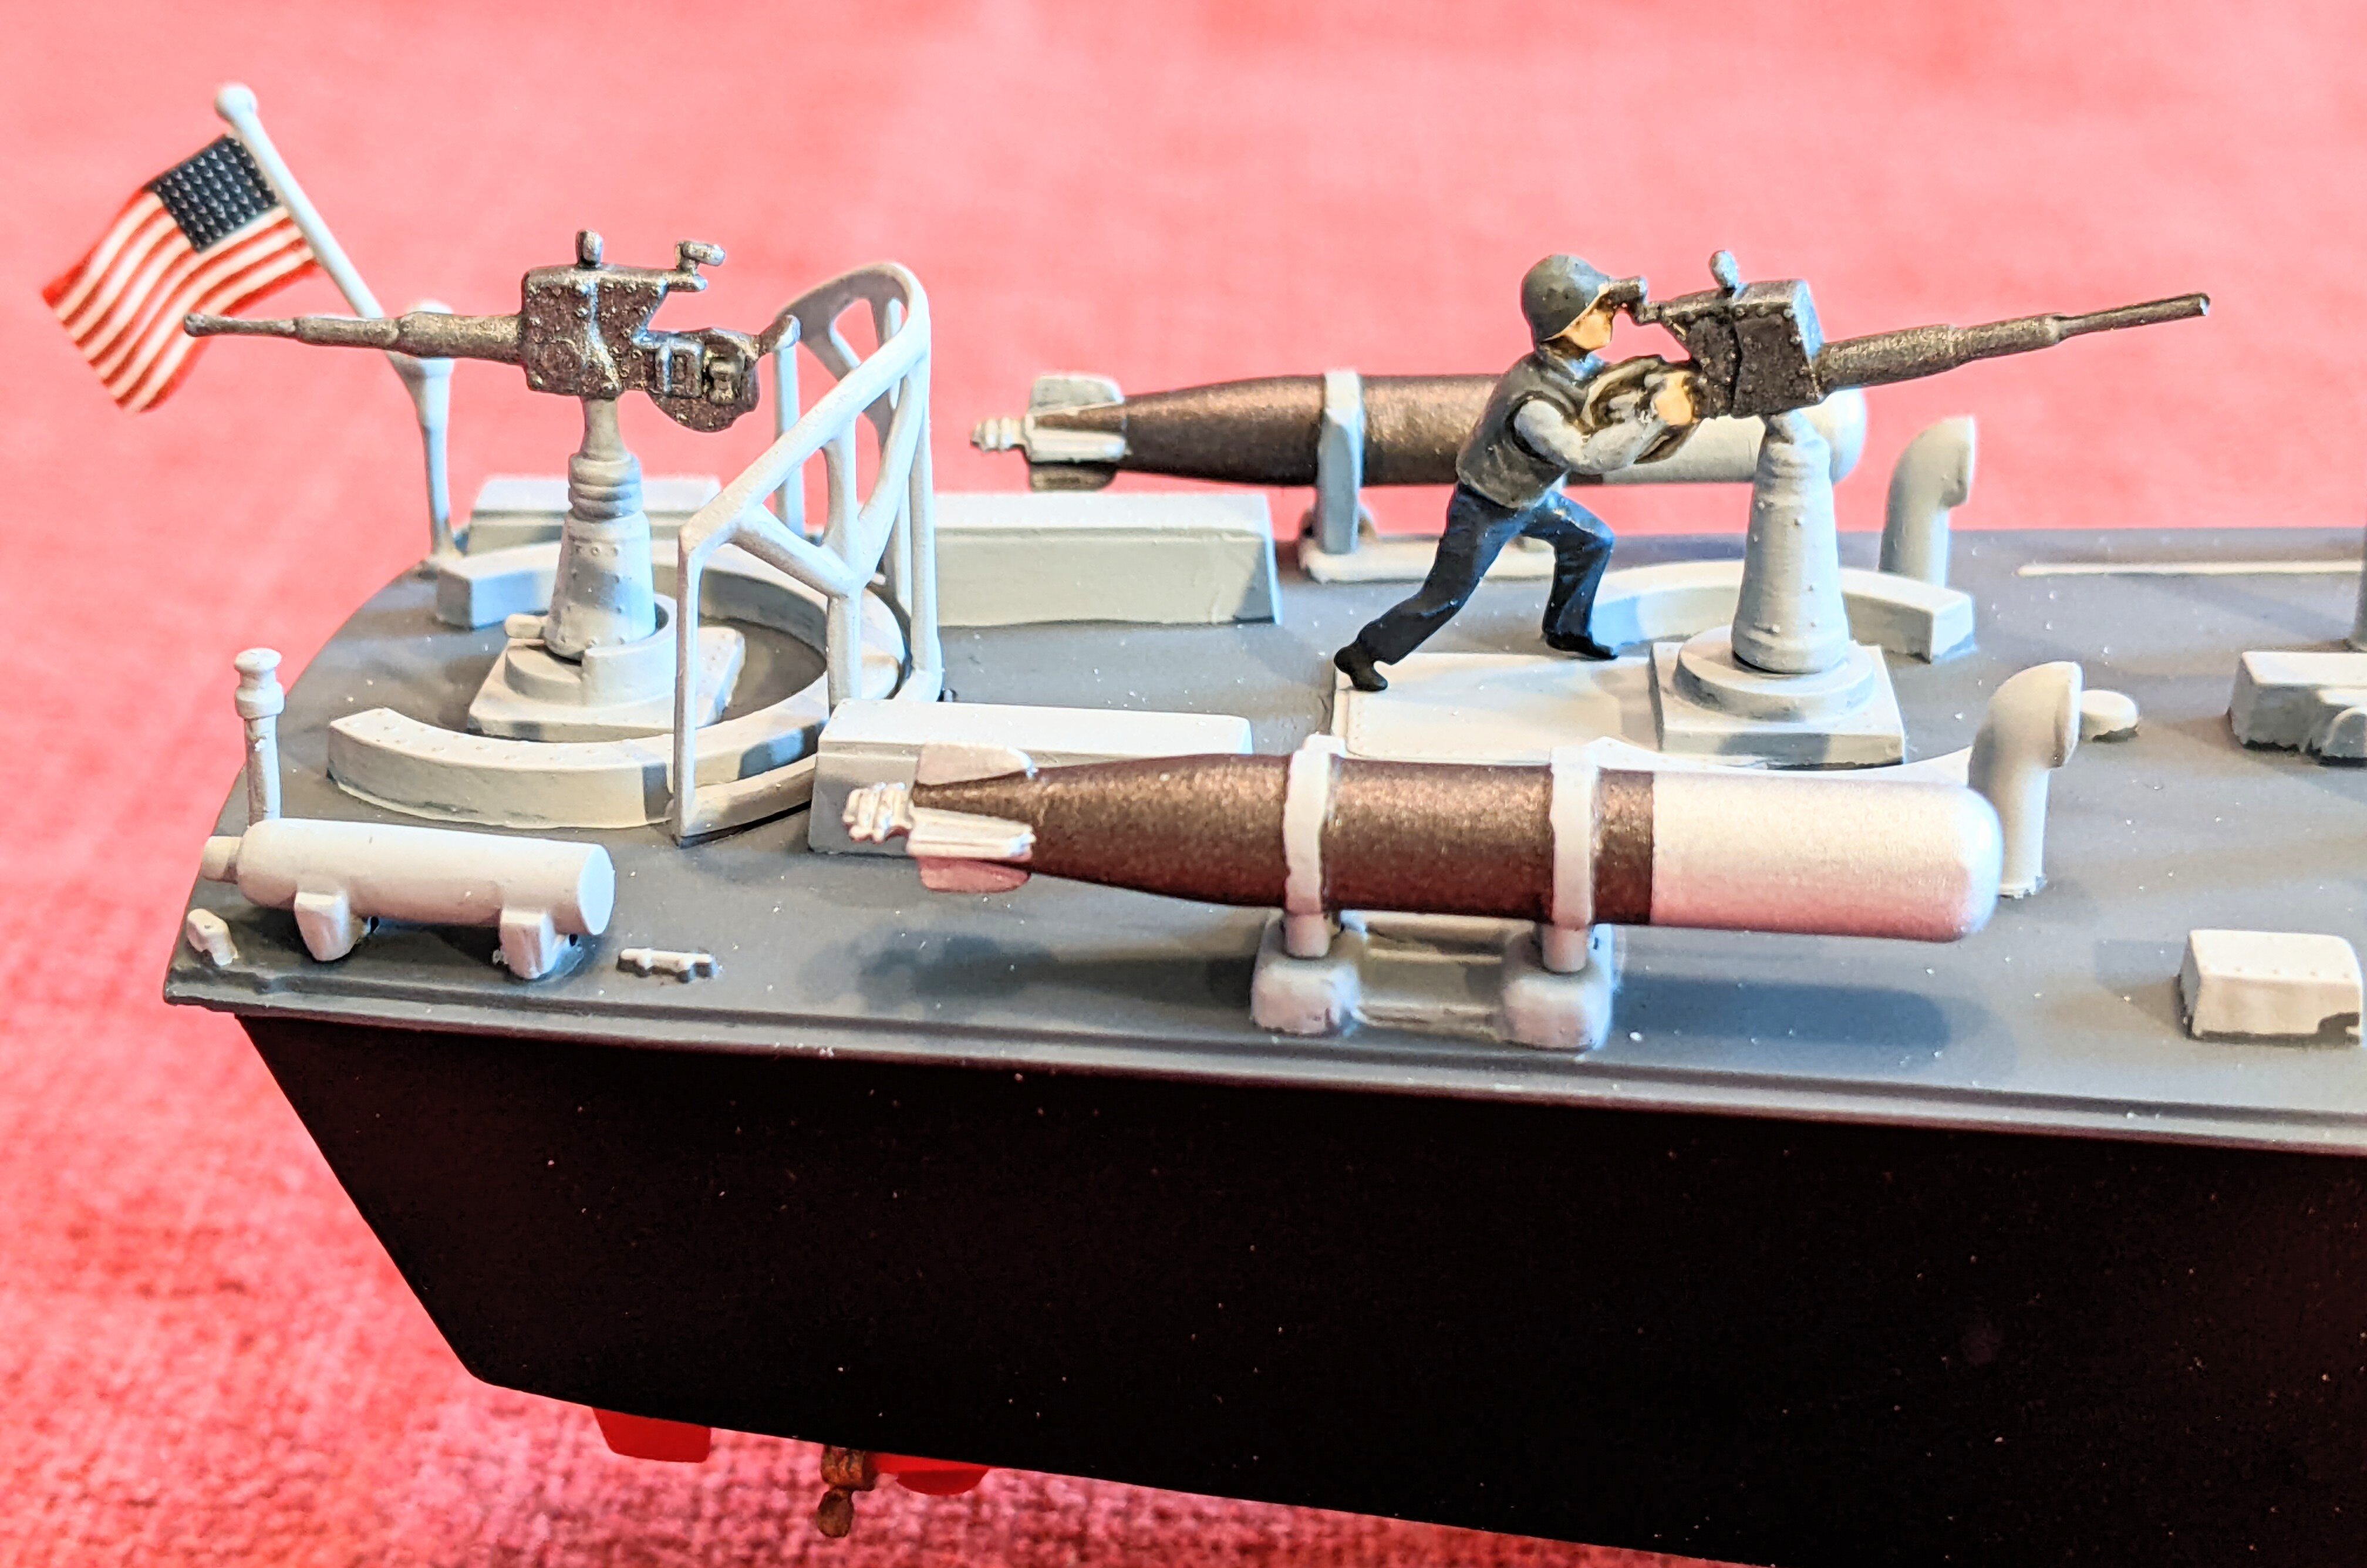
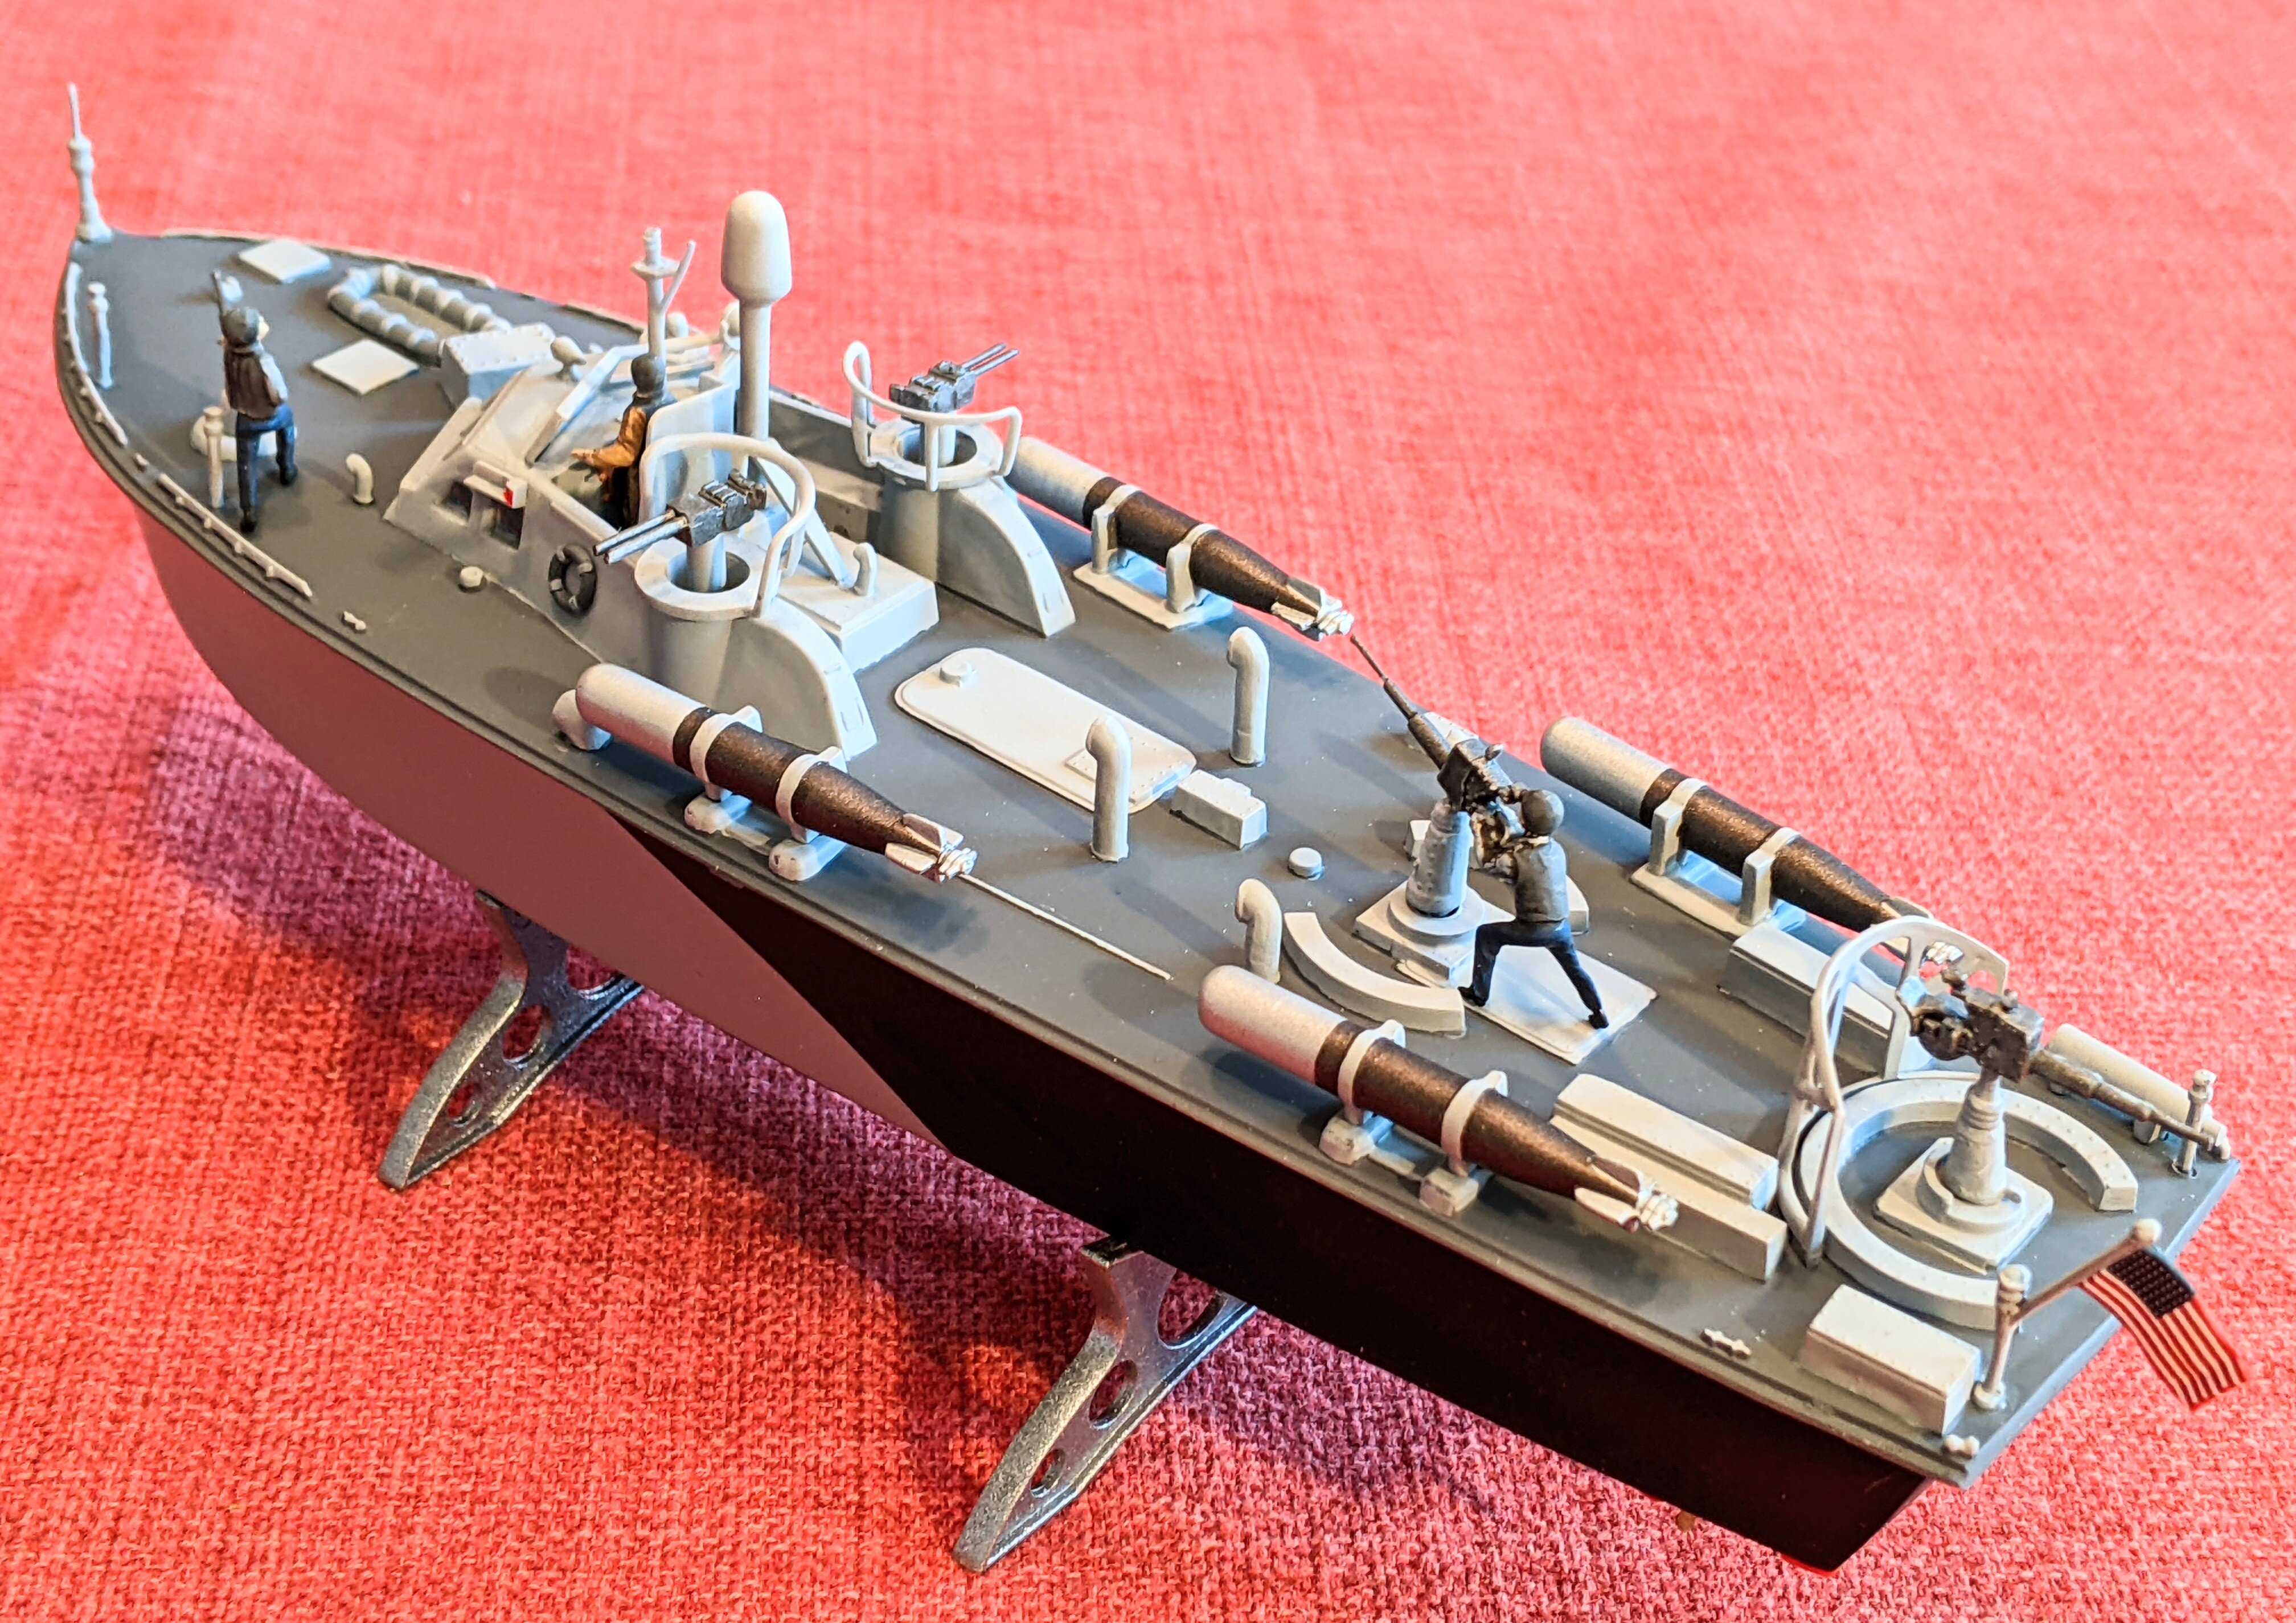
This is part of the Air Land Sea Gift Set. It's the old Revell PT-212, although it has been rereleased under several other designations as well. I'm no PT boat expert, but I think, as old as it is, it's one of the few kits of a Higgins PT boat, all the others being Elco's, but I may be wrong on that. The kit is very 1950's-ish, which is no surprise as that's when the kit originated. Atlantis has done a good job cleaning up these old molds and for it's age, there was surprising little flash, although the mold seams were unavoidable. It builds up into a nice display model and would be great to get youth or new modelers involved. Personally, I like them as they are simple to build, look nice and don't have thousands of tiny parts to break or lose. In short, they are fun to build.
-
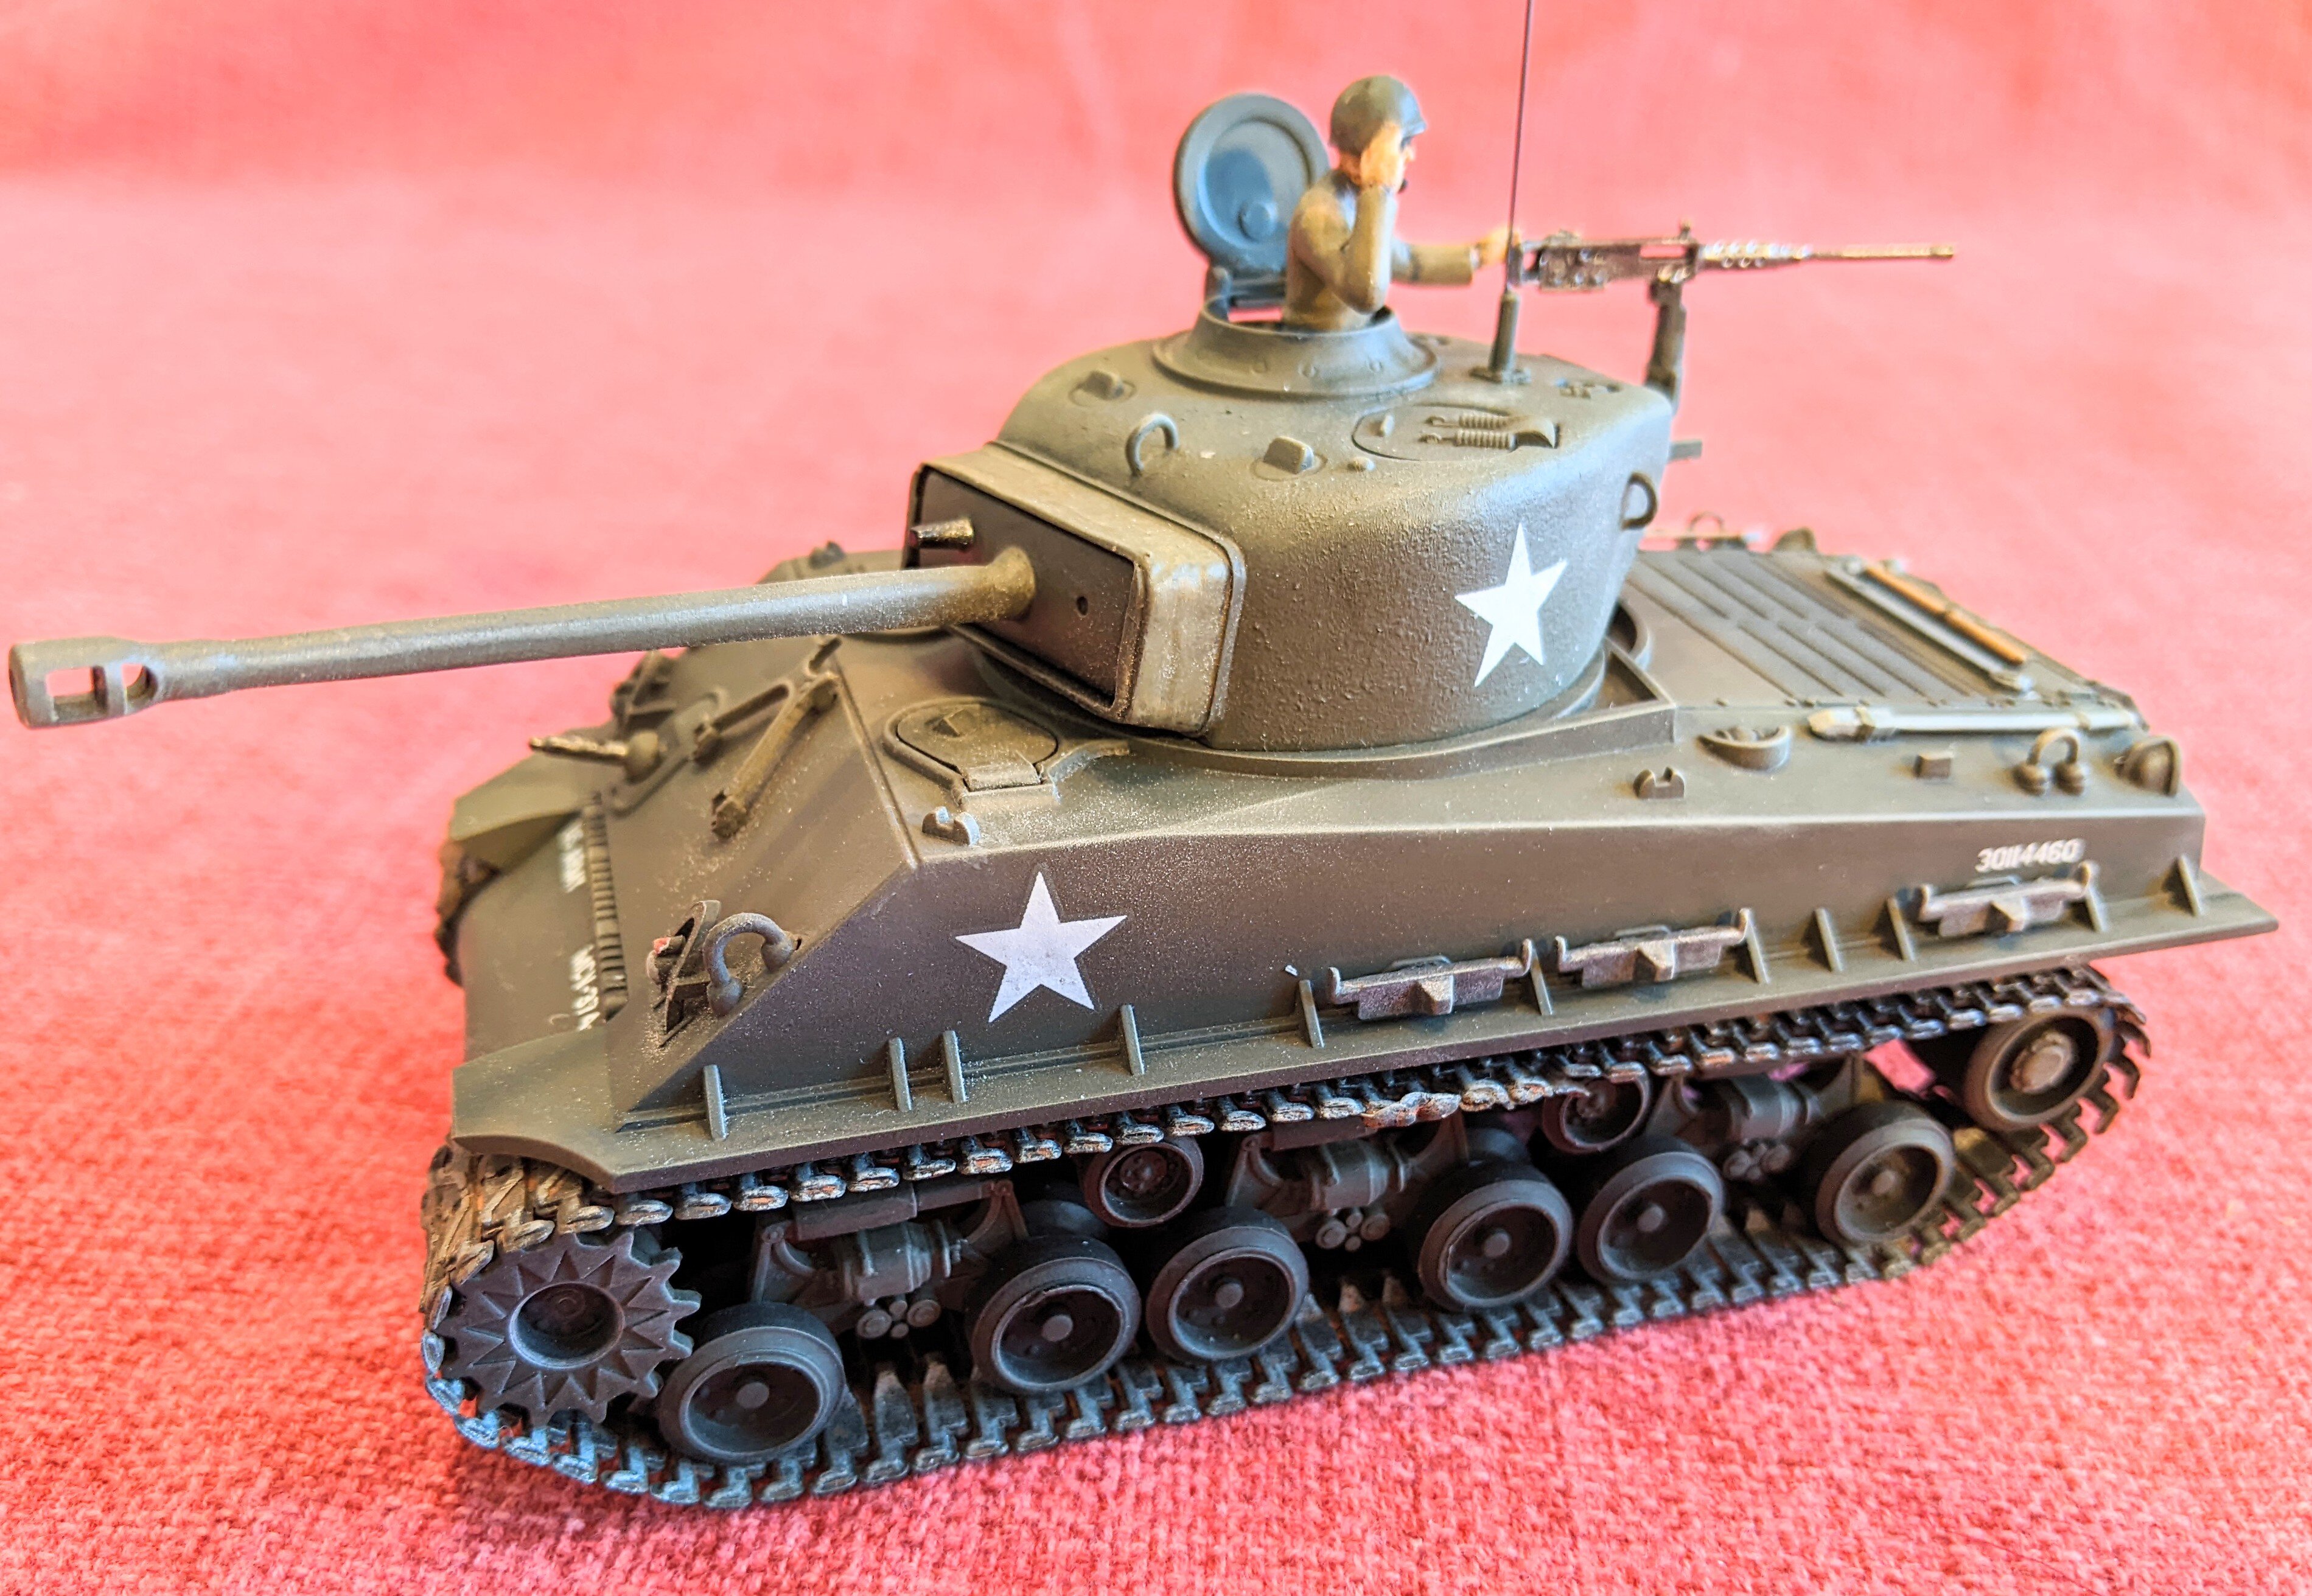
This is part of the Land, Sea, Air gift set. It's the old Aurora Sherman and dates from back in the 60's. They have done a nice job cleaning up the molds and by and large, it generally looks like a Sherman. The figures, however, are kind of mushy with very poor faces. They're not even up to "green army men" standard. But, it was a fun trip down memory lane. The Atlantis kits would be good ones to use to introduce younger modelers to the hobby or even get "lapsed" modelers back in, or, as in my case, ones that are just tired of fiddling with dozens of microscopic parts and PE stuff.
-
Here's the finished product. It has many flaws, but given what I started with, I think it looks pretty nice.
- 1 reply
-
- 2
-

-
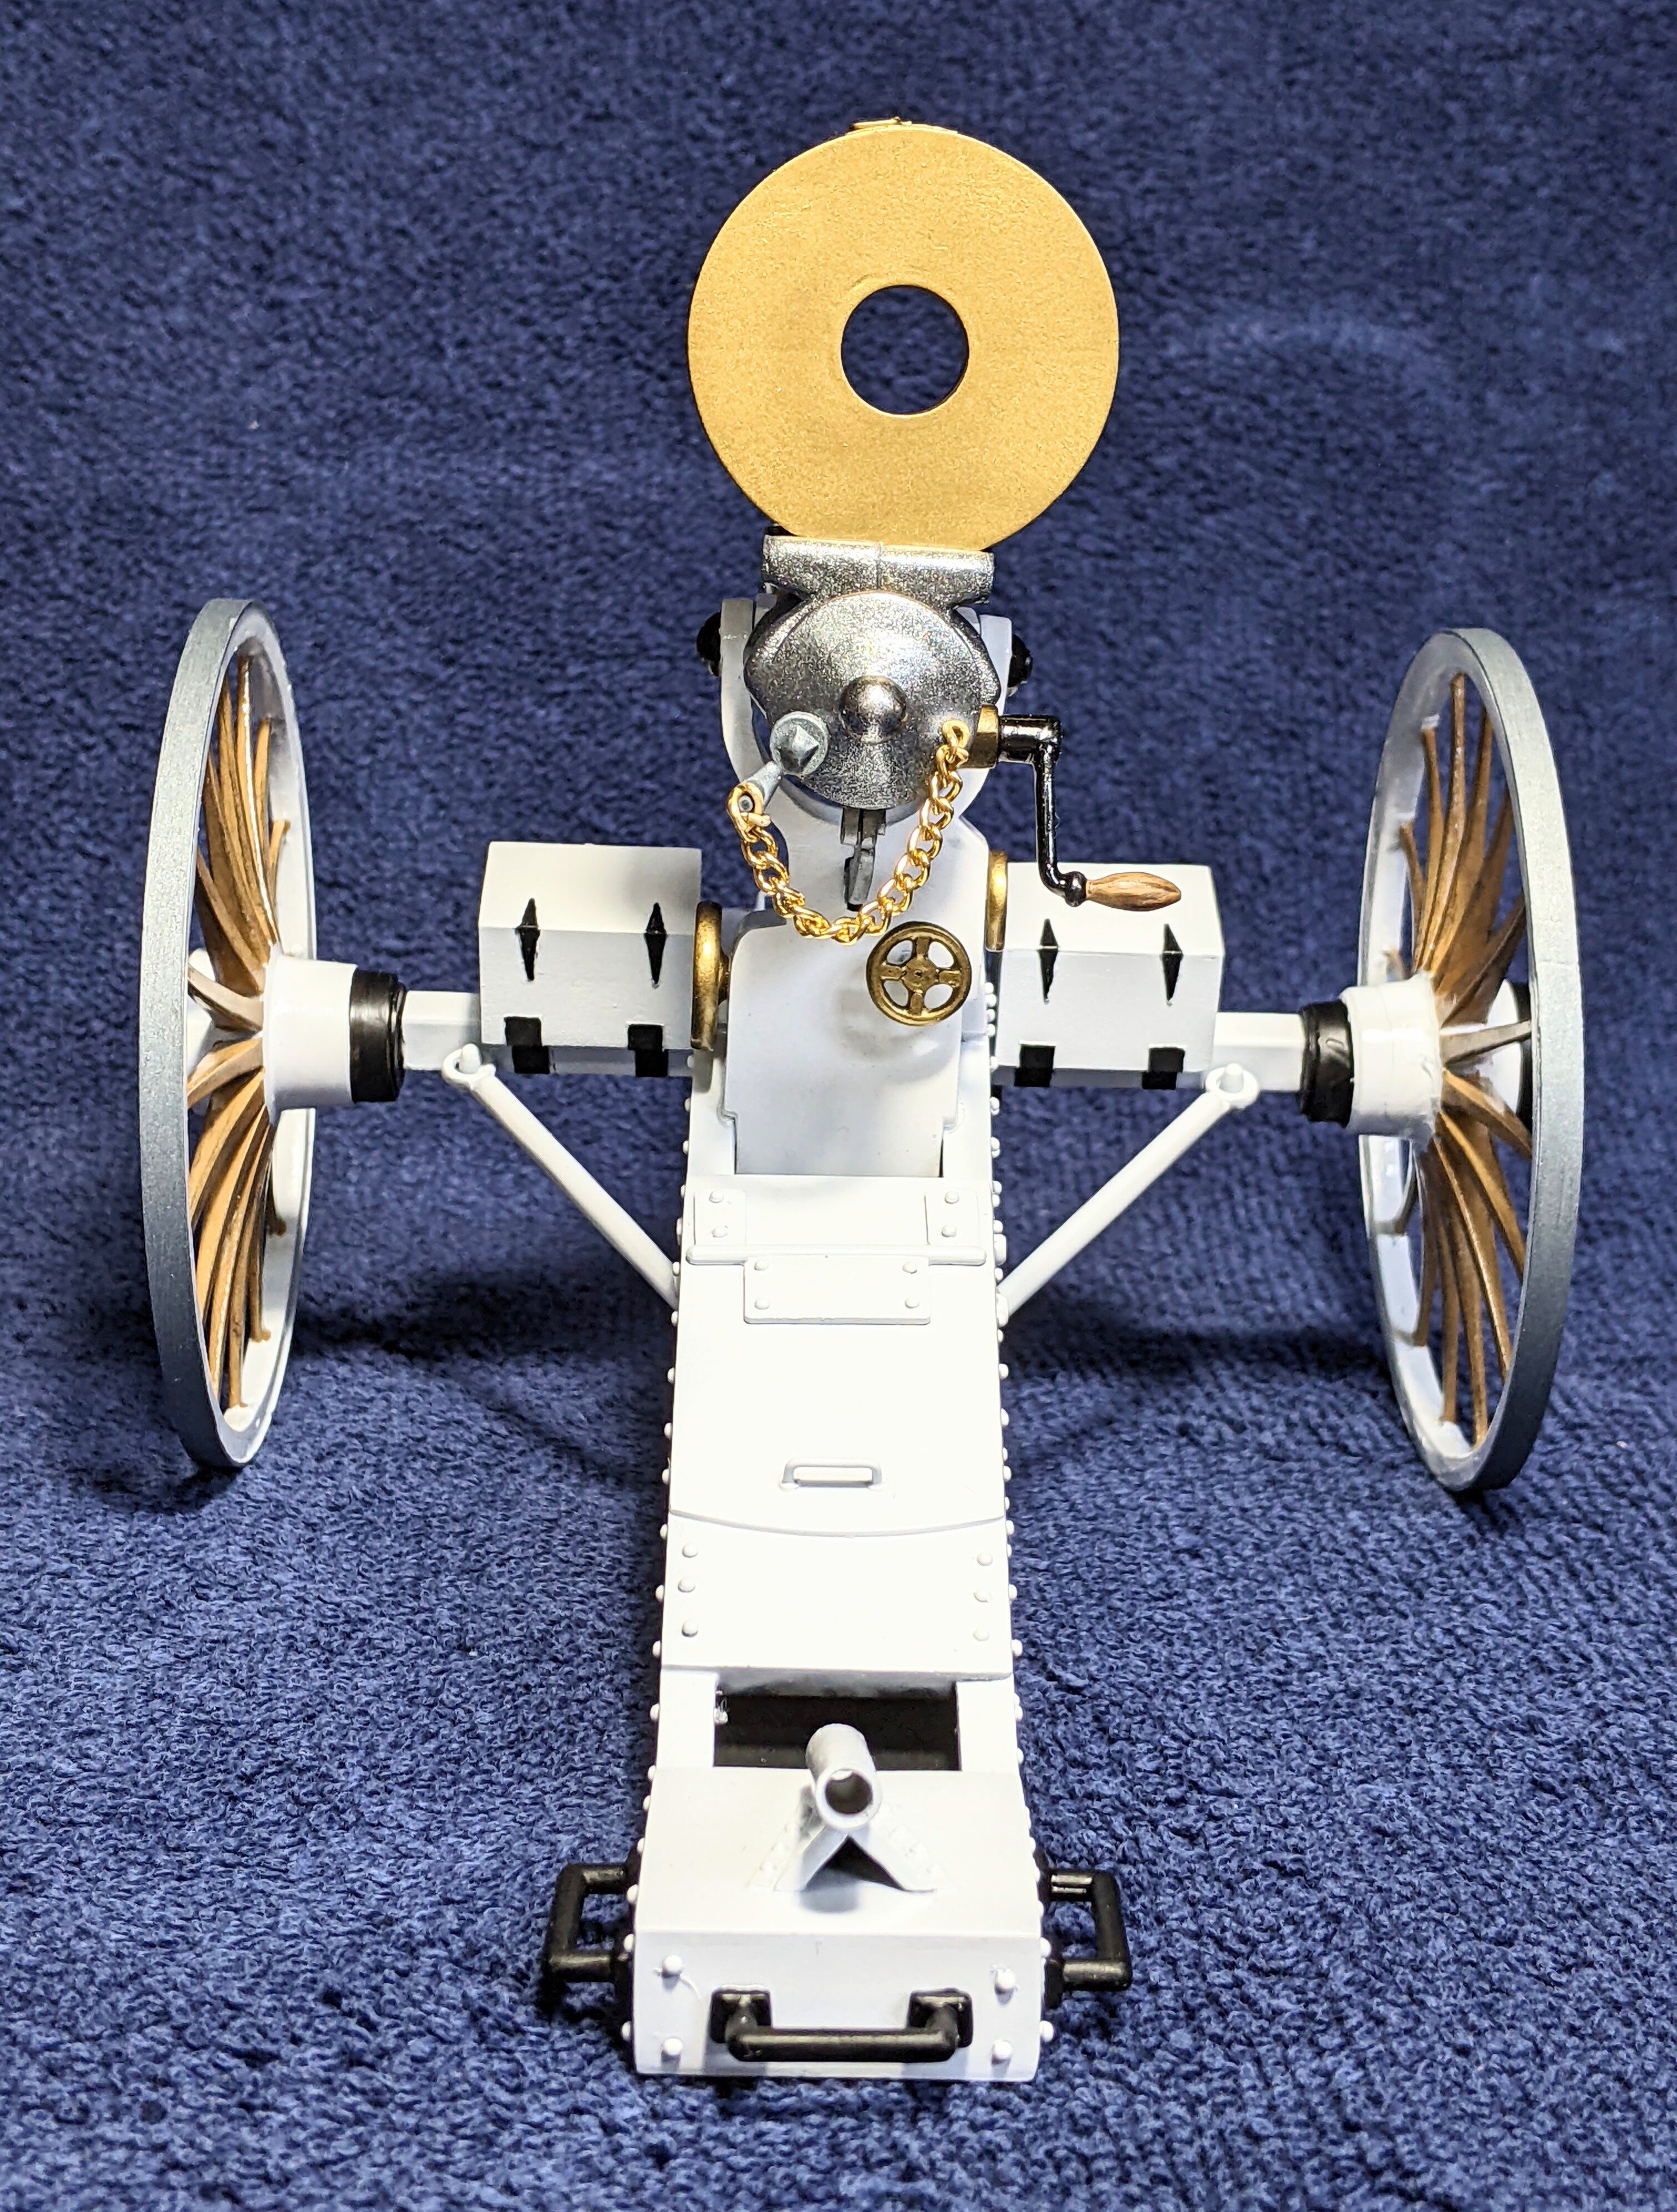
This kit's molds originated in 1961 and have been passed down through several manufacturers. The one I started with was a LifeLike kit. It's molded in grey and brown styrene with a short piece of brass(?) chain. It's incredibly inaccurate and has lots of flash, mold seams and sink holes all over it. But I wanted a desk model not a museum piece, so accuracy wasn't a top concern. The trail had rows of really large, mushy looking rivets all over it and some lumps where handles should have been. The rivets were removed and replaced with SIG RC model aircraft rivets. The handles are from wire. One wheel had a HUGE sink mark right in the middle of the hub, so that was dealt with and a new nut made from plastic.The rims were extremely beveled to aid in getting the part out of the mold, so that had to be all sanded down and removed and new rims made from plastic strip. The magazine was hollow, so I had to fill in the center and removed the lumpy handle they provided and made a new one. The ends of the gun barrels were extended past the end cap by inserting plastic rod. I added the storage boxes on the the axle from scratch. Finally, a traversing spike locator was added to the back of the trail. This is the model before primer and is just sort of bodged together with some pieces that would not stay in place left off, so there are probably lots of mistakes yet to find and correct.
-
Very nicely done. I hate vacu-formed canopies as I can never get them cut correctly or fitted into place. Your's looks great. As to the "splotches", try using those tiny "foam on the end of a plastic stick" things (don't know what they call them). They come in a blister pack hanging around the other modeling supplies. They should be just about the right size you need and having them on the "stick" makes them easy to use. Or if you need larger, try the cosmetics section for eye make-up applicators.
-
Mountbatten would be proud. Good job on both.
-
Just getting those old Airfix decals off their backing and on the model is an accomplishment to be proud of, Duke. Nice trio.
-
This is the 1964 re-boxing of the unchanged original 1960 Aurora kit. No wheel wells, so I painted them in rather than go thru all the cutting and filling in to make them. The fit was surprisingly good and with attention, the seams were minimal. The panel lines were engraved by the same guy that did the early Matchbox kits, if you know what I mean, but at least there were no raised decal locators. It did take a whole lot of weight to keep it on its legs instead of its tail. The decals are from Skylancer and were beautiful.
-
1/48th. No interior, of course.
-
This is the Atlantis re-issue of the 1954 Aurora kit of the Piasecki HUP-1 helicopter, known in the US as the "Retriever". I did it almost all OOTB but added clear styrene in the styrene windows as they provide none, I added the exhaust on the port side and I used Caracal decals for a Canadian HUP-2 because I liked that scheme, but I'm not gonna lose any sleep over the slight differences in types. Building these old kits is downright fun.
-
I'm a bit of a throw-back and go old school with stretched sprue. Heat it, stretch it to the appropriate thickness, let it cool, cut it a tiny bit longer than needed, glue into place with a drop of white glue. When dry, if it is sagging, put a toothpick in a candle flame and let it light. Blow it out and then place the rigging line into the smoke (or visa versa). Slowly draw closer until the sprue snaps tight. Get too close and it melts, but it's easy to start over and no harm done. Some sprue stretches better than others and maybe best of all, it comes in all sorts of colors. This is the 1/72 Contrail Vacuform Wildebeest.