All Activity
- Yesterday
-
 "Our Germans are better zan zer Germans" 😉
 -
Amazing!!!
-
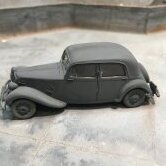
Cool, that's TINY!
-
The German Army set up a special program to get captured tanks (Beute-Panzer) back into service. A 1941 initiative directed a flamethrower to be installed on the French Char B1 bis. The conversion replaced the 75mm main gun with a flame thrower while the turret retained the 45mm gun. The model depicts vehicle number 23 from the 7th SS Volunteer Mountain Division Prinz Eugen. In April 1942, a Beute-Panzer-Kompanie was created for the division. These Pz.Kpfw.B 2 were used in fighting partisans in the Balkans. They were eventually traded in 1943 to a different division and replaced with the Panzer 38(t). The markings for this vehicle come from the Echelon Fine Details decal set. These decals were kindly donated as they have been out of print for years. This build uses the excellent Tamiya Char B1 bis with the Blast Models resin conversion for the flamm-panzer. There are a few details missing from the Tamiya kit and the Blast conversion has some accuracy and molding issues which I corrected with some scratch building and custom 3D printed parts. I also used the Eduard PE set for the Char B1 bis. Model is painted with Tamiya acrylics, weathered with oils, enamels and pigments.

-
Thank you!
-
Very impressive!
-
The Studebaker is a wonderfully designed automobile that lends itself to streamlining for racing purposes. In this case, I built a race car for the gas coupe class with a blown Hemi. The kit also supplies a 421 ci Pontiac engine for use in a different drag racing class. Yellow ignition wires are included in the box. I’m guessing that this kit is very old. There was so much flash on all the parts that I could have probably melted all of it and made another kit. Just terrible. Kit instructions are somewhat difficult to follow due to lack of details. Decals flowed on very well. Kit is molded in red plastic so I used Duplicolor red oxide primer covered with House of Color Cinder Red followed by 2 coats of Nason 2K clear. The Studebaker body is beautiful and I’d like to thank IPMS and Atlantis for the opportunity to build the kit. View the full review
-
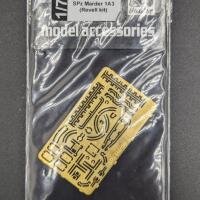
 Hauler is well known for its detail and this set created for the Bundeswehr Schütze panzer (SPz) Marder 1A3 Infantry Fighting Vehicle is no exception. This 40-piece PE set, on a fret measuring 2.25”x 1.25, packs detail into an older kit to bring it to the next level. If you want a Bundeswehr (or Chilean) Marder in 1/72 scale, this is the only injection plastic kit on the market, currently in its fourth boxing in 2020 (the original mold dates to 1999). View the full review
-
The Ukrainian kit manufacturer ICM has recently expanded their catalogue to include a range of acrylic paints and varnishes. In this review, I try out ICM’s paint set intended for WWII Royal Navy aircraft. The set comes in a small rectangular box with examples of the included colors printed on the front and a painting guide for a Royal Navy Sea Gladiator on the back. The set includes five 12ml bottles of paint and one 12ml bottle of satin varnish. The bottles are open-topped (no dropper-tips).The undersides of the lids have a raised ridge that does a pretty good job of keeping the paint from getting on the threads of the lids. The included bottles are: View the full review
-
Reviewer’s Comments:Hauler is well known for its detail and this set created for the Bundeswehr Schütze panzer (SPz) Marder 1A3 Infantry Fighting Vehicle (https://www.hauler.cz/e-shop/1-72-afv-photoetched-parts-7/spz-marder-1a3-(revell-kit)-1840) is no exception. This 40-piece PE set, on a fret measuring 2.25”x 1.25, packs detail into an older kit to bring it to the next level. If you want a Bundeswehr (or Chilean) Marder in 1/72 scale, this is the only injection plastic kit on the market, currently in its fourth boxing in 2020 (the original mold dates to 1999). View the full review
- Last week
-
Ron, To get the straight scoop on all things membership, I suggest you contact our office manager, Marie Van Schoonhoven, at manager@ipmsusa.org.
-
Beautiful build, and a fine addition to your outstanding collection of racers! Bravo! 🫡 👍🏼👍🏼
-
I printed this Fotis Mint bust of the Witch King from Lord of the Rings and painted him primarily with Vallejo acrylics.
-
I renewed my membership after being gone for a few years and I was just wondering if the IPMS still sent out a welcome letter with membership card and a sticker. Thanks, Ron Wilkinson
-
 Nole257 joined the community
 -
Simple.. I draw the line with a pencils when everything is ready I do an brun wash over it finally I gave it a last coat of clear !
-
Interesting.... since it already seems to be flat coated, what are you using to enhance the panel lines? Gil
-
 Just add this AIRFIX kits to the give away pile.. you can view what left in the entry message !
-
here is the update on the 2 ongoing C-130 projects ..You'le notice there is only one images available on each project , you can view more of the update picture of each projects on the Google link PROJECT # 1 EC-130V version ... (MAY 17th ) ..Today , I started to enhance the panel lines and started the decals on the dish ! Like to view the complete WIP of this project ,follow this Google link .. https://goo.gl/photos/jxfUh5Muw34MqsRY7 Enjoy and it's an 'rendez-vous' next week for more .on this particular project..!.
-
This week at MADDOG 1/48 CANADIAN SUBSIDIARY plant ( WEEK # 19)!
Jmarc replied to Jmarc's topic in Photos: On the Bench
WEEK # 19.. # 1..LOCKHEED EC-130V HERCULE (ITALIERIE/TESTOR + MODIFICATION MAISON) Lien Google du montage complet du project... https://goo.gl/photos/jxfUh5Muw34MqsRY7 (MAI 17) Cette semaine j'ai débuter les lignes de panneaux au crayon de plomb et débuter les décalque de la coupole ! # 13 BARRE DE REMORQUAGE ( SCRATCH ) Si vous désirez voir le montage intégrale visitez ce lien Google https://photos.app.goo.gl/MsgjJFuypRknCJRw5 (MAI 17) Cette semaine j'ai fait le montage et les dernier détailles , et le project es terminer ! # 18 CHARIOT POUR SOUDEUR ( SCRATCH ) Si vous désirez voir le montage intégrale visitez ce lien Google https://photos.app.goo.gl/uvpuN6o5JxcXekDc8 Si vous désirez voir l'intégrale de tout les chariots que j'ai monter visitez ce lien Google https://photos.app.goo.gl/F9RviTZpfp321S3EA (MAI 17) Cette semaine continuer le montage des dernier détailles ! # 20 AVRO TRIPLAN 109 et 1910 ( SCRATCH + PYRO/LIFE-LIKE + ADDITIONS ) Si vous désirez voir le montage intégrale visitez ce lien Google https://photos.app.goo.gl/3DSUdT1DNAFNzv146 (MAI 17) Cette semaine j'ai continuer les ruban de r.-enforcement des ailes des 2 versions ! # 24 BARIL D'HUILE sur roues (BARIL + SCRATCH ) Si vous désirez voir le montage intégrale visitez ce lien Google https://photos.app.goo.gl/gKP84R7hNnyH1wv68 (MAI 17) Cette semaine j'ai apposer les décalques sur les barils fait le gazon sur la base de présentation et coller les barils dessus ! # 25 NAVETTE STAR TREK ''NEXT GENERATION' (SCRATCH ) Si vous désirez voir le montage intégrale visitez ce lien Google https://photos.app.goo.gl/rvv4MCAv1CgW8dBS6 (MAI 17) Cette semaine j'ai coller la section avant de la navette et débuter les corrections ! #33 SOUS-MARIN ALLEMAND TYPE VIIc (trumpeter + additions) Si vous désirez voir le montage intégrale de ca projet ,visitez ce lien Google https://photos.app.goo.gl/Yor8v3Q9pGkybXLh6 (MAI 17) Cette semaine j'ai préparé le plancher et fait le wash/dry-brush du mu et débuter les détailles ! #35 DC-3 'QUEBECAIR' (TRUMPETER / MONOGRAM+DÉTAILLES) Si vous désirez voir PLUS ,visitez ce lien Google https://photos.app.goo.gl/vJQjytVSVLGsQjYa6 (MAI 17) Cette semaine j'ai sabler la section arrière et lui es donner une autre couche de putty , fouiller dans ma boîte de pièce et retracer les différente entrée d'air . les es coller et place et débuter leur modification ! #36 Petit NIC NAC ... (SCRATCH) Si vous désirez voir PLUS ,visitez ce lien Google https://photos.app.goo.gl/mzzBBq5WxJKEVh1v9 Si vous désirez voir l'intégrale de tout ls projet fabriquer a date , visiter ce lien Google : https://photos.app.goo.gl/8h1ExuE1BfxczTHP9 (MAI 17) Cette semaine j'ai terminer la structure de base, peint le tout et débuter les dernier détailles ! #40 DFW-28 FLOH au 1/48 (EDIUARD + MODIFICATION et ADDITION) Si vous désirez voir PLUS ,visitez ce lien Google https://photos.app.goo.gl/uHDXvrXDAzX93vMf7 (MAI 17) Cette semaine j'ai débuter les structure qui retiens le moteur et débuter la modification du moteur ! #43 PLANEUR BLOHM und VOSS BV-40 (CZECH MDL + MODIFICATION) Si vous désirez voir le montage intégrale visitez ce lien Google https://photos.app.goo.gl/7vuaBVvnBxn4q9Ve6 (MAI 17) Cette semaine j'ai continuer le travaille sur les ailes ! #48 MACROSS VF-1S/A (HASEGAWA + ADDITION et MODIFICATION) Si vous désirez voir le montage intégrale visitez ce lien Google https://photos.app.goo.gl/jEtQtXgwPi8L8RVf9 (MAI 17) Cette semaine j'ai continuer le travaille dans la section de la baie électronique es fait la structure qui vas retenir les panneaux d'acces ! #53 PERSONNAGE de piste aérienne de la PREMIÈRE GUERRE (EDUARD ) Si vous désirez voir le montage intégrale visitez ce lien Google https://photos.app.goo.gl/EPzVy61DDpcKAh398 (MAI 17) Cette semaine j'ai peint les couleur de base des personnages ! And on the CANADIAN side .. # 1 .....Muck-up de bois du ARROW MACH 2 (HOBBYCRAFT + MODIFICATION MAISON) si vous désirez voir le montage intégrale de ce project visitez ce lien Google: https://goo.gl/photos/jXeQLJioaoky58HR9 (MAI 17) Cette semaine j'ai continuer le travaille sur les structure avant de la baie des missiles, lui es donner une couche de primeur ! # 2 .....Le BOMARC IM-99B et sont HANGAR de lancement (project REVELL + MODIFICATION +scratch) si vous désirez voir le montage intégrale de ce PROJECT visitez ce lien Google: https://goo.gl/photos/q4rxkYiwrrbd8Tmi8 (MAI 17) Cette semaine j'ai débuter les raccords de la pince avec le missile , et fait le dry-brush sur le couvert protecteur avant des moteurs extérieure 3...JIG D'ASSEMBLAGE DU AVRO CF-105 ARROW (PROJECT SCRATCH) Voici le lien Google pour le montage complet du projet (c'es la phase 2) https://goo.gl/photos/d6TczBBAmLeLeeGRA (MAI 17) Cette semaine j'ai couper un gabarie d'une flèche et ligne pour pouvoir les peindre sur la présentation ! Agrandir cette imageCliquez ici pour la voir à sa taille originale. # 4 MOULE MAÎTRESSE de la section extérieure des ailes (kITBASHING +SCRATCH ) si vous désirez voir le montage intégrale de ce project visitez ce lien Google ' Phase 3 ': https://photos.app.goo.gl/3pBpv8FH0OhzQalQ2 (MAI 17) Cette semaine j'ai débuter les dernier détaille pour les 2 échaffaudage ! # 5 MOTEUR IROQUOIS du AVRO CF-105 ARROW (KIT BASHING ) si vous désiré voir le montage intégrale de ce project visitez ce lien Google https://photos.app.goo.gl/z9mSKHrEf6z84nGQ9 (MAI 17) Cette semaine j'ai continuer le travaille sur la section de protection du moteur ! # 08 Site d'information du CF-105 ARROW ( SCRATCH) si vous désirez voir le montage intégrale de ce project visitez ce lien Google https://photos.app.goo.gl/3n8AXR62ufi2hADi6 (MAI 17) Cette semaine j'ai débuter le montage de vêtement pour une étagère a vêtements que j'avais fabriquer par le passer! # 09 PROPOSITION d'AVRO POUR UNE CROSSE D'ARRÊT POUR LE CF-105 ARROW MACH 2 (SCRATCH) Si vous désirez voir le montage intégrale visitez ce lien Google https://photos.app.goo.gl/eD3gocMQTDWTD7cT6 (MAI 17) Cette semaine j'ai peint la structure de soutiens ! # 11 AVRO C.104/1 et 104/1T ( REVELL + MODIFICATION MAISON ) Si vous désirez voir le montage intégrale visitez ce lien Google https://photos.app.goo.gl/DqfQCQDdoWNDuIIg1 (MAI 17) Cette semaine j'ai débuter le travaille de raccord des entrée d'air ! #16 La maquette soufflerie 1/10 du AVRO ARROW ( RV3D + SCRATCH) Si vous désirez voir le montage intégrale visitez ce lien Google https://photos.app.goo.gl/DvrVTZbBUFoAfKBSA (MAI 17) Cette semaine j'ai continuer le travaille sur les poste de contrôle et peint et détailler la première bois en bois de transport du ARROW ! #19 Les JIG de MONTAGE de la section de l'HABITACLE du AVRO CF-105 ARROW MK,I ( SCRATCH) Si vous désirez voir le montage intégrale visitez ce lien Google https://photos.app.goo.gl/GN6xSxJTJEEDnX246 (MAI 17) Cette semaine j'ai fait les dernière structure intérieure du train avant et débuter le travaille sur la station arrière de la section de fuselage ! -
TTTTTTTTTThanks !
-
This build is the 1/48 Hobby Boss YF-23. This is a prototype aircraft designed by Northrop was in competition against Lockheed’s F-22 back in 1990. It was nicknamed “Black Widow II” with reference to Northrop’s famous P-61 from WWII. For this build I will be adding Aires resin seat and Caracal’s YF-23 Prototype decal set. I will be building this as the PAV-2 prototype. As a reference I will be using Air Force Legends number 220 book written by Paul Metz. This book is filled with a lot of information on the design and development of the YF-23 as well as many detailed photos of the prototype aircraft. The kit has some items that need to be changed. The first thing is the aft section of the cockpit. This area is more of a “what if” rather than what the prototype looked like. The second thing is the kit does not have the option of having the canopy in the open position. I will need to modify the canopy for these details as well. So to start off I cut out the areas of the cockpit tub that need to be changed. I used a lot of scrap photo etch to rebuild the areas. One thing to note is that the prototypes left a lot of these areas with the zinc chromate coating with no top coat of the grey or black that a production aircraft may have. I added the large white pipe air pipe and started making all the wire cables that mount on the rear bulkhead. I also started making the actuator that raises and lowers the canopy. The ACES II ejection seat in the YF-23 was more like the F-117 version rather than the typical version used other aircraft like the F-16. The main difference is instead of having the ejection handle on the front of the seat between the pilots legs there are two handles on the sides of the seat. I am still working on adding details for the rear of the cockpit tub then I will be moving onto the panel just behind the seat. You can see all the photos and detail of this start in the build log at: https://davidsscalemodels.com/build-log/1-48-yf-23-atf-black-widow-ii/
-

Kalmbach Publishing sells FineScale Modeler!
noelsmith replied to SkyKing's topic in General Modeling
One can understand why magazines are looking to go digital. As an example the IPMS UK magazine costs approximately £36k sterling to publish and distribute, so no wonder the suggestion of going digital rears it ugly head regularly. So far it has been resisted, but who knows what the future will hold? A paper magazine is much a more tactile way of reading just like turning the pages of a good book. -
That's a very pretty build, and being from scratch is all the more impressive! I'd be interested in seeing a few in-progress pics to see what methods you used. That's also quite the unique collection of Golden Age racers too! Thanks for sharing! Gil
-
After getting to see this model once again; 3 years later, it's JUST as stunning an achievement as when I first saw it. I hope it's found a home in a museum somewhere so that others can enjoy it! Gil
-
Although the pics say otherwise, that interior framing LOOKS like wood! Nice! Gil