

MikeH
-
Posts
316 -
Joined
-
Last visited
Content Type
Profiles
Forums
Events
Everything posted by MikeH
-
Thanks, I planned to hit Strada Sports some time for them as I also have a set of 1/12 Camel sponsor decals to purchase for a motorcycle.
-
I'm diving head-long in to this one and have the PE set to go with it. It's a very simple kit. No engine, and minimal chassis elements to show for the wheels as the pan covers everything underneath. I may get a hold of some carbon fiber decals to do the interior some justice also. The molding is clean with minimal effort required to eliminate mold lines.
-

Ford/Cosworth DFV Head Painting Tip needed
MikeH replied to TimDarrah's topic in Cars, Trucks, & Motorcycles
Like Pyrman said, the white colored pencil. I use a white pastel sketching pencil myself. Picks out raised detail beautifully. -
The article's done along with plenty of pictures for the tutorial process on how I did the body work. Thanks for the encouragement, and support all!
-
Nice work!
-
LOL Thank you for the kind words and compliment.
-
I've been asked by John Heck, so I will be starting on it tonight.
-
Thank you for all of the kind comments and compliments guys.
-
After a long and hard life in dad's trees, junior rescued the family farm truck. With a new set of wide whites, chrome rims, and a shiny new license plate (not to mention a lot of TLC for the engine), it's ready to hit the road. Sure the gas cap got lost and the wood bed rotted and had to be replaced with some pole-barn siding, but it's functional right? I've still got a bit of touch up to do, but I'm sticking a fork in it and calling it done!
-
A guy's gotta start somewhere doesn't he?
-
I'm close to being driveable, but I've yet to receive my tail lights to be street legal. I'm also waiting for some new brackets to attach the visor. He said something about sending my chrome off to be redone sometime, but we'll wait and see. My owner's also currently at the bone yard trying to find me a new gas cap and some emblems...
-
Actually I didn't even consider it. I don't think my skills are professional enough really for something like the Journal.
-
Well, a bit more progress from my owner. I've got a rolling chassis and drivetrain now. Unfortunately the wood in my bed was rotted well beyond use. The flip-side is that there was a good chunk of sheet metal left from when they patched up the morton building on the farm some years ago after a bad storm. A bit of angle iron and some welding and my box is good to go again! Please excuse the specs of white in the bed. Clearing the dried bird poop from the bed wasn't a priority when they were piecing it back together... giggle
-
A bit of progress finally. I got the engine assembled and a sludge wash applied for a gamy look. I've still got a lot of weathering to do yet. I found a terrific idea for the bed and wood problem too. :D
-
Ferrari FXX (Ltd Issue Black Version)
MikeH replied to jrivera55's topic in Cars, Trucks, & Motorcycles
I believe the black FXX requires the Scale Motorsports super detail set including all the carbon fiber body panel decals and PE parts. Strada Sports sells it but it's not cheap. They also sell the Tamiya FXX kit. http://www.stradasportsstore.com/product6117.html -
No. I just put it on for mock-up purposes. I'll give it the pastel and hairspray treatment before it's done.
-
Not much progress today. The "filter" wash is done on the body parts and a mock up with the wheels. I put the engine together and have yet to paint it. Here it is mocked up. This is approximately the ride height it'll be at depending upon how I get the suspension to sit.
-
So the paint's destroyed but not good enough just yet. Time to ruin it some more... This is a "dot filter" weathering technique as described in Finescale Modeler for those that may not read the magazine. What I'm about to do may make you wonder through the pictures, but in the end you'll see... First, I used a super fine sandpaper to lightly scuff the surface of the already muttled paint. One, maybe two quick strokes, and that was it to smooth/blend the surface and expose the green a touch more. The next part, utilizes oil paints. I chose dark grey, yellow ochre, yellow ochre pale, and raw sienna. A bit extreme for this example, but I'll get the rest of the truck a bit less (this is the part of the truck box facing the cab). 1. I choose my paints and dot the colors on at random 2. Next, dip your brush in the oil thinner and drag the oil paint down. 3. Continue to wipe your brush clean and repeat the process until there is no heavy paint left. 4. Here's before and after shots. It's not an extreme difference, but what you've now done is create a "filter" of sorts to trick your eyes and dull down the paint and give a better "petina" to the worn paint. I'll continue this process on the rest of the truck. BEFORE AFTER
-
OK, so here I sit, rusted out body parts and all. My owner is in the midst of a dilemma and is trying to determing if he wants mags and fat whites, or a set of other wheels with or without whites.... That aside, I'm still unsure of my running future. My exhaust is GONE. That'll have to be new I'm sure. The rear end and drive train is in good condition though spotty with rust. The in=line 6 he found at the swap meet is a go though! A little TLC and it'll be good I think! Below are various lighting. The darker pictures show the true look of the build presently. The flash really brightened up the blue in the first two.
-
And then one day junior painted me a "groovy" shade of blue. Wow did he get verbally abused by his father! Wow! Well, the color was on, and nothing could be done about it at that point. It wasn't long before junior graduated high school and toodled off to college. I stayed on the farm for many more years until my engine locked up. The old man pushed me back in the trees where I remained through many a season's change. I was all but forgotten until one day when junior came back home and saw "that old truck" sitting in the trees. Fond memories of the old truck brought back the itch to get it running again. My body's still in pretty rough shape, but I think he's got a new rear end, suspension, exhaust, and I think he may have even found me a new motor at a swap meet! burningrubber All the goodies sprayed from the bottom up. The top would be sun-bleached, and experience the most abuse. A cleaner blue under the protected hood area.
-
My slang term for an air ride/air bag suspension. It allows these guys to drop the truck/car/whatever to the ground. In my first life, I was a stock green pickup bought from the Chevy dealership for Dad's farm...
-
My progress thus far - Initial dark rust colored base - Next, a few random shots with orange hither and yon, followed by a spattering of a tan/mustard/yellowish color Finally tonight, a helping of liquid mask, a fogging of a lighter rust color, and a salting treatment that's now drying. When it's completely dry, I'll shoot the color coat(s) depending on the mood.
-
Well, below is my inspiration to do this build. I won't have mine "bagged" like these where they sit on the ground, but I hope to get it at an agressive stance none the less.
-
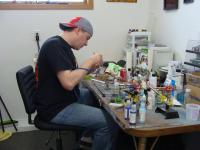
After 5 years of living in our new house, we finally finished our basement. It was a long three months without building, but worth every minute of wait. Here's my new completed man-cave. ;D ;D ;D What's everyone else's space look like? Close ups of the wall hanging's courtesy of George Trosley (CARtoon's and general auto mag artist he even personalized them to me). The closet full of kits Looking in the door to my fridge, geeetars, and shelves In the door looking at the paint booth exhausted to the outside for year-round warm painting!