


SkyKing
-
Posts
507 -
Joined
-
Last visited
-
Days Won
30
Content Type
Profiles
Forums
Events
Posts posted by SkyKing
-
-
You're welcome, and yes, Carrollton is where Squadron was and still is, less than a mile from my apartment. I was Editor for Squadron/Signal publications from 2005 to 2007, until the business was sold and new owner hired a know-nothing "Senior Editor" who fired me after I trained him. I no longer support Squadron in any manner whatsoever.
-
I think only the moderators can delete posts. But you can add another post to the thread saying "Disregard" or something to that effct.
-
See Rule 2:
1. Computing scale
Scale of model or drawing = prototype dimension ÷ model or drawing dimension
Example: A prototype has a wingspan of 40 feet, or 480 inches. A model of the prototype has a wingspan of 10 inches. What is the scale of the model? Dividing 480 by 10 we get 48. The scale of the model is 1/48.
2. Converting from one scale to another
Percentage of reduction or enlargement = denominator of scale you have ÷ denominator of scale you want (Interesting Fact: a scale is a fraction. The bottom number is the denominator).
Example 1: You have a 1/72 scale drawing but want to convert it to 1/48. How much should you enlarge or reduce it? Dividing 72 by 48 we get 1.5. We must enlarge our 1/72 drawing 1.5 times, or 150%.
Example 2: You have a 1/32 drawing but want to convert it to 1/48. Dividing 32 by 48 we get 0.66666… . We must reduce our drawing to 0.6666… (2/3) of its original size, or 66.67%
Save the above, print it, post it on your workbench. Learn it. Pretty soon you will be able to do this basic math in your head.-
 1
1
-
-
"Airfradt"??? Is this related to "covfefe"? :D
All kidding aside, that site is a great source of reference.
-
1
-
-
It has been suggested (on another forum) that clear polyurethane varnish might be a better adhesive for this technique than CA glue.
-
Side note, when I created my account here I didn't yet have my member number when it asked. Now I have it but can't find where in my profile to add it? Are my tired eyes just missing something?
It's in your signature!
Welcome back to the fold. I lived in Middletown, CT, for 6 years and worked in Hartford for the North Central CT E.M.S. Council.
-
A great tip from Paul Dunham on the Barracuda Studios Facebook page:
https://www.facebook.com/groups/848474938507986/permalink/1530849163603890/ -
If you like to build "planes on sticks," this could come in handy:

For more, see here:
-
1
-
-
Commencing with the December 1952 issue, Popular Mechanics magazine published a 5-part series of articles detailing the building of a 36-in model (1/330 scale) of this great ship, complete with half-scale plans and cross-sections. The articles comprise one 7.5 MB PDF and the plans/templates comprise a 632 KB file. If you are interested in copies of these, send me a private message or email me at:
mcmurtreyjames(at)twc(dot)com
-
Up until a few years ago, Raytheon made available large-scale engineering drawings of Beechcraft aircraft for model builders. Current owners/management of the company claim no knowledge of them. Here is a list of those available as of August 1996. I have the drawing for the Model 35 Bonanza, but if you have any of the others, I'd very much like to obtain a copy.
Aircraft / Model Drawing Number
Travel Air 2000 / 441211
Travel Air 6000 / 340928
Model 17 Staggerwing / 340744
Model T-34A Mentor / 113603
Model T-34B / 540834
Model T-34C / 541005
Musketeer Series: Sierra / 540079, Sundowner / 540673, Sport / 540672
Model 33 Bonanza / 33-001014
Model 35 Bonanza / 35-001014
Model V35A Bonanza / 35-001124
Model A36 Bonanza / 541028
Model 76 Duchess / 541019
Model Travel Air (short rear window) / 95-001012
Model D95A Travel Air / 540080
Model A55 Baron / 540076
Model B55 Baron / 540140
Model D55 Baron / 540389
Model 58 Baron / 540865
Model 58P Baron / 540908
Model 58TC Baron / 541022
Model 60 Duke / 540500
Model 65-80 Queen Air / 540078
Model Super 18 (conventional gear) / 540085
Model Super H18 (tricycle gear) / 540110
Model A90 King Air / 540336
Model B90 King Air / 540357
Model F90 King Air / 541121
Model 99 Airliner / 540594
Model A100 King Air / 540833
Model B100 King Air/ 540123
Model 200 King Air: 1/20 scale / 540770, 1/30 scale / 540794, 1/40 scale / 540850
Model 77 Skipper / 541115
Model 300 King Air / 541274
Model 1900 Airliner / 541219
Model 200 Starship: 1/32 scale / 122-000010, 1/64 scale / 122-000011
Note the absence of the Twin Bonanza. I'm looking for the Beech model drawing of that aircraft as well, and I believe there was one. Thanks in advance. -
Ray,
I don't know if this has ben posted somewhere else on your threads, but you will want to squirt Future floor wax over the canopies then let dry. This should be done before you start any construction, that way the canopy has time to dry & cure. By appling Future to the canopy, it makes the canopy look clearer than before the application, it also protects the canopy from scratching and reduces the chance of fogging.
Tim
Ray, this is a good tip except you can't find Future floor wax anymore as such. It is now Pledge floor wax with Future shine. Most grocery stores don't carry it any more either so Home Depot is you best shot at finding it.
It's not "Pledge with Future Shine" any longer, either. As of 15 March 2017, it's now "Pledge Floor Care Multi-Surface Finish" (until they change the name again).
-
In his review, Pablo Bauleo stated, "They are an enamel-based wash, so it is smelly and it could attack bare plastic, so test it on a scrap piece (a runner or extra part) first." I've been building models for approximately 60 of my 70 years on this planet, and while I cannot attest to the smell of this product as I have not tried it, I've NEVER known an enamel that would "attack bare plastic."
-
Nick is correct. Sky's original airplane was a Cessna T-50 Bobcat (ex-USAAF UC-78, N67832), followed by Cessna 310B N5348A.
I'm 70 and watched the TV show religiously on Saturday mornings. I took "SkyKing" as my forum ID from my interest in the show and the aircraft used. I'm currently working on a book about the T-50.
There were some single-engined aircraft featured in the TV show. Sky's nephew Clipper flew a Cessna 140, and in one episode a Beech Bonanza appears with the "Flying Crown" logo of Sky's ranch painted on the side.
"Fire up the Songbird, Penny." (Penny was Sky's niece, played by the extremely cute Gloria Winters.)
-
You can make your own clear flat by adding Tamiya's Flat Base to Future/Pledge with Future Shine (or whatever they're calling it this week).
1 part flat base to 3 parts Future = very flat
1 part flat base to 10 parts Future = flat1 part flat base to 15 parts Future = satin
See here for more: http://www.swannysmodels.com/TheCompleteFuture.html
-
If the primer has a rough sandpaper-like finish, then yes, you should sand it. I'd start with 400 grit and gradually work your way up (600-grit, 800-grit, etc.) until the surface is completely smooth, then finish off with a rubdown with a micro cloth. For best results, when you change grits, sand at right angles to the previous effort.
-
Normally you can put an enamel on top of another enamel, assuming the same type of enamel is used for both coats. Tamiya's 'acrylics' are technically enamels, but are alcohol based, so if Tamiya's enamels and enamel thinner use a different solvent, it's possible they might damage a coat of Tamiya 'acrylic.' The only way is know is to try it on an old model. Spray a coat of 'acrylic' and allow it to fully dry/cure, then try the enamel stain on top of it.
-
(Click on thumbnail for a larger image.)
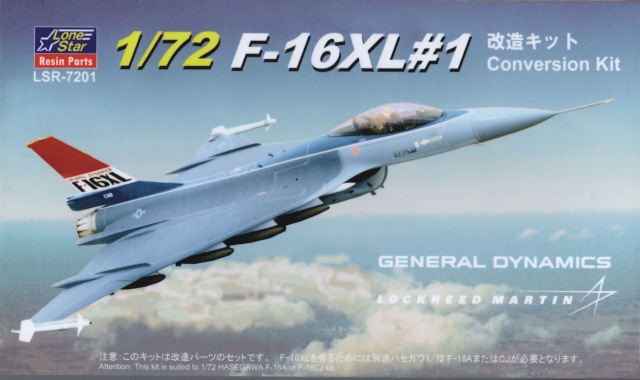
I accidentally stumbled upon this in my search for a Monogram kit and thought I'd pass it on. This is not Lone Star Models of Texas that many of us are familiar with, but the Japanese 'cottage industry' of one Yukio Kanezawa. That notwithstanding, it's one of the best examples of resin casting I've seen, without flaws and with panel lines so subtle as to be almost invisible. Although labeled a 'conversion,' it's an almost complete airframe, needing some parts (mainly landing gear, canopy, and cockpit details) from a Hasegawa F-16C or F-16CJ. The intake and landing gear are in the correct position, the rear fuselage has the correct upward tilt, and the wing has the correct camber and twist, so all the problems of accurizing the Monogram F-16XL are eliminated. It's available with either of two sets of decals, one for the USAF and the other for NASA, or a combo containing two kits plus decals for both versions. A kit of F-16XL #2 (the two-seater) was available but is currently sold out. For photos, see here:
http://lonestars.web.fc2.com/SALE06.htm
If you need a 1/72 F-16XL for your collection, this is the one to have.
My kits arrived well-packed and undamaged, via Japan Post registered mail. Mr. Kanezawa accepts PayPal. If you are interested, I'd suggest contacting him via email for an exact quote. He has other 1/72 items as well, and they can be seen here:http://lonestars.web.fc2.com/SALES.htm
I have no connection to this vendor other than as a very satisfied customer.
-
I wanted to attend, but the venue's move across town to the west side of San Antonio means it's now a 5-hour drive from north Dallas County, too far for me to go down and back in one day at my advanced age :D, and a bit expensive if I go the day before and stay in a hotel the night before. Glad it was a success, however.
-
See here:
http://www.ascalecanadian.com/2015/09/maroon-19-and-usaac-and-usaaf.html
('19' is a typo in the original. The link works.)
-
I recently purchased some decals from a well-known decal designer who specializes in decals for sci-fi subjects. They are beautifully printed and in perfect register, and I would not hesitate to recommend them to anyone. However, the instructions for these decals contain this claim: "A known fact is that you can apply lacquer over enamel, but not enamel over lacquer."
This "known fact" was not known to me. In fact, it contradicts everything I have ever read or learned about lacquers and enamels in over 60 years of building models. The rule has ALWAYS been acrylic (water-based) over enamel over lacquer but not the reverse.
The instructions also state "Using an enamel clear coat such as Krylon or Rust-o-leum may cause damage to the decal." I've never known anyone who uses Krylon or Rust-o-leum on their models and wouldn't recommend them in the first place.
I questioned him about this and was told: "I've been making decals for over 17 years and early on those who used Krylon Enamel sprays found it ate their decals. They use it because it was cheap and it ruined their finish and they had to repaint their kits. The only cause we could determine was that it was the enamel. At that time I spoke to a friend of mine who did autobody work. He told me that the rule was lacquer could go over anything, but not enamel."
I've never heard of this "rule." I suggested to him that an auto body specialist was not necessarily the best person to ask about painting plastic models, and that his "known fact" may result in some damaged models and some unfortunate and unwarranted criticism of his decals when a novice modeler sprays a model which has been painted with enamels with an incompatible lacquer clear coat. I also suggested that he correct his "known fact," advise modelers to use paint products intended for plastic models, and eliminate any reference to DIY spray paints.Comments, anyone?
-
Frederic Hultberg, proprietor of Fotocut, and known by his email signature, "oletcherfred," died last September at age 70. In association with the late Harry Woodman, Fred developed sheets of photoetch details for World War I aircraft models in the 1970s, and expanded the line to include photoetch details in other scales for specific models as well as sets of generic photoetch products.
http://www.burgessandtedescofuneralhomes.com/book-of-memories/2707681/Hultberg-Fredric/obituary.php
-
See attachment (Photobucket not working today). There was also a conversion kit for the 2-seater. Both released about 2008 according to Scalemates. Both 1/72.
Click on thumbnail to see larger version of box art.
-
"Chrome" finishes should always be applied over a gloss black base, but should be applied so that they are a bit transparent and NOT completely opaque. It is the transparency and black base coat that gives the chrome finish its chrome look. If you don't believe this, try a test. When your lovely chrome finish suddenly looks like nothing more than high-quality silver paint, you've gone too far.
-
Yes it was and your stock number is correct. I have one & the Nord 1402 Gerfault I (kit # 7202). I bought mine from Squadron several years ago. And sorry, I don't want to part with them.
But at least you know they exist.
Tim
Thanks for the confirmation. I have the FM Gerfaut II but am looking for the Griffon II to add to my delta wings collection. The only alternatives seem to be a pricey resin kit or scratchbuilding.


How do I delete a post that is no longer valid?
in Ask the IPMS/USA
Posted
And there was one on Long Island that I visited back in the '70s. And also one in San Francisco, I think.