MarkYoungCrewChief
-
Posts
174 -
Joined
-
Last visited
-
Days Won
10
Content Type
Profiles
Forums
Events
Everything posted by MarkYoungCrewChief
-

Question on US Red Anti Fouling Paint
MarkYoungCrewChief replied to MarkYoungCrewChief's topic in Ships
The TCP Red Antifouling paint is much darker than the Colourcoats. Don't know if it is exactly correct or not, but I like it a lot better. -
Question on US Red Anti Fouling Paint
MarkYoungCrewChief replied to MarkYoungCrewChief's topic in Ships
Thank you. Good info there. -
Question on US Red Anti Fouling Paint
MarkYoungCrewChief replied to MarkYoungCrewChief's topic in Ships
Light grey Dupont 131S primer. Even after three decent coats of the red, it still comes out pink. The TCP Antifouling Red I ordered is due for delivery today. We'll see if it is any better. At least the miniscule color chip looked better, for what it is worth. -
I'm an experianced aircraft builder that is a complete newbie at large scale ships. I am working on a resin 1/350 USS West Virginia, BB-48 in her late 1941 Pearl Harbor scheme, and in painting the bottom, the Colourcoas US14 Norfolk 65A Antifouling red is coming out way too pink for my mind. Ir is also dead flat. Is this correct or is there another, better, color I should be using? Also, what would be the color(s) of the ships boats, life boats and life rafts? late 1941c Inquiring minds want to know...
-
A word of warning. This has been a very expensive and aggravating event. Even after washing the parts the Dupont 131S primer was not sticking to the resin well at all. I decided to strip it down and start over. In my experiance resin is immune to solvents so I dropped the finished cab and bed in a bowl of lacquer thinner to remove the primer. It did not take long to realize the resin was being eaten away/softened. There are some beautiful rust holes, not what I was expecting. The bed in particular is really messed up though the cab is not much better. I do not see any way of saving this holy blob of a kit. Thanks for asking.
-
Even after washing the parts the Dupont 131S primer was not sticking to the resin well at all. I decided to strip it down and start over. In my experiance resin is immune to solvents so I dropped the finished cab and bed in a bowl of lacquer thinner to remove the primer. It did not take long to realize the resin was being eaten away/softened. There are some beautiful rust holes, not what I was expecting. The bed in particular is really messed up though the cab is not much better. I do not see any way of saving this holy blob of a kit. Thanks for asking.
-
I totally screwed up my 1/24 A & N Ram 3500 dually 4 door long bed heavy duty pickup kit and am looking for a replacement. If you have one you are willing to part with, I'll gladly take it off your hands.

-
How do I white letter tires?
MarkYoungCrewChief replied to MarkYoungCrewChief's topic in Cars, Trucks, & Motorcycles
"Thanks for the inputs guys. I have a Tamyia pen on order." Well, that didn't work out. In my ignorance I ordered and received the Tamyia Weathering pen. The point is about 1/4 in in diameter. I have found and ordered a pen with a supposedly fine tip. It should be here today. -
How do I white letter tires?
MarkYoungCrewChief replied to MarkYoungCrewChief's topic in Cars, Trucks, & Motorcycles
Thanks for the inputs guys. I have a Tamyia pen on order. -
How do I white letter tires?
MarkYoungCrewChief replied to MarkYoungCrewChief's topic in Cars, Trucks, & Motorcycles
Eric Thank you for the links, but the tires are NEXEN brand. Oddly enough, they are what are in the kit and on my truck. Who woulda thunk it? -
No, No, No. Not that clear part that goes on airplanes. The Cargo box on my 1/24th scale resin pickup was warped. Heated it up in almost boiling water for a few minutes but needed some weight to hold it down while it cooled. A guy uses what he has at hand that will work. BTW, the box is square now.
-
OK. Plenty of experiance in just about everything but highlighting the tire white on 1/24 scale cars. I have done a few cars in my lifetime but never have looked into the tires. I have a very nice resin kit of my pickup and would like to see it sitting on the shelf with clean, sharp lettering on the tires. The tires have nice, slightly raised, lettering on them. What is the best way to pick out those white letters? Also, while I am here, what is the best color for the rubber tires? I have some Testors Rubber that looks pretty good, but is there anything better? Thank you in advance. Thank you vurry much ladies and gentlemen. Mark
-
IPMS Chapter Newsletters available to all
MarkYoungCrewChief replied to MarkYoungCrewChief's topic in General Modeling
Bob, Thank you. Hopefully your Chapter Contact is forwarding all of the Blasts to your memebership. If not, rattle his cage. Thank you for your efforts as editor. Without you and all the others, I would not have a job😀 -
As always, another piece of exceptional work. You amaze me.
-
IPMS Chapter Newsletters available to all
MarkYoungCrewChief replied to MarkYoungCrewChief's topic in General Modeling
Thank you Bill. This is just how the system is supposed to work. -
See what other chapters are doing... Many IPMS Chapters publish Newsletters for their membership. I have been collecting and bundling them into what I call a Newsletter Blast and sending them to as many IPMS members I can reach. Most of this effort goes to the Chapter Contacts though individuals are on the distribution list. If you have not been getting these Blasts, 7 or 8 per month, and would like to, PM me and I'll get you added in. (This is not an "Official" IPMS funtion, but something I do on my own.) Looking forward to having you in the recipients.
-
Thank you Nick. Just hat i needed to know.
-
I seem to remember seeing something about an upcoming National Convention in the Indianapolisl, IN area. Can someone confirm or deny this?
-
Gil I don't care what you build, it ends up in the SUPERLATIVE column. The weathering is as spot on as it can be. Well Done. Mark
-
Aircraft Maintenance Questions (Vietnam)
MarkYoungCrewChief replied to ModelMage's topic in Aircraft
The only time I jacked a fighter sized airplane was in tech school in 1966. IIRC, we used some sort of bottle jack. It does have to be a able to fit under the jack lug found on the bottom of the strut. I spent my time on KC-135s and with the four tire truck, we would jack up whichever end of the truck needed it, using a rhino-jack. It is very much a common floor jack, only much stronger and heavier. They were pretty simple back in the day, but a Google image search shows all sorts of rhino jacks. Not the definitive answer you are looking for, but I hope this helps. -
Don't ever let anyone tell you your work is not IPMS compatible.
-
Classic Kit: Airfix Lockheed Hudson I Kit 05034
MarkYoungCrewChief replied to thevid's topic in Aircraft
Very nicely done David. I had to do one as part of a Secret Santa build. Yep, the first thing I did was sand the rivets off. Makes all the difference in the world, doesn't it. You talk about having problems with the windows. I was told of a technique I find very effective. Use clear epoxy, the laminating kind. It can be found in most any craft store. This is what I used, though there are other brands. https://www.hobbylobby.com/Crafts-Hobbies/Clay-Molding-Sculpting/Casting/EasyCast-Casting-Epoxy/p/27003?msclkid=4d833c0669971f5ee5945e5541ab61bb&utm_source=bing&utm_medium=cpc&utm_campaign=Shopping-Catch All&utm_term=4579534652838142&utm_content=Crafts Hobbies-Clay Molding Sculpting Take some clear packing tape - if you can find the end on the roll. Not touching the adhesive, place it over the windows you want to fill. The Hudson side windows are a prime example. Work the tape down good and tight. Mix up some epoxy and, from the inside, drop it into the window cavity, eliminating any bubbles. I use round toothpicks with a little cut off the end for this. Fill the cavity and set the part up to cure, with the windows as level as possible. Walk away. At room temperature, it will cure in 24 hours or so. Pull the tape off and presto-chango, you have form fitting clear window. It took several sessions, but I did the nose windows also, except for the one spanning both fuselage halves. I find it amazing that the sticky side of the tape produces such clear windows and pulls off easily. Oh, yeah. Should you need to, the epoxy can be sanded and polished out. Another note. The light color ring around the windows is the primer I used. Have not licked that problem yet.
-
Obviously it has been a while since I visited the Forums. Whenever I click on the 'Aircraft' button, I get sent to the 'Builds' page. Nothing wrong with that, but I was looking to see what the hot topic of the day might be and whatnot. Is this just a glitch or something more sinister?
-
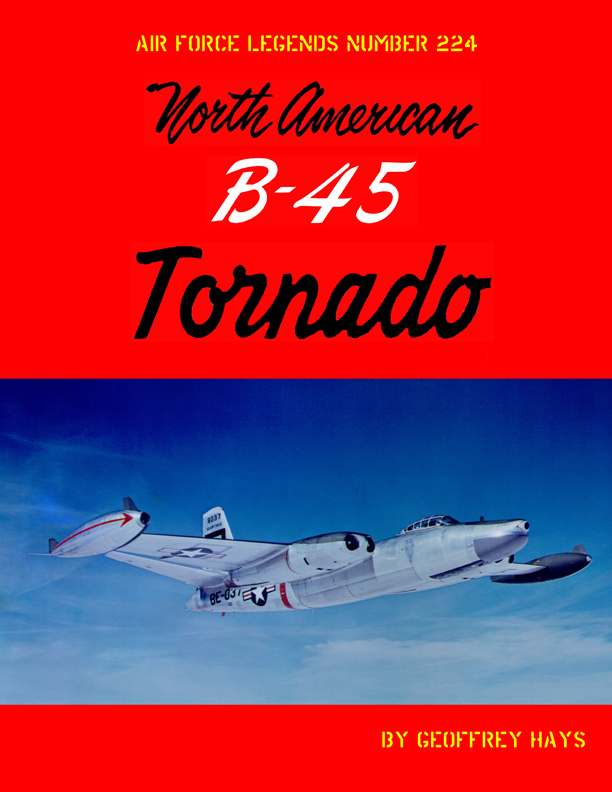
Steve Ginter’s Air Force Legends series introduces volume 224, North American B-45 Tornado by former USAF Museum senior staffer, Geoffrey Hays. Geoffrey is also the author of the popular Air Force Legends #215 Boeing B-50 Stratofortress. (I have no associaton with the author other than being long time modeling friends.) A concise text, supported by insightful captions, covers operational and hardware details from its development as our first jet powered bomber to the atomic role to unit assignments and deployments. This 262 page volume features: 262 Pages, 267 drawings, 355 photos, and 95,763 words in 12 Chapters. 15 color aircraft images Color drawings of 33-unit insignia of units known to have flown the Tornado 4 pages covering scale models of the Tornado from 1956 List and details of all known accidents List of tail numbers of RB-45Cs assigned to Yokota AB, Japan which flew tactical missions over North Korea and Manchuria as well as highly classified strategic reconnaissance missions deeper over the Peoples’ Republic of China and the eastern USSR during and after the Korean War. List of tail numbers of aircraft assigned to units supporting NATO from the UK List of tail numbers of RB-45Cs which flew Peripheral Aerial Reconnaissance Missions in Europe (missions flown from 35 to three nautical miles of denied airspace, sometimes into denied airspace) List of tail numbers of all armed Tornados in The Far East Air Forces and United States Air Forces Europe. List of tail numbers of Tornado that penetrated denied airspace including the Soviet Union in 1952 and 1954 Details of B-45A, B-45C and RB-45C design, production, performance, payload, endurance, and operations. A section on the configurations, colors and markings of all RB-45Cs which were based at Yokota AB, Japan during the Korean War and for a few years thereafter.
-
Madjack56 - Yes I did, and they would have had they had one in stock. A fellow IPMSer has stepped up and sent one to make a copy from. T Thank you for your interest. Mark Young


960.jpg.768dac67ce1ec3b96ecb62488e7df254.jpg)
960.jpg.a9d8232669be40c5976efe78f3ce8363.jpg)
960.jpg.5282adb6f0d3c324554759597758185a.jpg)