StuartMont
-
Posts
233 -
Joined
-
Last visited
-
Days Won
10
Content Type
Profiles
Forums
Events
Everything posted by StuartMont
-
Well the model looks perfect and no one would even know otherwise, but it's a shame your hard work on the linkage was defeated by a fall. Stuart
-
Clearcoat for Vietnam era aircraft models
StuartMont replied to StuartMont's topic in Tools, Tips & Techniques
Thanks for responding so quickly Gil. Almost time to apply the final coat. I’m building the Navy A-1H Skyraider with Light Gray and Insignia White color scheme. Flat it is. Always very helpful . . . Stuart -
Can someone remind me if the final clearcoat should be matte or gloss? I seem to remember reading in these forums that Vietnam era aircraft do not get the gloss final clearcoat. Thanks for helping! Stuart
-
Very cool model Mark . . . 11 coats of white and clear, that is perseverance but it sure paid off, it is beautiful. What other challenges did you face with this kit? Stuart
-
Oh my, seems like that belongs in a museum of the Vietnam War or something, amazing.
-
What an incredible build. Where will you be displaying this masterpiece after the convention?
-
So I sanded and cleaned the wing. Did not completely remove the primer. Airbrushed the final color and the result is pretty good. Now that it’s dry I think it needs another coat, it’s so hard to tell when wet. It’s a little grainy but I know that is my issue, not the airbrush. I looked it up😀. Why the brand new siphon brush created the moon surface on my wing must come down to a bad airbrush or primer. I’m not sure how my “technique” could have caused that. Thanks so much for the advice on how to fix this, my Skyraider is saved, for now 🥴

-
Very cool. I understand about using decals since they cause me trouble when I put them in kit supplied panels. But, I can’t even get airbrushing right yet so scratch building instrument panels is something to strive for later. Amazing stuff Gil. Seeing what you took out of the box turn into that finished beauty is very impressive indeed.
-
Well I did shake the bottle vigorously as directed and double-checked the viscosity, it seemed fine. The surface of the wing looks like it has a bunch of little craters, a microscopic meteor shower. Could that be solids in the primer? It is about four years old, I bought it but then took much longer to pull the trigger on an airbrush. I’ll clean up the wings and try again. It’s a 1/48 Skyraider and I love that airplane, it looks like a big bruiser that you wouldn’t want to see coming at you 😀 Fingers crossed, thanks so much for helping. Stuart
-
Thanks so much for responding Ron. The primer is acrylic. Actually I have had so many problems with these airbrushes, I’m sure because of improper use, that I do disassemble and clean all of the parts after every (sad) attempt. However, in this case I used the siphon brush for the very first time, so it was new. I will fix the wings as you suggested and keep on trying. When it does work there is no comparison, so much nicer than my brushwork on larger surfaces. Stuart
-
Thanks so much for responding so quickly. Isn’t this a water trap? If not I’ll look it up and take care of it. Do I need to do anything to the wing surface before I apply the next coat? I’m curious if the “marks” will disappear or if I have to sand. Stuart
-
Good morning. I used a siphon airbrush for the first time and a surface primer designed for use with the airbrush. Can you help me with what caused the bubbles and how I can fix it if possible? Thanks in advance.
-
Gil, thanks so much for taking the time to detail the sandwich method. Very nicely explained but most likely not as easy as you make it sound. Scribing the tick marks and needles at a 1/48 scale must require a very steady hand. Was there no instrument panel with the kit? Just curious what lead you to scratch build it. Thanks again, I agree with Mark wholeheartedly!!! Stuart
-
That’s a beautiful model Gil. I have only worked with resin once and that was figures. Did this require removing large blocks of resin and the accompanying sanding/smoothing? The details you added are incredible. Any chance you might explain the “sandwich” method for us newbies? Stuart
-
Amazing! Are you building a miniature fully functional helicopter 😀? The detail is incredible.
-
Thanks very much Christopher and Jean-Marc!
-
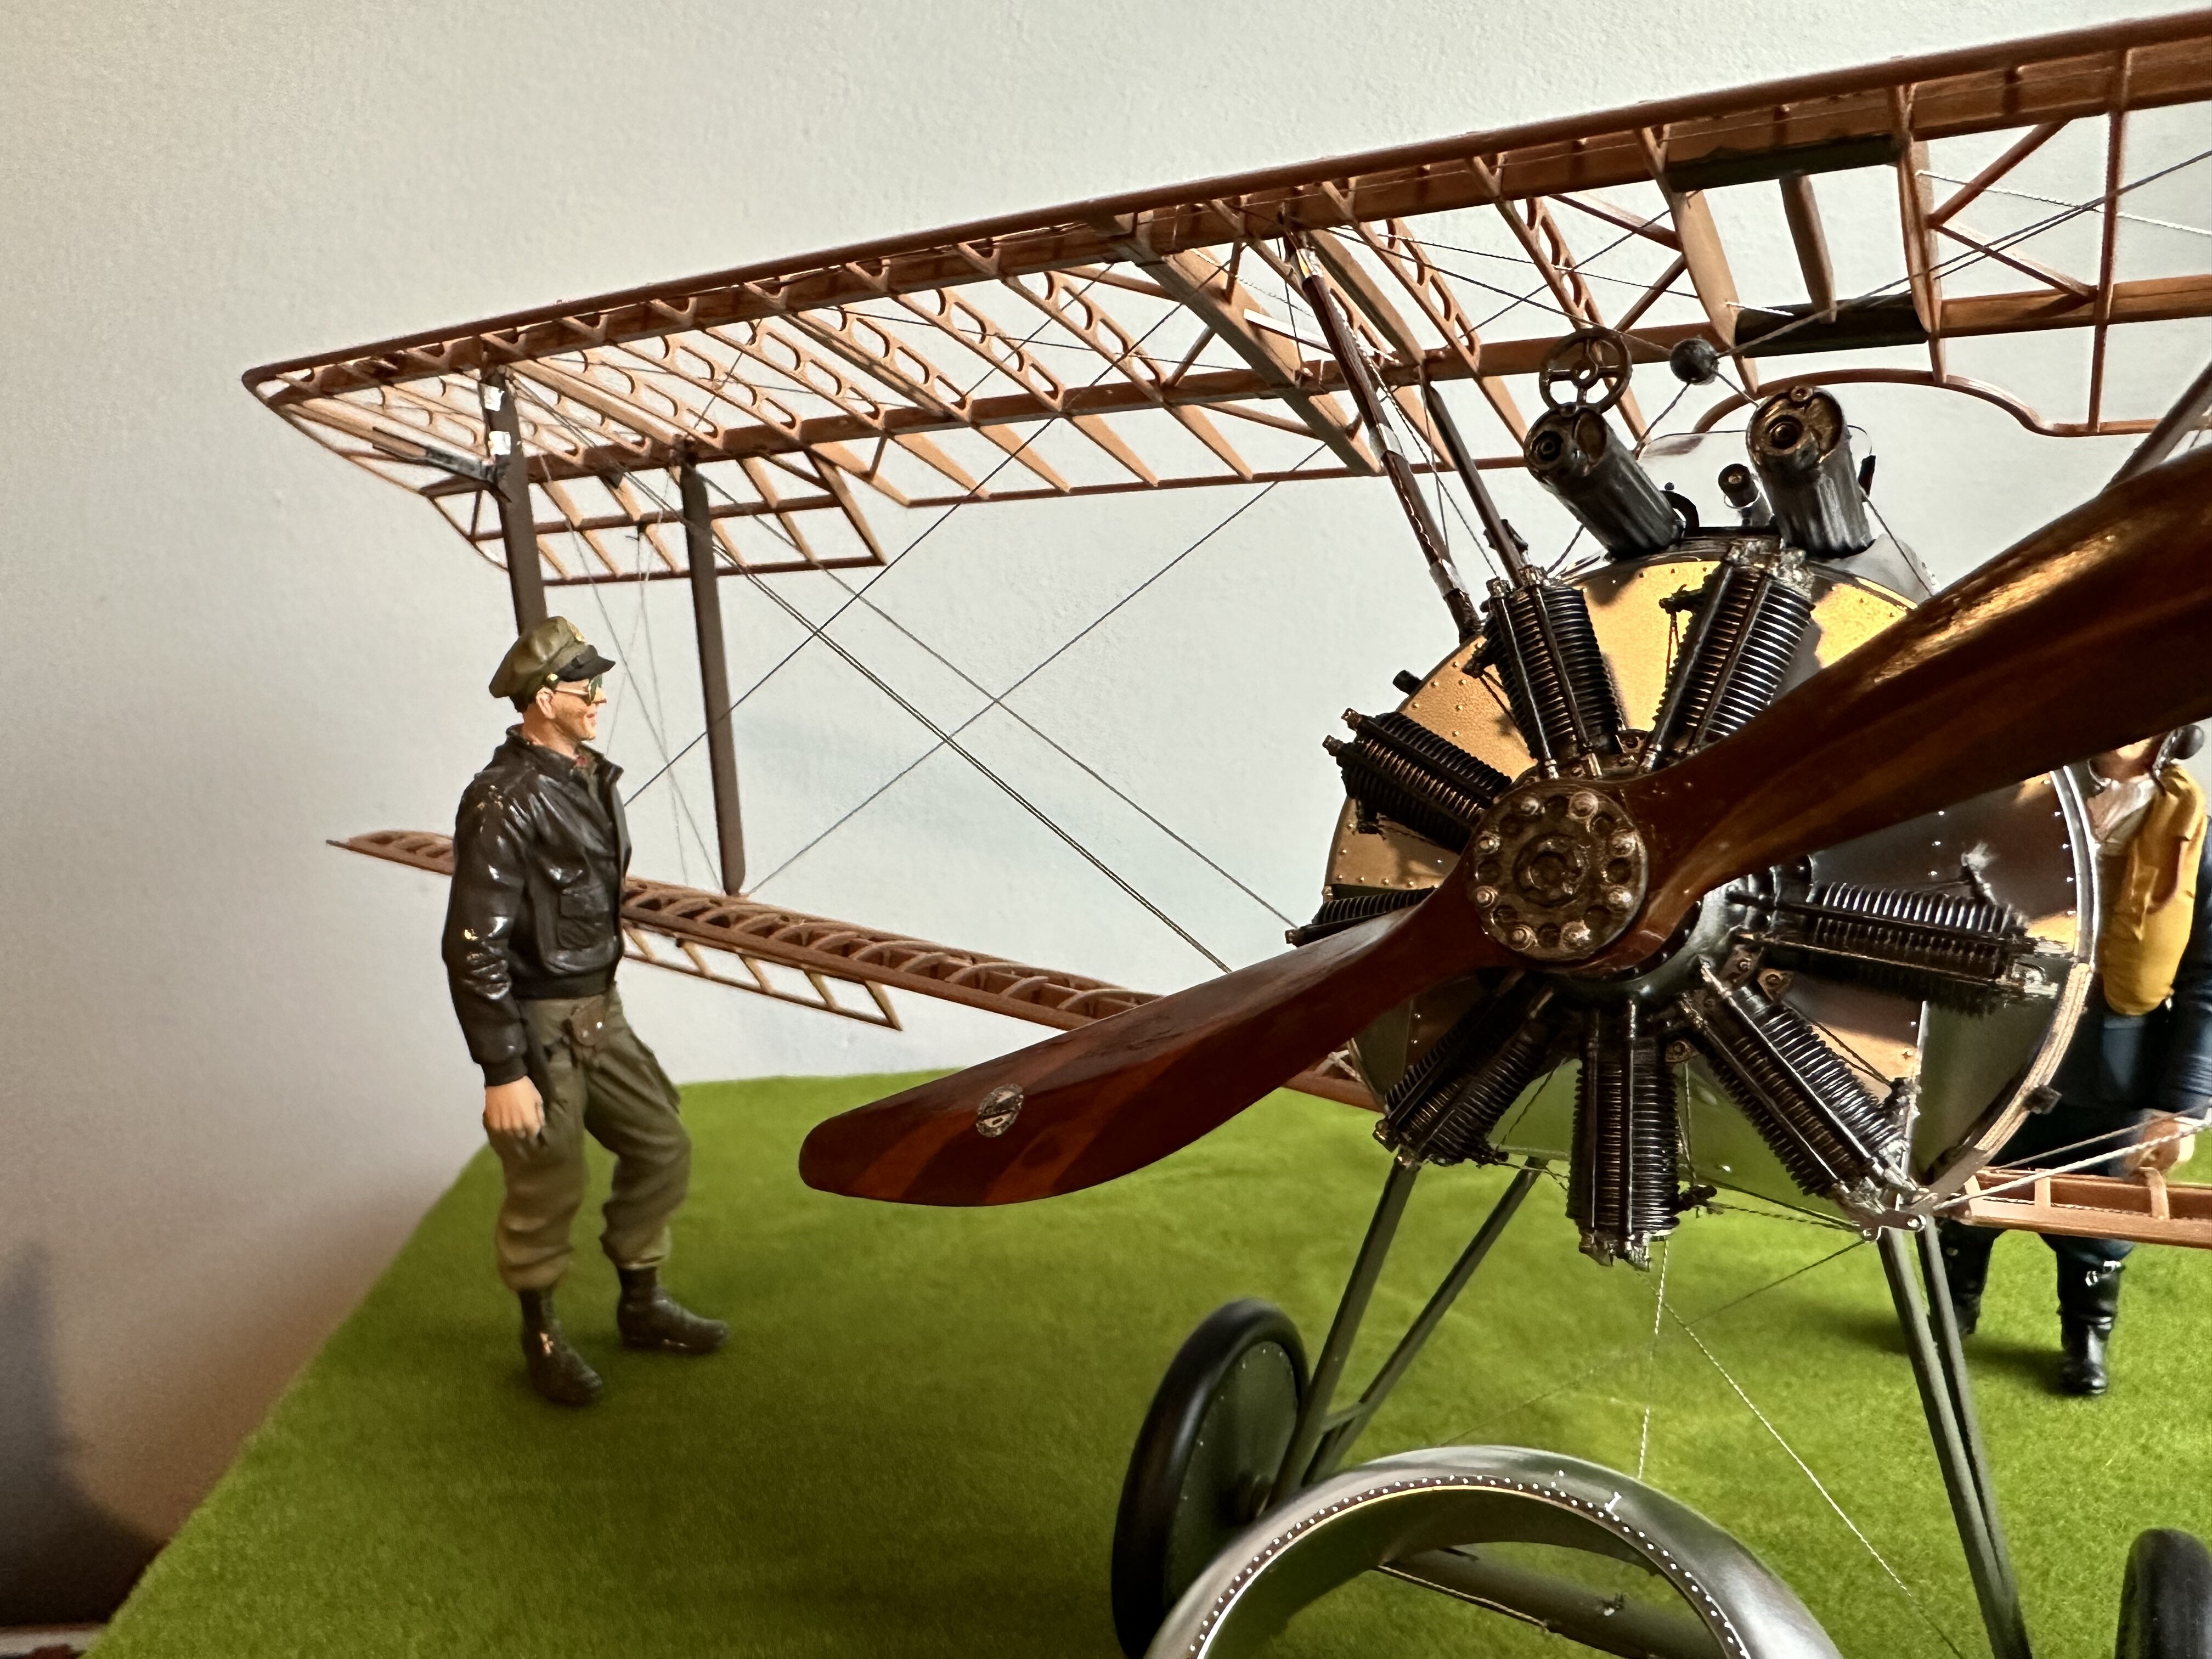
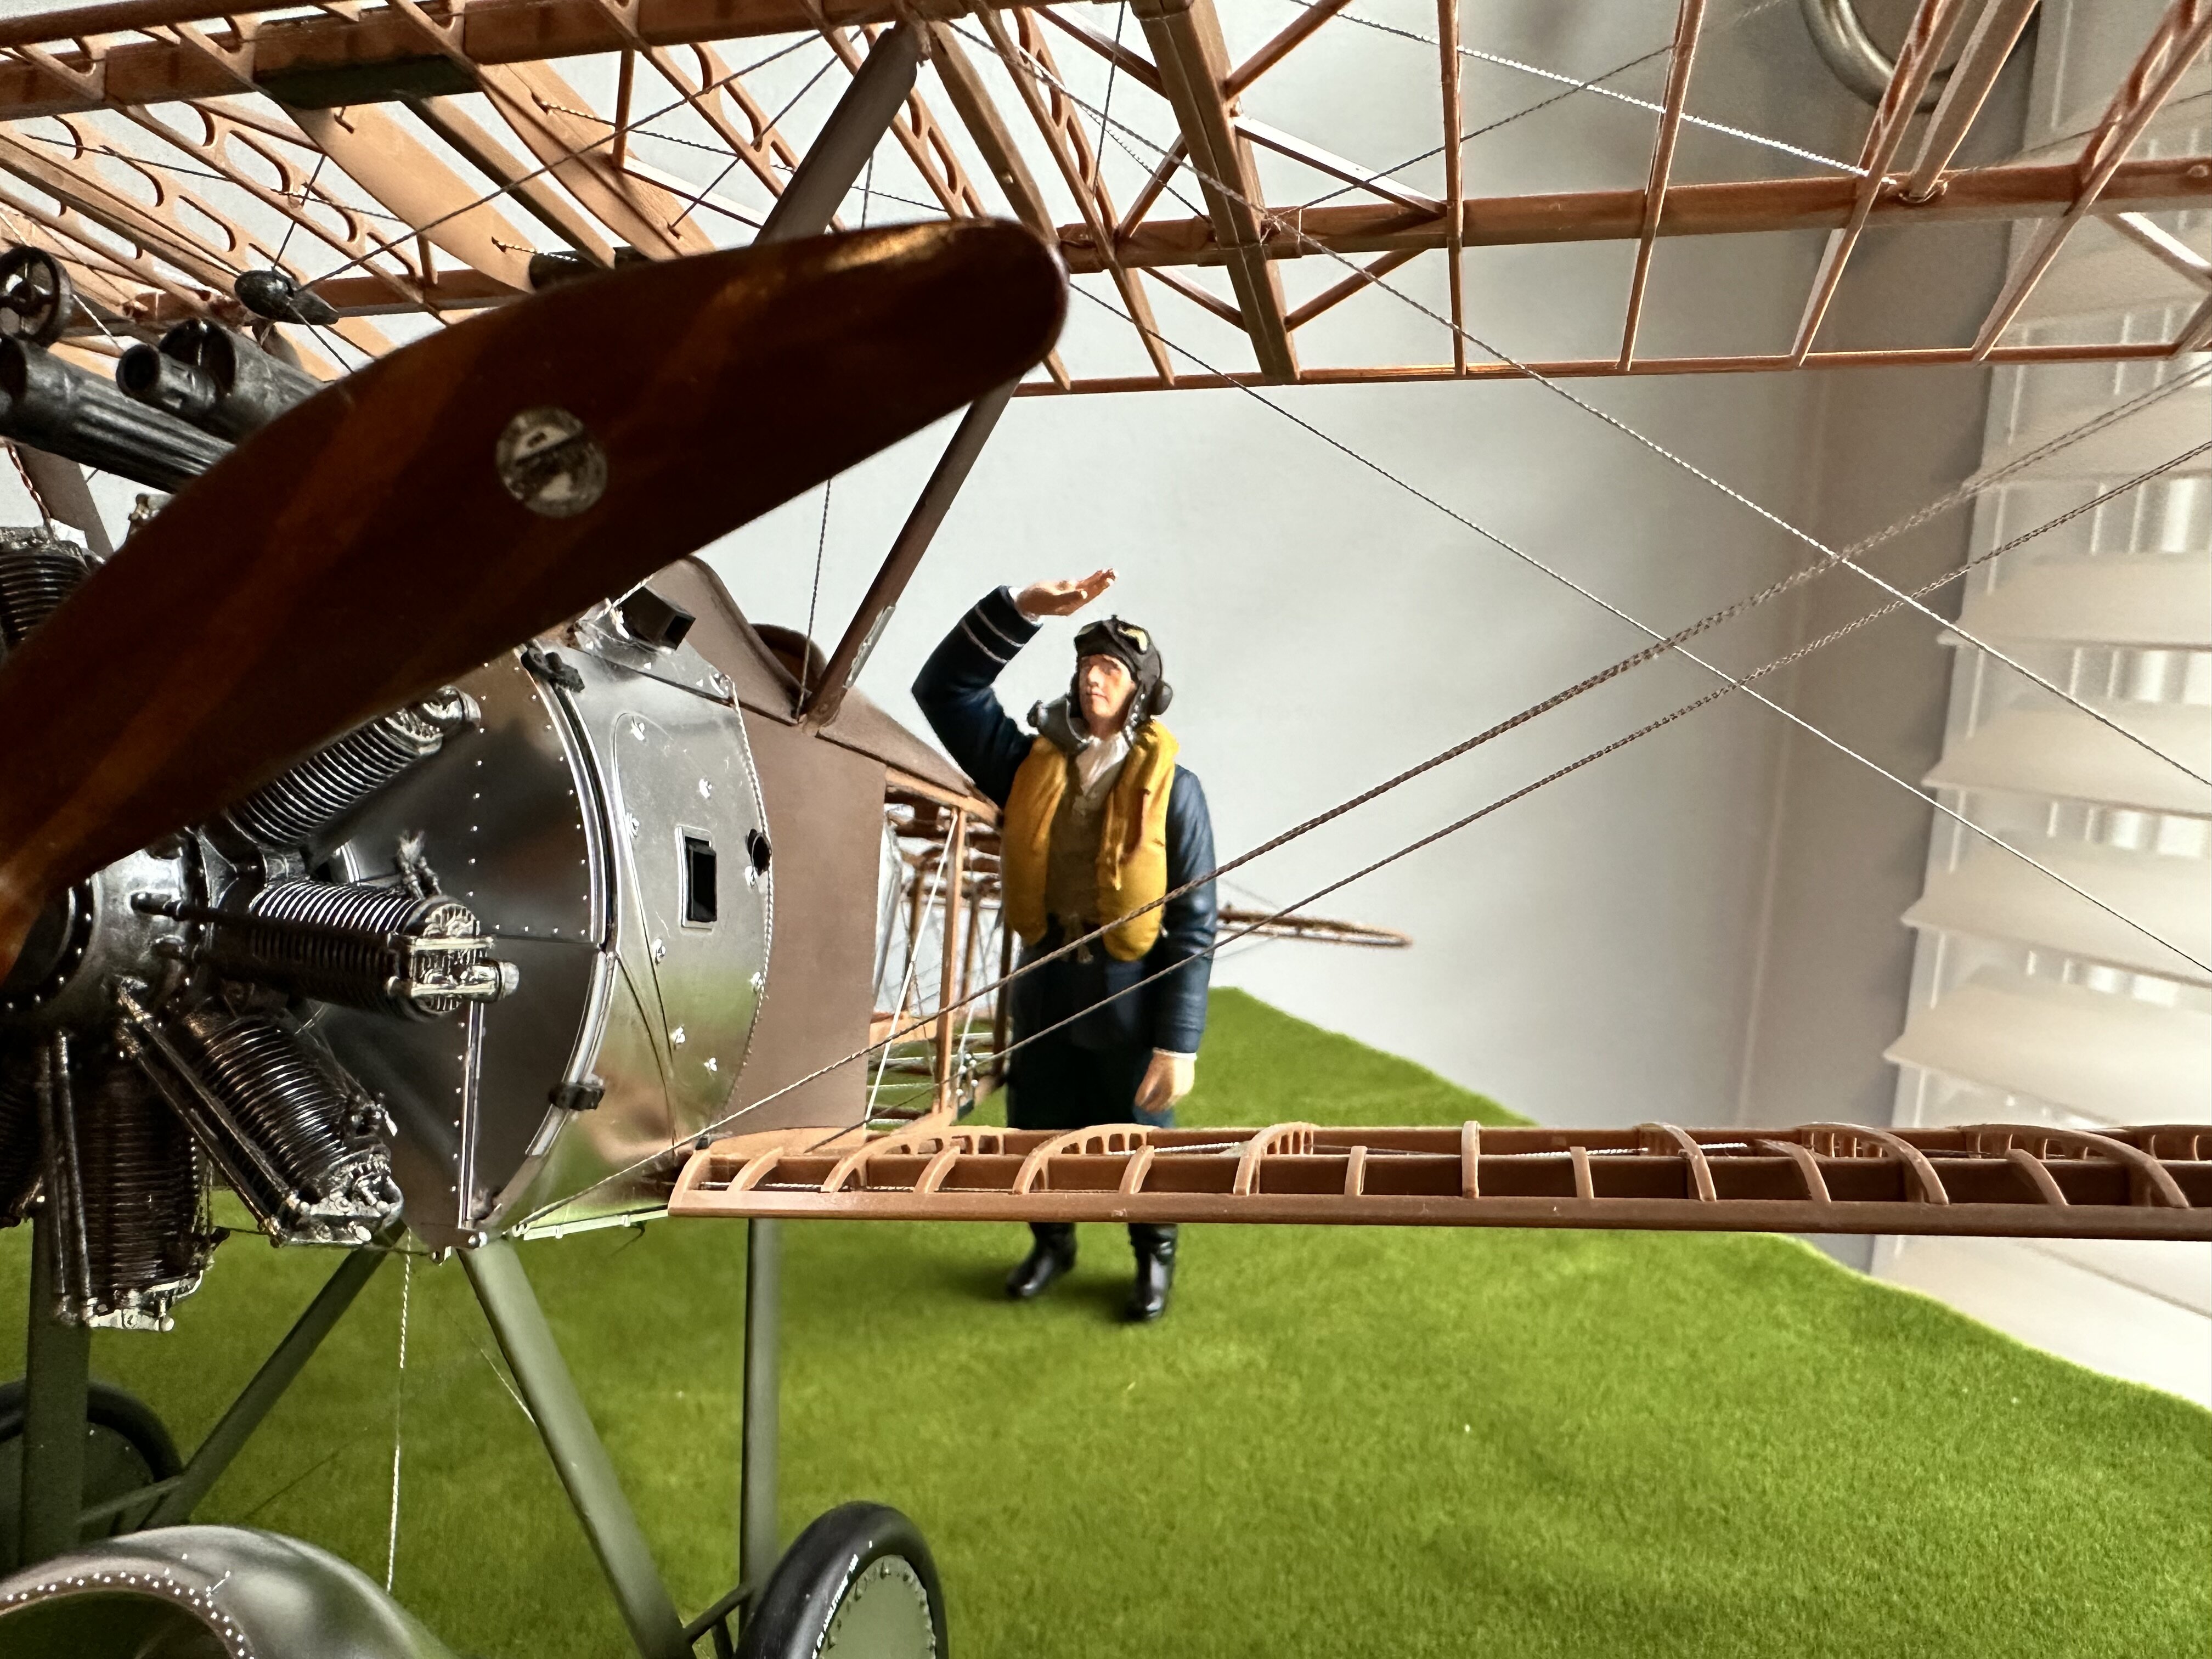
Last pictures, I promise 😀 I moved the USAAF guy to the front and kept the RAF guy in the back. I used semi-gloss clear on the leather jacket but it is still quite shiny, let’s just say it’s brand new😀😀 BTW, I did some research into the issue of the size of the hands on the RAF pilot. I was referred back to the original art for this figure (Verlinden) and the hands are quite big. Interesting is that I learned this is why cartoonists usually only draw four finger hands. I am going to use masonite that I found in the basement for the base. It won’t curl and it looks like dirt below the grass. Thanks to everyone for following along.
-
Thanks very much Gil, I am happy with my work for once. The highlighting and shadowing is the hard part I think and that is what I have yet to do. I will say that the size of these guys and the depth of relief on their clothing causes very minor “natural shadows and highlights”. My wife is trying her best to help me with the colors for the faces, they’re tough. Also, There is an issue with the size of the hands of the RAF pilot discussed in the other forum but its not painfully obvious the way I have them set up. I’ll keep thinking about the surface, I do want do do something there. No plans to compete, it wouldn’t stand the scrutiny of a magnifying glass, but I’ve loved every minute of putting this plane together. And thanks again for following along and most of all for helping out.
-
Well Ron, you have pointed out a significant difference. The RAF hand shading his eyes is 15 mm long which is 240 mm full size. That’s 9.5” from base of palm to tip of middle finger. The overall figure height works out to 6’-3” tall, which is my height and the similar measurement of my hand is 8”. Most of all his hand is almost twice the “volume” of the hand on the other figure. Similar math on the arm is actually pretty close, only off, compared to mine, by the same 1.5”. I think both of the hands on the RAF guy are way too big. I’m just going to assume that the flight jacket is much bulkier than the leather jacket on the other guy. In the photo the US guy’s shoulder is slightly above that of the RAF guy. They both measure exactly 120 mm tall. I was so focused on gluing these things and painting that my brain never saw this until you responded and I took another look at the photo of the two of them together. Maybe I’ll stage the USAAF guy in front of the plane and keep the RAF guy behind it 😀 Thanks again for responding.
-
Thanks very much for your kind words! So I’ll use semi-gloss clear. And . . . now that you say it, looking at the two side-by-side it sure looks like the RAF arms and hands look too big. I hope it’s a photo perspective thing, I’ll look. Otherwise the manufacturer screwed up I guess.
-
I still have some painting work to do. Any comments/criticisms would be very welcomed. The color of the RAF pilot’s eyes need to be fixed and the USAAF pilot’s sunglasses didn’t turn out well I don’t think. No shading or highlighting yet. The color of the American pilot’s jacket is leather brown but it needs a glossy clear coat, correct? Please have at it, especially colors if you see something.
-
It has taken me a long time to assemble and paint these two 1/16 WWII pilots. They are not quite done. Also, I’m having trouble finding a good grass base for this scale without spending over $100. This is temporary. Any suggestions there would be quite welcome. I’d like to call it “Admiring a WWI Warbird” or something like that. Thoughts, criticisms are very much welcome and appreciated. Thanks for looking, Stuart
-
Thanks very much Mark! These are cool models but those little knobs are hard to remove from the sprues without deforming them. Looking back I should have used a knife rather than the nippers. This is my second one, had some practice on the F-104 cockpit. I’m going to see if there are others available, they look good placed next to each other.
-
Thanks very much Gil. I appreciate your kind words, and, most of all, your time spent helping me with my issues. I know there are many, but they are reducing in number as I gain experience building these models and reading posts on these forums. Stuart
-
Good morning Nick and thanks very much for your post. I really appreciate your kind words about the build. And yes, unfortunately I do drive myself mad even doing stuff that I love to do. My 40 years of designing bridges and buildings has created that drive to get it exactly right, its ingrained now. I thought about using putty and noted it in my first post. It’s pretty clear that the prototype photographed on the box cover was modified the way you described. The photo posted by Ron gave me another thought (yikes!). That pad looks like three pieces to me. This is done except for one knob and one toggle which have joined the tiny piece graveyard that is my carpet. I know I focused on the gap issue but I am still interested to hear any advice on painting those tiny knobs, etc. I masked off the base, painted all of the panels black and then the knobs, toggles, switches, decals, etc. There were many places where I had to touchup the black panels because I slipped with the brush. I hope I don’t annoy people on this forum with my nature, it’s hard to suppress. Here are some photos of the completed model sans the “gap fix”. I‘ll post the final photo when I am done that as well.