


1320Wayne
-
Posts
49 -
Joined
-
Last visited
-
Days Won
4
Content Type
Profiles
Forums
Events
Posts posted by 1320Wayne
-
-
On 7/5/2018 at 11:32 AM, WildBill50 said:
Very cool. The graphics look great! Love the detail.
A question...I notice the exhausts go right to the rear tires; Is that normal for a dragster? Wouldn't the heat melt the tires or is that how they get the 'grip' to the track?
Just wondering..
Bill
This is pretty much normal. Some cars run with the headers pointed up but most are aimed down. When you consider the amount of heat generated from the slicks under power the heat from the exhaust isn't a concern.
-
On 7/14/2018 at 3:03 PM, TimDarrah said:
Wayne,
May I please ask why you said the decals were a pain to apply? Also, do they include a placement chart? What base color did you use for this Merc? I've ordered these same decals.
Thanks,
Tim
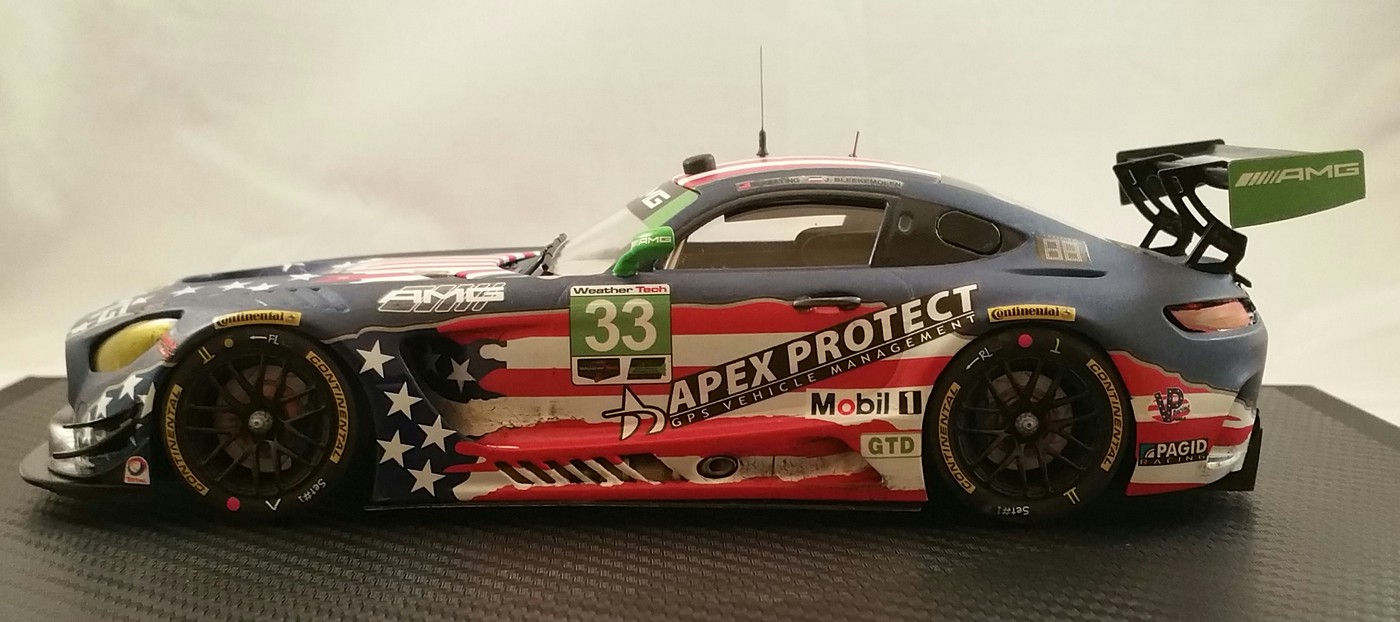
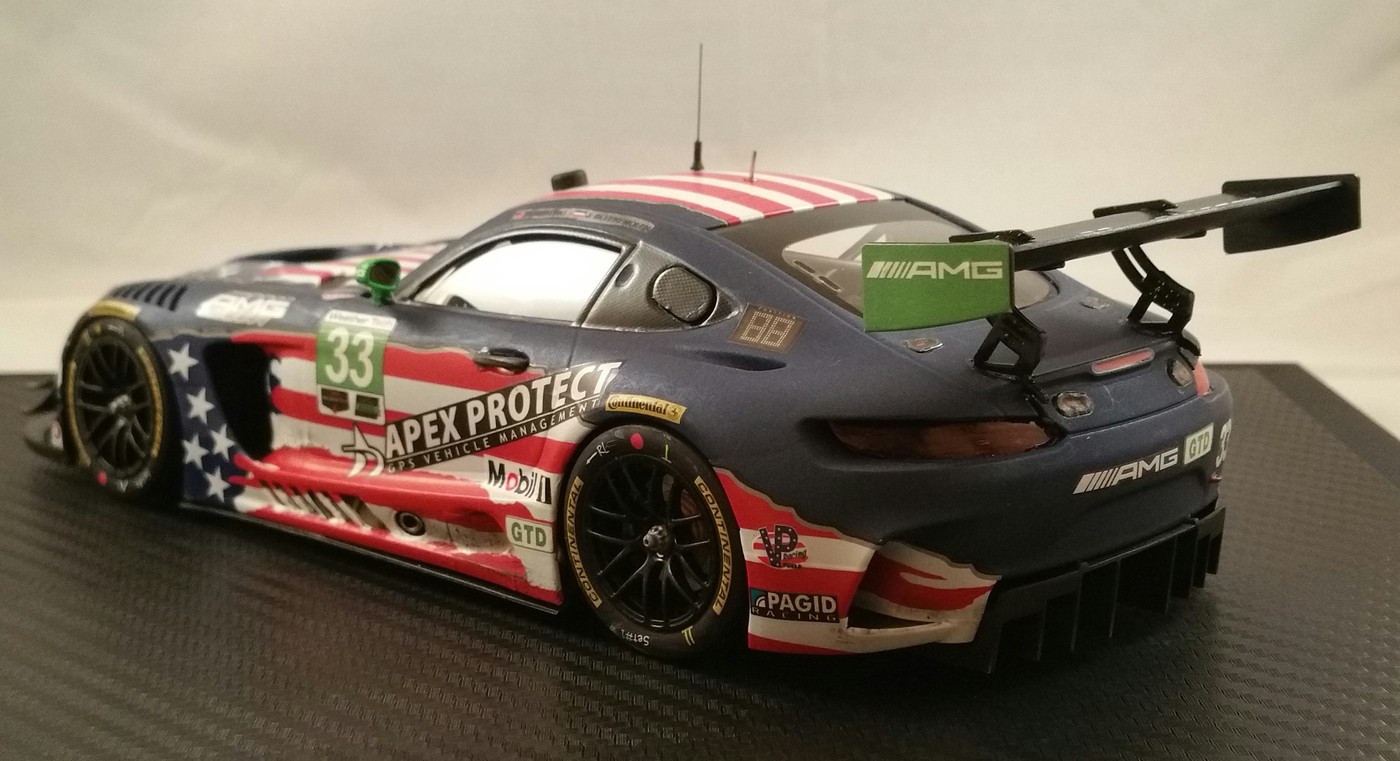
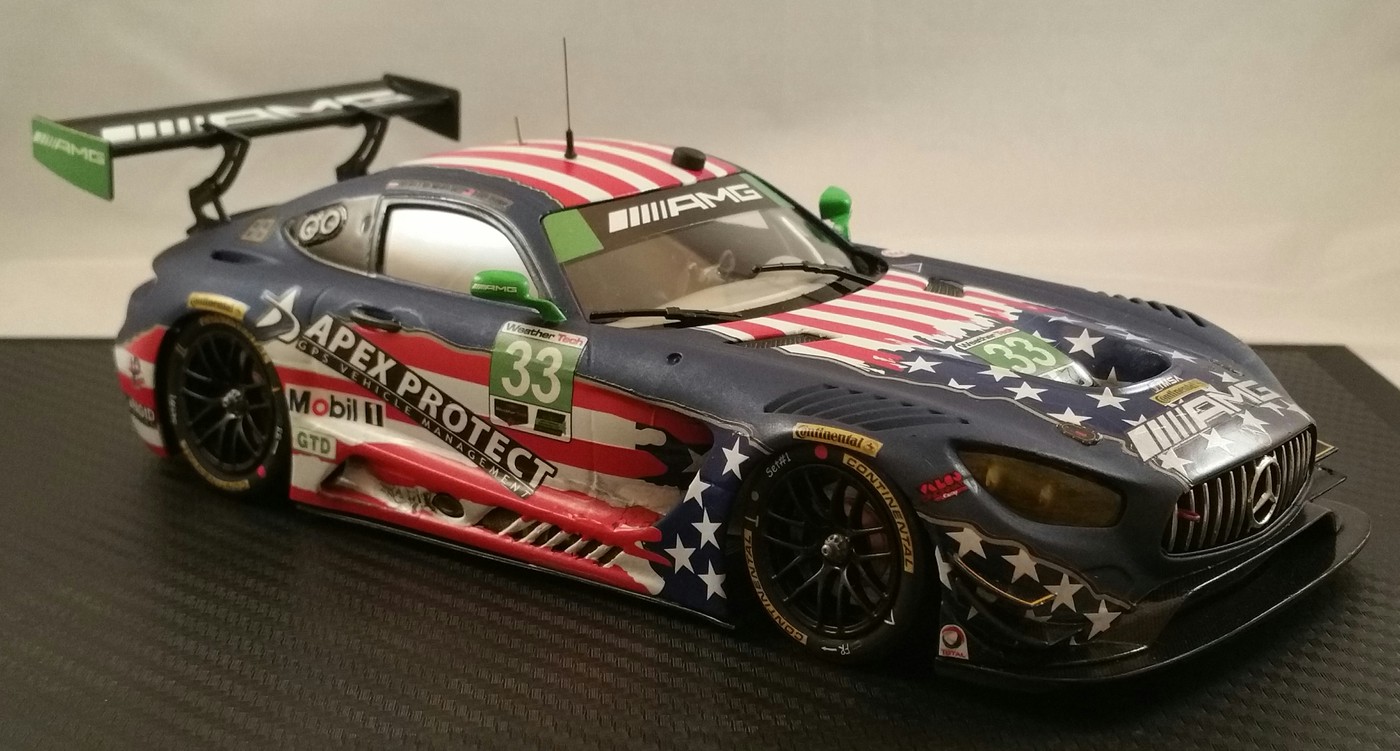
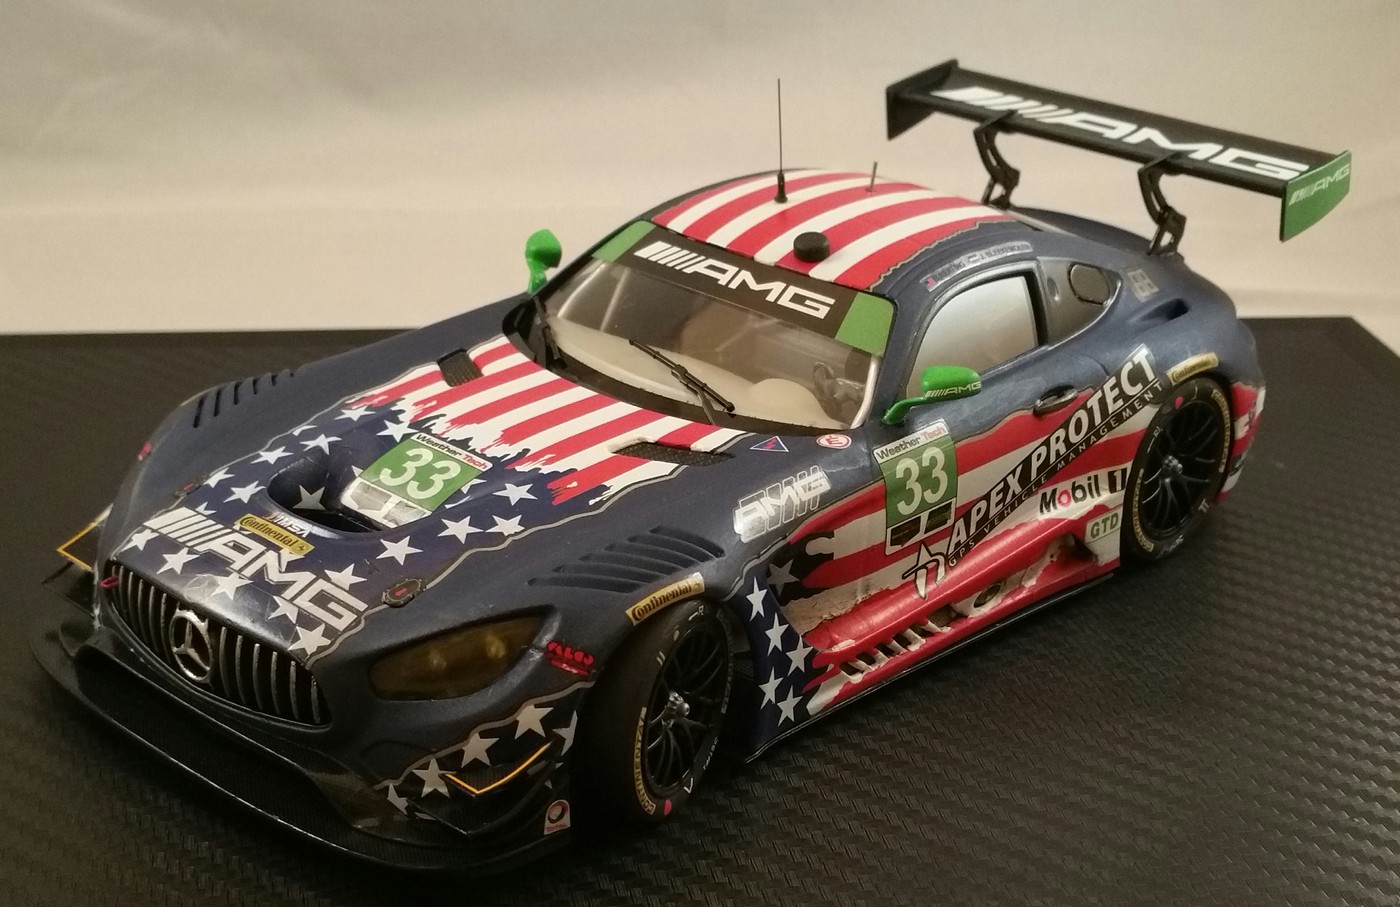
The decals are great as far as registry and accuracy but they are rather thick (no bleedthrough) and don't like to conform to contours. I used ample amounts of decal setting solution and still had a time getting them to settle into certain areas. I learned from the drivers side and went with a different approach on the passengers side by cutting the large panels into smaller components and it went much better. I also cut the stars sections into much smaller areas and that worked well.
No placement chart. I used as many research photos as I could find. For instance. There are sections of white decal needed inside the open side vents. They are not included on the sheet so I made my own with some plain white decal film.
The base coat that I went with, after three failed attempts at matching, was Testors Arctic Blue Metallic. Add the matte finish and it was almost perfect. Then mask off the areas for the gloss blue on the hood and sides.
When you receive your decals check to make sure that the roof decal is correct. The original decal roof image had the wrong number of stripes. The guy who creates these did a correct roof piece and sent it to me separately. Unless he has changed the artwork on the original decal you should receive the extra piece with your order.
-
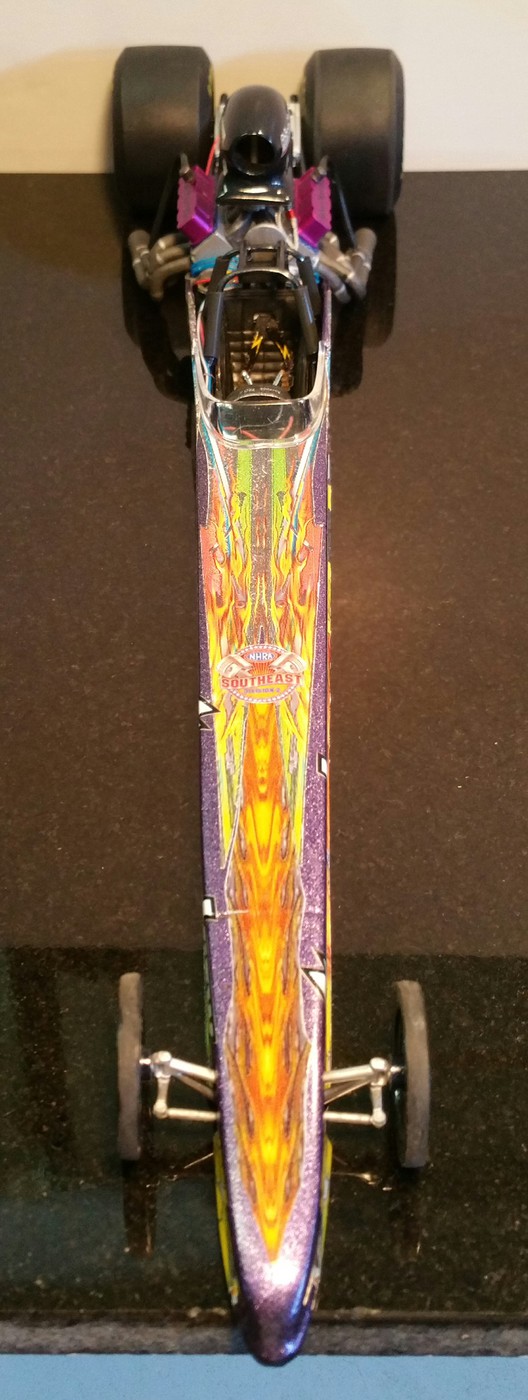
Another completed build that was started over a year ago. It's an NHRA class Super Comp dragster build using a Revell top fuel kit as the base. The body and chassis has been shortened to better represent the dimensions on a super comp car. The graphics are fictitious in nature and were created on my home computer and transferred to decal film. The scoop is a resin piece that I created the master for using Renshape. And, the engine, interior and chassis is loaded with added details for wiring, plumbing, etc. If you go to my Fotki link you can see the entire buildup in pics. which also shows the change in graphics after a failure in clear coat application.
http://public.fotki.com/1320wayne/my-drag-models/sportsman-cars/super-comp-dragster/

-
 2
2
-
-
4 hours ago, dhamilton said:
That looks great!! It looks good sitting on the carbon fiber!!
Where did you get the decals? I recently picked up the kit, but need new markings!!
The decals came from Slotfabrik, out of Germany. They are expensive and for this particular build, very difficult to work with. This was probably the most laborious decaling job that I've ever had to do, and I've done some insane full wrap decals before.
-
Here are the completed pics. of my latest build. It's my first official Tamiya sports car build so there were some small challenges to it. I also had a time with some challenging decals, especially the side panels so I ended up adding some subtle weathering to help minimize the flawed decal application. It was so much of a different, fun build than what I'm used to building I'm looking forward to attempting another one real soon.
Oh, and yes, the paint job is part gloss and part matte finish.
-
1
-
-
Gil, had another great time at the event. Your club always puts on a fantastic show which is validated by the overall turnout. I had an excellent time, as has been the case in years past, and look forward to next year.
In the meantime, here is a link to my album. I took about 500 photos. So far I have about 400 downloaded. Just a few more to go.
http://public.fotki.com/1320wayne/model_shows/2018-model-shows/jaxcon-2018/
-
 1
1
-
-
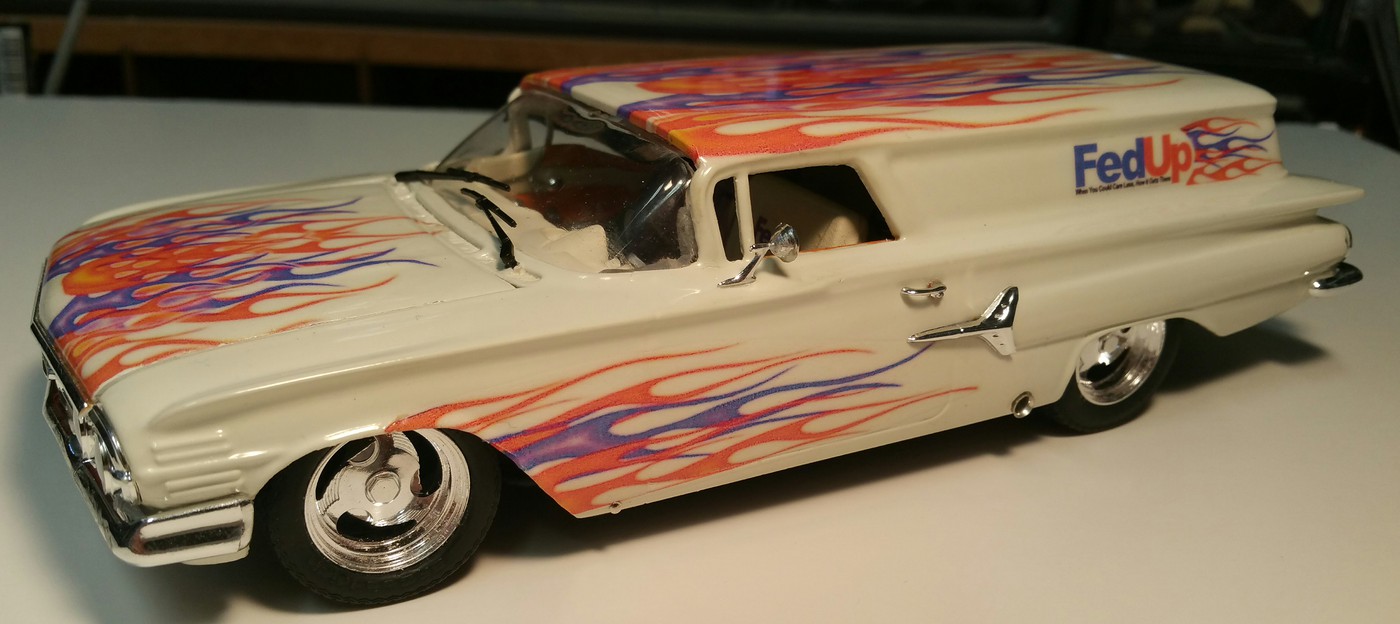
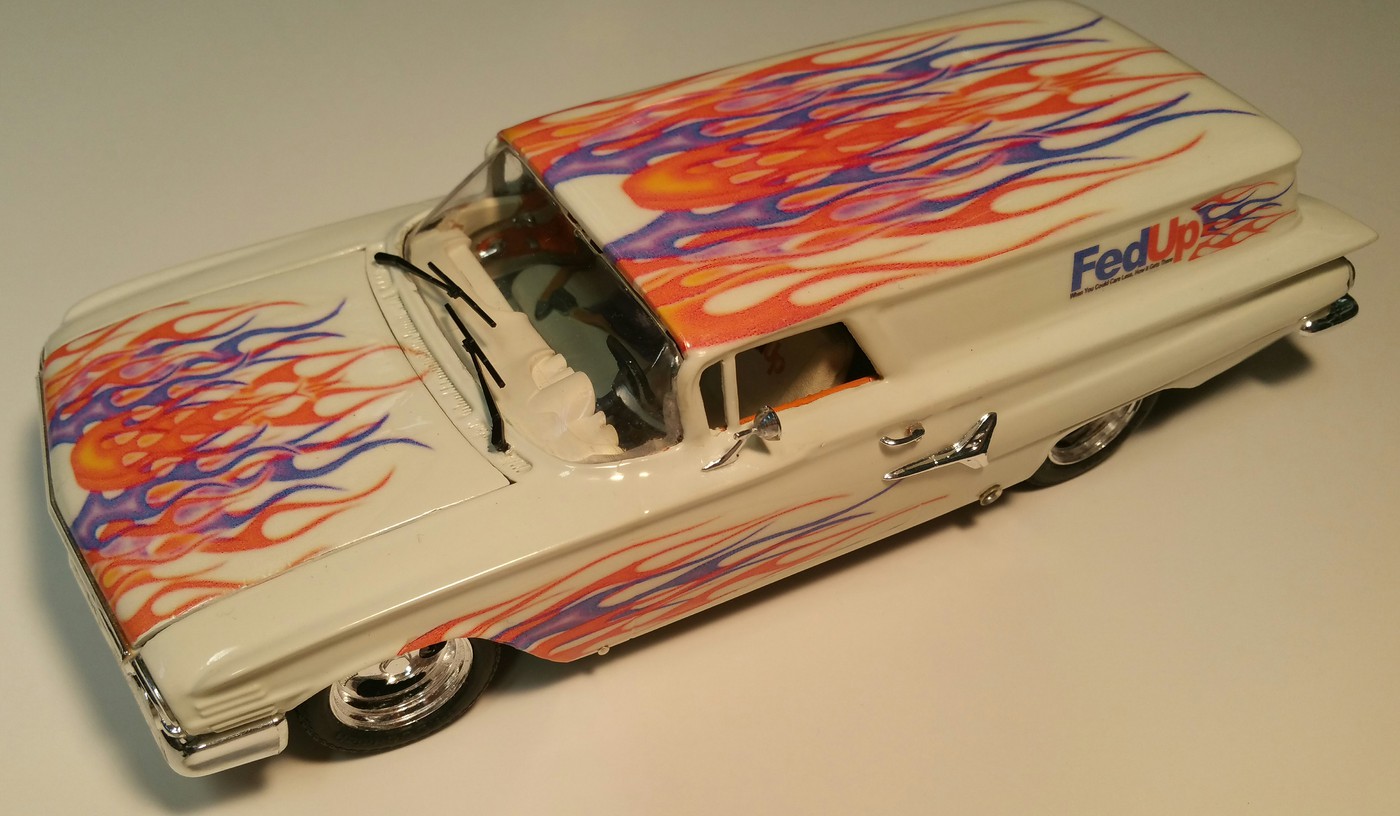
Another recent completed build. This is a 60 Chevy Sedan Delivery built from a Revell 60 Chevy lowrider kit and a resin body. The tires and wheel are parts box pieces and the decals are homemade on my computer. I added a touch of humor with the markings.
-
1
-
-
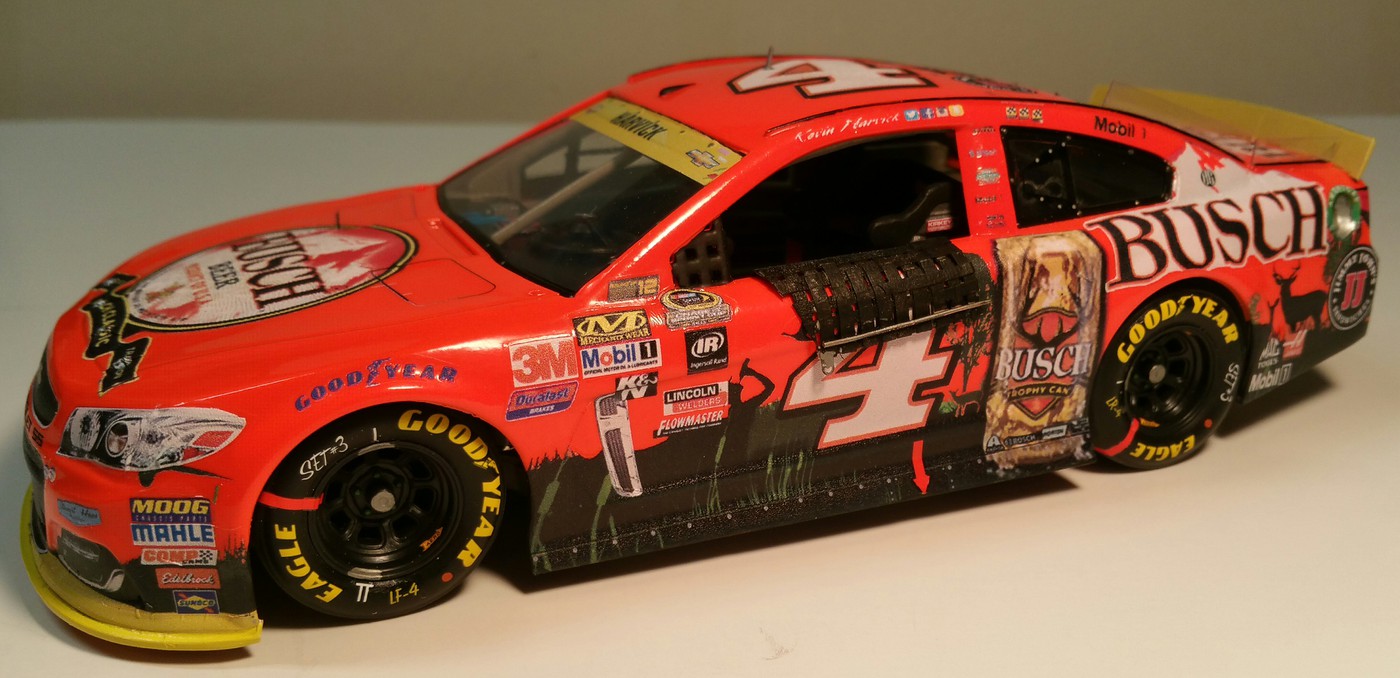
Here's one that I just completed. This is a curbside build of Kevin Harvick's 2016 Busch Hunting paint scheme from the Fall Charlotte race. The kit is Revell's recent curbside/snap Chevy SS kit with decals provided by Pattos Place out of Australia. I added a few extra details to this build like the front splitter, kicked out the drivers side lower skirt, lowered the stance, added the shark fin on the rear decklid and made my own window net. I also enhanced the interior with a few added details and added numerous tire and wheel decals for added detail.
-
1
-
-
Very nice build.
-
Here's another build that is definitely out of my comfort zone, being a car builder by nature.
My wife has always loved NASA space subjects, especially shuttles. In my travels I came across this Lindberg space shuttle kit for a very reasonable price. I'm not a sci-fi builder but I do know that this was not a very detailed model to build. Regardless, I picked it up and told her that one day I would build it for her. Well, that day came and as I got into it I decided that it needed to be represented a little bit better than how it builds from the kit.
I basically built it straight out of the box but using numerous research photos was able to apply some paint details and slight weathering to bring out more realism. I also created my own base and positioned it to replicate a launch. I scratchbuilt the flames using card stock rolled into cones and then added putty to try and look like the flames. Then I added cotton for the smoke. It's not perfect by any means but I think it still came out alright and my wife was very happy with the final outcome.
-
2
-
-
Stunning! That's one of the coolest looking and fiercest looking Mirages I've ever seen done. That's going to get a lot of attention wherever you take it. What a way to come back to the forums here....Congrats, and thanks for sharing!
GIL :smiley16:
Thanks Gil. The past 5 years I've been out of sync with modeling on a consistent basis as I've been an OTR truck driver. Now I'm back home and able to get back to building on a regular basis and I can also get back to attending some shows from time to time. Next up will be getting back to Jaxcon every year. See you in February.
-
1
-
-
Oh, and before anyone comments, I discovered that I put the front gear on backwards and corrected it after these photos were taken.
-
Haven't been here in forever. I think this is my first post in almost 4 years. I am primarily an automotive builder but have always loved military aircraft and the history behind the individual subjects. I do build aircraft from time to time and mainly stick to WWII era subjects but every once in a while I see something that sparks my interest and I pick it up, especially if it's a good bargain.
Many years ago I purchased an Aeromaster multi media kit of the Mirage 2000N in 1/72 scale. It came with a Heller kit along with resin cockpit and landing gear as well as photo-etch and Aeromaster decals. It was a good deal at a swap meet and looked like a pretty good challenge, especially for someone like myself that doesn't build aircraft all of the time.
I actually started this build over 7 years ago and got to a certain point in the build and set it aside. It has been sitting, collecting dust ever since. Well, finally I decided that it needed to be completed so two weeks ago I went back to it and here it is.
Also, mid build, I discovered Syhart decals and saw their Tiger Meet sheet for the Mirage and decided that it had to be done.
-
Thanks go out to Gil and all of the folks from IPMS First Coast as once again they put on a great show with awesome participation levels for the contest and the vendor area. The level of competition was also at a high level as it is every year. Lots of great builds to view and photograph and plenty of great deals to spend money on. Now if I can just keep my wife from finding out just how much money I really spent.
Here is a link to my Fotki album of pictures that I just finished loading. Over 400 pictures again this year. Of course, being an automotive guy that's what your going to get first.
http://public.fotki.com/1320wayne/model_shows/2013-model-shows/jaxcon-2013/
-
How'd you know I was a Mopar nut Gil? Great news. Just that much more to take pictures of.
-
You are correct in what you heard. Revell is indeed releasing a newly tooled 70 Hemi Cuda. Test shots have already been viewed at a large contest in New Jersey back in October of last year. The kit looks good and I'm sure that there will be good hockey stick stripes included. No set timetable as to when this will be available though.
-
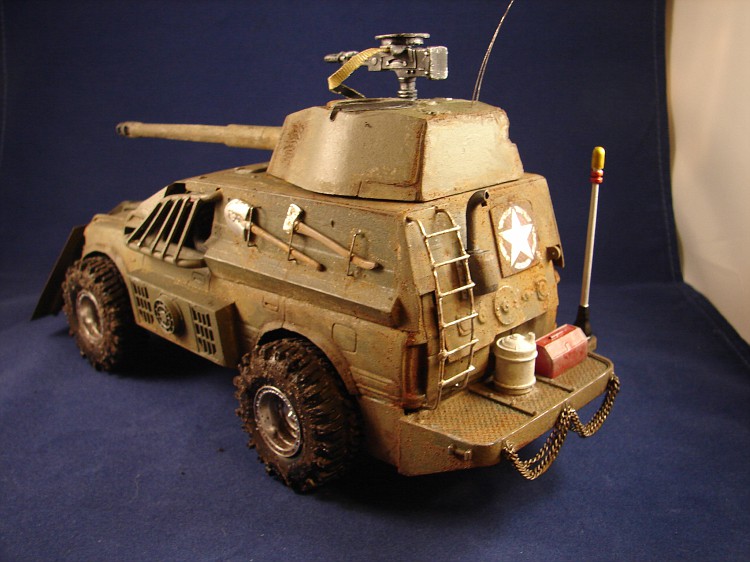
I'm not sure if this fits into the conversation or not but I recently completed a "post apocalyptic" creation using a normally gas powered vehicle and even though it was way too much fun to create (as there are no rules that had to be followed in order to "be right"), and the fact that the model does have an engine, there was no detailing done whatsoever on that part of the build. The hood was glued shut and no real accesable detail was done to the undercarraige as this was built primarily as what would be called a curbside model. Designed to be viewed/judged, from a distance, with no handling for scrutinization.
-
Mark, as you've obviously discovered already, the 70 and 71 Cuda models have many differences and cannot be built using one for the other. The "hockey stick" stripes that you speak of are for the 70 model. The 71 model graphics package would have been called a billboard as it covers a good portion of the rear quarter panels. Most kits, and their respective resissues, would have had either black or white billboards available in them. However, if you want to build something with a bit more flair to it, there is a seller on Ebay that offers 71 Cuda billboard decals in a muriad of colors, for many different callouts, I.E., 340, 440, Hemi, etc.. I'm not sure of the user name but if you do a search under automotive models for 71 Cuda decals your bound to find them. I've picked up at least two sets, one in red and one in blue, for a much different look.
-
Nice pictures Mark. I went there once when my wife and I lived in Oregon for six years. Lots of great aircraft but it's kind of an eerie feeling walking around that huge, cold, damp, dark blimp hanger.
-
All photos are loaded. Click on the link above to see the completed albums. Thanks for looking.
-
Gil, you know that I'll be there. You and your club always put on a great show with plenty of categories for one and all. Even us car guys never have any complaints. I might even finally plan my day accordingly so that I can volunteer to help with judging.
-
Here is a link to my 2012 Convention albums, broken down by build type. Being a car guy I am loading the automotive photos first. Please check back periodically as I took nearly 1,200 photos and it will take some time load them all.
http://public.fotki.com/1320wayne/model_shows/2012-shows/2012-ipms-national-/
-
Hello. My name is Wayne Stevens, JR. and I reside in Daytona Beach, FL, World Center of Speed. I have recently renewed my membership with IPMS and am new to this forum. I am primarily an automotive builder but also dabble in aircraft builds as well. I hope to be spending some time here viewing, learning and hopefully contributing.


'56 Ford F-100 "Demon II"
in Cars, Trucks, & Motorcycles
Posted
Very nice indeed. Superb finish and added detail. Love the flames.