TheKeeper Posted September 21, 2015 Report Share Posted September 21, 2015 (edited) I really enjoyed the MPC Gangbusters Collection. Here's a link to some pictures: http://postimg.org/gallery/m68ktvro/ If that doesn't work try this https://postimg.cc/gallery/m68ktvro/ I've been wanting to build this collection since its inception and now I've got some inspiration. Any clue why it did not place? Edited May 10, 2018 by TheKeeper Link to comment Share on other sites More sharing options...
dmorrissette Posted September 22, 2015 Report Share Posted September 22, 2015 No.. but I really liked it. DAve Link to comment Share on other sites More sharing options...
66Foxtrot Posted September 22, 2015 Report Share Posted September 22, 2015 Yeah, that was really cool..... Link to comment Share on other sites More sharing options...
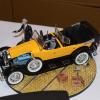
atlantaprops Posted September 22, 2015 Report Share Posted September 22, 2015 Thanks, all. I normally build airliners, but had built some of these as a kid (and played with them) and decided to build them again. It took a few years to collect them all, at shows, auctions, etc. Built all 5 and repeated a 6th as a police whiskey buster. I highly recommend them. They're fun! Link to comment Share on other sites More sharing options...
TheKeeper Posted September 24, 2015 Author Report Share Posted September 24, 2015 (edited) Great to hear from you Paul. I started the '28 Lincoln when I was kid but got a bunch of runs in the yellow and never finished it. I've collected a few editions over the years, including some restorable '32 Chevys, sadly the doors are missing from the truck. You obviously did proper research on the color schemes, I'll bet the beltlines on the Lincolns were arduous. I've avoided the MPC re-issues which are devoid of the Gangbuster parts and got the AMT editions circa '86 along with some originals. Now that I've seen your awesome display I'm ready to start. Any suggestions? Fine job, hope to see them again! Edited September 24, 2015 by TheKeeper Link to comment Share on other sites More sharing options...
atlantaprops Posted September 26, 2015 Report Share Posted September 26, 2015 The Chevy panel truck kit is the most rare and hardest to find. The '28 Lincoln is the easiest. Here are a few suggestions from my builds, which obviously got easier as my assembly line got going: 1) I spray painted the chassis and underside parts first with a rattle can of Testors flat black enamel. After assembling the chassis, I used a brush to touch it up where needed. Even though the kits allow you to build workable steering, I started gluing those fiddly parts after the first car. I varied turning them depending on the final stance. You will find that some of the chassis may end up slightly warped and will have to check that as you go along. Some of the kits already come in black plastic, but some were green and some white. 2) I hand painted and built the engine as I went and glued it to the completed chassis next. 3) Unless you leave them chrome, I spray painted the spoke wheel hubs, again with rattle can enamels. After letting them dry a few days, I assembled them with the wheels. I attached completed wheels to the chassis, but set aside the spares until after finishing the body. 4) After fine sanding to remove any blemishes, I sprayed the fenders, body and hood parts with a light gray primer. After fine sanding again, I sprayed the main color to the body, hood (and fire wall, if desired) with Testors rattle can enamels. But be careful. Spraying too much will create runs and too far away will cause the paint to orange peel. I found several, quick light passes worked best over a couple of days. I actually began painting the body and hood parts FIRST and worked on the chassis and wheels while the body cured for several days. I did have to lightly sand down a few run spots. On the cars with added color trim, I masked off those areas and either air brushed or hand brushed the second color, depending on how large the area was. 5) I sprayed the cabin interior and any convertible top sections with Testors rattle can flat colors. If you prefer a color that only comes in gloss, you can later overspray with a clear flat (like the armor builders). 6) After they thoroughly dried, I installed the interior before adding the complete fenders and body to the chassis. 7) Lastly, I added spare tires, grill, lights, trunk racks (and trunks, if desired), windshield and door handles. 8) I used clear drying white glue to install the clear windshield in its frame and headlight lenses in those fixtures. 9) Once finished, I used a medium sized brush to gently coat the gloss fenders, body and hood with Future Floor Wax (now a Pledge product, I believe). It also works to make the windshield, headlights and chrome parts really shine. 10) The figures were actually the most difficult thanks to poor fit and seams. I filled the seams with crazy glue and sanded them before painting. Where possible, I also painted separate arms, feet and heads before attaching them and then touched up those seams afterwards. I used varying lighter and darker shades on wrinkles and facial highlights for more realism (as in most figure painting). I brush painted gloss enamels then spray painted the completed figures with an overall clear flat spray. 11) I hand painted all the small weapons, booze and other accessories and glued them in place near the end. WARNING- These kits have many fit issues, so be sure to do a lot of test fitting before gluing (and in some places before painting). I suggest NOT gluing the steering wheels on until after locating and gluing any driver figure in place, if you want one. Otherwise, he won't fit with the wheel in the way. I also didn't glue the driver's arms in place until he was in place, to make sure they line up with the steering wheel. Then you'll have to carefully touch up and shoulder seams and paint AFTER the driver is in place. Paint ALL the extra arms because you may not know which ones work best until you position the driver and/or add weapons. These kits DO NOT COME WITH ANY BASES, but I added a variety of some cobblestone street bases from Tiger Werke to have some way of displaying the figures and gangster accessories. All of the items you see are from the kits except for the liquor barrels, jugs and axes in the police car whiskey buster diorama. A friend gave them to me from a Beverly Hillbillies truck kit, I believe. Good luck! Link to comment Share on other sites More sharing options...

Recommended Posts