Search the Community
Showing results for tags 'naval aviation'.
Found 12 results
-
My latest build is Hobbycraft's 1/48 T-33. I used Iliad Designs Naval T-Birds decal sheet to model a jet from Guided Missile Group One, used to control Regulus missile flights in the early 1960's. I replaced the very plain kit cockpit with one from True Details cockpit. The biggest accuracy issue seems to be the aft fuselage, which has a humped appearance just before the tail. The the rear canopy fairing where it meets the fuselage is the wrong shape as well. Otherwise, the kit looks enough like a T-33 to me to pass muster. The only options the kit gives you is to display the canopy open or closed, to add pylons and bombs beneath the wings, or to have nose guns visible or replaced with blank-off plates. (I used the bank-off plates, since the TV-2D I was modeling was unarmed.) The flaps are designed to be displayed down, but could probably be trimmed to fit closed. The tip tanks are (I think) the Misawa type, that hang under the wingtips. The jet I was building, though, had the longer Fletcher-type tanks that attached directly to the end of wingtips. Fortunately, I had a pair of Fletcher tanks in my spares box left over from an old Testor T-33 kit. I primed all the cockpit pieces with Tamiya white primer in a spray can, then airbrushed the cockpit Tamiya acrylic NATO Green. I added wire ejection pull handles to the seats, and painted them black with yellow stripes. The seats themselves were painted Tamiya acrylic NATO Black, with Model Master Acryl Insignia Red headrests, and Model Master Acryl Light Grey belts and harnesses. A fellow modeler told me that the Regulus missile drones were flown from the front cockpit of TV-2D’s, so I guesstimated and added a side control stick to the right console, along with a few additional instruments and boxes. I couldn’t find out if these jets retained the main control stick in the front cockpit, so I left it in. The kit instrument panels had better detail than the True Details panels, so I used them instead. I used Repli-Scale decal instruments for the instrument panels, and generic white stenciling for the headrests. The torsion links on the struts are solid, so I drilled them out for a more accurate appearance. The kit wheel wells are bare, so I added a few lines and cables from wire and styrene rod. Nothing major, just enough to busy up the wells some. I did replace the molded-on brake lines on the main gear with wire for a more scale appearance. The flaps have molded-on rib detail, but it’s not very pronounced. I left them as is, but added ribs and stringers to the upper flap wells, which had zero detail. I also added sheet styrene to the fuselage to cover huge holes visible when the flaps are lowered. The splitter plates, which are supposed to go inside the intakes, did not fit well all. I adjusted the fit by trimming part of the plate, but they still fit very poorly. For the tail position light, I drilled out a small hole at the base of the rudder, painted it silver inside, and added a drop of Krystal-Clear for the lens. The wingtip and tank lights were replaced with clear resin pieces, then colored with Tamiya Clear Red and Clear Green. I added a red anti-collision light under the center of the fuselage. I also used Krystal-Clear to make the two landing lights on the nose gear strut. In researching T-33’s for this project, I read that all T-33’s had a green-tinted center windscreen panel, so I used thinned Tamiya Clear Green to replicate this on the kit windscreen. The kit had no pitot probe, so I made one from a probe found in the spares box, bent and sanded to shape, and attached it under the nose. Finally, I added antennas for drone-controlling on the top and bottom of the nose. The tall blade antenna on top came from a 1/48 Hasegawa A-4 kit, and the smaller bottom antenna came from a 1/48 Hobbycraft A-4 kit. I used a sharpened mechanical pencil to lightly enhance the panel lines on the wings and tail. But otherwise, I kept weathering to a minimum.
- 6 replies
-
- 1
-

-
- Naval aviation
- TV-2D
- (and 2 more)
-
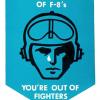
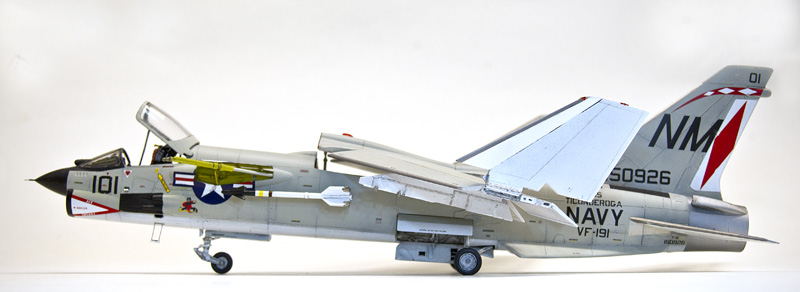
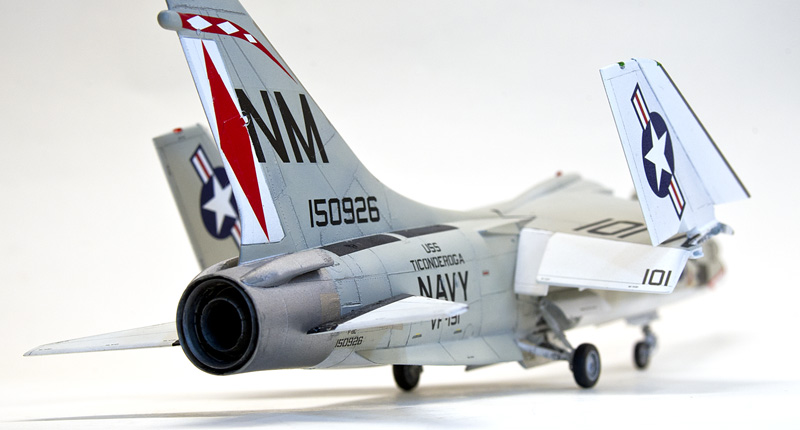
My latest effort is the old, but solid, Monogram 1/48 F-8E Crusader. This classic from Monogram features average fit, with (mostly) accurate outlines and shapes. It has raised panel lines, which also appear accurate compared to drawings and photos in my references. There is one glaring mistake: the entire nose, from aft of the canopy to the end of the nose, is one quarter inch (or one scale foot) too wide. This gives the windscreen and canopy a flattened appearance compared to the actual aircraft. Monogram made this same mistake on their 1/48 A-4 E/F Skyhawk kit. Another flaw, though one more easily remedied, is an incorrect seat. The kit seat looks more like one from a Tomcat or Intruder, rather than the correct Martin-Baker Mk F5 or F7 seat. The sit of the landing gear, especially the mains, is too low, and needs to be corrected. Inaccuracies aside, the kit can still be built into a fine and relatively accurate model with a little work, and some help from the spares box and aftermarket parts. But why bother, when the far superior Hasegawa Crusader is readily available? First, I’m a Crusader nut, and I bought several Monogram Crusaders before the Hasegawa kit was released. I had it in the stash, and every once and a while, I enjoy the challenge of updating and improving older kits. Second is cost, but not by much – you can get two or three Monogram/Revell Crusaders for the price of one Hasegawa kit. However, you must factor in the cost of a resin replacement seat, and if you raise the wing, the underwing bay (unless you scratchbuild it yourself) and replacement landing gear (again, unless you modify the kit gear yourself), and decals (the kit decals may be useable, but are old and very thick). By the time you purchase update sets, you may still be under the cost of a Hasegawa kit, but just barely. And you still have a kit with a nose that’s a scale foot too wide. Another reason I chose to build it is that I had already purchased the excellent Furball Aero Design sheet of MiG-killing Crusaders, and wanted to add another F-8 MiG-killer to my collection, so this was a slightly less expensive way to do so. Here’s a list of additions and modifications I made to the kit to bring it up to snuff: The kit cockpit needs replacement seat, but has a good insturment panel and side consoles. The area behind the seat, though, is void of any detail at all, so I used a resin cockpit from Black Box, which can be had for around $10 these days. But use the kit instrument panel, as it is more accurate for the F-8E. The bulkhead at the rear of the canopy was replaced – the kit piece is too thick and has raised lines, but the actual bulkhead was thin sheet metal with stamped indentations. I cut a thin piece of sheet plastic to shape, and carved in the grooves. The front windscreen was detailed with a grab handle, and a stand-by compass. I added rearview mirrors and a restraint strap to the canopy. Monogram didn’t provide an afterburner nozzle, so I created one from an old F-18 exhaust cone from the spares box. Before closing up the fuselage, I cut out the boarding steps. The afterburner cooling scoops were hollowed out for a more realistic appearance before attachment to the tail. I drilled out the small navigation lights on either side of the upper fin, painted them silver, and filled them with Krystal Klear. I also drilled out a hole for the refueling probe light on the left side just under the windscreen, filled it with a drop of Krystal Clear, and painted it with Tamiya Clear Red. The wingtip lights received the same treatment, with the starboard lights painted Tamiya Clear Green and the port lights Clear red. I removed the over-scale pitot probe and replaced it with a more accurate resin piece from Quickboost. The landing gear needs a lot of work. The nose gear strut is too thin – it should be almost twice as thick in diameter. I used the replacement metal gear from the old Cobra Company backdate set. But the nose gear strut is just a copy of the kit piece – I left it as is. I added a 1/4 inch thick spacer of scrap plastic to the top of the nose gear strut to give the model the characteristic nose up stance seen in most photos. I drilled out the lightening holes in the kit nose gear drag link, and added an actuating cylinder in the nose gear well. The main gear were replaced by the Cobra Company set as well, which does correct the squat stance of the kit gear. The wheel bays are pretty bare, so I busied them up with wire, styrene rod and bits of plastic scrap, including the prominent main fuel line in the starboard well. I wanted to build this jet with the distinctive variable incidence wing raised, which means the flaps and leading edge droops must be lowered. The kit makes no provision for raising the wing, so the underwing bay must be either scratchbuilt or an aftermarket set used. I used an old Cobra Company F-8 backdating set for the underwing bay and the separate flaps and droops, which must be cut away from the kit wing. The plastic used in the Monogram kit is soft, so this makes all the surgery a little easier. I used to think the under-wing bay was painted white, but Tom Weinel, a former F-8 pilot, informed me that this area was painted interior green. I painted the bay Tamiya NATO Green. The large diameter pipe that runs along the right side of the well, the heat exchanger cooling line, was painted Tamiya Flat Aluminum, and the the fuel filter red. Folding the wings presents a challenge. The kit has seperate wing tips, but there is zero detail at the fold joints, so all of it has to be scratch built. I used sections of styrene rod and wire for the fold joints, and photo-etched tie-down rings.. The Squadron/SignaI F-8 Crusader Walk Around book was an invaluable reference for this project, with a wealth of detail photos. The kit has the option to display the in-flight refueling probe extended, but again there is no detail in the probe well, and the probe itself has incorrect and missing details. I wanted to display the IFR probe extended, so virtually everything was replaced or scratchbuilt, using plastic strip and rod styrene, wire, scrap plastic pieces, and photo-etched pieces from an Eduard detail set. The tip of the probe is inaccurate, so I robbed a tip from an extra A-4 refueling probe in my spares box. The probe bay door was replaced with metal pieces from the Eduard set. The only kit piece I used was the forward half of the probe arm. A small data plate at the rear of the probe well was replicated with a small landing gear data plate decal from an F-18 sheet. The IFR probe and well were then painted Tamiya Yellow Green, which appears to be a good match for the yellow protective primer Vought used. F-8E’s often carried underwing pylons, so I decided to include them on the model. The Monogram pylons are simplified with soft details, so I used a pair left over from a Hasegawa F-8. The paint scheme was the standard Navy gull grey over white. I pre-shaded the model with Tamiya rubber black, then used Model Master acrylic Gull Grey for the topside color. The underside, the UHT’s (unit horizontal tail) and the upper and lower surfaces of the flaps and ailerons were sprayed Tamiya acrylic gloss white. To represent the Coroguard applied to all leading edges, I masked them off and sprayed them Tamiya Flat Aluminum, darkened a bit with Gunmetal. The raised panel lines were accentuated with a mechanical pencil. The markings presented another challenge. I wanted to portray F-8E BuNo 150926, the jet flown by LCDR John Nichols when he shot down a MiG-17 on July 9, 1968, when deployed aboard USS Ticonderoga with VF-191. Originally I intended to use leftover kit decals from a previously-built Hasegawa F-8, but when Furball Aero Design released their sheet of F-8 MiG-killers, I bought it and assumed it would have more accurate markings than the kit decals. My research indicates otherwise. The Furball sheet appears to be in error in two cases for this jet. I couldn’t find photos of this jet during the timeframe of the MiG-kill, but photos in the ’68 Ticonderoga cruise book show that other jets in the squadron during the time of the shootdown carried large black blast panels around the canons on each side of the nose, and also carried the Satan’s Kittens squadron insignia just behind the blast panels. The Hasegawa kit decals have these markings, but the Furball sheet doesn’t. Two emails to Furball inquiring about the discrepancy went unanswered, so I went with the best available evidence and included the markings. In addition, a cruise book photo showed the red bulkhead visible when the wing was raised carried the squadron number inside three white diamonds, rather than the ‘Satan’s Kittens’ logo that both sheets provide. I recreated this with small numbers and white diamond shapes raided from my decal catalog. Whew….it was a lot of work, but I enjoyed improving and modifying the Monogram Crusader. It will always be a favorite kit of mine, even though it has been outclassed by the newer and far superior Hasegawa kit. But with patience, research and some work, it can be used to build a fine model of this attractive and historic MiG-killing jet.

-
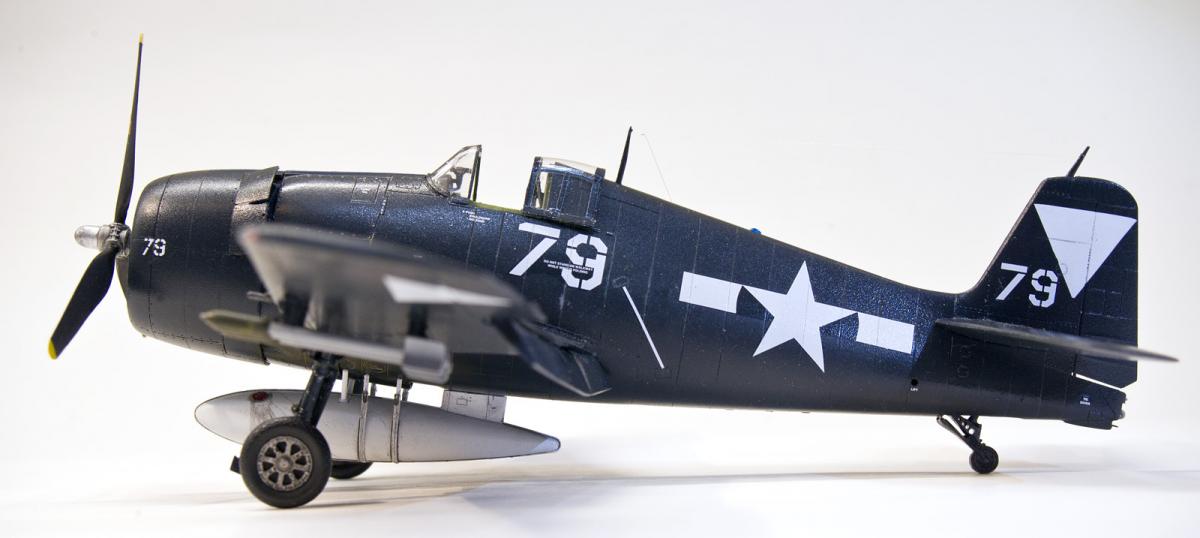
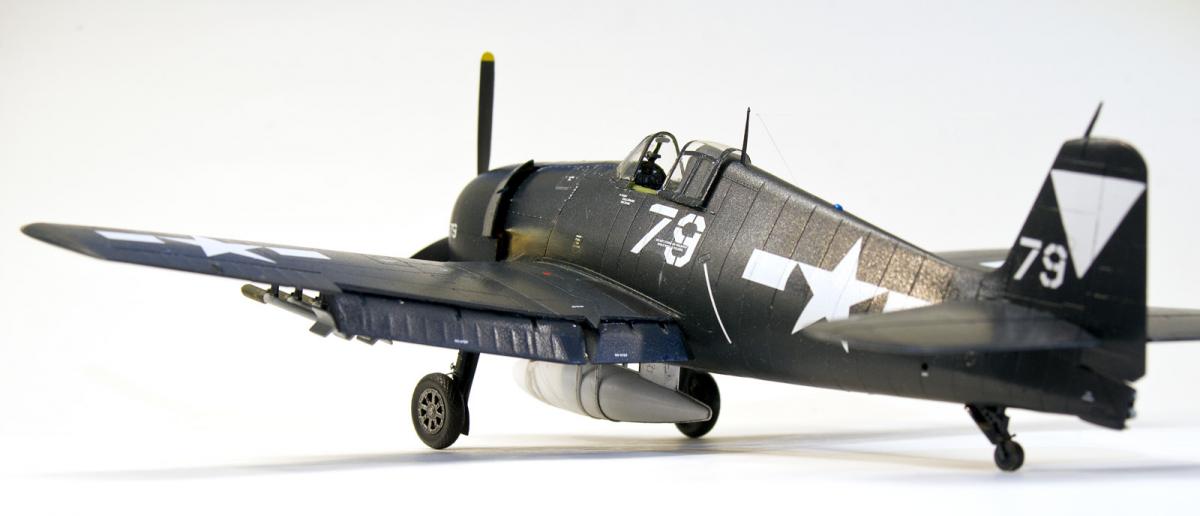
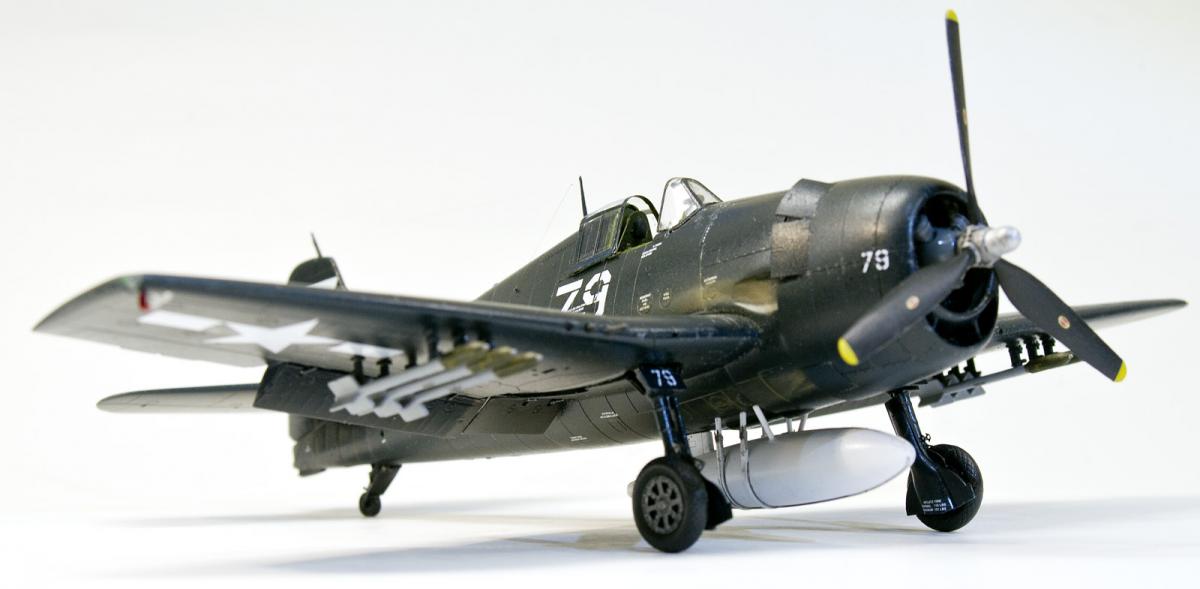
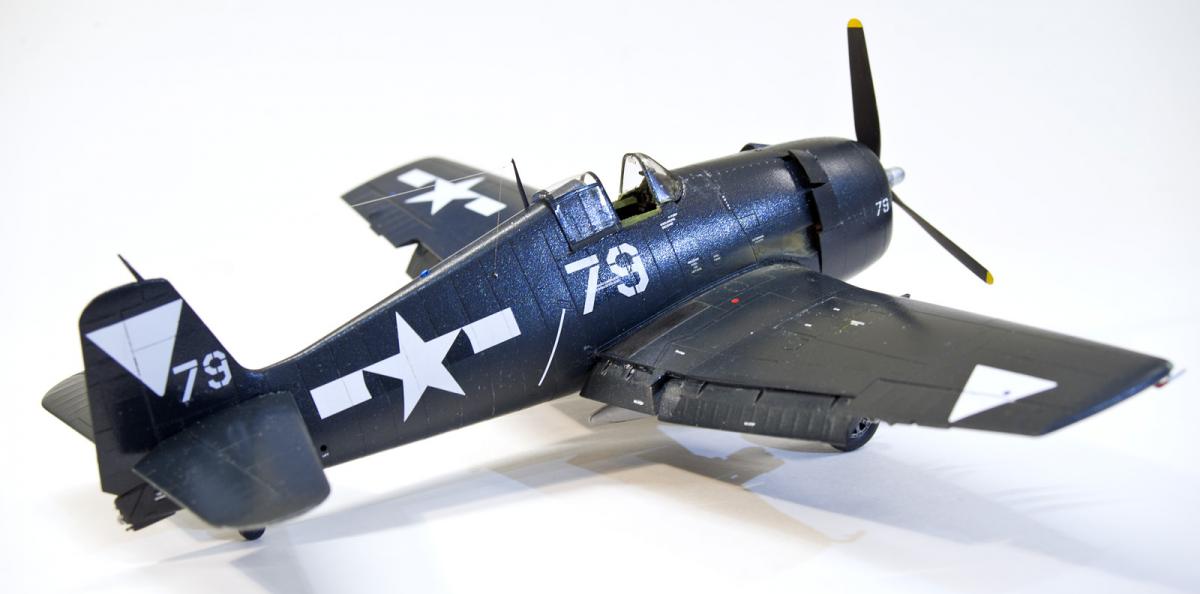
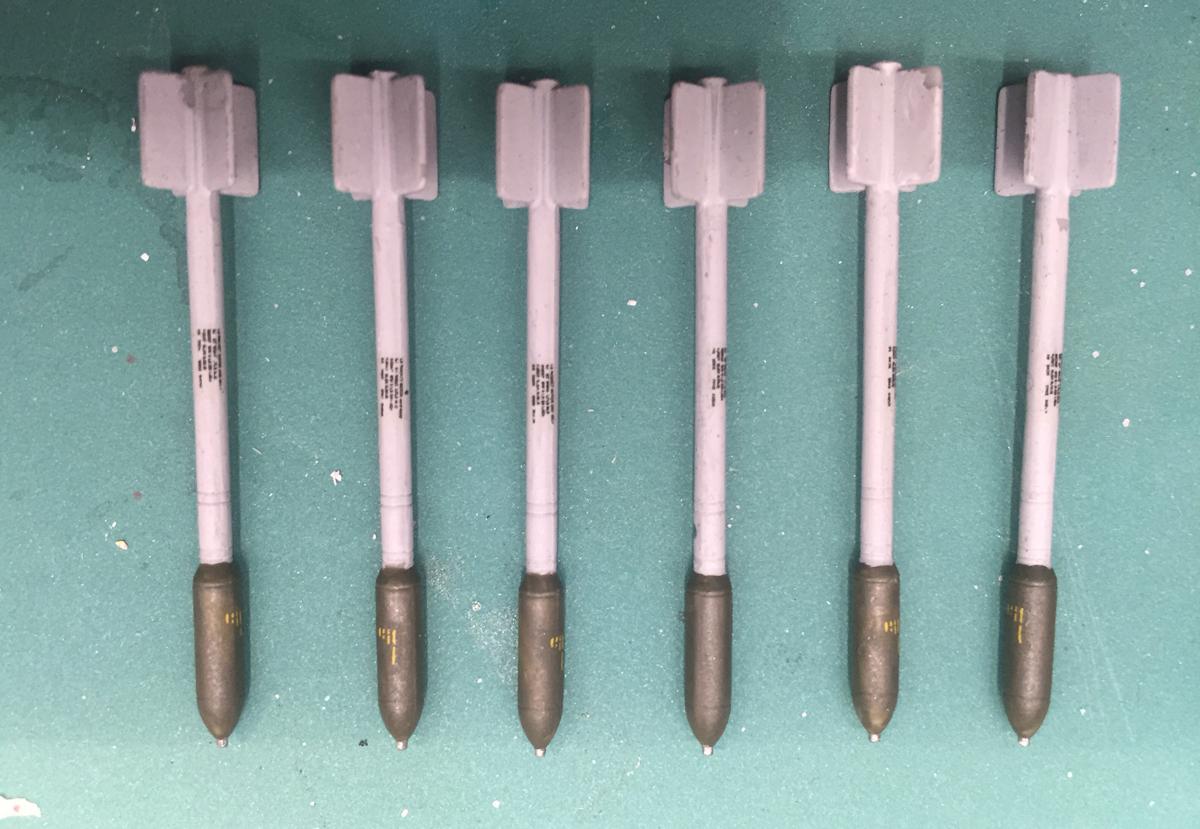
Here’s my latest effort, Eduard’s 1:48 scale F6F-5 Hellcat ‘Weekend Edition’ (which, ironically, took me six months to complete.) The Eduard series of 1:48 scale Hellcats were hailed as the best in scale when they were released in 2008. They are great kits, but after building one, I’m not convinced it’s the best. The kit features excellent surface detail and good-to-average parts fit. The wings and horizontal stabilizers are basically butt-joined to the fuselage, leading to some gaps along the left wing root, which I filled with Mr Surfacer 500. It also makes getting the correct dihedral a challenge. The kit has separate flaps and control surfaces, but has no provision to display them in any position but neutral. This just complicates the build, and creates extra seams that have to be filled and sanded. The Weekend Edition doesn’t have the photo-etched and resin parts that come in the standard kits. To dress up the cockpit, I bought a photo-etched cockpit set from Eduard, a replacement seat from Ultracast, and painted the cockpit Tamiya NATO green. Not technically the correct color, but it looks good to my eye. New wheels came from Ultracast, too, since the kit wheels are way too thin. In photos, you often see Hellcats in the overall gloss sea blue scheme with aluminum or even white wheel hubs, so to add a bit of color, I painted the hubs Model Master Metalizer Titanium, to give a weathered and oxidized metal effect. Unlike Hasegawa Hellcats, The Eduard kits come with two canopies, one designed to fit open, and another for a closed canopy – something all kit makers should do. The engine is good, but needs a wiring harness, which I added from thin copper wire. The kit prop is really poor, with soft or missing details, and blades that are too wide at the base. I replaced it with the excellent prop from an old Arii Hellcat. The drop tank in the Weekend Edition is poor as well, with no representation of the prominent vertical or horizontal seam, and without the bracing straps provided in the standard kit. The fit of the forward tank brace piece was really bad, needing filling and sanding. I used thin strip styrene to replicate bracing straps and the horizontal seam seen on the early version of the tank. I added a small round photo-etched piece from the spare parts box to represent the fuel tank filler cap. Again to add more color, I painted the tank white. Photos indicate this was seen often, too. You get two sets of HVAR’s – the earlier 2.5 inch rocket with a 5-inch warhead, and the later 5-inch rocket. Both sets are very well detailed, but the mounting pylons are molded with the rockets, and have little detail. I used the later version HVAR’s on my kit, with the warheads painted olive drab, and the rocket bodies painted light grey. I recently switched to acrylics, and boy, did I make a big mistake by not priming this kit before spraying the overall gloss sea blue paint scheme. While the Model Master paint sprayed beautifully once I arrived at the right thinning ratio, the finish was extremely delicate, and the paint would scratch off easily. I spent a few hours re-spraying scratches in the finish. Lesson learned – always use primer! I kept weathering to a minimum, since the aircraft I was modeling had been in combat just a few months. To recreate the ever-present exhaust stains, I used Tamiya Weathering Master sets, made for armor modelers. These powders, applied with a make-up type brush and pad, give me greater control than doing applying stains with an airbrush. I also think it's easier to blend the colors to get the effect you want with these sets. It's hard to see in the photos, but for the antenna wires, I used my wife's hair. I've never had much luck stretching sprue - it always broke, and never looked in scale. To my eye, hair is just right for antenna wires. The Eduard kit decals are outstanding, with walkways and full stenciling, and features a Hellcat from VF-20 deployed aboard USS Enterprise in October of 1944. I wanted something a little more eye-catching, so I chose the flamboyant checkerboard markings of VF-27 deployed aboard USS Independence in the final months of the war. VF-27 was famous for their earlier ‘cat-mouth’ squadron markings that adorned the cowls of their Hellcats. After their carrier, USS Princeton, was sunk, the squadron was sent stateside for a while, then re-deployed aboard USS Independence from June to August of 1945. The checkerboard tail and wing markings came from SuperScale sheet #481239. The checkerboard markings on the sheet are for VF-46, but VF-27 was deployed aboard Independence at the same time and used the same checkerboard carrier ID markings. The only difference was VF-46 used a single small plane number on the tails, and VF-27 used the more common large plane number beneath the cockpit, and also on the upper right wing. My main reference for the markings is an outstanding little booklet, ‘Markings of The Aces, Part 2, U.S. Navy, Book 1, by Richard Hill. It was published by Kookaburra Technical Publications in 1969, and provides a detailed look at the markings and combat record of VF-2, VF-9, VF-17, and VF-27. Once everything was decaled, I airbrushed a coat of Testor semigloss clear coat over the model, which I think has more scale accuracy than a gloss coat. Having built a Hasegawa and Eduard Hellcat back to back now, I can say that neither kit has a big advantage over the other. Both kits have great points, and weak ones, but I think I prefer the Hasegawa Hellcats for overall ease of construction.
-
Here’s my latest build, hot off the bench – Hasegawa’s 1:48 F6F-5, the “10,000th Hellcat” boxing. The Hasegawa kit can be made into a fine model straight from the box, but I made a few additions and corrections. Good points are excellent parts fit, accurate outline and shapes, finely recessed panel lines, early HVAR’s, and a drop tank. Drawbacks are a canopy that cannot be posed open, average cockpit detail, very basic wheel well detail and off-color decals. Anyone who has built a Hasegawa kit will be familiar with their baffling inability to print the color white on their decal sheets. On an all-blue airplane, the yellow-tinted markings will stand our starkly, so aftermarket decals are a must. Here are some of the corrections and additions I made during construction: I used a True Details cockpit, but soon regretted that decision. The parts fit poorly and threw off the fit of the fuselage, necessitating extra filling and sanding. I used two different Eduard photo-etched sets to add details, including a new instrument panel, rudder pedals, ignition wiring harness, landing gear and gear well details. Once assembled, the cockpit was painted Tamiya acrylic NATO Green. The “grin” of the Hasegawa chin scoop on the cowling is a little off, so I replaced it with a new cowl from Quickboost. Most people will be fine with the kit part, but the resin replacement also features opened cowl flaps, which gives a more animated look to the finished kit. I also added a small section of micro screen to the inside of the chin scoop. I cut away the flaps and replaced them in the lowered position with a CMK resin set. If you do this, you’ll need to scratch-build a well for the flaps, too. The kit machine gun barrels feature holes for cooling vents. They look good, but are incorrect. Gun barrels of F6F’s were in solid metal sleeves. I should have replaced them with styrene rod, but I got lazy and left them alone. For the wingtip navigation lights, I cut away the plastic, and replicated bulbs with small sections of thin styrene rod, painted red and green. I used Micro Krystal Kleer to make lenses for the lights. I made a towing bracket under the tail hook with a small section of wire bent to shape. To display the canopy open, I used a Squadron vac-formed canopy to replace the too-thick kit part, but used the kit windscreen. I painted the simple overall sea blue camouflage (FS #15042) with a Model Master spray can. Warming the can in a sink of warm water helped the paint to spray more evenly. Overall gloss sea blue aircraft can be rather drab, but there are ways to add color to this scheme. It was very common to see overall sea blue Hellcats sporting white drop tanks, holdovers from the previously used tri-color camouflage scheme, so that’s how I painted mine. Also, photos indicate that -5 Hellcats could have either sea blue, aluminum or sometimes white wheels. I painted my wheels Model Master Metalizer Steel, to replicate a weathered and oxidized aluminum look. The rockets were painted Tamiya Medium Grey, with Olive Drab warheads and Steel fuses. I finished the rockets with stencils from an old Pro Modeler decal sheet for US bombs and rockets. Finally, I used strands of my wife’s hair to rig the antenna wire. To recreate the exhaust stains on the fuselage, I used Tamiya Weathering Master sets. These are primarily used to weather tanks and armor models, but work well for aircraft exhaust stains. They are powders in different colors, and applied with a small make-up brush applicator. For the exhaust stains, I used soot, light sand, and rust. I’m not skilled enough with an airbrush to recreate these stains, but the weathering powders look good enough to me. The aircraft I was modeling was new and well-maintained, so I kept additional weathering to a minimum, with just minor paint chipping here and there. The aforementioned kit decals were not pure white, so I made my own geometric wing and tail carrier ID markings from a solid white decal sheet. The numbers, stencils and stars and bars came from various Super Scale sheets. The markings are for an F6F-5 from VBF-87, deployed aboard USS Ticonderoga from May through September of 1945. The squadron entered the war late, but did see combat while making strikes on the Japanese mainland during the final weeks of the war.
-
I used the terrific 1:48 scale Tamiya Wildcat kit to build “White 23”, the F4F-4 that Lt. Cdr. John Thatch flew on June 4, 1942 during the battle of Midway. Thatch flew this plane, BuNo 5093, when he shot down three Zeros in one of the classic fighter combats of World War II. On that mission he also used his famous “Thatch weave” defensive maneuver for the first time. This particular Wildcat has quite a history: before being assigned to Fighting Three and participating in the Midway battle, this plane was assigned to Fighting Eight attached to USS Hornet, and was aboard for Doolittle’s B-25 raid on Tokyo. Sadly, 5093 was pushed over the side during unsuccessful efforts to save USS Yorktown from sinking after being torpedoed at Midway. The Tamiya Wildcat is the best F4F in 1:48 scale, but the HobbyBoss Wildcats are a close second. I used no filler, as there were no fit issues at all. Careful parts preparation and assembly will result in near-perfect fit. I built the kit almost straight from the box, with just a few corrections and additions. The cockpit is kit stock, with the addition of True Details lap belts and shoulder harneses. Shoulder straps were added to navy aircraft just prior to the Midway battle. I did correct the kit cockpit floor – the kit piece is solid, when in fact the actual cockpit had no floor, just foot troughs on each side of the stick. I cut away the sides of the kit floor to more accurately represent this. I substituted the kit wheels with True Details resin examples. The tail wheel appears to be the larger pneumatic tire, rather that the smaller solid rubber tire used on carrier-based aircraft, but I didn’t correct it. I cut away and dropped the flaps, and added an antenna wire made from my wife’s hair. I also added a small whip antenna made of thin wire to the fuselage spine behind the cockpit. I used Model Master enamels to paint the USN Blue Gray topside color and the flat gull grey underside color. The decals came from a long-out-of-production Three Guys Replicas sheet, ‘First Team Wildcats’.
-
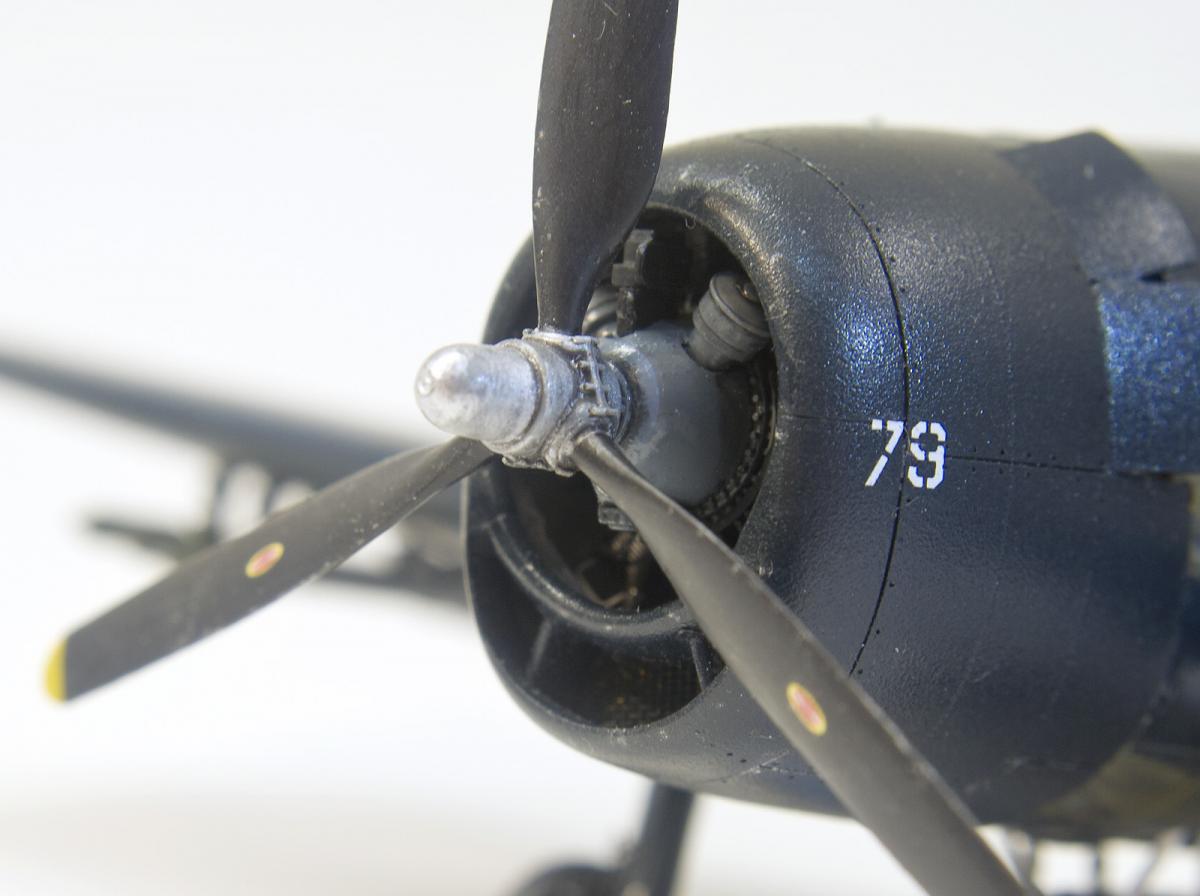
Here’s my rendition of the Arii 1:48 scale F4U-1A Corsair. Though this kit was originally released by Otaki in 1972 (!), it still builds into a nice Corsair. The good points are very accurate outline and shapes, finely recessed panel lines, and good parts fit. Drawbacks are a simple and inacurate cockpit, wheelwells and wheels, and an engine that doesen’t remotely resemble any engine ever used in any aircraft. Here’s how I upgraded the kit: I replaced the cartoonish engine with with a resin R-2800, updated the cockpit with Eduard photoetched insturment panel, seat and sidewall details, used seatbelts and wheels from True Details, and added a Falcon vacum-formed canopy I replaced the kit tail wheel with a more accurate-looking one from the spares box, and attached it at an angle for a more candid appearance. I also cut away the flaps and dropped them, added resin exhaust stacks from Ultracast, and added a small whip antenna to the fuselage spine. I couldn’t determine if this plane had the tail hook removed or not, so I left it on. VF-17’s Corsairs didn’t have the standard forward antenna mast, and photos indicate this aircraft had an unusual field-modified antenna. Based on photos, I built an antenna that runs fron the top if the vertical fin down to the tip of the right horizontal stabilizer. From there, it runs into the usual antenna lead-in on the right side of the fuselage, behind the cockpit. I don’t know for certain if it’s accurate, but that’s how I interpreted the antenna arrangment in photos. I used a Pasche VL airbrush to apply the three-toned camouflage scheme, though most photos of the actual aircraft indicate it was very weathered, with almost no distiction between the non-specular sea blue upper surfaces and the intermidiate blue sides. For markings, I used a SuperScale sheet to portray “White 29”, the plane flown by Lt. Ira Kepford of VF-17 while based at Ondonga, New Georgia, in the Solomon Islands in late 1943. I made a mistake in not placing the kill markings at the correct angle to the tape covering the seams of the forward fuselage cell. Finally, I used clear decal strips painted very light grey to replicate the six-inch-wide medical tape ground crews used to tape over the gunports to keep out coral dust and debris. VF-17 was the second navy squadron to be equipped with the Corsair, and the first to deploy aboard a carrier. Assigned briefly to USS Bunker Hill, the unit was soon transferred to the Solomon Islands to serve as a land-based squadron. In its two tours of duty in the Solomons, VF-17 was credited 156 aerial victories and produced 12 aces, the most of any squadron in the Navy when it completed its tour in 1944. Kepford was the U.S. Navy’s 6th highest ranking ace, with 16 victories and 8 probables.
-
Here’s my attempt at the 1:48 Accurate Miniatures Grumman F3F-1, and it’s built straight from the box. The only thing I added was the antenna wires. The kit is a real jewel – any flaws are mine alone. Accurate Miniatures was my favorite model company, and I really hate they went under. The kits they produced were – and still are – the best examples of their kind ever made. I finished it with kit decals to depict an F3F-1 from Fighting Four deployed aboard USS Ranger in 1937.
- 5 replies
-
- 1
-
-
- Naval aviation
- F3F-1
- (and 1 more)
-
Here’s another one of my collection of US Navy MiG-killers, a 1/48 Hasegawa F-8E Crusader. The Hasegawa F-8 is by far the best kit in this scale, but it does have issues. There are bumps on top of the wings at the wingfold joint that need to be removed, and you can't drop the flaps without serious sanding of the inside pieces to get them to clear the fuselage. The cockpit is really basic, especially for a kit of this price, and needs at least an aftermarket seat to dress things up. I tried to replicate a faded look by preshading with flat black over major panel lines, then lighlty applying the flat gull grey top color. I used the Aires cockpit and wheel well sets, and a Seamless Suckers intake – which had as many seems to fill as the kit intake. I also scratchbuilt a boarding ladder and steps, a standby compass, canopy restraint strap, and a few other cockpit details. The AIM-9B Sidewinders are from my spares box, and I used Quickboost afterburner scoops and pitot probe, and a few Eduard photoetched pieces. I finished it in the markings of ‘Nickel 103′, an F-8E from VF-211 when deployed aboard USS Hancock during an eventful Vietnam War cruise. Cmdr. Hal Marr piloted this jet when he shot down a MiG-17 on 12 June 1966, scoring the Crusader’s first kill of the Vietnam War.The decals are from an Eduard sheet of F-8 MiG-killers, though more accurate markings of this jet are available on the excellent Furball Designs sheet of F-8 MiG-killers. . All the resin aftermarket parts somehow threw off the fit – I had to do LOTS of filling and sanding on the fuselage seams, especially in the bottom of the fuselage, and I had to reposition the right main gear slightly to correct a list to starboard. I usually don’t use more than an aftermarket seat or cockpit, but I traded for this kit and it came with all these extra resin accessories, but they wound up causing lots of construction problems so I wouldn’t use them all again. Still, it was an enjoyable build of an attractive and historic aircraft.
-
Here’s another of my collection of F-8 Crusaders, this one the 1/48 Hasegawa kit. It represents a MiG-killing F-8E flown by one of the great characters of Naval Aviation, Commander Richard Bellinger, the commanding officer of VF-162. He's been described by those who knew him as being an open cockpit, scarf-in-the-wind type pilot in a jet age, a throw-back to an earlier time. I first read about him in Zalin Grant's excellent book, "Over The Beach', which describes the activities of the men of VF-162 and the squadrons' many Vietnam deployments aboard USS Oriskany. After being shot down himself, Bellinger devised a plan to ambush MiG's attempting to sneak up on A-4 Skyhawks after an air strike. On 10 October, 1966, with the help of his wingman, Lt. Dick Wyman (who later became a MiG-killer himself), he was able to avenge his shoot-down by bagging the Navy's first Mig-21 kill of the Vietnam War. Bellinger was was a hell-raiser, and could drink more than most thought humanly possible, but he had the respect of everyone aboard Oryskany. The captain overlooked Bellinger's sometimes-outrageous behavior because he knew his pilots would go through a wall for him. After reading 'Over The Beach', I committed myself to one day building his jet. The Hasegawa F-8 is the best 1/48 Crusader yet produced, but it’s not without its’ flaws. It’s more accurate and better detailed than the Monogram kit, but costs three times as much. The canopy and cockpit are much more accurately shaped than the Monogram kit, but the tops of the wings have raised bulges over the fold joints. These were not present on the real aircraft, so they must be sanded off. I used a Cutting Edge resin cockpit, and Aires resin gear wells. The Aires resin replacement gear wells are simply beautiful – extraordinarily detailed, and a drop-in fit. But I used the kit nose gear well, since its' resin replacement didn’t offer that much more improvement over the kit part. I scratch-built the boarding steps and ladder, and added brake and hydraulic lines to the main gear struts. In the cockpit, I added a flap handle and emergency canopy release to the instrument panel, a grab handle and standby compass on the windscreen bow, and added a canopy restraint strap, and used tissue to replicate the canvas cover over the hole in front of the gunsight. For markings, I used an Eduard sheet of Mig-killing Crusaders to portray 'Superheat 210'. As per my research, the jet carries a dissimilar weapons load of an AIM-9B and an AIM-9D, since there was a shortage of the newer sidewinders at that point in the war. It’s no contest winner, but it’s finished, and on the shelf!
-
Here’s my attempt at Hasegawa’s 1:48 A-4C Skyhawk. It’s the best-detailed 1:48 Skyhawk to date, though quite expensive and hard to find now. It’s an out-of-the-box build, except for the True Details ESCAPAC aftermarket seat I added. I managed to snap off the kit nosewheel during construction, so I re-attached it at an angle for a more candid appearance. I used a very light wash of thinned black paint to subtley highlight the exquisite surface detail of the kit. I used kit decals to finish it the markings of VA-15 Vallions while deployed aboard USS Forrestal on their 1969 Mediterranean crusie. The only major problem I had was trying to get the many small decals that make up the gold and black tail colors to settle down into all the nooks and crannies. I wound up getting a second set of kit decals to cover up several mistakes. For weapons, I wanted something different, so took a bit of artistic license and educated guess and loaded it with a B43 nuclear weapon on the centerline pylon. At the time (1969), A-4's were an important part of SIOP, or the Single Integrated Operational Plan, which was the was the United States' general plan for nuclear war from 1961 to 2003. In case of nuclear war, carriers stationed in the Med were tasked with destroying targets in Baltic and other Soviet satellite countries, and A-4's were to be used to deliver nuclear weapons to some of these targets. In fact, the US had a 'Broken Arrow' incident (loss of a nuclear weapon) during a 'special weapons' loading exercise off Japan on Dec. 5, 1965. An A-4E of VA-56 rolled off a deck-edge elevator into 16,000 feet of water about 80 miles off Okinawa. The pilot, plane and weapon were never recovered.
-
Here’s another 1/48 Monogram F-8E Crusader that I converted to a J model, which I have ugraded over time. I added an aftermarket seat, and an out-of-production flap/droop/underwing bay set by High Flight. I scribed additional panel lines lines on the leading edges to at least suggest the appearance of the extended droops of the J version. The UHT’s (unit horizontal tail) are larger on the J version, but I didn’t correct that (yet!). I also extended the main and nose gear struts to correct the squat stance of the kit parts. Later I scrounged parts from a Hasegawa Crusader kit for the ‘football’ ECM antenna on the tail. I added scrap plastic, rod and wire to busy up the gear wells, and scratch-built steps, boarding ladder, and canopy restraint strap. Monogram molded the tail pipe without an afterburner nozzle, so I used a cut-down section of an exhaust cone from the spares box to simulate it. I used rear view mirrors from an old Model Technologies (remember them?) set, and wire to replace the over-scale plastic pitot probe. The RBF flags are from Eduard, and the Sidewinders are from Hasegawa’s weapons set (which I need to replace with a later variant!). For markings, I used an old SuperScale sheet to depict the VF-211 CAG jet from USS Hancock circa 1972. The black walkways on the aft fuselage and tail were made using painted clear decal sheet. Monogram’s Crusader is a great value for the money, with the biggest innaccuracy being the cockpit. It's a few scale inches too wide, giving the canopy and windscreen a flattened appearance when compared to the actual jet. But with a little extra work, it can be buit into a fine model.
-
Here’s my attempt at backdating the 1/48 Monogram F-8E Crusader into a DF-8A drone controller/utility aircraft from the Naval Missile Center at Point Mugu, California during the late ’60′s-early ’70′s. The Crusader is my favorite aircraft, and while I had already built three F-8E's, I just had to have the earlier A version in my collection, and I've always been a fan of the Navy's colorful drone controller scheme. I started this project ten years ago, but shelved it when I realized how involved it really was, and that I lacked the proper references. I finally resumed the project last year. The kit used was the venerable Monogram 1/48 F-8E, and a few parts from the Cobra Company F-8 backdate set. Monogram’s Crusader makes a decent F-8E out of the box, but there are many minor - and a few major - changes you must make to any F-8E kit to backdate it to the earlier A version. I’m sure I missed some things, but here’s what I did: I removed and filled in the dorsal avionics ‘hump’ on top of the wing, filled in the holes and slots for the afterburner cooling scoops and ventral fins, installed a fuel dump vent on the rear port side, removed the ECM fairing from the vertical fin, and filled in the vents just behind the nose cone ( though I should have left the three vents on the right side!). The cockpit was a resin replacement from Black Box (but the insturment panel has a radar, which isn’t right for the A version). I used the main gear from the Cobra Company backdate set, along with the earlier spoked nose wheel. I also used the Cobra replacement nose cone, but heavily modified it. The hardest – and most crucial – part of the project was getting the shape of the earlier nose correct. Seen head-on, it’s more of a flattened oval. In profile, it’s almost flat on top, and slightly curved on the bottom. While nowhere near perfect, the shape I wound up with is at least in the ball park. The afterburner section on Monogram’s kit is incorrect – the burner nozzle is missing. I used a cut-down section of an old Monogram F-18 exhaust cone to replicate the nozzle. The antennas and pitot probe were taken from leftover parts from a Hasegawa A-4 Skyhawk kit. I also scratchbuilt the ejection face curtain pull rings, refueling probe light, tail hook, a canopy restraint strap, steps and a boarding ladder. I also added lots of plastic rod, scraps and wire to the main wheel wells to busy them up some. The decals came from several different sheets from my scrap box, with the Naval Missile Center markings courtesy of Mike Grant. Finally, many thanks to Tom Weinel, a former F-8 pilot, who provided me with the necessary information, photos and encouragement needed to do this conversion.