Search the Community
Showing results for tags 'F-8'.
Found 5 results
-
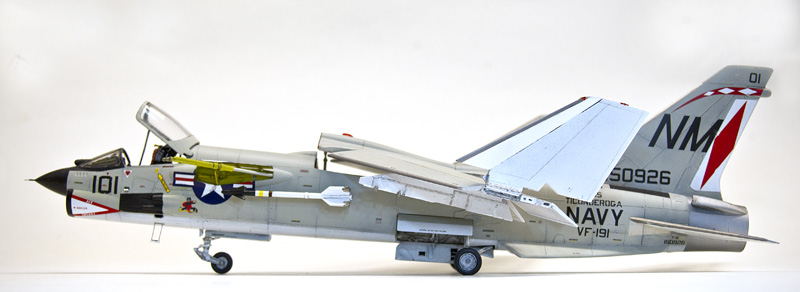
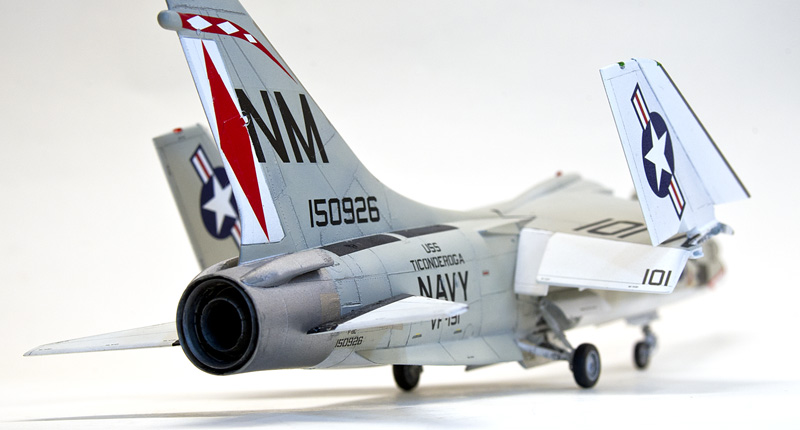
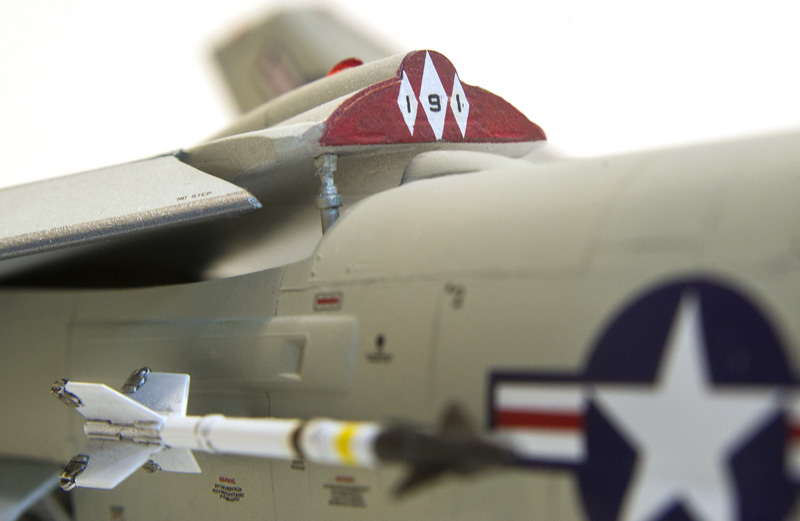
My latest effort is the old, but solid, Monogram 1/48 F-8E Crusader. This classic from Monogram features average fit, with (mostly) accurate outlines and shapes. It has raised panel lines, which also appear accurate compared to drawings and photos in my references. There is one glaring mistake: the entire nose, from aft of the canopy to the end of the nose, is one quarter inch (or one scale foot) too wide. This gives the windscreen and canopy a flattened appearance compared to the actual aircraft. Monogram made this same mistake on their 1/48 A-4 E/F Skyhawk kit. Another flaw, though one more easily remedied, is an incorrect seat. The kit seat looks more like one from a Tomcat or Intruder, rather than the correct Martin-Baker Mk F5 or F7 seat. The sit of the landing gear, especially the mains, is too low, and needs to be corrected. Inaccuracies aside, the kit can still be built into a fine and relatively accurate model with a little work, and some help from the spares box and aftermarket parts. But why bother, when the far superior Hasegawa Crusader is readily available? First, I’m a Crusader nut, and I bought several Monogram Crusaders before the Hasegawa kit was released. I had it in the stash, and every once and a while, I enjoy the challenge of updating and improving older kits. Second is cost, but not by much – you can get two or three Monogram/Revell Crusaders for the price of one Hasegawa kit. However, you must factor in the cost of a resin replacement seat, and if you raise the wing, the underwing bay (unless you scratchbuild it yourself) and replacement landing gear (again, unless you modify the kit gear yourself), and decals (the kit decals may be useable, but are old and very thick). By the time you purchase update sets, you may still be under the cost of a Hasegawa kit, but just barely. And you still have a kit with a nose that’s a scale foot too wide. Another reason I chose to build it is that I had already purchased the excellent Furball Aero Design sheet of MiG-killing Crusaders, and wanted to add another F-8 MiG-killer to my collection, so this was a slightly less expensive way to do so. Here’s a list of additions and modifications I made to the kit to bring it up to snuff: The kit cockpit needs replacement seat, but has a good insturment panel and side consoles. The area behind the seat, though, is void of any detail at all, so I used a resin cockpit from Black Box, which can be had for around $10 these days. But use the kit instrument panel, as it is more accurate for the F-8E. The bulkhead at the rear of the canopy was replaced – the kit piece is too thick and has raised lines, but the actual bulkhead was thin sheet metal with stamped indentations. I cut a thin piece of sheet plastic to shape, and carved in the grooves. The front windscreen was detailed with a grab handle, and a stand-by compass. I added rearview mirrors and a restraint strap to the canopy. Monogram didn’t provide an afterburner nozzle, so I created one from an old F-18 exhaust cone from the spares box. Before closing up the fuselage, I cut out the boarding steps. The afterburner cooling scoops were hollowed out for a more realistic appearance before attachment to the tail. I drilled out the small navigation lights on either side of the upper fin, painted them silver, and filled them with Krystal Klear. I also drilled out a hole for the refueling probe light on the left side just under the windscreen, filled it with a drop of Krystal Clear, and painted it with Tamiya Clear Red. The wingtip lights received the same treatment, with the starboard lights painted Tamiya Clear Green and the port lights Clear red. I removed the over-scale pitot probe and replaced it with a more accurate resin piece from Quickboost. The landing gear needs a lot of work. The nose gear strut is too thin – it should be almost twice as thick in diameter. I used the replacement metal gear from the old Cobra Company backdate set. But the nose gear strut is just a copy of the kit piece – I left it as is. I added a 1/4 inch thick spacer of scrap plastic to the top of the nose gear strut to give the model the characteristic nose up stance seen in most photos. I drilled out the lightening holes in the kit nose gear drag link, and added an actuating cylinder in the nose gear well. The main gear were replaced by the Cobra Company set as well, which does correct the squat stance of the kit gear. The wheel bays are pretty bare, so I busied them up with wire, styrene rod and bits of plastic scrap, including the prominent main fuel line in the starboard well. I wanted to build this jet with the distinctive variable incidence wing raised, which means the flaps and leading edge droops must be lowered. The kit makes no provision for raising the wing, so the underwing bay must be either scratchbuilt or an aftermarket set used. I used an old Cobra Company F-8 backdating set for the underwing bay and the separate flaps and droops, which must be cut away from the kit wing. The plastic used in the Monogram kit is soft, so this makes all the surgery a little easier. I used to think the under-wing bay was painted white, but Tom Weinel, a former F-8 pilot, informed me that this area was painted interior green. I painted the bay Tamiya NATO Green. The large diameter pipe that runs along the right side of the well, the heat exchanger cooling line, was painted Tamiya Flat Aluminum, and the the fuel filter red. Folding the wings presents a challenge. The kit has seperate wing tips, but there is zero detail at the fold joints, so all of it has to be scratch built. I used sections of styrene rod and wire for the fold joints, and photo-etched tie-down rings.. The Squadron/SignaI F-8 Crusader Walk Around book was an invaluable reference for this project, with a wealth of detail photos. The kit has the option to display the in-flight refueling probe extended, but again there is no detail in the probe well, and the probe itself has incorrect and missing details. I wanted to display the IFR probe extended, so virtually everything was replaced or scratchbuilt, using plastic strip and rod styrene, wire, scrap plastic pieces, and photo-etched pieces from an Eduard detail set. The tip of the probe is inaccurate, so I robbed a tip from an extra A-4 refueling probe in my spares box. The probe bay door was replaced with metal pieces from the Eduard set. The only kit piece I used was the forward half of the probe arm. A small data plate at the rear of the probe well was replicated with a small landing gear data plate decal from an F-18 sheet. The IFR probe and well were then painted Tamiya Yellow Green, which appears to be a good match for the yellow protective primer Vought used. F-8E’s often carried underwing pylons, so I decided to include them on the model. The Monogram pylons are simplified with soft details, so I used a pair left over from a Hasegawa F-8. The paint scheme was the standard Navy gull grey over white. I pre-shaded the model with Tamiya rubber black, then used Model Master acrylic Gull Grey for the topside color. The underside, the UHT’s (unit horizontal tail) and the upper and lower surfaces of the flaps and ailerons were sprayed Tamiya acrylic gloss white. To represent the Coroguard applied to all leading edges, I masked them off and sprayed them Tamiya Flat Aluminum, darkened a bit with Gunmetal. The raised panel lines were accentuated with a mechanical pencil. The markings presented another challenge. I wanted to portray F-8E BuNo 150926, the jet flown by LCDR John Nichols when he shot down a MiG-17 on July 9, 1968, when deployed aboard USS Ticonderoga with VF-191. Originally I intended to use leftover kit decals from a previously-built Hasegawa F-8, but when Furball Aero Design released their sheet of F-8 MiG-killers, I bought it and assumed it would have more accurate markings than the kit decals. My research indicates otherwise. The Furball sheet appears to be in error in two cases for this jet. I couldn’t find photos of this jet during the timeframe of the MiG-kill, but photos in the ’68 Ticonderoga cruise book show that other jets in the squadron during the time of the shootdown carried large black blast panels around the canons on each side of the nose, and also carried the Satan’s Kittens squadron insignia just behind the blast panels. The Hasegawa kit decals have these markings, but the Furball sheet doesn’t. Two emails to Furball inquiring about the discrepancy went unanswered, so I went with the best available evidence and included the markings. In addition, a cruise book photo showed the red bulkhead visible when the wing was raised carried the squadron number inside three white diamonds, rather than the ‘Satan’s Kittens’ logo that both sheets provide. I recreated this with small numbers and white diamond shapes raided from my decal catalog. Whew….it was a lot of work, but I enjoyed improving and modifying the Monogram Crusader. It will always be a favorite kit of mine, even though it has been outclassed by the newer and far superior Hasegawa kit. But with patience, research and some work, it can be used to build a fine model of this attractive and historic MiG-killing jet.

-
Here’s another one of my collection of US Navy MiG-killers, a 1/48 Hasegawa F-8E Crusader. The Hasegawa F-8 is by far the best kit in this scale, but it does have issues. There are bumps on top of the wings at the wingfold joint that need to be removed, and you can't drop the flaps without serious sanding of the inside pieces to get them to clear the fuselage. The cockpit is really basic, especially for a kit of this price, and needs at least an aftermarket seat to dress things up. I tried to replicate a faded look by preshading with flat black over major panel lines, then lighlty applying the flat gull grey top color. I used the Aires cockpit and wheel well sets, and a Seamless Suckers intake – which had as many seems to fill as the kit intake. I also scratchbuilt a boarding ladder and steps, a standby compass, canopy restraint strap, and a few other cockpit details. The AIM-9B Sidewinders are from my spares box, and I used Quickboost afterburner scoops and pitot probe, and a few Eduard photoetched pieces. I finished it in the markings of ‘Nickel 103′, an F-8E from VF-211 when deployed aboard USS Hancock during an eventful Vietnam War cruise. Cmdr. Hal Marr piloted this jet when he shot down a MiG-17 on 12 June 1966, scoring the Crusader’s first kill of the Vietnam War.The decals are from an Eduard sheet of F-8 MiG-killers, though more accurate markings of this jet are available on the excellent Furball Designs sheet of F-8 MiG-killers. . All the resin aftermarket parts somehow threw off the fit – I had to do LOTS of filling and sanding on the fuselage seams, especially in the bottom of the fuselage, and I had to reposition the right main gear slightly to correct a list to starboard. I usually don’t use more than an aftermarket seat or cockpit, but I traded for this kit and it came with all these extra resin accessories, but they wound up causing lots of construction problems so I wouldn’t use them all again. Still, it was an enjoyable build of an attractive and historic aircraft.
-
Here’s another of my collection of F-8 Crusaders, this one the 1/48 Hasegawa kit. It represents a MiG-killing F-8E flown by one of the great characters of Naval Aviation, Commander Richard Bellinger, the commanding officer of VF-162. He's been described by those who knew him as being an open cockpit, scarf-in-the-wind type pilot in a jet age, a throw-back to an earlier time. I first read about him in Zalin Grant's excellent book, "Over The Beach', which describes the activities of the men of VF-162 and the squadrons' many Vietnam deployments aboard USS Oriskany. After being shot down himself, Bellinger devised a plan to ambush MiG's attempting to sneak up on A-4 Skyhawks after an air strike. On 10 October, 1966, with the help of his wingman, Lt. Dick Wyman (who later became a MiG-killer himself), he was able to avenge his shoot-down by bagging the Navy's first Mig-21 kill of the Vietnam War. Bellinger was was a hell-raiser, and could drink more than most thought humanly possible, but he had the respect of everyone aboard Oryskany. The captain overlooked Bellinger's sometimes-outrageous behavior because he knew his pilots would go through a wall for him. After reading 'Over The Beach', I committed myself to one day building his jet. The Hasegawa F-8 is the best 1/48 Crusader yet produced, but it’s not without its’ flaws. It’s more accurate and better detailed than the Monogram kit, but costs three times as much. The canopy and cockpit are much more accurately shaped than the Monogram kit, but the tops of the wings have raised bulges over the fold joints. These were not present on the real aircraft, so they must be sanded off. I used a Cutting Edge resin cockpit, and Aires resin gear wells. The Aires resin replacement gear wells are simply beautiful – extraordinarily detailed, and a drop-in fit. But I used the kit nose gear well, since its' resin replacement didn’t offer that much more improvement over the kit part. I scratch-built the boarding steps and ladder, and added brake and hydraulic lines to the main gear struts. In the cockpit, I added a flap handle and emergency canopy release to the instrument panel, a grab handle and standby compass on the windscreen bow, and added a canopy restraint strap, and used tissue to replicate the canvas cover over the hole in front of the gunsight. For markings, I used an Eduard sheet of Mig-killing Crusaders to portray 'Superheat 210'. As per my research, the jet carries a dissimilar weapons load of an AIM-9B and an AIM-9D, since there was a shortage of the newer sidewinders at that point in the war. It’s no contest winner, but it’s finished, and on the shelf!
-
Here’s another 1/48 Monogram F-8E Crusader that I converted to a J model, which I have ugraded over time. I added an aftermarket seat, and an out-of-production flap/droop/underwing bay set by High Flight. I scribed additional panel lines lines on the leading edges to at least suggest the appearance of the extended droops of the J version. The UHT’s (unit horizontal tail) are larger on the J version, but I didn’t correct that (yet!). I also extended the main and nose gear struts to correct the squat stance of the kit parts. Later I scrounged parts from a Hasegawa Crusader kit for the ‘football’ ECM antenna on the tail. I added scrap plastic, rod and wire to busy up the gear wells, and scratch-built steps, boarding ladder, and canopy restraint strap. Monogram molded the tail pipe without an afterburner nozzle, so I used a cut-down section of an exhaust cone from the spares box to simulate it. I used rear view mirrors from an old Model Technologies (remember them?) set, and wire to replace the over-scale plastic pitot probe. The RBF flags are from Eduard, and the Sidewinders are from Hasegawa’s weapons set (which I need to replace with a later variant!). For markings, I used an old SuperScale sheet to depict the VF-211 CAG jet from USS Hancock circa 1972. The black walkways on the aft fuselage and tail were made using painted clear decal sheet. Monogram’s Crusader is a great value for the money, with the biggest innaccuracy being the cockpit. It's a few scale inches too wide, giving the canopy and windscreen a flattened appearance when compared to the actual jet. But with a little extra work, it can be buit into a fine model.
-
Here’s my attempt at backdating the 1/48 Monogram F-8E Crusader into a DF-8A drone controller/utility aircraft from the Naval Missile Center at Point Mugu, California during the late ’60′s-early ’70′s. The Crusader is my favorite aircraft, and while I had already built three F-8E's, I just had to have the earlier A version in my collection, and I've always been a fan of the Navy's colorful drone controller scheme. I started this project ten years ago, but shelved it when I realized how involved it really was, and that I lacked the proper references. I finally resumed the project last year. The kit used was the venerable Monogram 1/48 F-8E, and a few parts from the Cobra Company F-8 backdate set. Monogram’s Crusader makes a decent F-8E out of the box, but there are many minor - and a few major - changes you must make to any F-8E kit to backdate it to the earlier A version. I’m sure I missed some things, but here’s what I did: I removed and filled in the dorsal avionics ‘hump’ on top of the wing, filled in the holes and slots for the afterburner cooling scoops and ventral fins, installed a fuel dump vent on the rear port side, removed the ECM fairing from the vertical fin, and filled in the vents just behind the nose cone ( though I should have left the three vents on the right side!). The cockpit was a resin replacement from Black Box (but the insturment panel has a radar, which isn’t right for the A version). I used the main gear from the Cobra Company backdate set, along with the earlier spoked nose wheel. I also used the Cobra replacement nose cone, but heavily modified it. The hardest – and most crucial – part of the project was getting the shape of the earlier nose correct. Seen head-on, it’s more of a flattened oval. In profile, it’s almost flat on top, and slightly curved on the bottom. While nowhere near perfect, the shape I wound up with is at least in the ball park. The afterburner section on Monogram’s kit is incorrect – the burner nozzle is missing. I used a cut-down section of an old Monogram F-18 exhaust cone to replicate the nozzle. The antennas and pitot probe were taken from leftover parts from a Hasegawa A-4 Skyhawk kit. I also scratchbuilt the ejection face curtain pull rings, refueling probe light, tail hook, a canopy restraint strap, steps and a boarding ladder. I also added lots of plastic rod, scraps and wire to the main wheel wells to busy them up some. The decals came from several different sheets from my scrap box, with the Naval Missile Center markings courtesy of Mike Grant. Finally, many thanks to Tom Weinel, a former F-8 pilot, who provided me with the necessary information, photos and encouragement needed to do this conversion.