


Roktman
-
Posts
947 -
Joined
-
Last visited
-
Days Won
70
Content Type
Profiles
Forums
Events
Posts posted by Roktman
-
-
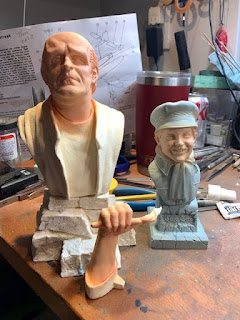
Looking for kits to start the year (besides the Skystreak) I found Mark Warthling's Pestilence Labs Monster from Young Frankenstein, and John Dennett's Tiny Tim. I guess I want to get a head start of next Christmas. But he's for a separate post.

First thing to decide is what color was the Monster. Fortunately the movie being filmed B&W on purpose, and there were plenty of color images available. Where the box are shows a blue-green. He's definitely a blue.
One dilemma I always have for myself is should I paint him up as if the character is real, or as an actor in makeup. I usually go for the former, but this time I went for the later. I got out my flesh triad and went to work.
The blue went over the skin tones. I actually muffed up at this point putting too much blue on, and eliminating all the skin tone. I tried to save it my using my lightest skin ton as the highlight. Worked fairly well.
Then it was time to paint up the clothes. His shirt was a black, and the jacket was a brown. The stone was was painted with 3 colors to add a little extra color to the model.
The kit comes with a broken mug from his scene with the hermit. I was lucky enough to find this screen grab, as I thought I noticed a design on the mug while rewatching the movie. I tried my best to copy it.
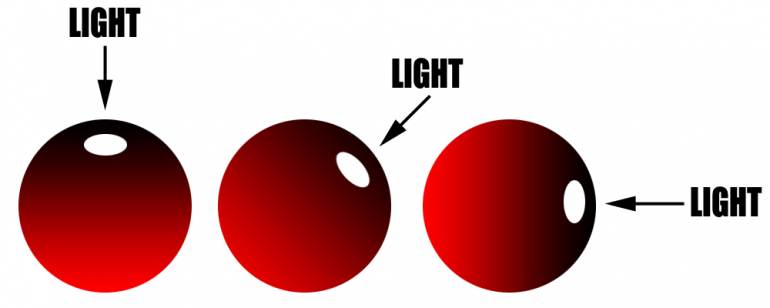
Almost done I tackled the fire, and is my typical fire recipe. Remember that fire has to be painted backwards from the usual Base color, shadow, highlight. The lightest (hottest) color appears closest to the source of fuel - his finger in this case.
The last thing was his eyes. Looking up Peter Boyle's eyes, according to a few statistic websites, I was surprised to find out that his eye color is black! Having a pupil show up against that would be a problem. So I made the irises a dark gray. I also chose the eyes down as if he's pondering *whats happening to my thumb* look. A little gloss over the eyes, and I was done. Thanks for looking.
-
 3
3
-
-
-
I just happened to look up Anigrand's site for some info on a kit I'm building. While their catalog is still there, most of the latest updates were '18 or '19 depending on the page. I realize the troubles in Hong Kong, but kind of surprised that no one has written anything about them. Any info or gossip would be welcomed. I hope they're just laying low and haven't quit.
-
Very cool models, and extra points for getting a young'un interested!! 😁
-
Two thumbs up. Awesome stuff! 👍👍
-
All beautiful models! Love to see aircraft built in the Scale of Kings! 😉
-
A tremendous year. Excellent builds!
-
Excellent work - all top notch models!
-
1
-
-
Thanks, guys! :)
-
16 hours ago, Mark Deliduka said:
They may not be many, but your quality makes them a magnificent end of year accomplishment! Brilliant work Kevin!
Thank you, sir! 🙂
-
Each year I put together a little look back. I didn't get as much done as in previous years, but TIA for having a look.
Expand build log on my blog - kevtk.blogspot.com
-
I'm calling it close for this year's Christmas model. It's Bob Crachit from Christmas Carol sculpted by John Dennett's MoonDevil Studio. A typically nice kit in 1/5 scale. It's 2 parts of purplish resin - the bust and the base. As with the Scrooge bust from a few years ago, it's based on the 1951 film.
Since the film was done in B&W, I had to look fro movies posters to see how the characters were imagined. I found two images of Bob - one with a blue tie/scarf, and one with red. Thinking there's nothing Christmas-sy about blue, I went with the red one. Plus the red tie sort of ties in with Scrooge's red scarf.
As usual I started off with the face. All images show him fair skinned with dark hair so here we go. Besides the red tie, I'm planning for a white shirt, green vest and a brown jacket, with hopefully some texture on it to make it look tweed. We'll see about that. But that's for next time.
I started out this session by painting the hair. On TV it shows up very dark. I hit it with the darkest brown I had, Then highlighted it when dry. Ugh. Too light. Then 3 coast of Citadel's Nuln Oil got it back to a decently dark color.
For the clothes, I had the colors I wanted picked out - White shirt, red tie, green vest with brass button, and black piping, and then a brown jacket. It went along well. for the vest I added a little design in a light green and ten went a little lighter for the 2n'd highlight. The jacket I decided to make a tweed jacket. A dark brown was the base coat. A lighter brown stippled with one of my ruined brushes started the tweed look. Finally, I used V's English Uniform, which is a lighter brown but with a lot of green in it was stippled on and this gave me the tweed color I was used to seeing. Only problem was that it dried a satin. I found a bottle of Anti Shine that The Army Painter put out and it dulled the jacket down quite a bit.
I'm still trying to get my clear coats straight. When I spray gloss, I want gloss. When I was matte - I want completely flat - not almost satin, not even egg shell. I want flat. Any discoveries will be reported.
A simple gray stone base was painted with a white cut out and Bob's name in red. To finish it off, A let it snow on the base. Thanks for looking.
-
3
-
-
3 hours ago, Stikpusher said:
Every time I come across Bossk stuff, I think of this Robot Chicken clip… 🤣
LMAO!
-
23 hours ago, Mark Deliduka said:
That is magnificent! Way to go man!
I did know who Bossk was, I just didn't know the name of his ship. That thing rocks! It also looks just like something a lizard man would be flying....
Thanks!
Eh, you can never be too sure. 😉
-
Nice work!
-
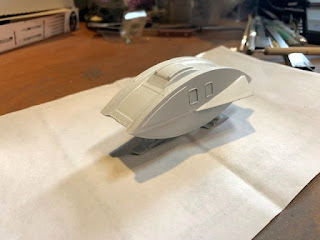
For those that looked at the title and when "Huh?" If you remember the line up of bounty hunters at one point in The Empire Strikes Back, the one that looked like the Lizard Man - that's Bossk. In the books and comics he had a starship that was a converted freighter. JPG Models has made the spaceship in 1:144 scale resin.
It's a very nice kit and yet another from JPG where you could shake the box and pour the completed model out. In the comics it appears as a brown rusty looking vehicle. With so many large open space, I took advantage and used Aztek Dummy's Basic Plating Masks to "busy it up." After that a mist coat to settle the colors down a bit, decals and some weather and it was done. Thanks for looking.
Even the underside had lots of details...
-
15 hours ago, EmpireOfGhosts said:
Love this.
Though I would say that the base needs some embellishment, like the Italian flag or propaganda poster. That would really make it popnks Jeremy! Being fixated on not getting the Italian soldiers in the correct scale, I never thought about other items to fill in the scene. Now you got me thinking... 😉
-
Thanks!
Yeah, give the windows a shot. The mini guys do it with a paint brush, but super easy if you have an airbrush. Just use lo pressure so you can’t easily over do it. 👍🏼 -
23 hours ago, dmorrissette said:
Very nice. Always liked the kit and you made it shine
Dave
Thanks very much, Dave. :)
-
On 11/11/2021 at 1:43 PM, Mark Deliduka said:
Oh man that is fantastic! Loved the movie too. Your suggestion for the windows is brilliant.
Thanks Duke! The idea actually came from the mini modelers who do the vehicles. Almost 100% of them have solid windows, so there are a few ideas how to create that reflection that it *may* be a transparent window. The one technique I chose was sorta like how they paint jewels -
I also liked this idea too, with a simple light up top - -
-
1
-
-
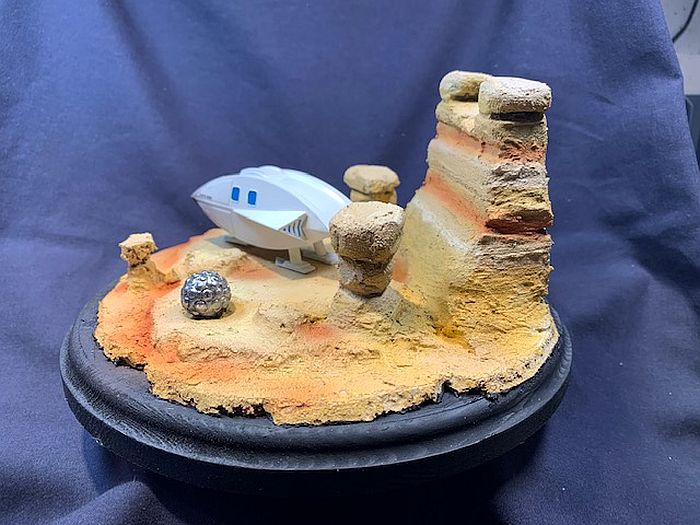
JPG's model is 1:72 scale and comes in 16 well casted white resin parts.
The only real hiccup I had was the landing gear. They are at an angle, but to my eyes the angle was so slight I couldn't really make it out. trying to fix one, I snapped it, but thankfully my little collection of styrene rod had the correct size.
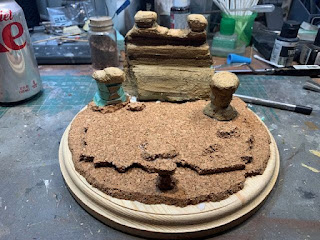
Giving the build a break, I wanted to make a little vignette representing the alien planet or Goblin Valley UT. I had generic "science" looking figures. But when it came time to find them, they were no where to be seen. 😞 So my vignette will just be the ship. The base was some carved foam, the base was a Michaels 6" round plaque with some torn cork sheet on it, and then some Vallejo Ground paste (or whatever it's called). 😉
Next up was painting the windows. I saw a tutorial about painting windows once and it involved creating a gradient where the darkest color was up top and it got lighter toward the bottom I airbrushed some MIG NASA blue after a bit of masking, and then added a few drops of the darkest blue I had to the cup, and just shot the upper left corner. It worked out pretty well.
Then came the decals. They looked pretty poor as they weren't solid. But once down on the craft, they looked fine.
And just like that I was finished. Thanks for looking.
-
2
-
-
I was ready to call this finished the other day. I took pics and when uploading the to my PC there was something missing. I never added in her eyebrows. I went up to my hobby room, and I gotta be honest and say those two thin lines were the scariest paint stokes for me to date. The model show the scantest line where they go, and even when I drew them in with pencil first - it was still nerve wracking.
Whew she's done, and this completes my BPMS Pledge for 2021. Thanks for looking.
https://1.bp.blogspot.com/-E-7-_2qqQ1c/YY07ucxoHGI/AAAAAAAAGrc
-
3
-
-
Back at the hobby desk, and despite not getting as far as I wanted I did make some progress. I finished the painting on the film cans and attached it to a fairly wide Warhammer round base. I feel it has a little more stability that way. Marlene's body is just sitting there, for now, to see how it looks.
I took another look at the face, and added another layer with some pale flesh. I also did my black eye base, and started her hair. Just holding the head and hat together to see how it looks. I should finish it up the next session. Check back and thanks for looking.
-
On 10/28/2021 at 9:32 PM, Dick Montgomery said:
Can't see the eyes very well ("see" what I did there?) but it looks good to me!
Hehe Dick. Thanks. You're right, here you go. The irises look too big to me, almost like anime eyes. Will redo soon.


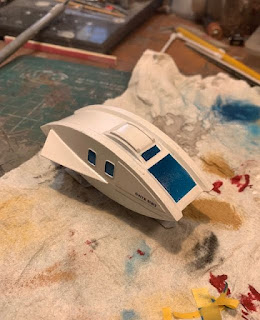
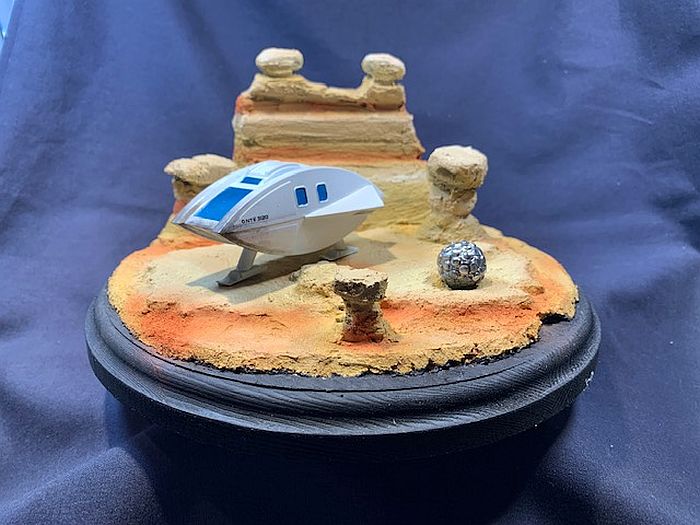
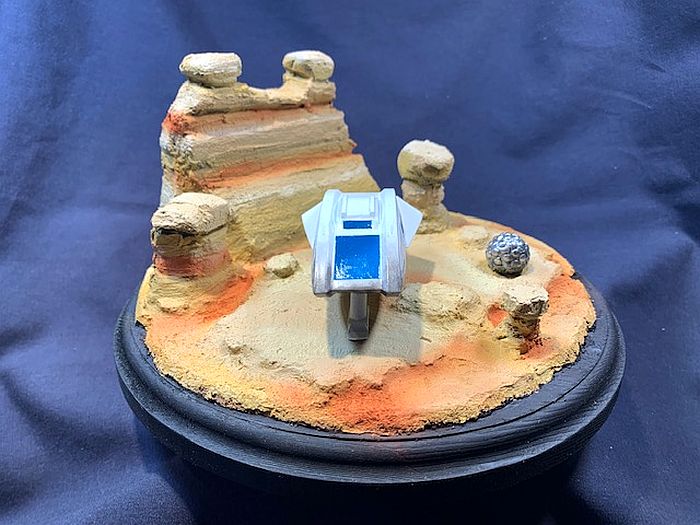


JPG Galaxy Quest Shuttle
in Space, Sci-Fi & Fantasy
Posted
Thanks guys! Haha Without the translater it was Gor-ignak. hehe Another possible model with some foam and a hot wire cutter. 😉