


Roktman
-
Posts
947 -
Joined
-
Last visited
-
Days Won
70
Content Type
Profiles
Forums
Events
Posts posted by Roktman
-
-
Besides my love of sci-fi and horror movies and their models, I also have a fondness for X-Plane group of aircraft. This includes the planes categorized as Luft '46 planes.
But both the x-planes and Luft '46 has to be looking "spacey" for me to build the model. If it just looks like another WW2 plane, well then, I'll let someone else build it.The P.170 is one of the aircraft designed in 1942. Although still rather odd-looking, the BV P.170 had a symmetrical basic structure unlike other Blohm & Voss projects of the time. The fuselage was cylindrical with the central engine located at the front end and the cockpit at the back end. The other two engines were located at both ends of the constant chord wing and their propellers turned in opposite directions.
This plane was based on the Nazi propaganda concept for a Schnellbomber, a bomber so fast that it would be far faster than any enemy fighter aircraft threatening it. Therefore, providing it with defensive armament was deemed superfluous. Eventually, owing to other war-related priorities, as well as the new jet possibilities, the BV P.170 did not go into production.
The model came from Planet Models, and is a very nice resin kit -
The parts are in separate sections of a poly bag and while there is some flash. It's not as bad as some other short run kits. Where the kit falls short is in the instructions, especially showing exact parts locations, etc... I found this out almost right away while locating the radioman/bombardier seat location -
The top of the canopy area went on and the wings went on with the help of some stringers made from paper clips. While close, there still needed to be some seam filling -
There are two bombs that come with the kit and the holders are installed. The 3 landing gear are being built and I came across another hard time with the instructions. The diagram shows the support brace and a straight piece, but the parts show a triangular piece. Also one of the spars turns up missing so you can see one is made from brass tubing and paper clip.
I'm finally getting a handle of the large size of the kit being it's only 1:72 scale!!
Then I come across the next problem with the instructions when I go to close up the two "doors" at the bottom of the craft. Both pieces seem to be missing! After a bit of cursing, I take a break from that to give the vac form canopies a dip in Future and notice two additional windows. Those are the pieces - they aren't doors but windows! Problem solved but no where in the instructions does it give you the indication they are windows -
Here we have the wheels and landing gear installed. Since those 2 parts were windows, they are still off as they got their dip. The gaps are filled with tissue while I primed the model -
Giving the landing gear adequate time to dry and solidify, it's now can rest on it's 4 wheels. You can see the bottom of the engines have also been painted their yellow color (RLM 4). Thankfully Vallejo has RLM colors noted on the bottles, plus on a listing of compatible paints -
Still being too chicken to tackle the vac form canopies, I went ahead and painted the splinter camo on the top (RLM 81 and 82), and the light blue (RLM76) on the bottom of the plane. Here I've also sprayed a gloss coat in preparation of the decals and weathering -
I finally broke down and and tackled the canopies. Honestly, they were tough.
The framework lines as well as the edges were NOT clearly defined and I ended up doing a lot of cutting and fitting and cutting and fitting.
In the end, IMHO they turned out ok. It will make a good "3ft. model." It will look ok from 3ft. away. ;) LOL
Next time, I'll finish it up with the bottom windows, and light weathering. Being no P.170's were made, I can't see a lot of weathering on them.Oh yeah, I will also have to paint the canopy frames. Yikes.
Thanks for looking.
-
 1
1
-
-
WOW, thats a great idea.
-
Very cool. I was waiting to scroll down and just see an empty base... :lol:
Excellent job, both on the plane and the figure.
-
Really nice painting too. The hint of colors below the skin is outstanding.
Thanks. I used one of 2 "techniques" the GK guys to do bring the skin alive. One is to flick tiny drops of many colors of paint on the skin and then lightly do a top coat to settle the drops underneath. I first saw this watching Rafael Robledo work - https://youtu.be/tQizFgzbvYY
BTW, This guy is absolutely amazing.
But I can't get the dot of paint tiny enuff so I do the older technique of just doing squiggles all over the skin -
I used red, blue, yellow, green and a little purple over a light gray primer. I Spray a clear coat after every 2 colors so if I screwed up the last color and I need to remove the goof, I wouldn't go all the way to the base or even worse the primer coat. Rafael suggest a clear coat after every color until you get used to the technique.
After the last clear coat was dry I hit it with the flesh color, but making sure not to apply it too heavy so that all the other colors disappear. It's tough to know when enuff is enuff - so go slow.
Wow...that is excellent! Thank you for sharing this picture and the information!
You're quite welcome. I have no secrets, so if I can pass something on and help someone else, it's all good.
If you really like Figures, I would definitely subscribe to Rafael's YT channel. IMHO he's better than amazing.
-
Nailed the sickly gray-green skin color! Also, how did you do the eyes? They look flawlessly glossy.
GIL :smiley16:
Thanks.
The skin color is Vallejo's Gray White or is it White Gray over light gray primer and the squiggle technique I described previously...
edit: I looked and it's White Gray. The paints are arrange by a position number on the rack at the store (and my paint rack at home). :smiley2: They are grouped together that way rather than by their stock numbers which are all over the place. So the White Gray is 151.
I hate to admit the eyes are done simply with black paint and a brush. I almost never use gloss paint, but Vallejo has a Gloss Black that goes on VERY smooth. I won't say it's self leveling, but it appears to me to do that.
-
Really nice painting too. The hint of colors below the skin is outstanding.
Thanks. I used one of 2 "techniques" the GK guys to do bring the skin alive. One is to flick tiny drops of many colors of paint on the skin and then lightly do a top coat to settle the drops underneath. I first saw this watching Rafael Robledo work - https://youtu.be/tQizFgzbvYY
BTW, This guy is absolutely amazing.
But I can't get the dot of paint tiny enuff so I do the older technique of just doing squiggles all over the skin -
I used red, blue, yellow, green and a little purple over a light gray primer. I Spray a clear coat after every 2 colors so if I screwed up the last color and I need to remove the goof, I wouldn't go all the way to the base or even worse the primer coat. Rafael suggest a clear coat after every color until you get used to the technique.
After the last clear coat was dry I hit it with the flesh color, but making sure not to apply it too heavy so that all the other colors disappear. It's tough to know when enuff is enuff - so go slow.
-
Thanks.
I got it from a garage kit guy, Gillman Productions. You can find him on FB.
-
Not that I officially represent Vallejo, but as someone who is thoroughly satisfied with it - sorry your having a problem.
In all honestly I only got 1/2 thru the video you linked - the guy just took way to long to get to the point. I turned it off after the was mentioning the part about putting the agitator in the bottle. If he looked at the documentation - and yes there's a lot of it in small font - it says to NOT shake the bottle but to roll it between you hands. If he doesn't want to add extra "stuff" to the a/b cup, maybe add a little water or flow improver to the bottle. Pretty much the same way how a few YouTubers tell how to make Tamiya paint airbrushable right out of the jar by adding thinner directly to a jar...
For me I use an a/b with a .3 or .03 needle (whatever its) and set the compressor to about 17-18psi (documentations says to use "less than 20psi").
I roll the paint bottle to mix it. I then add 3 or 4 drops of flow improver to paint cup, then 2 or 3 drops of paint, then I take the paint brush I'm going to mix it with and dip it in water first and then mix it all together.
When I finish the cup of paint I put a few drops of water in and spray that, then add more paint if I need to keep going. I will also take that same paint brush and with water rub it over the tip of the needle to remove any paint that has dried on the tip (usually very little).
If I'm finished, then I do the drops of water, to clean out much of the remaining paint. Then I add squirt a little of the Cleaner - I use Iwata Cleaner - give it a blast then swirl with the brush to get whatever paint is left around the cup, and spray till all the liquid is gone. Then I'm good to go for the next time or the next color. HTH
-
Nice workshop. :smiley16:
We recently downsized from an old cottage on an acre of land to a new Townhouse on the lake. The only problem is I lost my work room and I now have a folding table in the corner to do my projects. Upside - no more acre of lawn to maintain, no snow removal, no more dragging trash to the street for pick-up. Trade offs are a bitch.
I hear ya.
We're "past due" for the move to somewhere where I'll never see snow again after I retired. But wifey already knows the new place *will* include a climate controlled section of the garage or an extra bedroom for my models and stash. Every time she comes up to my room, and sees the boxes, she's reminded of the room I'll need. :smiley2:
-
I always have at least 2 kits going at the same time. while I was waiting for parts of DeNiro to dry I got to work on this little alien kit. Super simple and quick to finish -
(This angle is for a good look at the crashed saucer)
Thanks for looking. As usual, CCs are welcomed.
-
1
-
-
Looks great!
-
Yep - in the 1994 movie Mary Shelley's Frankenstein.
Once started I just kept going so I have no WIP pics. Here's the shot I used as reference -
Here's my take. Thanks for looking .
As always CCs are welcome -
-
Yes, what the others have said - Vallejo paints only come in the small dropper bottles. BUT Vallejo does have White Primer in a large (200mL) bottle.
I use Vallejo exclusively and can vouch for their primers. Not priming? I use the white primer as regular paint - it goes on easier - and then hit it with clear satin/gloss - whatever I need.
-
1
-
-
Excellent link! I might have to pass as I don't think I could do all that stunning detail. We'll see; I have some time to think about it.
Thanks again for the link. That guy is truly a talented master!
No worries. :smiley2: As I looked at Mr. Kim's boat link again, the junk shape was a little off anyway. ;)
The RPF is a good place to lurk. There are often SFX guys that work in films and such, hang out there and build stuff for their own collections.
It is amazing. If you have time, checkout the Studio Scale section - WOW.
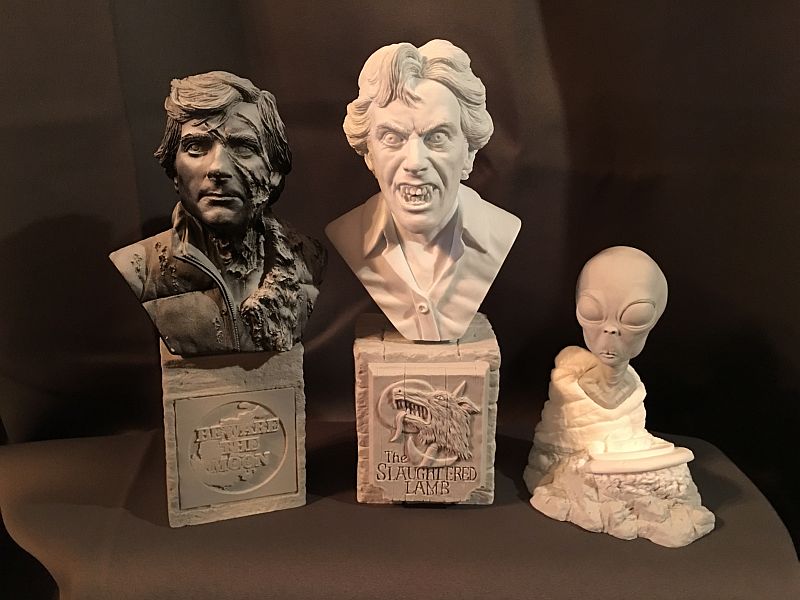
Ok guys sorry for bringing this off topic. I'll bring it back on topic by showing these latest busts. Two are from American Werewolf in London, and the 3rd is an Alien. You can never have enuff alien kits. ;)
-
Hmmmm......
That might be an idea if I can get some more detail shots....
Thanks Kevin!
Your wish ... and all that jazz. ;)
A guy at the RPF scratched one last year.
-
Okay, here's quite a haul I managed to get over the past few weeks. These first models I got were from Tim Kirkland representing the Spartanburg Scale Modelers Distribution Company.
This is what I bought from them; these are all in 1/72 scale:
AZ Models AH-1G Huey Cobra Early:
Hasegawa AH-1S Huey Cobra:
Hasegawa Mitsubishi T-2:
Heller SAAB J.32 Lansen:
Hobby Boss F-15E Strike Eagle:
Trumpeter BAe Lightning F.1A/F.2:
Trumpeter BAe Lightning F.6/F.2A:
These next acquisitions are what I purchased at the Pasadena Valleycon from the local vendors.
These tools:
This next one is a partially started Chinese War Junk I got for $5.00:
Another very cheap model was this Military Wheels 1/72 scale Russian Fuel truck I got for $3.00:
Late on I won these in the raffle:
Pegasus T-800 Endoskeletons from Terminator II:
Dragon 1/72 scale SdKfz 263 Funkspahwagen 8-rad:
That's all I got so far. The next things to post will be my prizes from CTA III. I might possibly have some additional acquisitions for my birthday too, but we'll see.
Okay now, back to the bench.....
Nice. The War Junk could be modified into Mr. Kim's flying restaurant from the 5th Element. :D
-
1
-
-
Ditto what the other genmts have said.
IMHO and FWIW, I think the two biggest problems is that the paints being airbrushed are too thick, and the air pressure being too high.
I use Vallejo acrylics now, and buried in their documentation they say to set the pressure no higher than 20psi. I keep my setting around 17-18 psi. This also helps prevent the drying of the paint on the needle tip.
In re: to the mix of the paint I usually do a 60/40 or 70/30 mix of paint with water and/or Flow Improver.
Then with regular cleaning I never get a clog.
-
Excellent job! :smiley32:
-
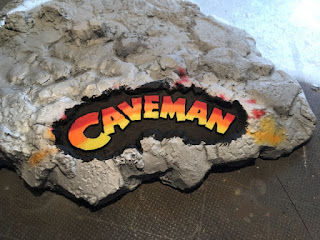
This past St. Patrick's Day I decided it was the perfect day to take this Spyda Adams kit out and start it.
The backstory - -
The Laignach Faelad were reputed to be a group of vicious warriors who were said to be half man, half wolf. These men are mentioned in an incredibly ancient Irish text known as the Coir Anmann, which claims that these faelad (soldiers) would fight for any king willing to pay their steep price. The text goes on to say that these men dressed in wolf skins and were tremendously brutal in battle, which is why the old Irish kings wanted them so badly. During this time the land was drenched in the blood of battle, the country was constantly at war and the kings would do whatever it took to win, including hiring the inhuman Laignach Faelad, which not everyone was too pleased with.Now, you may wonder why one would be wary about hiring the Laignach Faelad, kings have plenty of gold right? Yes, but unfortunately these warriors did not ask for money, instead they asked for something entirely more precious – the flesh of newborns. They would divide among themselves, falling upon the flesh like wolves and devour it raw. A king would have to be pretty desperate and ruthless to hire these warriors.Yikes!
The kit came in 4 parts of white, odorless resin. There was a little seam line, but it was easily dispatched amongst all the fur. I then applied some Aves to the two arms where the seams were. The other parts was the axe and the base.
I tried out my new "photo area" but didn't get the lights right. Apologies for the harsh lighting.
Thanks for looking and as always CC is welcomed.
-
1
-
-
Thanks Dave. Yep, you need to be in the mood for dopey humor for this movie. ;)
-
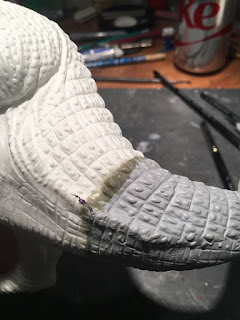
Everyone loved that Ringo Starr piece of cinema, :smiley2: so I was happy to pick up this kit.
It came in 6 pieces including the base. It only had one big bubble in the resin which was easy to fill with some Aves. I also practiced a little "sculpting" by putting the scale pattern back into the repaired area.
Looking up the logo for the base, it's the typical rainbow appearance so I shot that with my Iwata -
Online images of the monster showed it was all gray or a green gray. So I chose to do both. I basecoated in a light green gray. Vallejo actually has 2 colors both named green gray, I used the lighter one. The highlighted in a light gray.
Thanks for looking.
-
Very nice job!
-
Very cool, Mark. I always try and make a visit to Brookhurst when I'm visiting my bud in OC.
Been sick for about a month and haven't built a thing, but that didn't stop me from buying.
I just got the Pegasus Von Braun Moonlander -
I was also able to order a few diorama bits and bobs from Greenstuff World -
http://www.greenstuffworld.com/en/
They are in Spain but deliveries are pretty quick. I got a few leaf punches and a few rolling pins for flooring. The are actually rolling pins about 4 or 5 inches long and embossed with various flooring options - bricks, flagstones. So you put out some clay or Aves and then roll the pin over the clay. The image transfers to the clay. Then all you have to do is gently lay it out on the dio and voila, a brick roadway. Not being very long it's best for the 1/72 and maybe the 1/48 guys. worth a look.
They also have this stuff called "Blue Stuff" in which you put a few sticks of this "stuff" into almost boiling water and it softens up. Then take it out, knead it and put it over whatever you want to reproduce. So take a Jerry can,and put the BlueStuff over one side, and let it cool, Then put more over the other side of the can. Once it's all cooled you pull the two sections apart, remove the can, and then mix up some greenstuff or miliput (for some reason Aves won't work) and put it in the mold. Smoosh the two parts and then create your copy of the Jerry can or whatever. I used it top make a few 1/72 pilots for my planes.
-
1
-
-
Just picked up a few of the Bandai Star wars kits. There's something about them not being allowed to be sold in the US, so I had to get them from a 3rd party seller on Amazon. Terrifically engineered kits.
I also got Squadron's first kit, the Haunebu II. It's once of those Luft '46 jobbers - a Nazi flying saucer. Thing is going to be huge.


The Haul, or what you've recently bought.
in General Modeling
Posted
I really gotta stop buying... :lol:
This time around, with the upcoming release of Guardians of the Galaxy 2, I had to pick up Fantastic Plastic's Milano. It has a few problems, but it's the only Milano around...
Bandai's Y Wing -
Doesn't everyone need a few bottles of slime? Will come in handy for an upcoming dio...
A new "discovered" (by me) miniatures site featuring this possible Ma.K entry - in 1:35 scale
A closeup - Why do many of the vehicle operators in these Dystopian worlds seem to be women? ;)
This just lends itself to an interesting diorama.