Roktman
-
Posts
947 -
Joined
-
Last visited
-
Days Won
70
Content Type
Profiles
Forums
Events
Everything posted by Roktman
-
If anyone hasn't subscribed to this guys channel, they should. He's amazing. He goes back and forth between armor and aircraft. Today's build, IMHO, is unbelievable -
-
-
If I can I would rather fly. I really dislike driving. From NYC, 3 hrs used to be my limit. But then my sis moved to Pittsburgh. I flew at first but the cost was unbelievable for a 45 minute flight. So then my limit became 6 hrs., which coincidentally gets me to the Nats in the Va. Beach area. Otherwise I'm always flying. God bless the guys that do, but a multi day road trip is a non starter for me.
-
All good points. I would take as a carry on, if possible and be prepared to open it. Coming back from the Atlanta show (or was it Orlando)- one of my buys was a big chunk of resin. looked off in the xray and immediately got flagged. I knew exactly what the TSA guy was talking about, and went right to it in the bag. You could argue about it, but that's a game where the traveler never wins.
-
Hey Gang, I picked up this bust a few years ago at a JerseyFest (or was it Resintopia). Anyway, he hung around the shelf just in primer long enuff. I did the squiggles for under the skin, and a few stripes later I called it done. Thanks for looking.

-
Not up on my anime characters, but love the paint job!
-
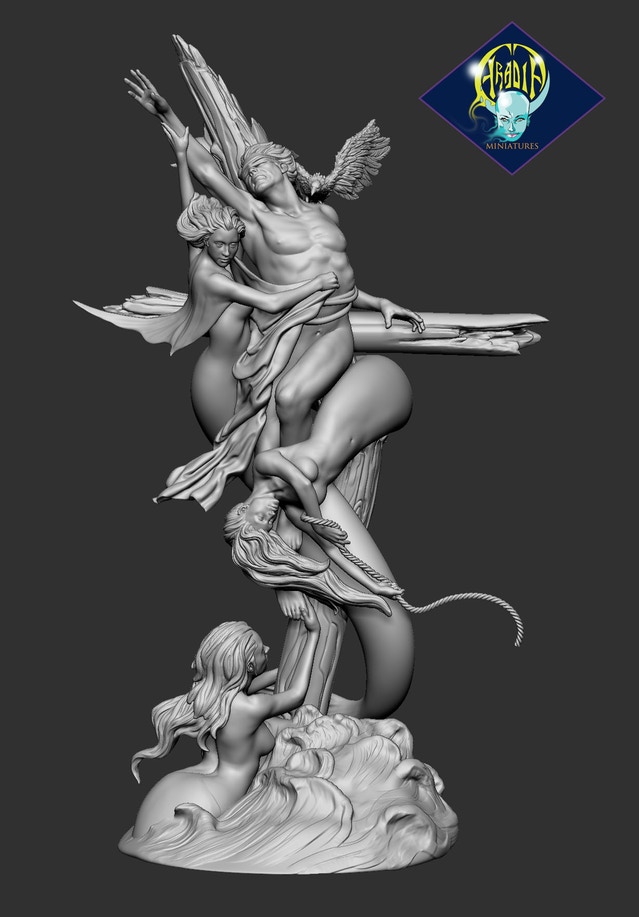
The mailman has been making stops with boxes the past few days. The first offering is the result of Aradia Miniatures Kickstarter campaign. eventually all these minis plus ones I didn't choose will be available on their site. Shipping is from Italy but as a customer for a few years, I've never had any problems with delivery. The minis were based on the works from Dantes Inferno. Unlike other minis that are 1 or 2 parts, these come in many. So rather than opening the bag and taking a chance of losing parts, I decided to borrow images from the campaign. All these images are borrowed from Aradia in an effort as free advertising for them (and them not coming after me for using their pics)). ;) Charon The Gorgon Paolo & Francesca Ulysses Some of the lesser know people are described on my page - https://kevtk.blogspot.com/2018/02/new.html Leaving the Circles of Hell, I move on to a Galaxy Far away with Bandai's Blue Squadron X-Wing from Rogue 1. I loved Rogue 1 and it moved to one of my top 3 star wars movies. Thanks for looking.
-
Thanks. It's on Saturn's moon Titan as part of the Cassini mission. ;)
-
All done. ;) Sorry for the blurry pic, my only camera is my phone.
- 1 reply
-
- 1
-

-
This kit was a Fantastic Plastic release back 2011-13. This kit is a re-imagining of the original kit of Revell from 1957. The kit is 1:72 scale and comes in 5 simple parts. The casting was done by BLAP! Models and is flawless. There was so few parts that I forgot to take a "before I started" pic. Here's the ship is together and primed. The small blue piece is the engine before it is primed. The decals are also very well done. There wasn't any painting instruction, so I just followed the box art. The was a diagram for the decals, and I forget exactly, but I think the box art decals was different than the placement on the instructions. No matter, it's a hypothetical ship - so I can do what I want. I got the dome bases from SSM, and painted it up the best I could to make it look like a moon. ;) Thanks for looking.
-
This is another kit that has been in the stash so long I forget where I got the heads up on it. The kit is 54mm, in a gray resin, with no flaws. The kit comes in 8 parts - the body, sputnik's globe, her head, helmet and the 4 antenna for Sputnik. The only painting guide was the boxart. So for now I'm following that - On the box, her hair is whited out, so I went back an forth between making her a redhead or blonde. The color in the image is Mahogany. In the end blonde won out, and her hair was brightened with a dry brushing of Dark Sand and then Iraqi Sand, both from Vallejo. I ended this session by gluing the antenna on Sputnik, and then giving it a coat of Gloss Black in preparation of giving it a shot of V's Metallics Chrome. Til next session, thanks for looking.
-
Thanks! Yes, you wouldn't see this from any of the big mfg's. Thats why I pay so much attention to the GK side of the hobby. ;)
-
This last session I could call the model done. I painted the experiments, and then used Citadels Agrax to highlight the rivets a bit. Then I added the parachute cord and added little bits of thin Tamiya tape to replicate the Velcro hold downs on the cord. The last thing I did was to get rid of the lander's shadow. I always overdo it, and that was true this time when I added black to the shadow. All it did was make the ground look burnt. So away it all went. Thanks for looking.
-
Thanks guys. They are. And with the genre so small with so few real space model builders, we could always use more modelers. :)
-
Santa has been dropping boxes off for the past month. So I thought I share whats in the boxes. First I got it into my head that I can start making my own figures. So besides signing up with Troy McDevitt's sculpting class thru Patreon, I got myself a stand to help stead any future works of "art." ;) Then there's a kit from Creepytables that looks a little like a certain caterpillar in a certain story about a certain girl in the 22cm size. ;) I refound Monster Dork Studios on Etsy, and picked up his take on Cookie Monster - COOKIE! Finally Space Cadet Models released kit #2, A kit of Pioneer 2 and 4. As of now Space Cadet is only on Facebook, but they have their page set to Public so no one has to join FB that doesn't want to just to have a look. As a fan of the vintage space craft, I'm looking forward to getting to these.
-
Thanks guys. If one doesn't have the names of the experiments memorized (I don't) it was a bit of a hunt and peck to find what colors went with which color. But now I have my list and am ready to finish this up. The real space genre (as tiny as it is) is pretty well represented not including the big mfg's, with Real Space Models, New Ware and now Space Cadets (apologies to other GKs I've forgotten). Then there's all the card models which can be used as templates to scratch a craft in styrene.
-
Showing my Lander on the Yahoo Space Modelers group, I got a note later on saying I installed the landing radar upside down. I have no idea how it happened was was happy when they simply snapped off the Lander and I was able to reinstall them correctly. Thanks Scott. While I was waiting for the glue to dry on the Lander I turned my attention to the base. Instructions says Titan is between a wood and dark brown color. So I went with V's Orange Ocher which is really more brown than orange as a base. The sun was streaming in and it cast some shadows across the base. I thought it may not be 100% correct (tho clouds have to break on Titan even momentarily) but I'm going to add that too. Some Titan ice was also added and I was called the base done. Then I turned my airbrush back to the Lander. The instructions say it's a combo of gold and silver, So I went to Vs new Metallics line and sprayed a 4 to 3 mix of gold to silver. The image makes it look too silver. But in real life there gold in there. Experiments get painted next. Thanks for looking.
-
Thanks. If I had younger eyes and non sausage fingers it would have gone more smoothly. But I'm almost there. This session was to assemble the Huygens Atmospheric Structure Instrument (HASI). First thing that needed to be done was cut the two pieces off the PE fret. Then a resin piece was added to make the "T' on the short side. After that I had to laminate 1mm half round styrene strips onto the straight parts. I thought this would be a lot harder than it was, save for my first cut which was short. Next was to add the mounting base. On the instructions it said to leave a little PE showing that would mate up with a slot in the hole for the HASI. No good. I could see the slot but the were no way I could fit the PE in there. I ended up just drilling out the hole, eliminating the slot and trimmed the exposed PE to fit. That was essentially it. They made further instructions for those wishing to do more. I wasn't going to but then I saw one step was to add wiring for the parachute jettison on top. Being crazy, I took some .010 lead wiring and added that one. Came out ok. Next stop is the paint booth. The instructions and images show a gold/silver color. That's next time. Thanks for looking.
-
Moving along, todays session was to finish adding the rest of the fins on the bottom of the lander. Just as soon as I thought I had a system down, things would go wrong and I'd have to come up with another "system". Also have a fin jump out of the tweezers and have to go searching took time as well. But they are all in now. :D Are they all straight? No way. But they're in. ;) Doesn't look like much progress, but this was almost 2 hrs. of work. Thanks for looking.
-
Thanks. Yes the base goes above and beyond. When it first came I studied the cast to see what was done, so I could try and mimic something similar on my other space "landers." The "Co." is brand new so the sky's the limit with options. The other good thing about these 2 man GK operations is someone who contacts them with a suggestion has a high chance of getting his wish than contacting Revell or the like. ;)
-
Thanks. Even with an Opti-visor, this is about the limit where I can give eyes any sort of detail. ;)
-
I must have been really cranky last time, with what looks like a less than stellar review. Apologies for that. It really is a nicely done, detailed kit. Being the kit does have a lot of small parts I'm still taking my time on this. This session, I finished building and installing the landing radar - the 4 PE parts that look like shelves (B in the previous post image). I then started cutting out and installing the fins on the bottom (red arrow). These take time. Besides cutting the part off the fret you need to get rid of any nub that remains, what slows you down is the fin is prolly one 1mm or so long. Tough for my big sausage fingers. :P Thanks for looking.
-
The real space genre got a little more crowded with the formation of Space Cadet Models. These guys have started their catalog with the Huygens probe that went to Saturn with Cassini and landed on the moon Titan. More on the mission here - LINK . Opening the kit revealed a LOT of parts - With the kit is a CD for the instructions. I thought Whoo Hoo! Someone finally listened. My pet peeve, for a long time, with a lot of GK Co's is that when you get instructions and there are fiddly bits the illustrations are usually photos. Sadly the photos look like 20th generation of copy of a copy. I thought I was golden. I loaded the CD and hit print. Out came 30+ pages, and the images were the same tough to see. Too bad. The other thing that's noticed was that most of the experiments on board are TINY. For example is this one. It's made up of three parts. I didn't even add the 32gauge wire that's supposed to connect the upright (I'm not near the instructions and don't have the part names memorized). As you can see the assemble is less than 1 CM - On to the build - Two thirds of the bus assembled, There are PE rings between the resin sections. Moving along I came across parts that IMHO make the kit more difficult than it needs to be (B,C). The tiny parts make for a slow go. More later.
-
Love it. Nice take on the liftoff plumes and exhaust!
-
The major step this session was painting in the eyes. A web check of the eye color of Kevin Peter Hall turned up nothing. Most of the images show him with green eyes so that's where I went. When dry, onto the tree he went. Merry Christmas and thanks for looking everyone.