


Wulf
-
Posts
90 -
Joined
-
Last visited
Content Type
Profiles
Forums
Events
Posts posted by Wulf
-
-
Hello all,
Just a reminder for the Region 6 clubs. AutumnCon 2011 is the 17th in Covington, LA. Looks to be a good time. All info and registration forms are available online.
www.htscalemodelers.com
Hope to see some of you there...
Andy
-
Any such beast out there??
Andy
-
Hey guys,
Doing a P-47 in olive drab. Need some actual photos of the plane from the top view to show fading. Any such animals out there??
Thanks,
Andy
-
Thanks for the kind words gentlemen...
Andy
-
Hey all,
This one's hot off the bench. It's Tamiya's 1/48 262. This was a true 'add glue and shake' kit. Superb design and kit all the way 'round. I had it ready for paint in 5 days (which is a miracle for me). The paint scheme was a bit of a challenge but came out okay. Added seat belts, brake lines and antenna wiring. Comments always welcomed...
Andy

-
Very sharp build and a cool subject. Always liked the PBY...
Andy
-
Gil,
The wingroot/fuselage joint was poor, and I mean poor! The fuselage area around the cockpit was a separate piece all together. This created unwanted seams and seam work. Nothing that can be fixed but a pain nonetheless.
Andy
-
Looks like a super clean, right off the showroom floor build. Very nice work...
Andy
-
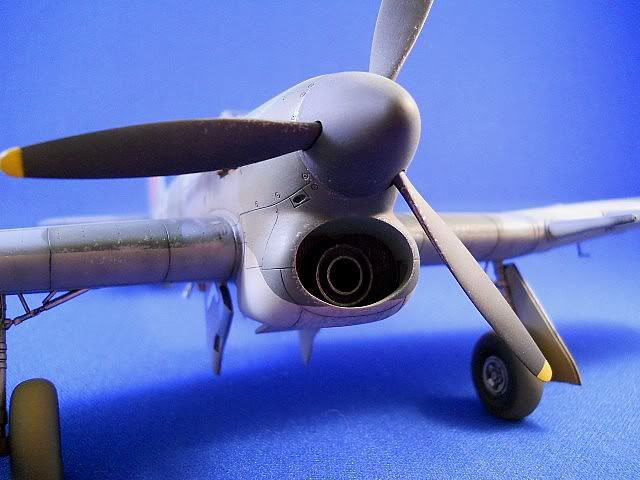
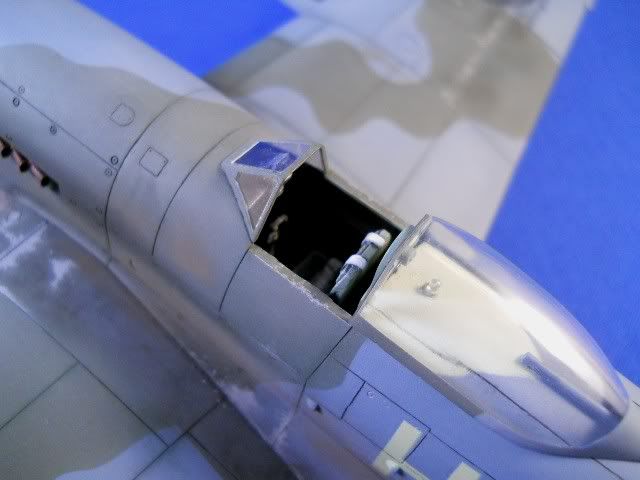
Hey guys,
Just finished this one up. This is Hase's 1/48 Typhoon. Not a bad kit at all but has a few issues. Extras include a PE office set, brakelines and a resin seat (really like those).
Weathering was done with preshading, postshading, pastels and silver chipping. Comments always welcomed...
Andy
-
I've got 1 week (about 15 hrs.) to complete a car for a show
Would like to do a curbside or slammer. Any ideas on a good kit that fits this criteria
And yes Matt, I'm sure you'll answer this one!
Thanks,
Andy
-
Thanks guys for the kind words. And yes Dick, it will be at GatorCon. I'm sure it's no match for most though.
Andy
-
Well, as some of you know, I'm mainly a plane guy. However, I decided to cross over the darkside briefly. This is my first attempt at a tank and it was a learning experience!
Needless to say, I've gained a whole new respect for good armor modeling. It was fun to try new things and techniques.
This is Tam's Panther (the older kit). It was a good kit but needed some additions along the way. The add ons include a scratchbuilt cannon barrel, sponsons, side skirts, antenna and utility storage tube. The real challenge was the whole road wheel/sprocket/tread assembly. It took many attempts and adjustments to get it all right. This project almost met an untimely demise against my shop wall! However, I pushed on. The finish is acrylics with pastel, pigment and mud weathering. This was also my first attempt at a 1/35 figure. He came out fairly well but still need practice.
Comments always welcomed...
Andy
-
Can you help? Looking for the Eduard week-end edition La-7 instructions.
Thanks,
Andy
-
Quite the project there. Kudos to you for taking that one on. Looks great so far...
Andy
-
Thanks for the kind words guys...
Andy
-
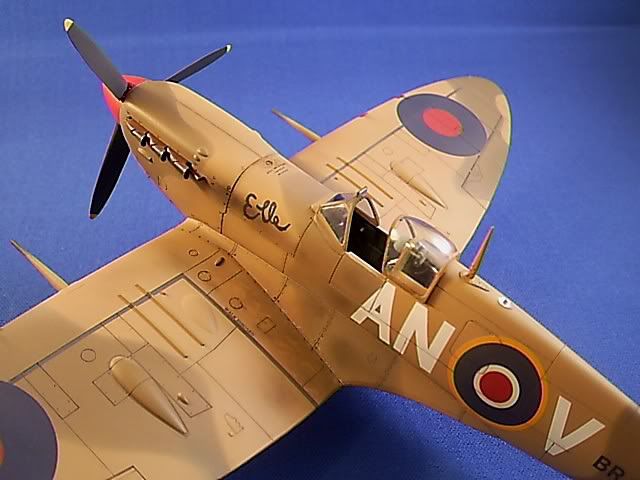
Well, I managed to get one done in a timely manner. This is Tamiya's Mk.Vb kit. Nothing bad to say about it. Used a PE interior set and found some turned aluminum cannon barrels online. They were a bit pricey but I used them anyway. The finish is acrylics with airbrushed and pastel weathering. Comments always welcomed...
Andy
-
I use both Pollyscale and MM acrylics. I have had good results from both. However, many people claim that MM are the weakest acrylics out there. That may be the case but you do have to treat acrylics like a little kid. They need extra attention and prep. I have no problem with MM and they have a decent selection of colors. Tamiya has a good product but their paint color selection is lacking. Also, Tamiya paint is the worst to handbrush. MM handbrushing is exceptional. Bottom line: try some brands and pick one that works for you.
Andy
-
Very nice Dick. You do some nice, clean work. Will I see it in the flesh on Saturday?
Andy
-
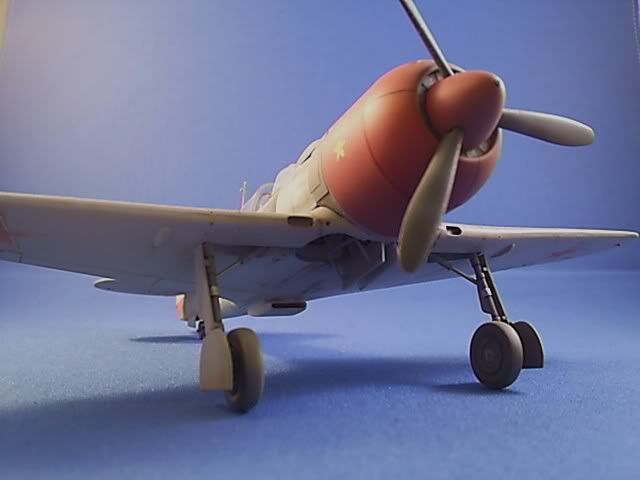
Well, I started this one back in Oct. 2008. It's the Hase 1/32 D-9 kit. I'm partial to the D series a/c so I decided to go all out with the detailing. Got half way in and made some mistakes which led to a small nervous breakdown (not real sure why now). So, I boxed it back up and forgot it. Back in Dec. 2009, I came across it and decided to take a look again. It appeared I was doing a decent job after all and decided to finish her off. I fixed the mistakes and moved on. Six weeks later, she is finished. Overall, I enjoyed it and am proud I finished it but I WILL NEVER super detail again.....I'm serious...no, really! In the end, this project cost me about $160. She will be front and center on my shelf! Comments always welcomed.
Andy
This is the Aires engine/gun mount kit. Was pretty pricey but it's a superb kit.
Used the PE cockpit set along with scratchbuilt extras.
Finished pics
-
Very nice work. The weekend edition kits are a nice break from the usaul marathons most of my projects turn into. How long did this one take you?
Chris
Well, I have a 7 month old so it was more like a "2 month edition" kit. <_<
-
Thanks Gil,
Yes, the rudder stripes were painted. It was not so easy curving them to match properly but it worked. The decals just wouldn't cut it.
Andy
-
Great build Andy. Love the finish with just the right amount of weathering
Do the Eduards weekend kits use the same plastic as their regular kits, or are they completly different?
-dave
It's the same. Eduard plastic seems to be a little softer than other kits. Easier to sand...
-
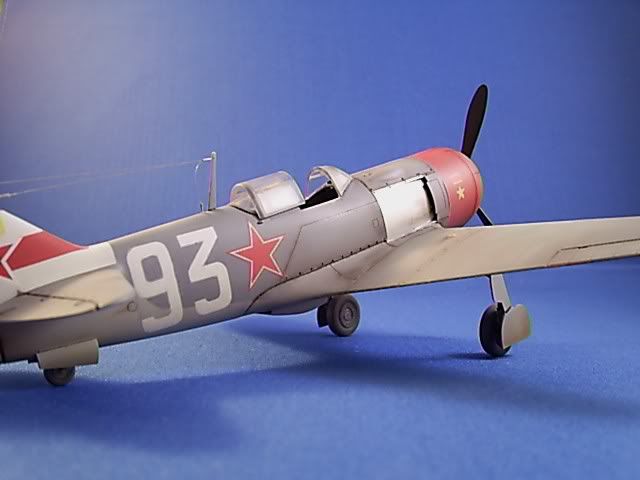
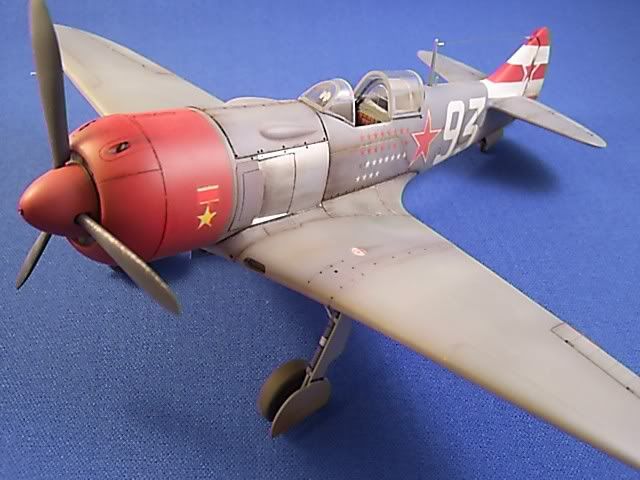
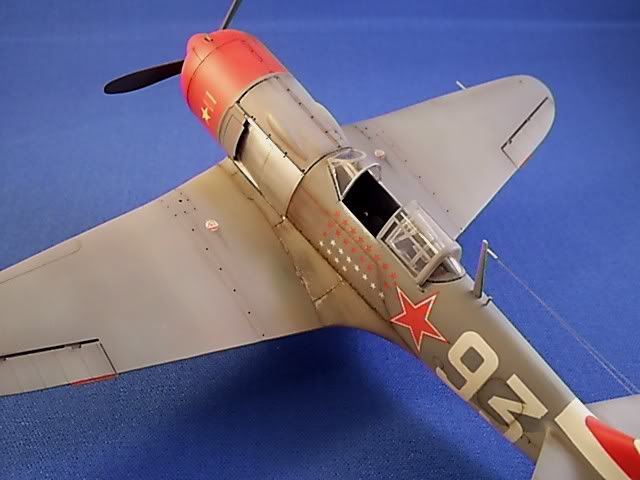
Finished this one in November but never took pics and posted. This is Eduards weekend edition kit built OOB with no frills. Tried the color modulation technique on this one. Primed with a dark brown and applied thin lighter coats on top. Came out pretty well with a hint of 'dirt' showing thru. Comments welcomed...
Andy
-
James,
I agree with everything you said and you were not the first to say them. Your case has been backed my others, merely by observation. Many people say that MM acryl is an inferior paint. However, I have been using it since I started back in the hobby. I get good results with it but have to treat it like small child, so to speak. The prep and app has to be just right. Now, I do use PS and Tamiya on occasion. I will say that brush painting Tamiya is something to be desired. PS and MM do hand brush very nicely.
Nonetheless, I'm disappointed with Testors for this move, regardless of the motivation. I guess my next step is to branch out and try other acrylic brands. I won't "divorce" MM entirely but I may find other "company".
Andy


Need some advice...
in Dioramas
Posted
I don't make it over here often but need some suggestions. I will be doing my first dio of a sunken Zero and was wondering what you all recommend to use for the sand/silt of the ocean floor?
Thanks!
Andy