ipmsusa2
-
Posts
577 -
Joined
-
Last visited
-
Days Won
31
Content Type
Profiles
Forums
Events
Everything posted by ipmsusa2
-
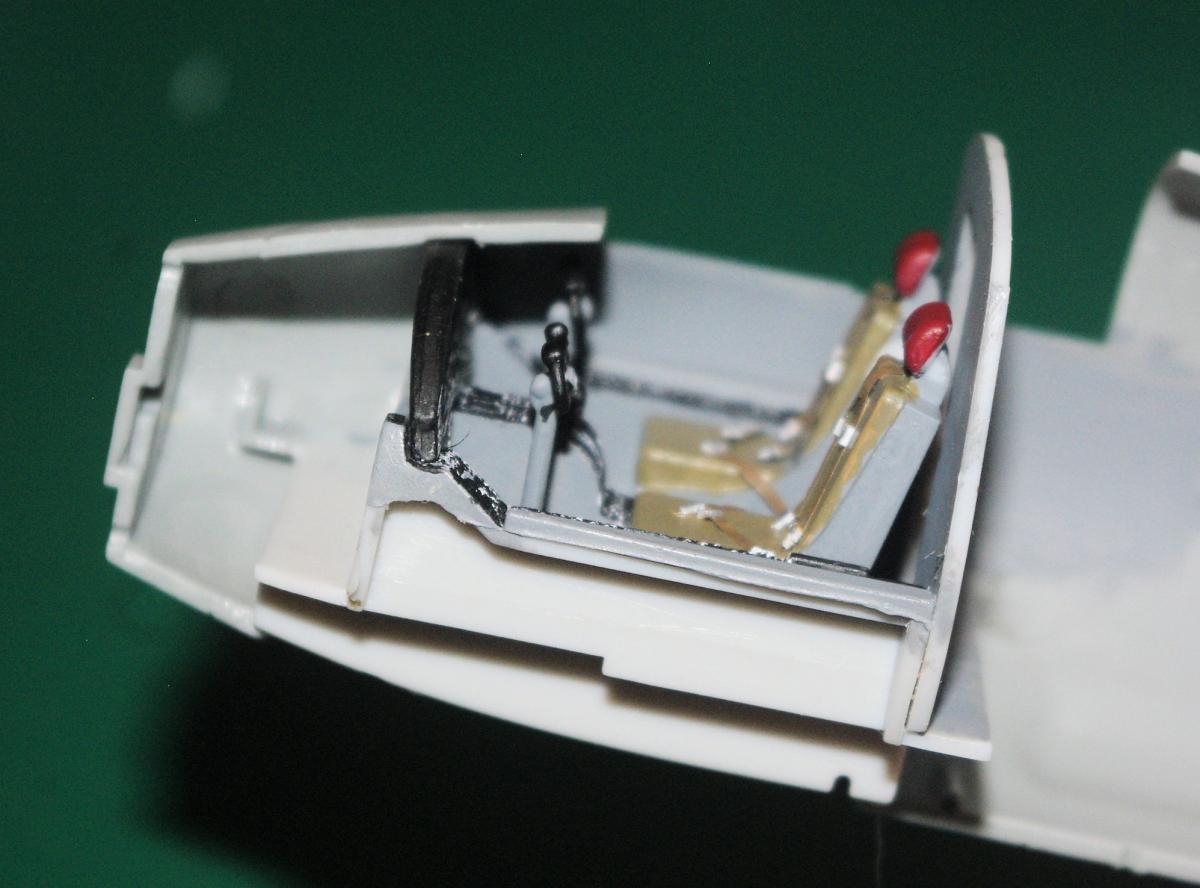
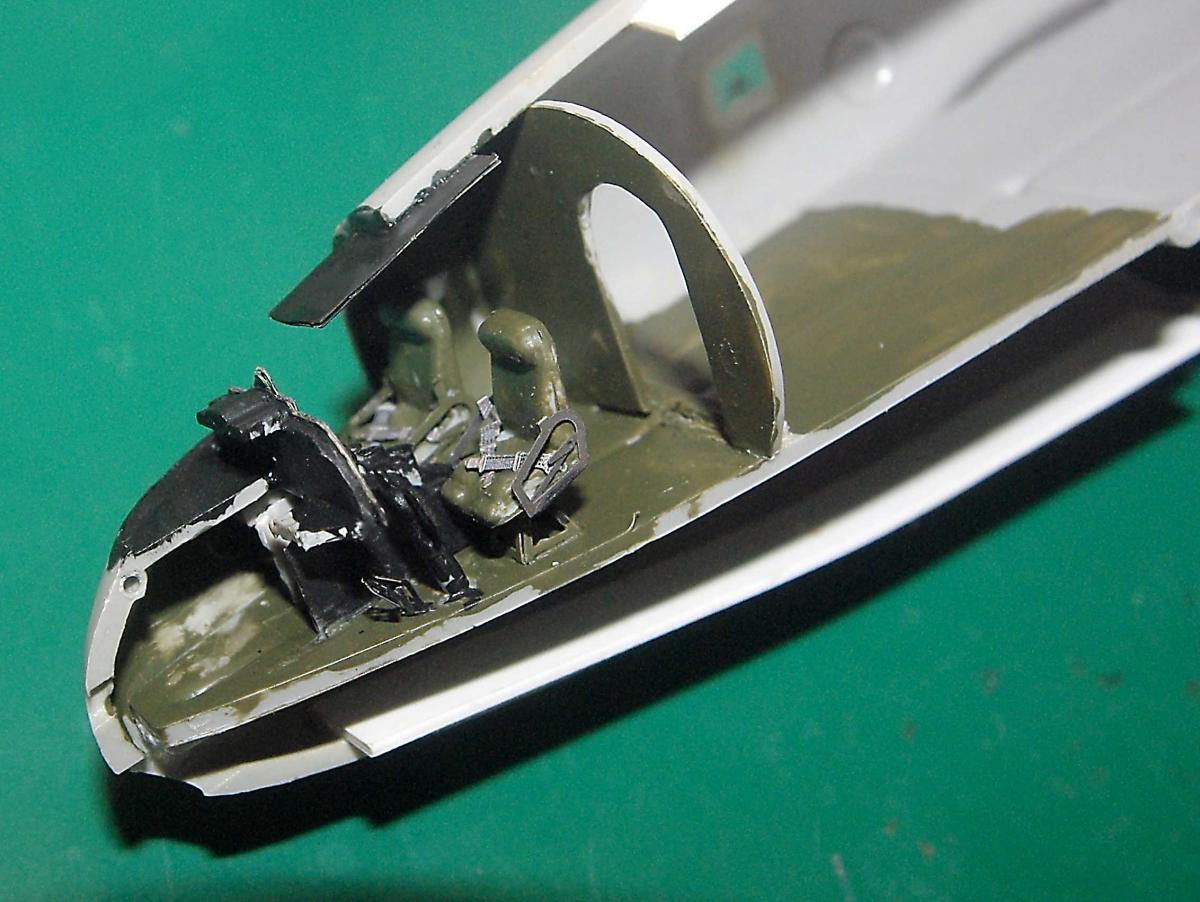
Here's the latest on my client's Kinetic E2C 2000. The cockpit is very nicely detailed. Too bad that most of it will barely be seen when the model's finished. Still, this shot shows the central console and seats installed in the basic tub. Only thing really lacking is seatbelts, but we'll take care of that in a bit. All the raised detail is done using an old technique I'm rather fond of. After painting all the panels flat black, a Prismacolor White art pencil is used to lightly rub over the raised detail. Then a shot of Testors Dullcote seals the white and also pops it out. Doesn't compare to color photoetch, but still quite effective. Control yokes and instrument have been added. So have seatbelts and buckles. Another view of the finished cockpit. Seatbelts and shoulder straps are nothing more than painted blue masking tape. Buckles are .15" Evergreen styrene strips cut to size and painted with MM Aluminum Metalizer. While I'll be installing the cockpit in the starboard fuselage half, I'm showing the port half here for clarity. The cockpit tub needs to be installed so that the front edge butts AGAINST the backward L, not on it. The side of the tub will fit on TOP of the long raised rib. You'll know when you're positioned correctly when the nose gear well matches the cutout in the bottom of the fuselage. The next photo will show the cockpit in place and everything should become clear. When properly installed, this is how the cockpit should be positioned. And yes, I know it goes against the grain but the bulkhead does not fit at the back edge of the cockpit opening. Do that and the gear well won't line up with its fuselage opening.

-
Installment #8 of the Williams Bros C-46 build is now online in the Builds sub-forum. Comments are welcome.
-
- 1
-

-
- Williams Bros
- C-46
- (and 5 more)
-
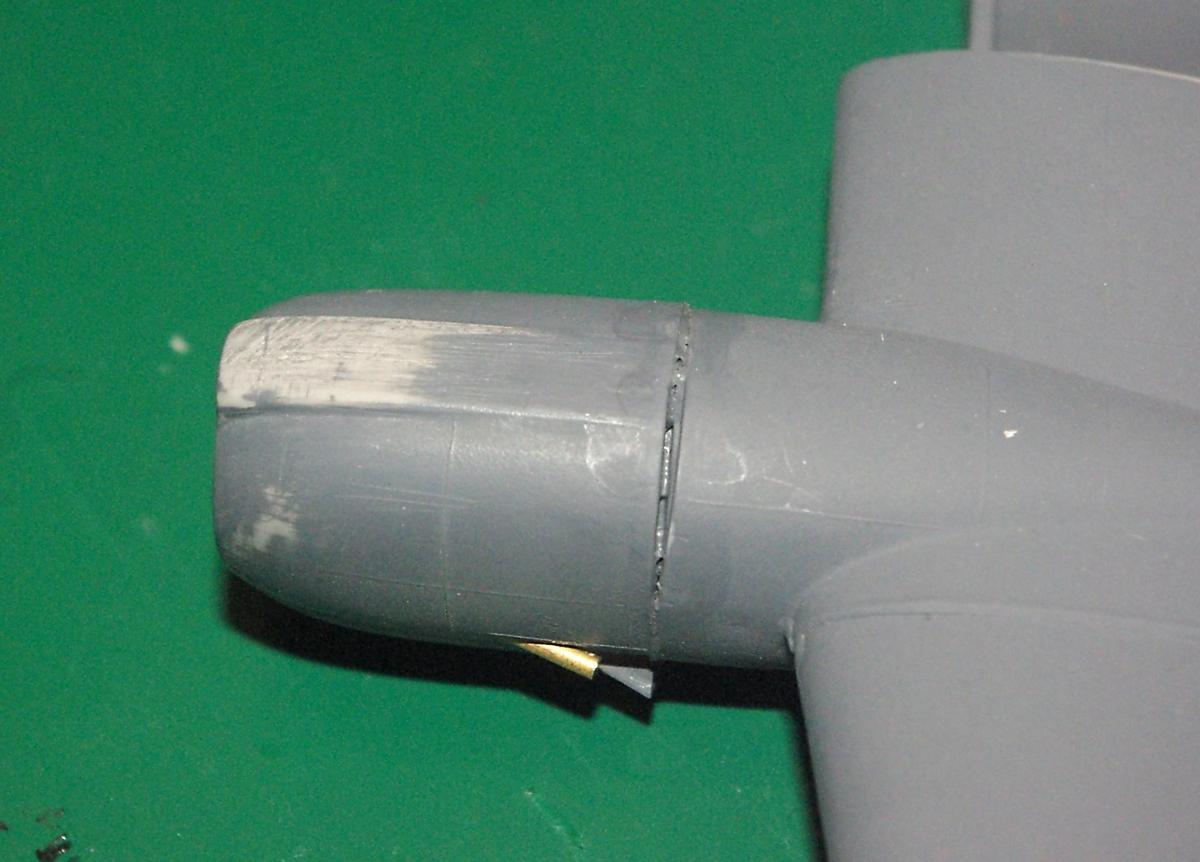
Here's the latest for your viewing pleasure: The kit exhaust pipes left a little to be desired, along with the fact that I would have had to drill them out. So...I planned to replace them with brass tubing. For starters, I drilled out the mounting hole with a 1/16" bit in a pin vise. Note that I angled the bit in order to allow the tubing to fit into the kit's recessed groove. Each of the exhaust pipes was a .30" long piece of 1/16" (or .625") diameter brass tubing. Since no tubing cutter I had on hand would handle tubing that small, I simply scored the tubing with a #11 blade, then snapped the piece using a pair of pliers. In order to avoid having to clean up the cut end, I cut each piece from the finished end of the tubing. Needing four stacks, that approach required two pieces of tubing. Fortunately, tubing that small comes packaged four pieces on a single card. Incidentally, instead of CA for installation, I used Gator's Grip, giving me time for minute adjustments. With the exhaust stacks in place, the cowls were mounted on the wing. Why now instead of later? Because I anticipate problems aligning the wing and the cowls will help get things right. Beyond that, it's easier to get the cowls properly aligned now. Keep in mind that the center section is dead horizontal with the dihedral not starting until you're outboard of the engines. Finally, and probably most important, because of gaps, seams and contour corrections that I would have to deal with, those problems would be a lot easier to handle if the fuselage wasn't in the way, This top view of the cowls after they've been installed. You can see some of the problems I'll have to tackle. With the cowl properly installed, this gap has to be dealt with. There's a slightly smaller, but similar, one on the other cowl. For reasons no one understands, Williams Bros left this flaw in their mold, along with those oddball gaps on the sides of the wing/engine housings. All of this has to be corrected before joining the wing and fuselage. Incidentally, the cowls don't mount to the wing without doing some adjustment to the inside of the cowls. I can't tell you exactly how to do it because it's probably slightly different on each kit. Just keep a knife nearby and do a lot of test fitting. Because of the size of the cowl/wing gap, I glued a piece of .15" x .20" Evergreen strip over the gap, then brushed over it with Same Stuff until it melted down. When dry, I could sand everything smooth. Some areas required small applications of Squadron White Putty, while others would be taken care of with Dupli-Color Sandable Filler & Primer. Of course, various grades of sandpaper and sanding sticks were used as well.
-
Frank and Gil, As you might expect, I agree with both of you. But there is another wrinkle to this story that's gonna wind up biting all of us in a very sensitive area. Due to the changes in formulation, caused in large part by the EPA, many paints are simply going bad in the bottle before they are ever opened the first time. An employee at my local Hobby Lobby told me point blank that they have paint that goes bad in the bottle before it is ever sold. Believe me, they aren't blowing smoke. I've had precisely that experience with MM paints, including buying three bottles of the same color, adding them to my paint rack and having one go bad before I ever used it. One way or the other, most of our old, familiar paint brands are going to be toast. Either that or changed in formulation to the point that we either can't use them or won't want to. Those of us who prefer solvent based paints...either enamel or lacquer...had better hope that TC, Tamiya and other new lines can tiptoe thru the regulations so that we can continue painting models the way we're used to.
-
For those of you following the slow death of enamel paints...particularly Model Master...here's my latest observation. Went to Hobby Lobby today for some small diameter brass tubing....for some strange reason they had what I needed...and I strolled past the Testors paint rack. That's right, rack...not racks. There were no Model Master enamels at all, just Acryl and two rows of the old square enamels that used to sell decades ago for ten cents and now carry a $1.79 price tag. At the same time, Hobby Town carries multiple racks and has everything Testors sells. This had me curious, so I checked the Testors website and here's what they list as available in Model Master enamels: American FS Enamel Paints 46 colors Metalizer Lacquer Paints 13 colors (still) Figure Enamel Paints 8 colors U.S. Military Enamel Paints 13 colors U.S. & United Kingdom Enamel Paints 7 colors WW-II German Luftwaffe Enamel Paints 12 colors WW-II German Panzer Enamel Paints 11 colors WW-II Italian Enamel Paints 3 colors WW-II Japanese Enamel Paints 4 colors WW-II Russian Enamel Paints 4 colors Modern Russian Enamel Paints 1 color Modern Armor Enamel Paints 2 colors Modern NATO Enamel Paints 3 colors Naval Enamel Paints 11 colors As if we didn't already know where things are going, on the Testors home page, just above the 'Explore Modelers' button that is near the bottom of the page, is a pale green hot link announcement for a new product...."Guide To Acrylic Painting...In A Post-Floquil World" e-book by Joe Fugate. The link will open a 43 page PDF document that discusses techniques as they apply to water-based and water-thinnable acrylic paints. You can save the e-book to your hard drive or print a hard copy. Keep in mind that the book is geared to model railroaders, but it can still be useful for anyone who is determined to switch to acrylics...or is being forced as enamels slowly vanish.
-
I was working on a commission of the Saratoga resin kit that was produced by Acme 360. Last Friday (Friday the 13th!!!) I was burglarized to the tune of $4000 - $5000 worth of equipment and kits. Unfortunately, one kit that was taken was the Saratoga, or at least part of it. They took the box, all the small parts and the decals...but left the main body and stand. I tried to contact the manufacturer to see about buying the missing parts or even a complete kit at what I hoped might be a discounted price. That's where the fun began. The email, which was sent to the only contact listed (buntyn1@comcast.net), bounced with the notice that the email address does not exist. The website has no other contact information. No individual name, no address beyond being in Denver, Colorado, no phone number, no nothing. On top of that, the copyright notice on the website is 2004. If anyone has any contact information on Acme 360, I would greatly appreciate hearing from you. If I can't find some kind of reasonable resolution to this mess, I'll wind up having to repay my client on the installment plan!
-
Thanks for your comments, Gil. As for the plastic, looks can be deceiving. Not hard but not soft either. Sands well.
-
Just a quick note to let you know that another installment of the Kinetic E2C 2000 build series has been posted in the Buids Sub-Forum. All comments welcome.
-
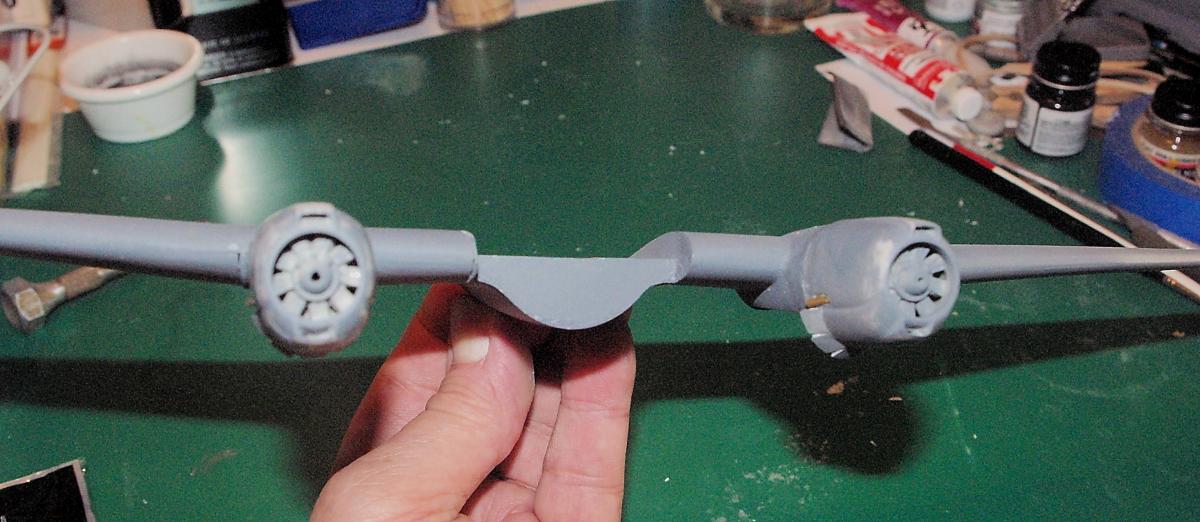
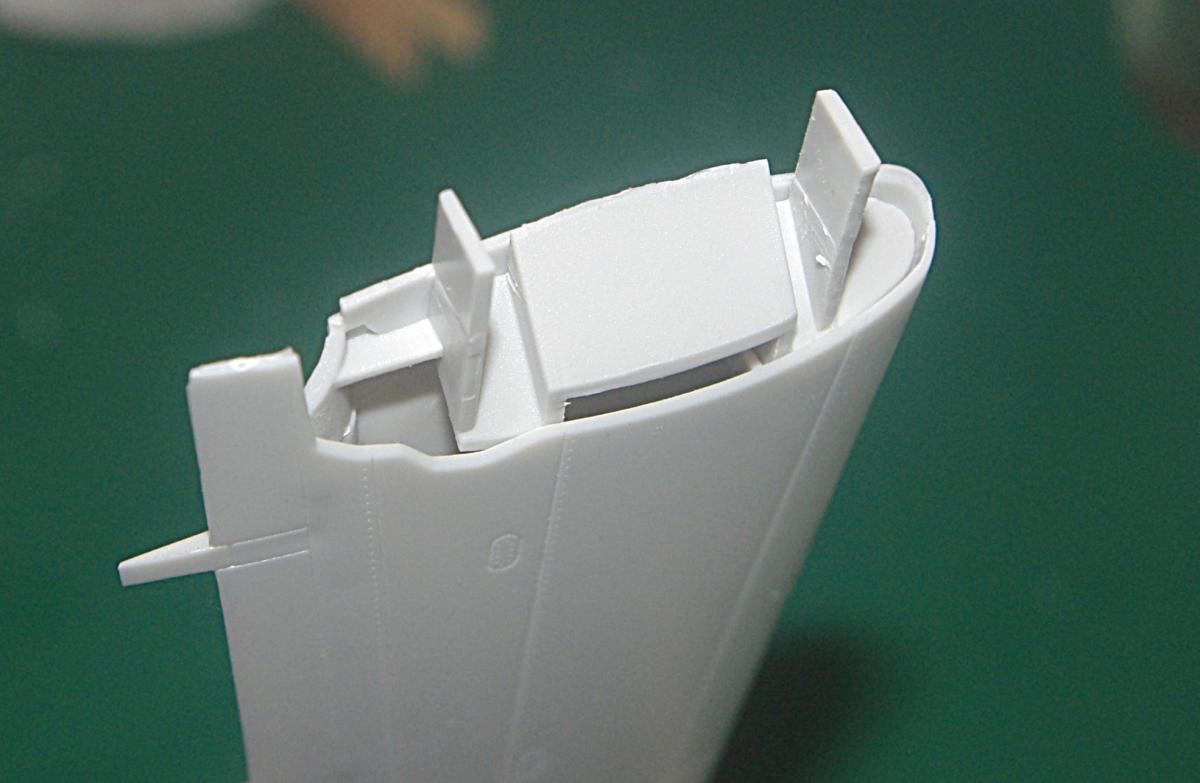
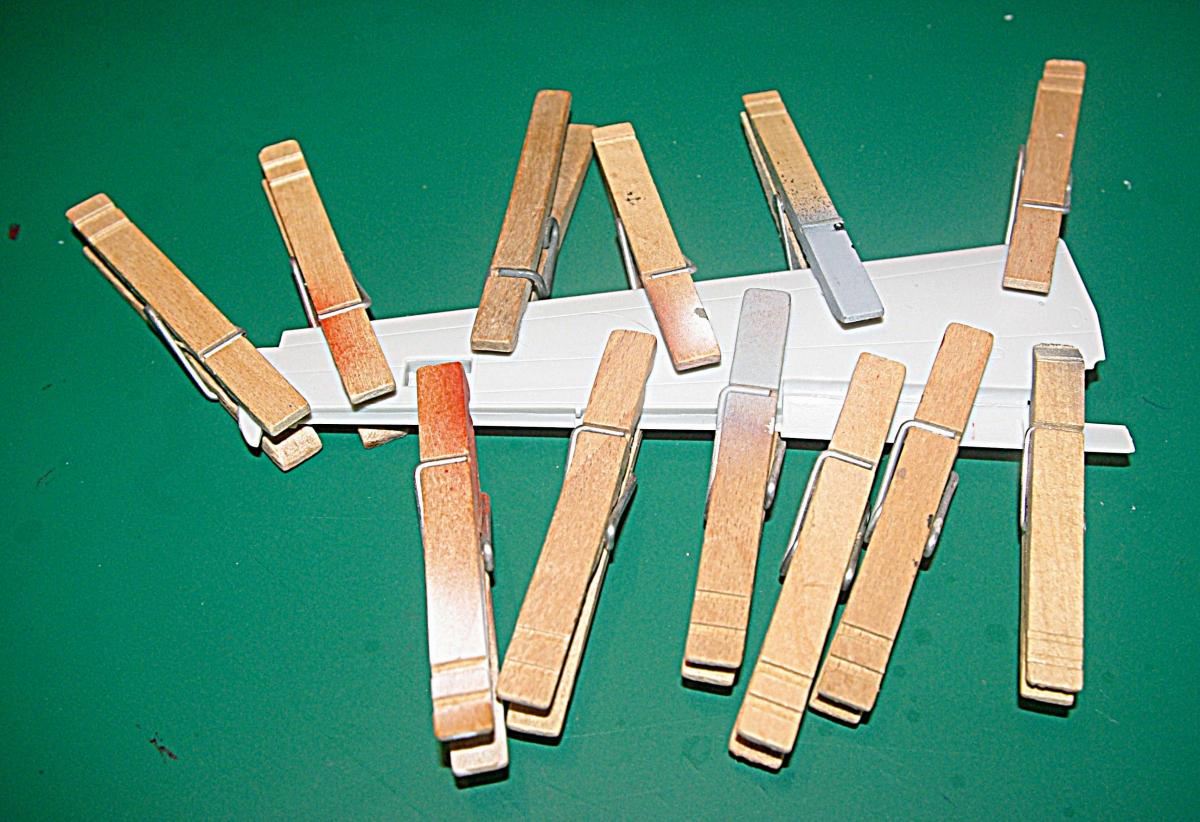
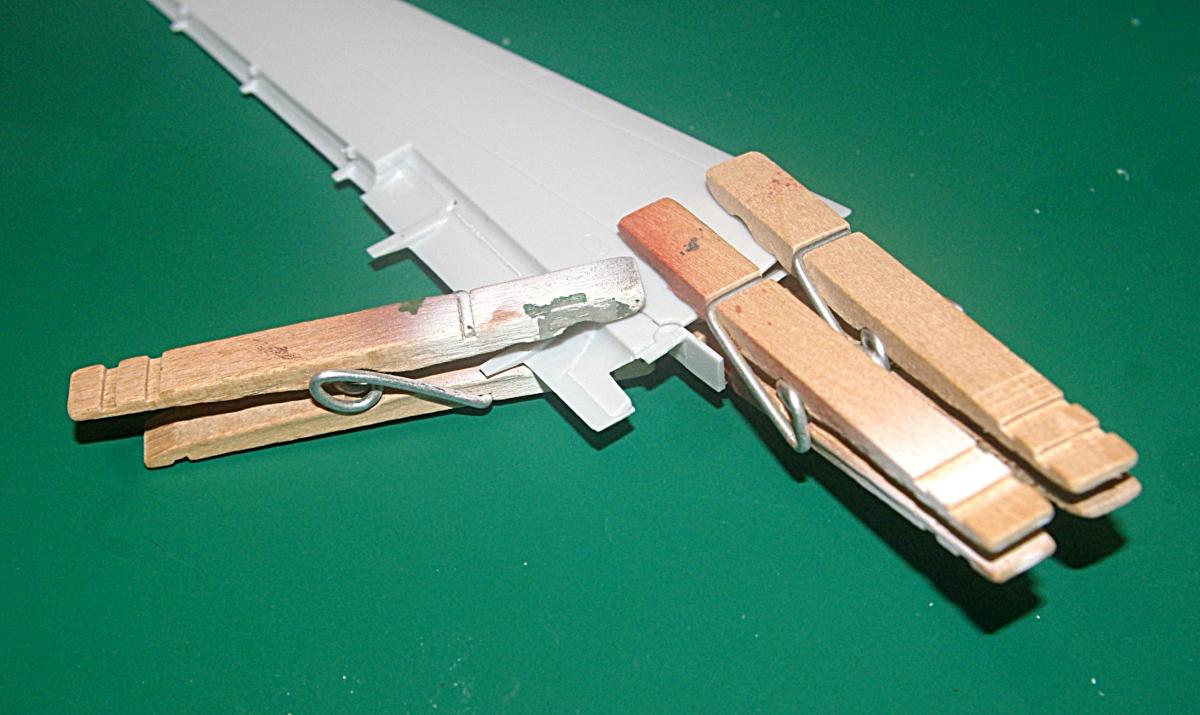
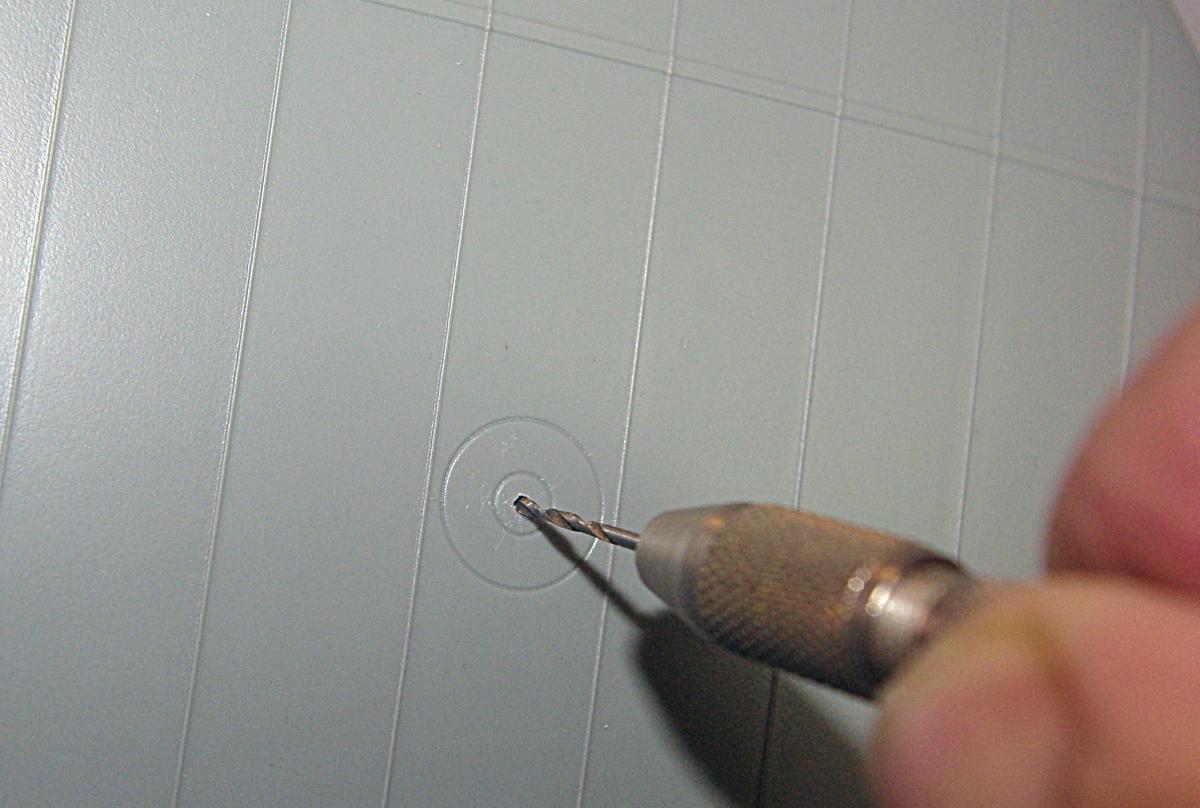
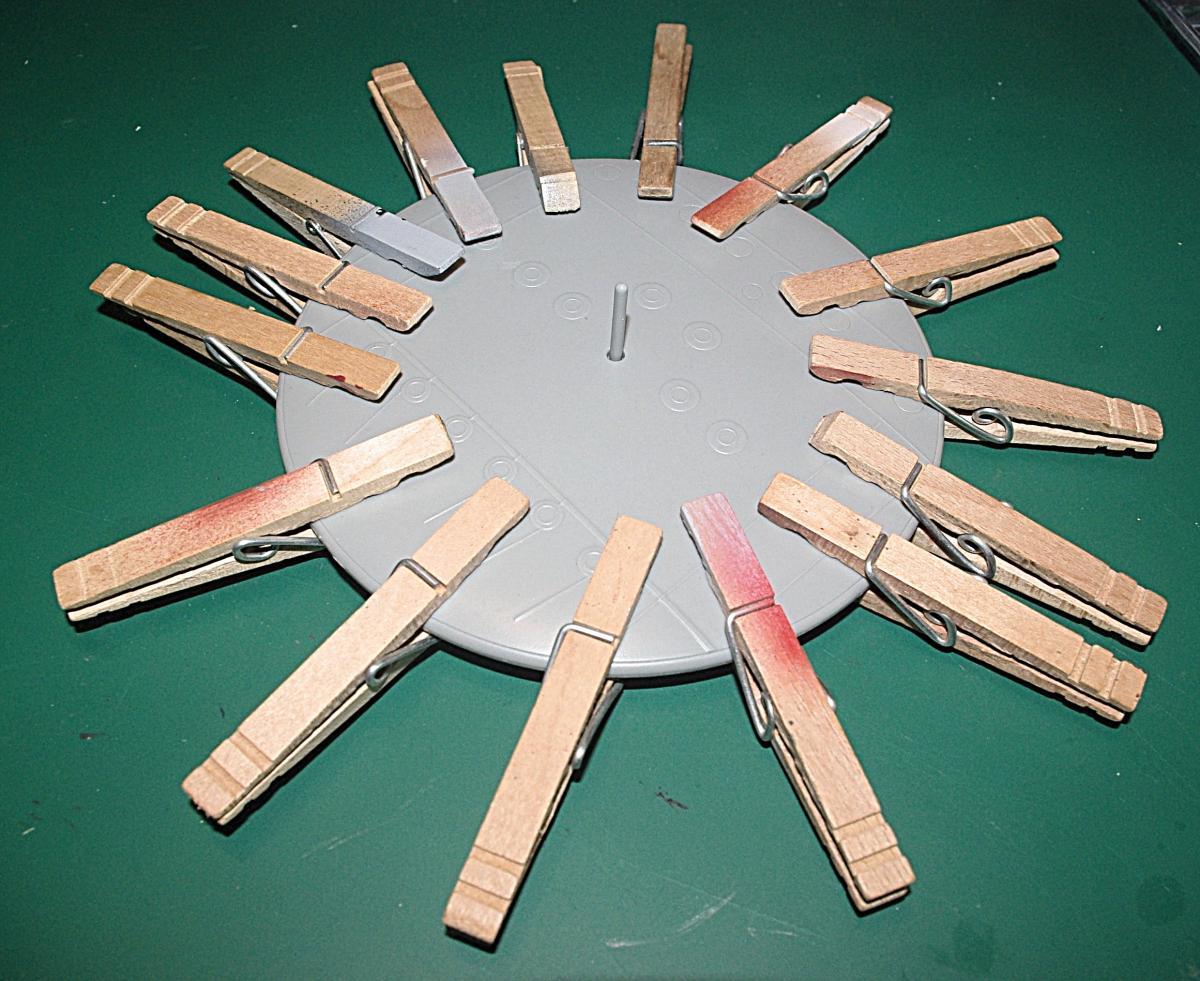
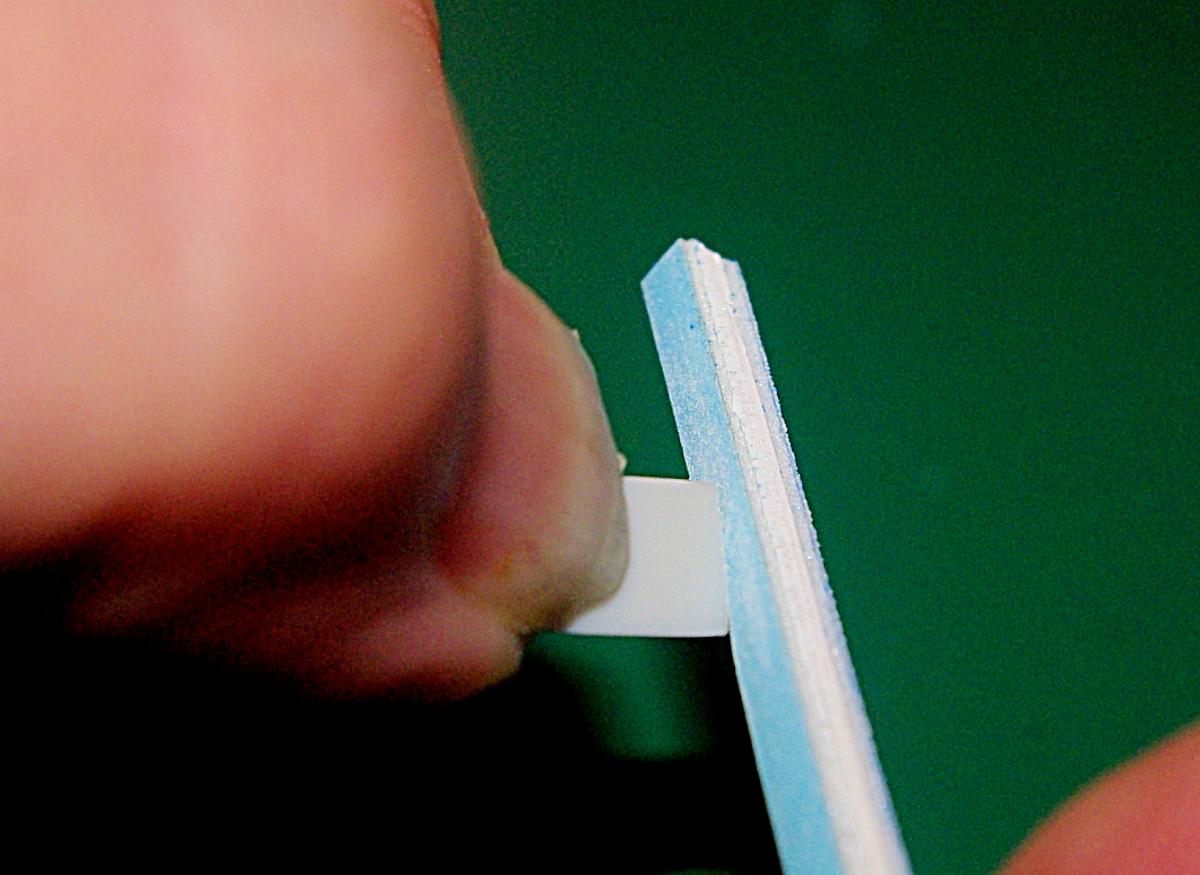
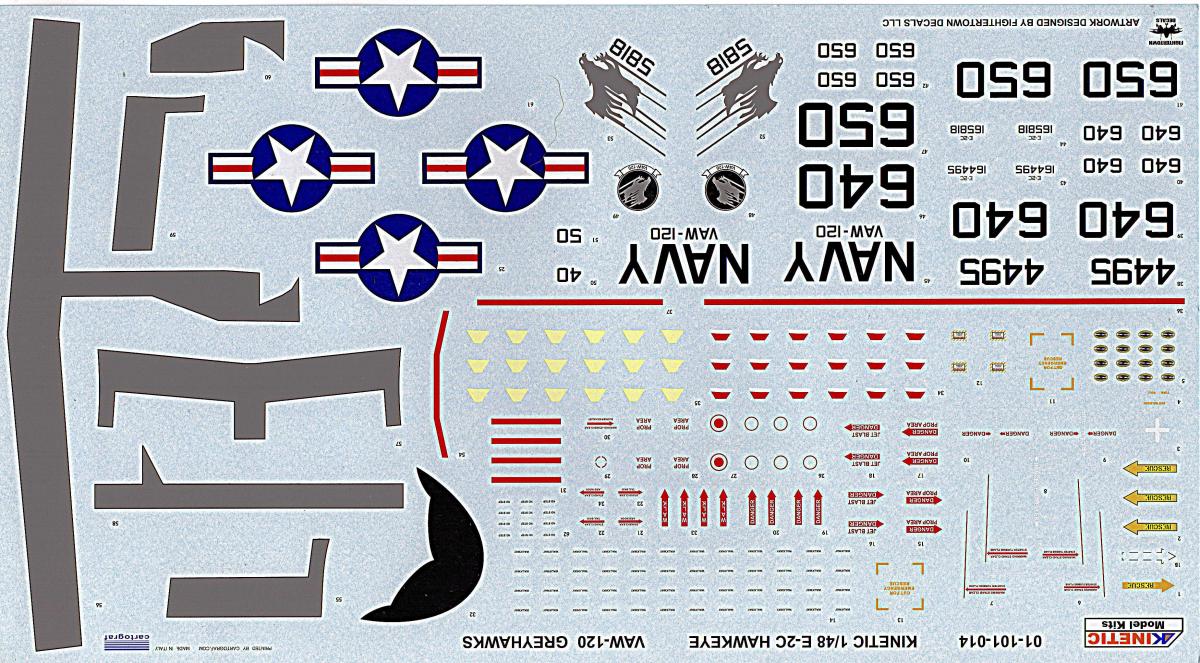
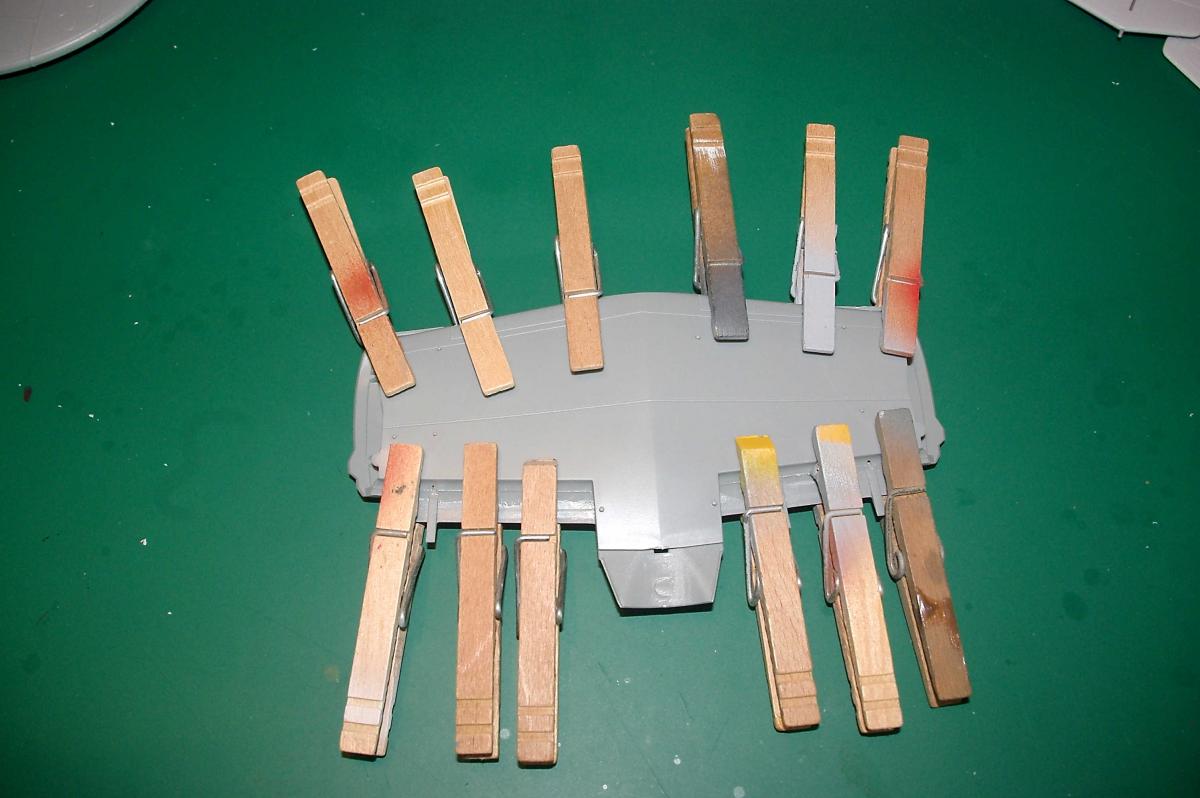
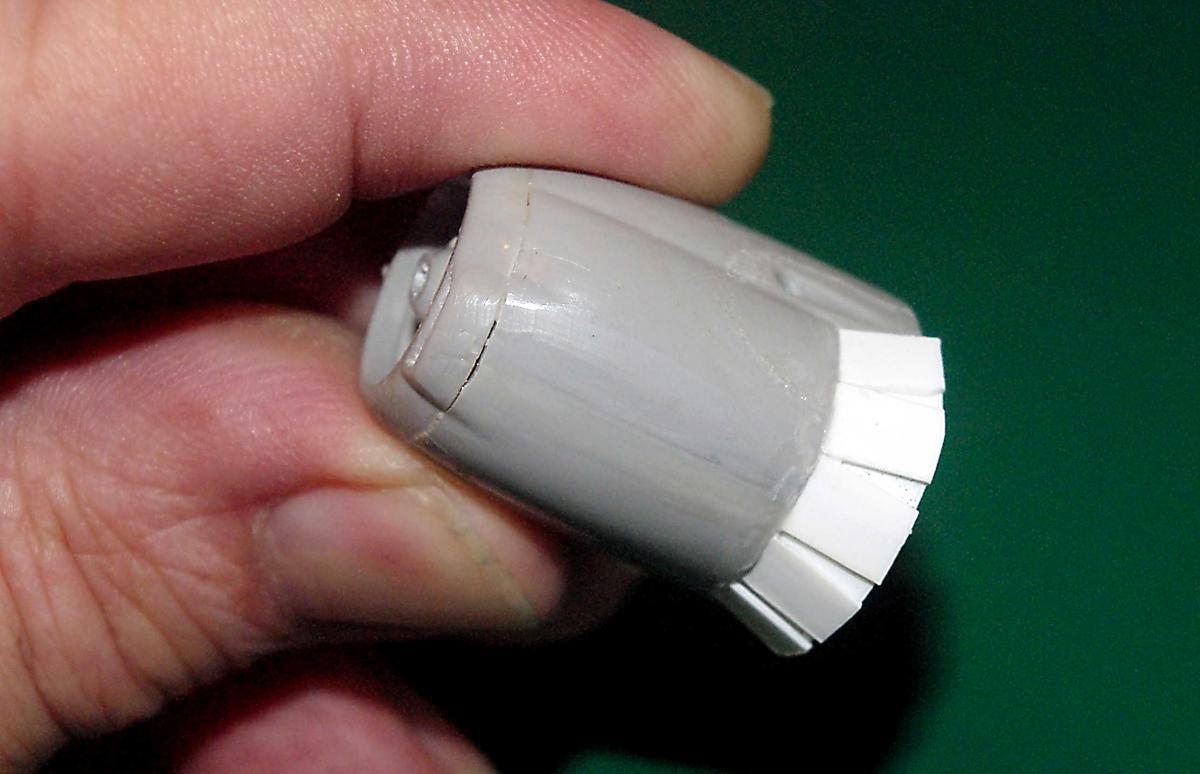
Hi all. More progress on the Hawkeye front. The door on the bottom of each nacelle is installed in the open position. Outer wing assembly is straightforward, but the configuration is such that clamping all around with wooden spring clothespins is the best way to go. This is due to positionable flaps and ailerons. There are inserts with proper detail for the wing fold area. Which ones you use depends on whether you want the wings folded or not. My client specified extended, so those inserts include healthy spars that eliminates any possibility of sagging. This shot shows the wing upside down. [ And so does this one. Just a different angle. Here is how it looks when viewed from the top. In order to get everything tight, clothespins are used for the final fit around the insert. In order to mount part H1 on top of the radome disc, it's necessary to drill a hole in the center of the disc. Strangely, Kinetic does not have a depression or any other method of locating the centerpoint, so you're gonna have to do it with a pin vise and ye olde eyeball computer. When joining the upper and lower radome halves, the only practical clamping method is a slew of wood clothespins. If you don't have enough, go buy some. Incidentally, don't forget to install the shaft that allows the dome to rotate (by hand). If you plan to fold the wings, the doors under the wings that cover the connection need to be posed open. That configuration is seen on the left. You do want to clean up any rough edges where the part might have broken off the sprue. On the right is a door modified to fit closed. A sanding stick does the job in short order. Properly trimmed, the doors can be made to fit perfectly.
-
Very nicely done!
-
For those who are interested, linstallment #7 of the Williams Bros C-46 build is now online in the Builds sub-forum. Comments are welcome.
-
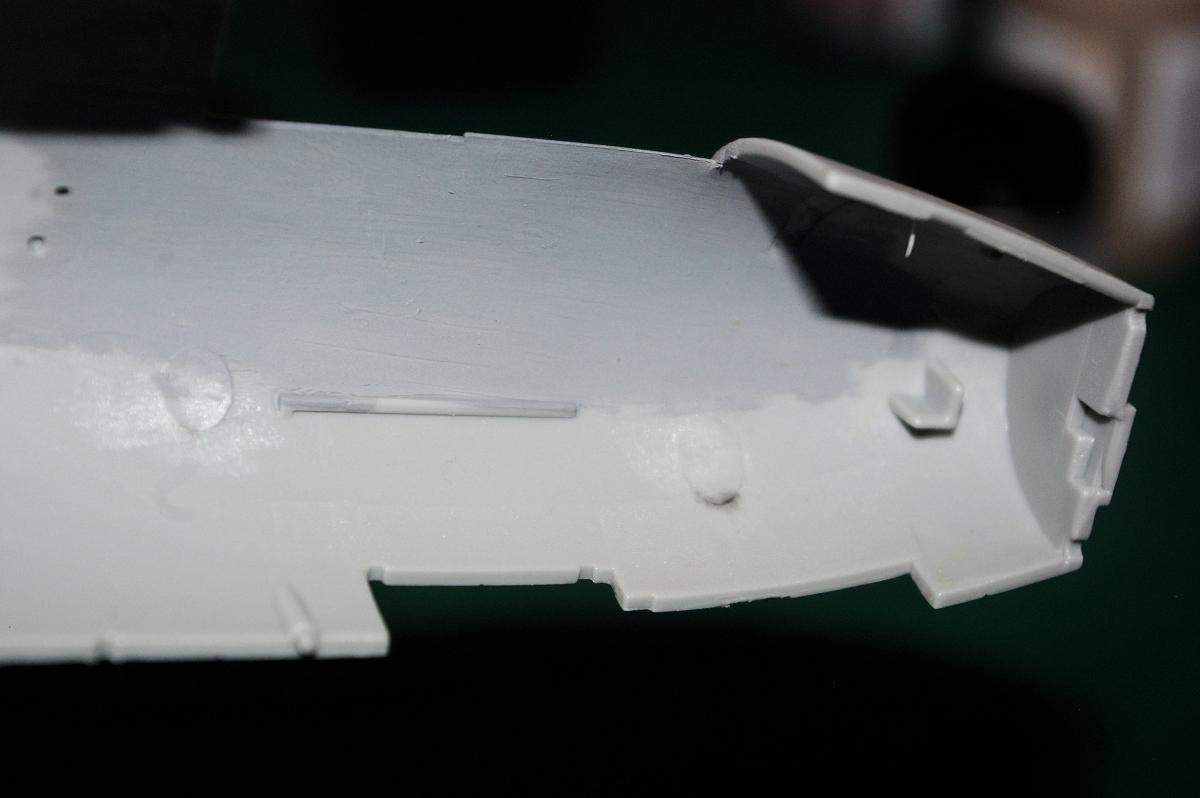
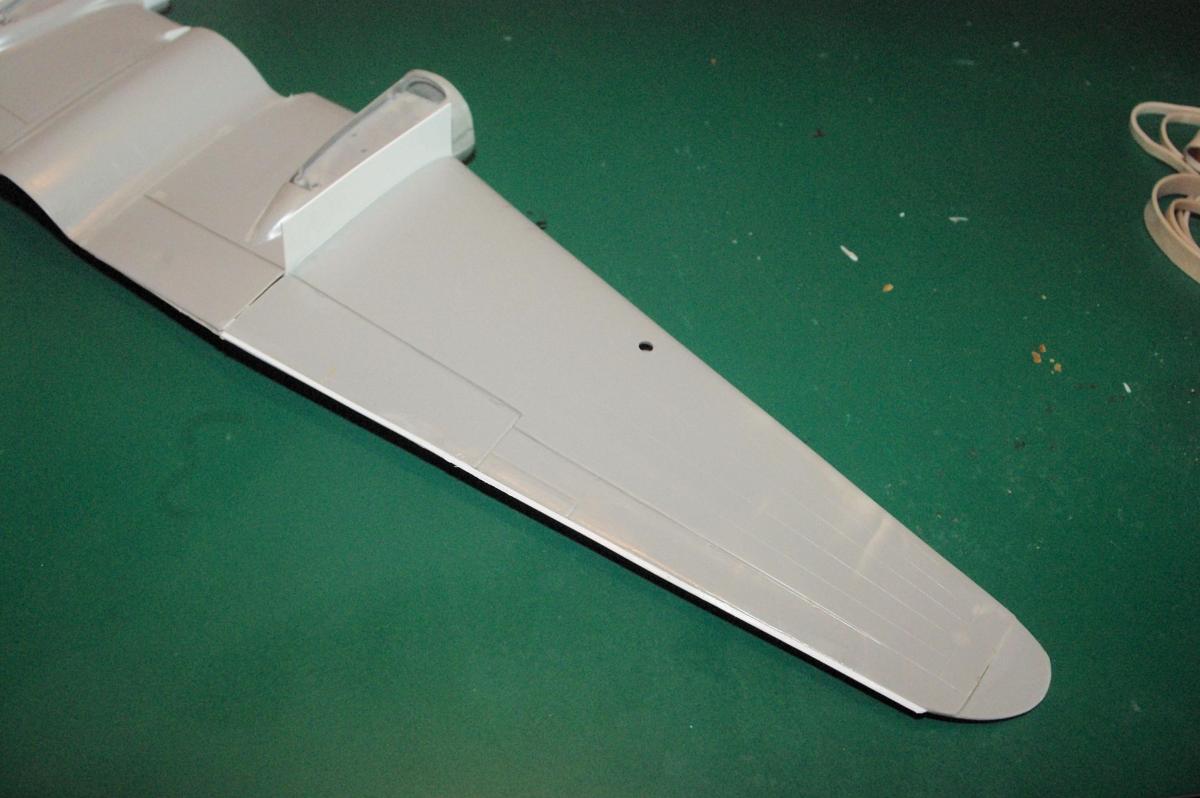
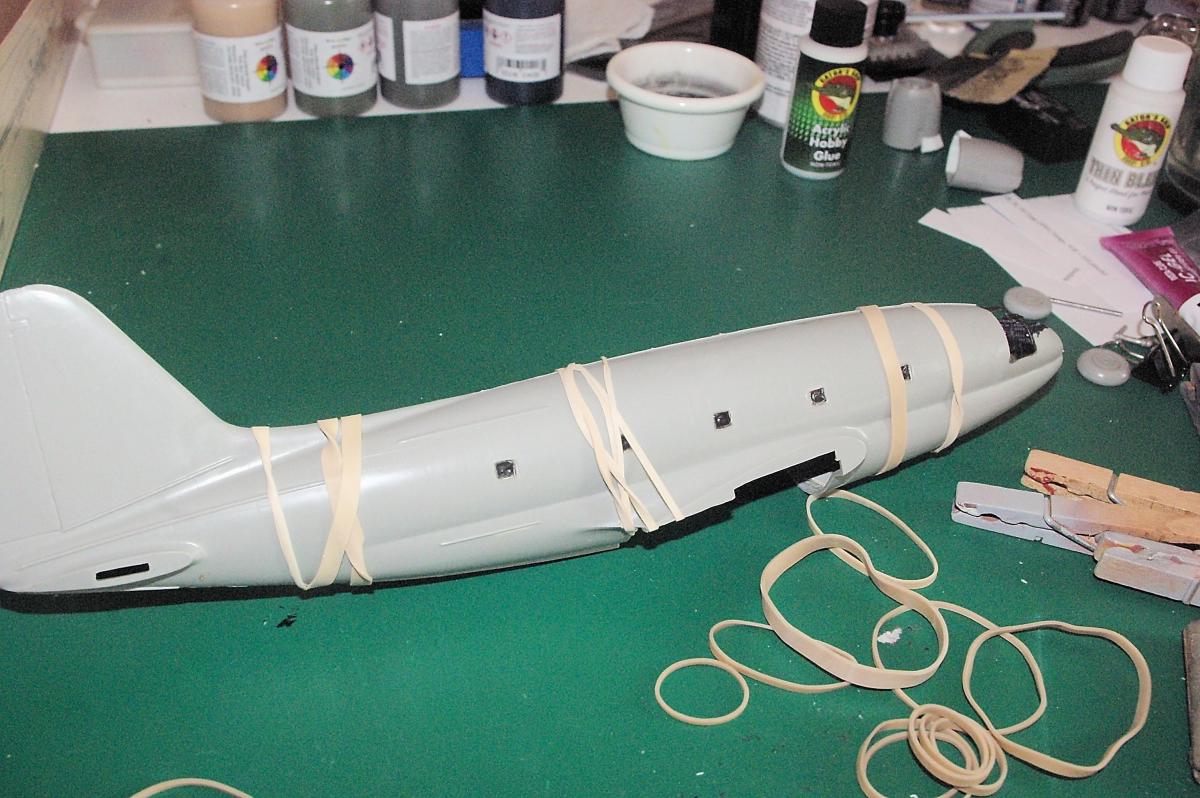
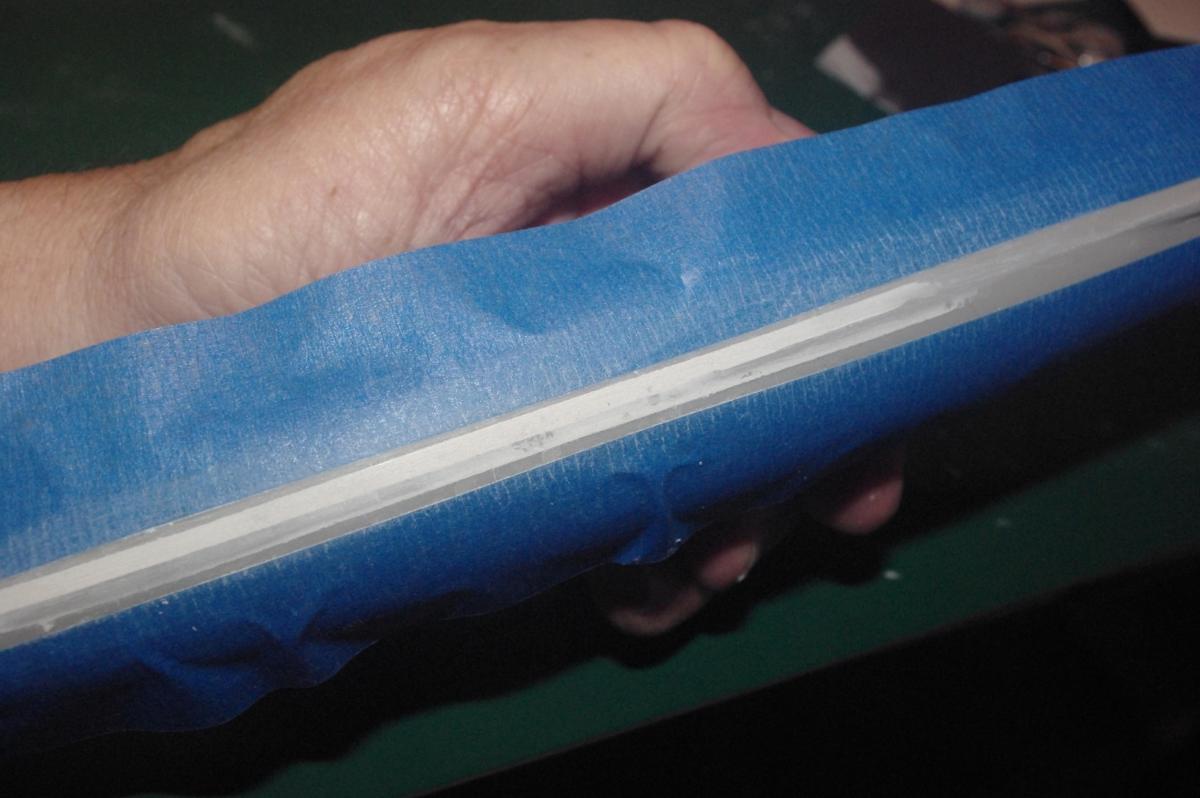
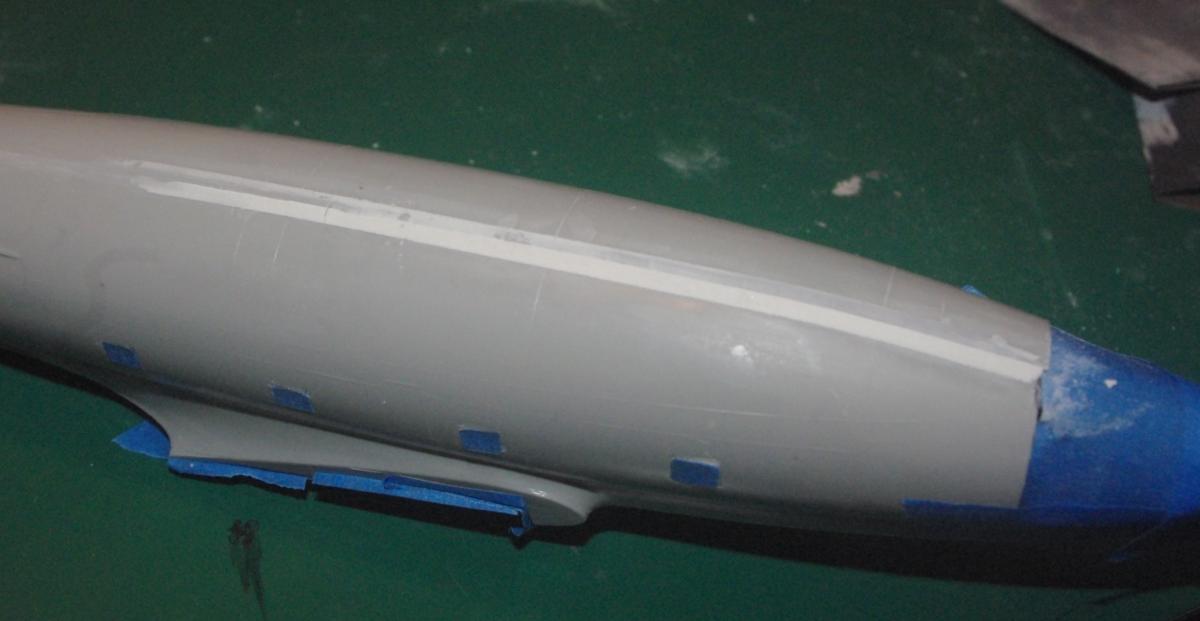
Hi all, Here's the latest for your viewing pleasure. The port outer wing panel trailing edge didn't line up, so I had to fill it with a piece of .020" Evergreen strip. Also, in order to attain the correct dihedral for the outer panel, I had intentionally left the bottom seam unglued. A piece of .020" styrene was shoved into the seam on each side, adjusted by eyeball so that the dihedral would be equal and slopped on some solvent. When that dried, the styrene would be cut down to match the wing. At long last, the fuselage halves were joined. I had to do it a few inches at a time, starting with the top seam and slowiy working my way around. Rubber bands, wood spring clothes pins, metal clips and anything else that would work were used. In spite of that, I still wound up with steps in some areas of the seams that would have to be addressed. In order to protect the surface detail, a strip of blue masking tape was laid down paralleling the seam step that needed to corrected. Squadron White Stuff was used to fill the step, then sanded down with 120, 320 and 600 grit sandpaper. The photo shows the putty already sanded down. Incidentally, the tape allows you to get a near-featheredge before removing the tape. Here's the bottom seam after being filled and sanded. Strangely, the short portion aft of the tail wheel well turned out to be the worst step area. In order to finish feather-edging the putty into the fuselage skin, I laid down another couple of tape strips just slightly out from the edge of the recently sanded putty. Then I went over the putty with 600 grit paper to finally fair the putty in. The bottom seam was finished out the same way. And there you have it. The step has been eliminated and smoothly faired in to the kit's surface. After a shot or two of DupliColor Sandable Filler and Primer, I can move on to the next problem. Incidentally, The cockpit has been merely masked off, due to the extreme thinness of the vacuformed canopy.
-
Just in case y'all haven't checked the Builds subforum, I've started a second series. This one features the Kinetic 1/48 E2C Hawkeye. Since the C-46 is not yet finished, I'm now working two builds at the same time. Check in from time to time to see how things are going and don't hesitate to comment.
- 1 reply
-
- 2
-
-
- E2C Hawkeye
- Hawkeye
- (and 4 more)
-
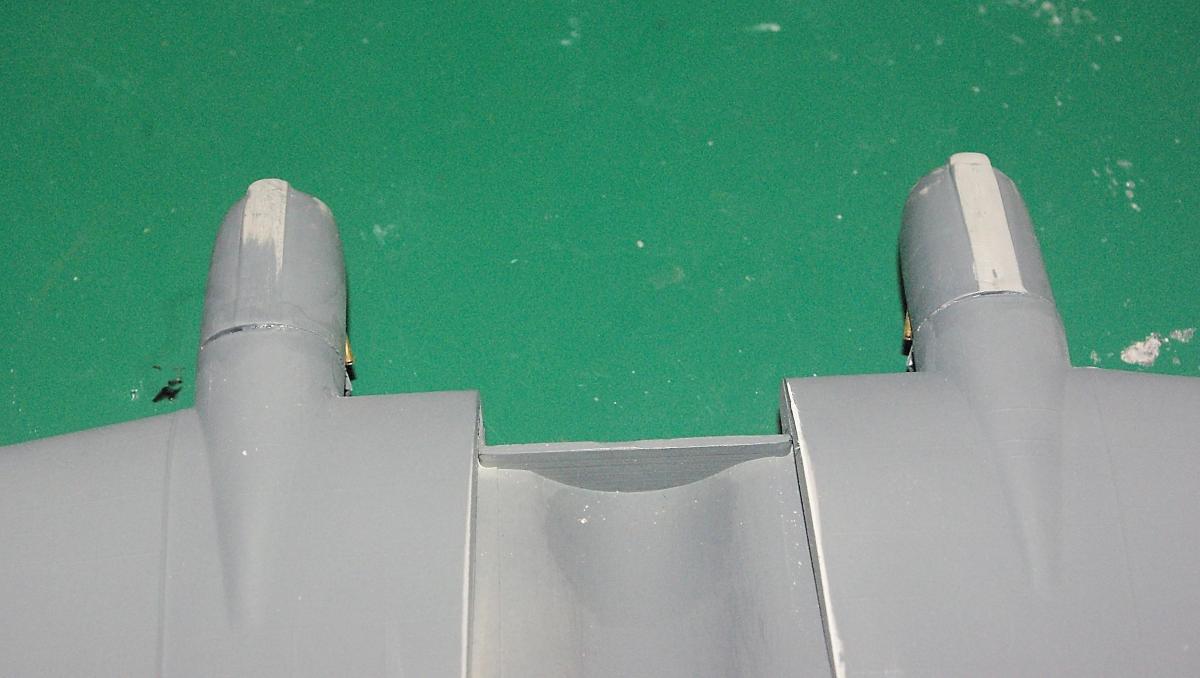
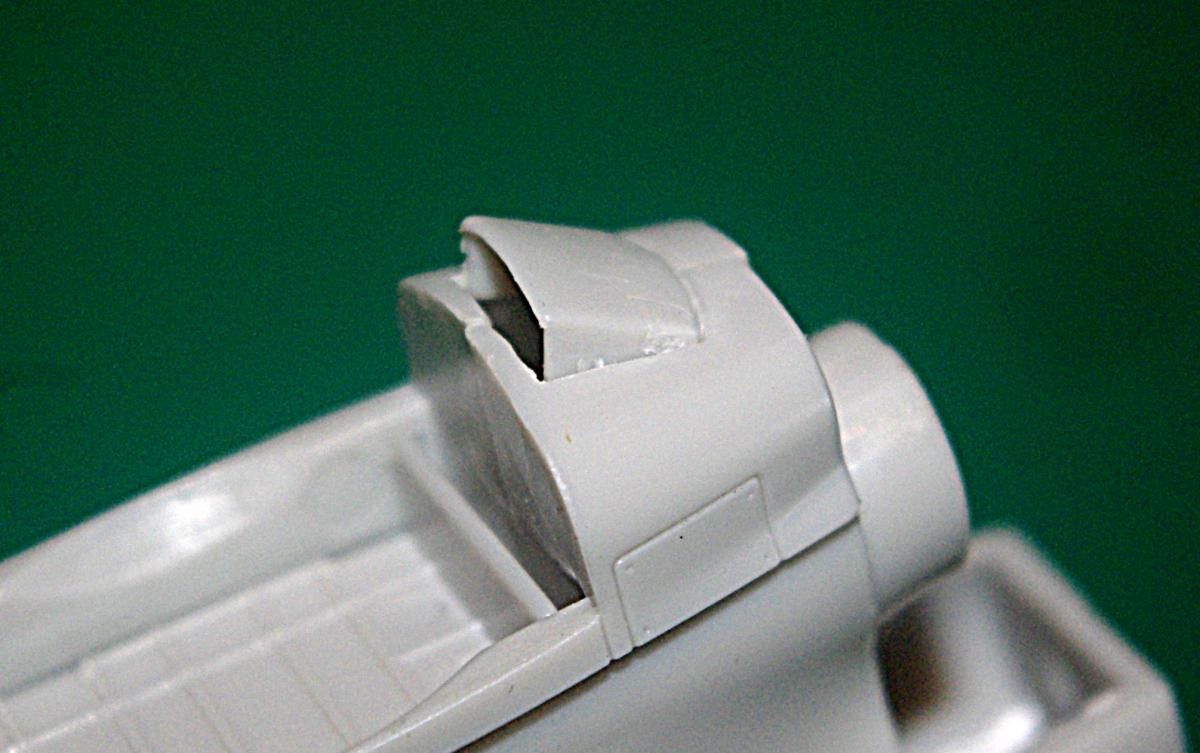
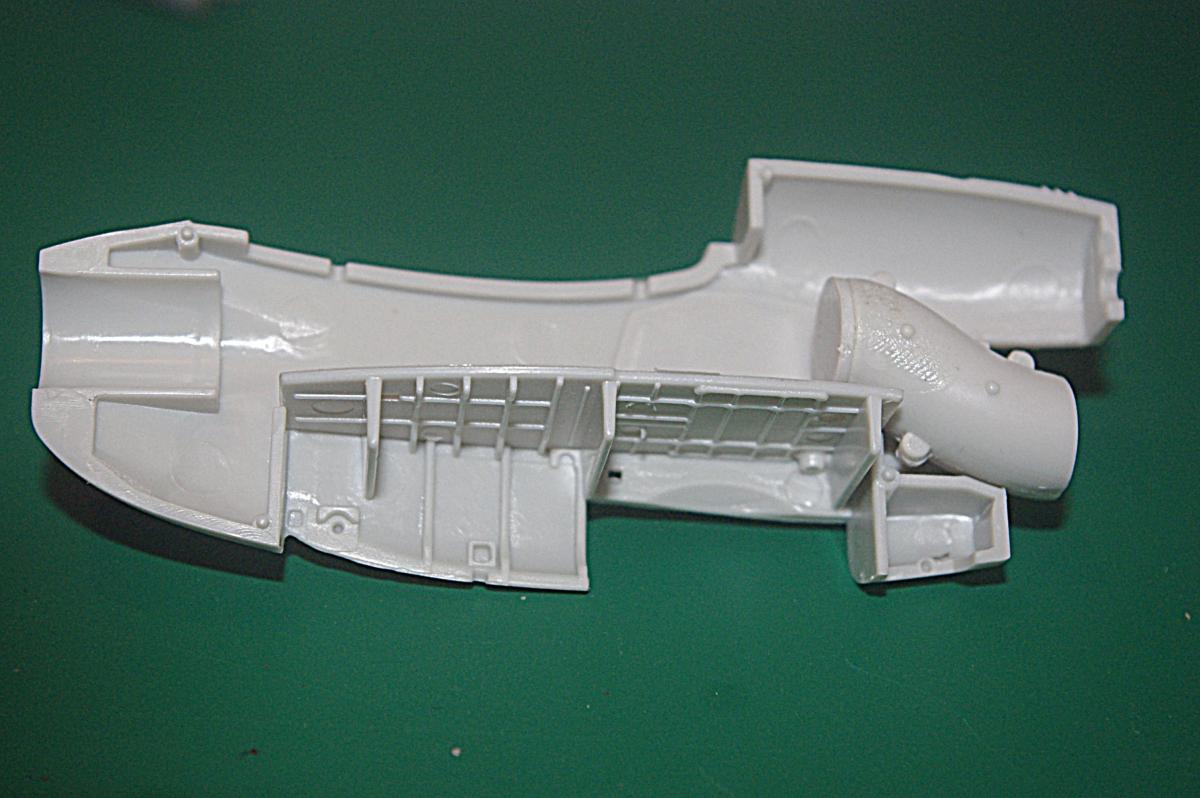
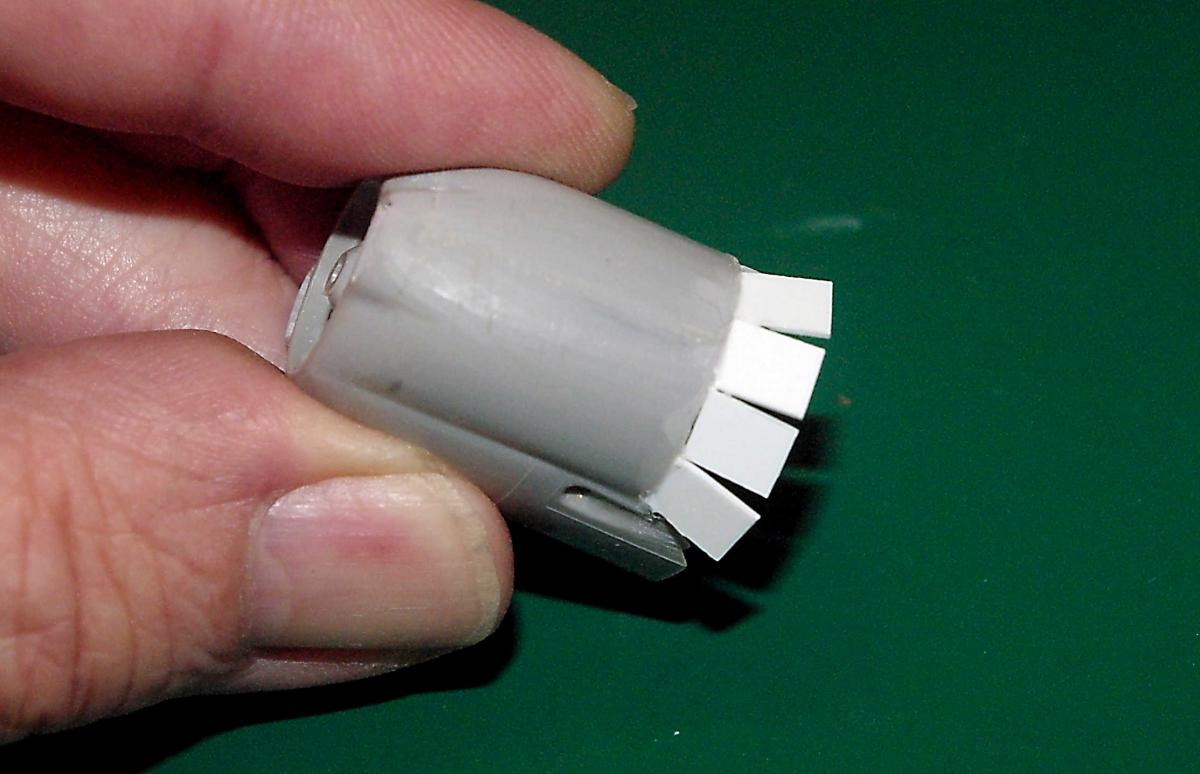
Hi all, This is another commission build that follows the C-46. Not near as difficult as the C-46, but more involved and tedious due to the greater number of parts, with many of them...primarily antennas...being very small and delicate.You also have options for extended or folded wings, flap position, etc. Hope you enjoy this series as many of you have the ongoing C-46 series. The box is large, sturdy, is crammed full of parts and presents a superb illustration to attract you. Interestingly, nowhere on the boxtop, instructions or decal sheet...including the aftermarket decal sheet...is the manufacturer's name mentioned. Obviously, this is due to royalty demands of various manufacturers. This is the kit-provided decal sheet. And the aftermarket sheet from Vagabond Decals that my client provided. Construction started with the tail components. You'll have to be very careful not to hit the static discharge wires. Center section of the the wing comes next. Here you're looking at the bottom of the center section. Old fashioned wood, spring style clothespins make excellent clamps. Don't forget that you can use them in tight areas if you backcut the jaws. The air intake duct is a somewhat tricky fit. Spend some time dry fitting the assembled duct and gear well insert before you ever reach for the glue/solvent. Don't overlook part 28 that mounts in the rear of each duct. It shows the front of the turbine fan but is virtually invisible after the nacelle is assembled, However, it does block light. A slightly different view showing the duct and gear well insert in place. Note that the duct has a front and back, though it's hard to tell, so be sure to determine that before installing part 28.
-
Nick, For your information, I authored an ebook that explains how to make your own decals. It includes an explanation of several different papers, coatings, printer techniques, etc. It also shows how to simply copy old decal sheets and eliminate the yellow cast from aged sheets. You can find full information and an ordering button by going to http://scalepublications.freeyellow.com Hope this helps.
-
Hi all, Here's the next batch of progress shots. It's been a slow road, but things are beginning to speed up a bit. Right now, though it doesn't show in this installment, I'm mating the fuselage halves. Now on to the photos: Small rectangles of .020 were used for the main cowl flaps. Even smaller pieces were used on the inside to cover the Vee shaped gaps. Here's a before and after shot of the cowl flap installation. Note that the individual flaps are a butt joint where the mount on the kit cowling. Due to the .020" thickness, you'll need a light touch and patience. Whlle the flaps were drying, I installed the windows. Some of you may prefer to sand the windows smooth and then polish them out. Do that and you'll either have to rescribe the entire model or sand it smooth. My client preferred to retain the raised lines and use the windows as is. The cockpit as seen here is nearly done. Control yokes had to be shortened and there were a number of other problems, but the end result is satisfactory. All in all, not bad when you consider it's a Williams Bros kit. With the addition of the overhead console, I'm finally ready to close the fuselage! Incidentally, I would suggest the use of black rubber toughened CA from BSI to attach the overhead console.
-
Testors discontinues even MORE Model Master enamel
ipmsusa2 replied to SkyKing's topic in General Modeling
Gil, that's essentially what I'm saying. I'll do exactly what you're doing for my own models or clients' commissions. But whenever I do an ebook, I have to think about the easy availability of existing solvent paints versus the gradual demise of Model Master. While I'll still use solvent paints in the ebooks...unless I am forced to change to acrylics for readers...I need to use solvent paints that are/will be more readiy available than MM. -
Testors discontinues even MORE Model Master enamel
ipmsusa2 replied to SkyKing's topic in General Modeling
Dave, I'm aware of that. But since Tru-Color is expanding their line at a rapid pace, you have to assume that they've found a way to handle those issues. Besides, with the stash of solvent paints I currently have, switching wholesale to acrylics doesn't even begin to approach practicality. -
Testors discontinues even MORE Model Master enamel
ipmsusa2 replied to SkyKing's topic in General Modeling
Kevin, that's fine. But I can't stand acrylics, especially water-based acrylics. I will be trying Tru-Color and anticipate gradually shifting to them as my go to paint if tests work as expected. -
Testors discontinues even MORE Model Master enamel
ipmsusa2 replied to SkyKing's topic in General Modeling
For those who are still dropping into Hobby Lobby for the occasional bottle of Model Master paint, you need to be aware of a change. While I can only relate my experience with one particular store, I suspect you'll find the same thing at every HL store since they are a chain. As of August 18, 2017, I found only one display rack of Testors/Model Master paint. Fully 60% of the products were the 1/4 oz square bottles. You know, the ones that started out with a price of 10 cents back in the 50s. They are now priced at $1.79 each. As for the rest of the paint, it's mostly Acryl with a scattering of Model Master enamels. Other paints? A small rack of Vallejo along with various craft paints. -
Here's a couple or three questions that have yet to be addressed. Is it a must that we use the Tru-Color masking paper or can we continue to use the masking tape of our choice, such as blue painters tape? Also, does Tru-Color paint have sufficient bite so that the paint will not lift from various surfaces? And finally, I normally use Dupli-Color Sandable Filler & Primer (an acrylic lacquer) from the nearest auto parts store. I use it as a base surface before applying finish coats. Also, I use it as a barrier on vinyl so that I can then apply any type of paint I wish without worrying about the paint lifting from the vinyl. Will I be able to continue that practice?
-
Michael is correct. That information and much more can also be found in my ebook on scale jumping. It can be found here.
-
Testors discontinues even MORE Model Master enamel
ipmsusa2 replied to SkyKing's topic in General Modeling
I was needing clarification on exactly which paints are being discontinued by Testors this time around. Reason? I'm trying to complete my latest column in Toy Farmer. Keep in mind that the beginning of this thread stated that Testors was dropping the International, Military & Figure Enamel Paints. This thread also stated that this included ALL of the FS595 colors. I brought this up to the customer service rep and was put on hold while she checked for accurate information. Here's the latest, straight from a customer service rep at Rustoleum. As we have all been told, the International, Military & Figure Enamel Paints ARE being discontinued. And YES, this DOES include SOME FS595 colors but NOT ALL. According to the Testors website, the U.S Military Enamels section of the group contains 22 FS colors. HOWEVER, the American FS Enamel Paints category has NOT been discontinued...at least for now...and according to the Testors website contains 50 colors, most of them being the ones that many of us use. Keep in mind that this information can only be considered valid as of August 17, 2017 at approximately 3 p.m. CDT. and must be subject to change at any moment. Also, the contact phone number listed on the Testors website now takes you directly to the Rustoleum customer service line. At the same time, the old phone number for Testors in Rockford, Illinois...if you can find it...takes you to an options recording that will, if you choose the customer service option, will take you directly to...you guessed it...the Rustoleum customer service line. -
Testors discontinues even MORE Model Master enamel
ipmsusa2 replied to SkyKing's topic in General Modeling
When you look at the gradual demise of MM paints, let me throw in a slightly different perspective. Many of you know of me as a freelance writer/professional modelbuilder and therein lies a major problem. As Nick, Michael and Gil have pointed out, "comfort of familiarity" combined with ready availability are even more important when you build models as a business. If you use MM, as I do, for most of my commission work, I've learned how to get MM enamels to provide the results I need. Keep in mind that if my clients weren't satisfied with what I give them, I'd be using different paint. The problem for me is this: I don't have time to put my commissions on hold while I spend time and money learning all the nuances of other brands, whether enamel or acrylic. As for converting to acrylics wholesale, the same comments apply in spades since I have never used acrylics and would have to start from square one. Regardingn articles and books, the enmasse elimination of an entire category of MM enamels gives me nightmares. Consider that a reader that is just getting into modelbuilding...or returning after a couple of decades...will not/may not be able to find the recommended paints if he/she is trying to replicate a particular project that I have described. Are there replacements? Sure, but the new or casual modeler may not have a clue where to find them. Especially since brick and mortar hobby shops are dying daily and online shops are difficult to find for the modeler who just discovered the hobby aisle at Hobby Lobby. Is the Testor decision a disaster. In some respects, the answer will be yes. Obviously, we will adapt and survive, but there will be definite damage in ways that have already been described by others. There will also be collateral damage that we haven't even begun to suspect. -
Hey John, Your C-46 is a dandy. Very nice effort. I'll be using a vac canopy as required by my client. The photoetch is still available from the company's website (http://www.maestromodels.com), as well as ebay and a number of other online sources. Richard