

MikeH
-
Posts
316 -
Joined
-
Last visited
Content Type
Profiles
Forums
Events
Everything posted by MikeH
-
Here it is. http://www.youtube.com/watch?v=cYTmx9WncMM
-
I've got the book case done tonight. Here it is with the books for mock-up. I've also made a video tutorial as to the technique I used to create the look.
-
Here's the table. I tried for a stained mahogany color/look with a red tint to it. Wood color base with a scrub over with the toothbrush using burnt sienna, and some dry brush highlights of raw umber, and a burnt umber oil wash to top it all off.
-
Here's my progress today. I based with Testors "wood", the followed over the top with a tooth brush and dry brushed Raw Sienna. After which, I mixed the wood color with flat white and hit a few highlight areas like the wood joints and some "high traffic" spots. Lastly I followed it up with a burnt umber oil wash. I gave some boards more of a sludge wash, and wiped excess off of some others to give the appearance of the random wood color pattern. I've got the table to do next.
-
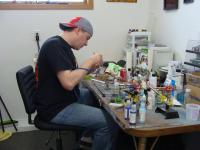
While I wait for my Robin's Demise kit to arrive, I'm going to work on this one. The challenge with this will be the painting and the entire process of blending and shading and using flat colors as opposed to gloss. The wooden table and floor will certainly pose a challenge. This will be my first real figure model. I've 99% done automotive subjects, and the other 1% sci-fi.
-
great piece of weathering James. B)
-
Very clean build Gooch.
-
Nice work!
-
Nice work so far!
-
She's a beauty!
-

Tamiya's Aston Martin DBS completed *PICS*
MikeH replied to nostab's topic in Cars, Trucks, & Motorcycles
I had the fortune to see this one in person at Nordicon. It's beautiful! -
Revell really did a nice job with the kit. I was really pressed for time with this one, but the interior is just as nicely decorated with detail. If I'd had the time to BMF everything and paint etc. it'd really pop. This kit is an 8 out of 10 on my scale.
-
Just completed this one for review. I wished I had the time between project to spend some quality time and doll it up. GREAT GREAT kit with tons of potential. I'll be getting a couple more and dolling them up for sure.
-
Looks great. What scale is that ? 1/87?
-
I wouldn't say I'm a pro by any means. LOL I just enjoy the hobby and it was very gratifying to get the response I did. That was more important than the payday. I would've been happy wih the $50 I shot him just for the materials involved. To hear and see him react the way he did to something that I personally put the effort in to is truly the most rewarding.
-
I used nail polish regularly also. It offers a variety of colors and they're cheap. My personal favorite is white pearl nail polish. Plus I mix it 1:1 with lacquer thinner and it lays down beautifully.
-
I delivered the commissioned build to the owner today. "You got that black beauty done. Holy censored " "Holy censored censored look at that!" "Oh my god look at that." Were a few of his words. He was VERY happy with the finished project. He also gave me a quick tour of his diecast collection, original Schwinn bike (very cool) and gave me two models he had also. When it came time to pay up he says "How's $200 sound?" to which my reply was "That's too much" (and it is in my opinion). He countered with "You put a lot of work and effort in to that and you're getting $200 and we're not discussing it." Needless to say I was very thankful, and gracious about it. I'm still in awe. He said he'll have it as a centerpiece with his car at the annual car show in April with my name by it.
-
Very nice & clean build Gooch.
-
Here's my next project for the IPMS Reviewer's Corps. Paint is on - Testors lacquer root beer brown
-
Thanks again guys for the comments. Here's a shot of the finished undercarriage and the engine bay that I added some detail to tonight. The decals are printed and drying so tomorrow this character will officially be DONE.
-
All done except for printing my own decals and some engine bay decals and detailing.
-
A bit late but Tamiya's Nissan 350Z is a great kit for that.
-
Thanks guys. A few frustration hours, clamps and glue, the interior is in place. The dash was twisting on something for some reason and couldn't figure out what. Next will be the windows, and front end/headlights, and some engine bay detailing. Wish me luck...
-
I used the House of Kolor hobby masking film. It's clear and has a very mild "tacky" adhesive that burnishes down and peals off beautifully without harming the paint. It's also easy to follow your cut lines as clear as it is. I also have Parafilm, but opted for the HOK stuff as the parafilm was too cloudy and was too flexible. I used my Grex Genesis XG airbrush on lower air pressure and a .3 mm tip for small detail to spray the window trim and t=top trim along with the grille and front intake in the engine bay.
-
I broke out the airbrushes and masking film tonight. The windows, t-tops, and front grille area are now a satin black. The interior's 99% done, I just have to get the brake cylinder in with the pedals and the stick shift.