


ghodges
-
Posts
7,570 -
Joined
-
Last visited
-
Days Won
298
Content Type
Profiles
Forums
Events
Posts posted by ghodges
-
-
The old Monogram Phantom kits are very accurate in airframe outline and exterior detailing, but most people don't like their raised panel lines. Most of the Hasagawa and even the old ESCI F-4s have indented panel lines. By the way, the Monogram Pro-Modeler F-4E is actually a reboxing of the Hasagawa kit, and not a Monogram or Revell mold.
As for me, I tend to build what I have on the shelf. This Phantom is just an exercise in a color scheme that I want to add to my collection, so I'm not too concerned with the panel lines. Cheers!
GIL

-
That's a great looking Phantom Jeff! I haven't seen that scheme since the old 1/48 Revell kit in the 70's was new. I've always admired the modern Luftwaffe camo on their F-86s, F-104's and F-4's. You nailed it nicely! Congrats, and thanks for sharing!
GIL
-
Like I said.....better info would be here soon!
GIL
-
Started my F-4C model.......this is about as clean and organized as my bench gets. Don't know how I make progress sometimes!
GIL
-
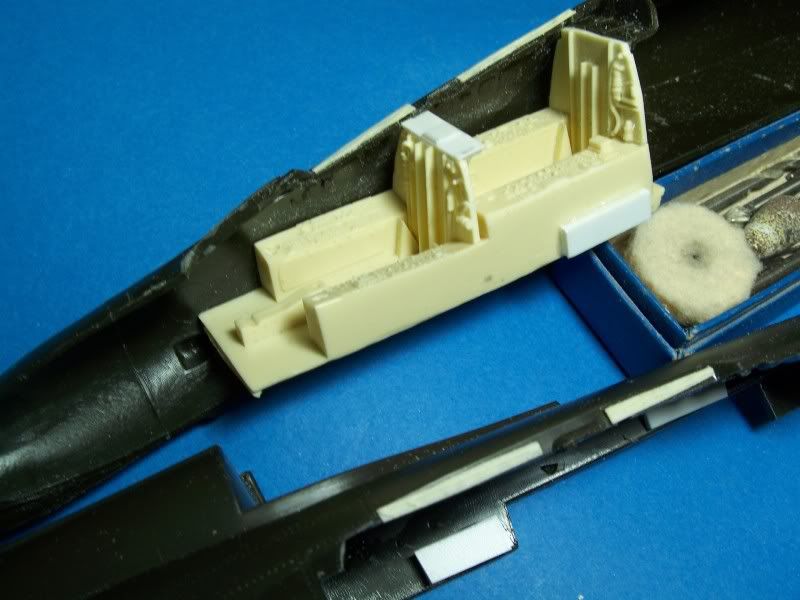
This is an ugly picture, but it shows how I'm shoe-horning a True Details resin F-4C interior into the old Monogram 1/48 F-4C kit. I have the Phoenix Nats convention decals with those colorful striped Phantoms, and I'm gonna do one of them! Outside of the resin interior, I don't plan to do too much extra.
Note some pieces of plastic placed on the resin tub and in the fuselage to help position it. The Monogram kit actually has decent interior side details, so I skipped using those resin parts, opting only to add the cockpit sill items. More pics as I make progress! Comments, critiques, and questions welcome!
GIL
-
I'll offer the following as a guide, but don't accept it as "gospel"....
American decks prior to WWII were natural wood color, or basically a "yellow/tan". Somewhere right around the beginning of the war, it was realized that they needed to be painted blue to blend in with the ocean when seen from the air, so they were painted "deck blue". That's a blue/grey that (to me) looks very similar to the a/c blue-grey used in 1942/43 on Wildcats and Devastators. Later ship camo (like the Saratoga in '44) went to an overall darker blue, but the concept was the same....a blue that would make the deck harder to spot from the air. You may find more useful information in the Sq. Sig. "Aircraft Carriers in Action" books.
Japanese decks seem to have always been a tan color. I've never seen any depiction of them being camouflaged. This may have been simply due to the fact that their carrier forces were used only sporadically after 1943 and they never spent the money and time on repainting. One thing you may note is that the planking on Japanese decks runs bow to stern while American deck planking runs span-wise across the deck.
A pin-wash is a term for a wash that is applied in a pin-point manner, as opposed to a wash that is generally slopped on. It's applied with a fine pointed brush and the attempt is to limit the wash only to the detail (bolt head, panel line, whatever) where the brush touches. When applied correctly, there's no need to wipe the excess away (though this can be done if needed).
Hope this helps!
GIL
-
Glad to have you here William, and congrats on your retirement! Let us know how we can help you get back into building models that you DON'T crash!
GIL
-
Sweet Zero Ying! What paint did you use for the Aotake color in your wheel wells? Looks like you nailed it!
GIL
-
Very nice looking Shiden-Kai! What silvers did you use on the bottom? The varying panels contrast nicely. Thanks for posting!
GIL
-
Wow.....doesn't that make 3 1/32 Bf-109E's in the last year (Trumpeter, Eduard, and now Dragon)? I'll just stick with my ancient Hasagawa kit (and the aftermarket I have for it) since I'm a glutton for punishment. However, I am interested in whether the new Dragon kit is any better than the last 2 1/32 109E's. My understanding is that they were less than desired by the Luftwaffe hard corp.......
GIL
-
That's a darn pretty model of a dang ugly airplane! Your wooden props came out really nice! What technique and paints did you use?
GIL
-
Those are both super builds! Anyone who can build one of the old Airfix 1/72 biplanes has bonified skills! Thanks for sharing!
GIL
-
It could be your wash isn't thin enough OR that it needs a tad more liquid detergent added to help it break the surface tension easier. If your wash is actually spreading outward from where you're applying it, that would be a sign of a thin gloss coat that's allowing the flat paint to soak up the wash. That's my best guess without you telling exactly what you're using for a wash medium. Best of luck!
GIL
-
Welcome! Are you named after the dog too?
I used to attend y'all's shows way back when. I hope to make another one after the statute of limitations runs out!GIL
-
Thanks for the heads-up Chris!
GIL
-
All objects have their OWN full area....However, a 1/48 F-104 model has 1/48 the surface area of a real F-104 (in theory). And, while we've shrunk the plane parts to 1/48 their original size for the model, the grain of the model paint is actually close to the same size (not shrunk) as any real paint used on any full size item! You can put the exact color green or gray used on the real Starfighter onto the scale model and the paint will NOT look the same. It will be probably be too "darK", or "bright" (actually meaning too intense) in comparison between the model and the prototype. Sometimes it's a problem of the juxtaposition of colors, such as an orange reserve band contrasting too much against the neighboring GSB. Your eyes tell you whether or not (in your own perception) of a problem. If it looks right to you, then scale effect isn't a problem.
Personally, I don't worry too much about scale effect. I've found that most model paints seem to have already accounted for this to a degree. Also, since we tend to weather and paint to match pics, we often take care of contrast problems without having to resort to changing the hue of the base colors. On the other hand, it can be argued that the degree of pre and post shading we use is just another way to achieve the same result: an altering of the basic finish to achieve greater scale authenticity.
All I was attempting to do was pass along a set of ratios that is easy to remember; 1/2 of the scale you're building in. I didn't invent it. I took it from my Luftwaffe Camouflage bible. It has a very long explanation about it. Whether you agree with it or not, it's obviously something that's bothered enough folks that some have tried to apply a formula that can help those who are concerned.
Some models look more "to scale", more "realistic", or "more authentic" than others. While many things in a build can contribute to that, a lot of people think that a "scale" paint job can help contribute to it. Cheers!
GIL
-
Arthur and all: Scale effect is a matter of personal opinion in that IF you don't like the colors that you apply, IF they don't look right, then you may need to adjust those colors for the scale of the model. It has less to do with atmospherics and more to do with surface area. The 1-1 scale item has MUCH more surface area to gather and reflect light and to let your eyes judge the colors, and even then the light that you see IT in will affect how you perceive those colors. A model has less surface area to reflect those same colors, so it's not unusual to think you might need to adjust a color so that it looks the same as on it's bigger brother. As mentioned above, the smaller the scale, the darker a paint will appear, so you always lighten colors for scale effect.
The best explanation I've seen as to ratios is basically 1/2 of the scale you're building. So, if you're building a 1/32 model, (to keep things easy), lighten your paint by about 15%. If you're building in 1/48, try lightening it by 25%. And in 1/72 you go up to about 33-35%. Most people use a flat white, but a very light flat gray may be safer, especially if working with something like red (you don't want pink!).
As mentioned, the TLAR method IS the bottom line. If it looks right-it IS right! If the color out of the bottle suits your eye, don't worry about things. It's all a matter of perception! Hope this helps!
GIL
-
Hi Michael! I'm NO figure painter, but I'll try to write something that might help you.....
First of all, I really like Model Master enamel "Leather" for painting brown leather items like headrests, etc. I've never used it over such a large area as your flight helmet, but I think it's a very good basic brown leather color. I would advise trying to airbrush it instead of brush painting such a large area.
As to realism, that's a matter that we all have wide opinions on...but in general the philosophy is that indented areas with folds and creases will appear darker than the base color of an item,while areas exposed to wear or that are simply large expanses (like the back of the helmet) without much other detail could appear slightly lighter than the base color. I too have a LOT of problems with pre-shading and then covering up what I've done. I use post shading almost exclusively for that reason.
What I'd recommend is to paint the overall helmet brown. Next, add a pin-wash of a VERY dark brown (or even black) into the recessed areas. If you can do this precisely (without needing to wipe away excess) all the better. However, standard "wash" techniques will work for this too. Last of all, add a few drops of flat white into the Leather brown and then LIGHTLY drybrush the edges of the items that stand "proud" on the helmet (strap edges, etc). The idea is to give them a finish that is just slightly lighter in color than their adjoining surfaces. Go slowly and check your results frequently until you like what you see. By the way, IF you do go too far, there is one "cover-up" technique you can use: Take some of the original Leather color and LIGHTLY airbrush the entire helmet again. DO NOT attempt to repaint it brown! The light over-coat of the original color will serve to tone down any garish mistakes in your high and low lighting.
The last item is that leather usually seems to have a sheen all of its own. Instead of using a flat coat or gloss coat, I suggest you rub your fingers on your forehead and then onto the helmet and use that skin oil as a "sheen" for the leather.
I'm sure there are other methods that may be more helpful, but that's the safest way I know that may take you toward what you want. Best of luck!
GIL
-
Very cool scheme! Your skills certainly covered your problems perfectly. I'd have never guessed you had a problem by your results! Congrats!
GIL
-
"And Gil, just put all your models you built in 2010 on a table and shoot them all at once!
"The sad part is that they'd all fit on one table......
GIL
-
Welcome to the party Ernest! Sounds like you are just like us.....adults who love our modeling as much as when we were kids! At least my 2nd wife knows I'll never grow up!
Glad you're here!GIL
-
NICE Zero Ying! I particularly like the weathering, the counter-shading, and the exhaust staining. Thanks for sharing!
GIL
-
Duke: LESS than a model a week? You could only get 48 done instead of 52? That's one whole MONTH of weeks you didn't finish something you piker......
Of course, the rest of we mere mortals shrink in comparison, and smite our workbenches in frustration and envy!
Unfortunately, I had a major computer crash a week ago. I was able to "recover" it, but lost all of the pics in the computer as a result. Doubt I'll take new pics just to cover the year. Besides, they've all been seen here at one time or another.
Congrats to everyone on their fine work and the inspiration you provide here!
GIL
-
Looks good Rusty, especially for a quick build. Looks like anyone who wants to go to town on it will have a good item to start on!
GIL


Organization is overated!
in Photos: On the Bench
Posted
No worries Ron! I have a perfectly good 1/48 VACUFORM Javelin in the stash! No need to kit-bash parts together, although that wouldn't be any harder than the vac!
GIL