ghodges
-
Posts
7,570 -
Joined
-
Last visited
-
Days Won
298


Recent Profile Visitors
5,411 profile views


-
Took a lot of skill to put a polish like that on that old mold! Very nice! Gil
-
As I mentioned earlier, the building details are impressive enough, let alone the wiring ingenuity that you're also incorporating. The more scale antenna details are also a nice touch, though I dare not put things like that on myself before painting and decalling is done or I'll knock them off while handling the model. Carry on! Looking forward to your final steps on this beauty! Gil
-
Clearcoat for Vietnam era aircraft models
ghodges replied to StuartMont's topic in Tools, Tips & Techniques
Vietnam era combat aircraft should be flat or matte. Even if the original paint had some gloss to it, it would "dull down" due to weather and use rather quickly in that environment. Gloss painted transport aircraft flying INTO the area and back out (being maintained elsewhere) might have some shine to them, but not the ones flying in theater and getting less maintenance under those circumstances. Even the aluminum painted F-100s and F-105s early in the war weren't very shiny after a week or two! Hope this helps! Gil -
Oooo.... pretty! I think your dropping it and putting the nose on "up" was a happy accident as I agree it looks much more graceful that way. Congrats on your perseverance! Gil
-
Nice progress Duke, as always! You didn't say how you were trying to shape the plastic strips you showed but implied you weren't getting the results you wanted. I've found I can bend thin sheet strips like that around a paint brush handle. BUT, you don't just "bend" it.... you bend it to get a curvature started and then holding between your thumb and forefinger take the thinner end of the paint brush handle and using thumb pressure with the other hand PULL the handle along the length of the strip, causing it to curl tightly around the handle as you pull and (hopefully) imparting even greater curvature to the strip. It'll never curl up as tightly as the handle due to the "straight memory" of the plastic; but it might help you get tighter curls if needed. If you're doing this already... oh well. If not, hope this helps! Gil
-
Welcome back Ron! Although I have a great interest in WWI, I never seem to build as much as I should. Hoping I can live vicariously through a few of yours. Prop your feet up, make yourself at home, and let us know how we can help you have more fun modeling! Gil
-
Phenomenal! The modeling is enough, but the electrical work is also an engineering marvel. Those couple of pics of your interior fuselage shots could double for reference pics from a walk-around book! Gil
-
Very nice builds! I guess I shouldn't be surprised how much the Russian drone resembles ours..... and I never knew the Brits were flying one of our designs! I also like the way you've displayed the one in transport. Congrats, and thanks for sharing! Gil
-
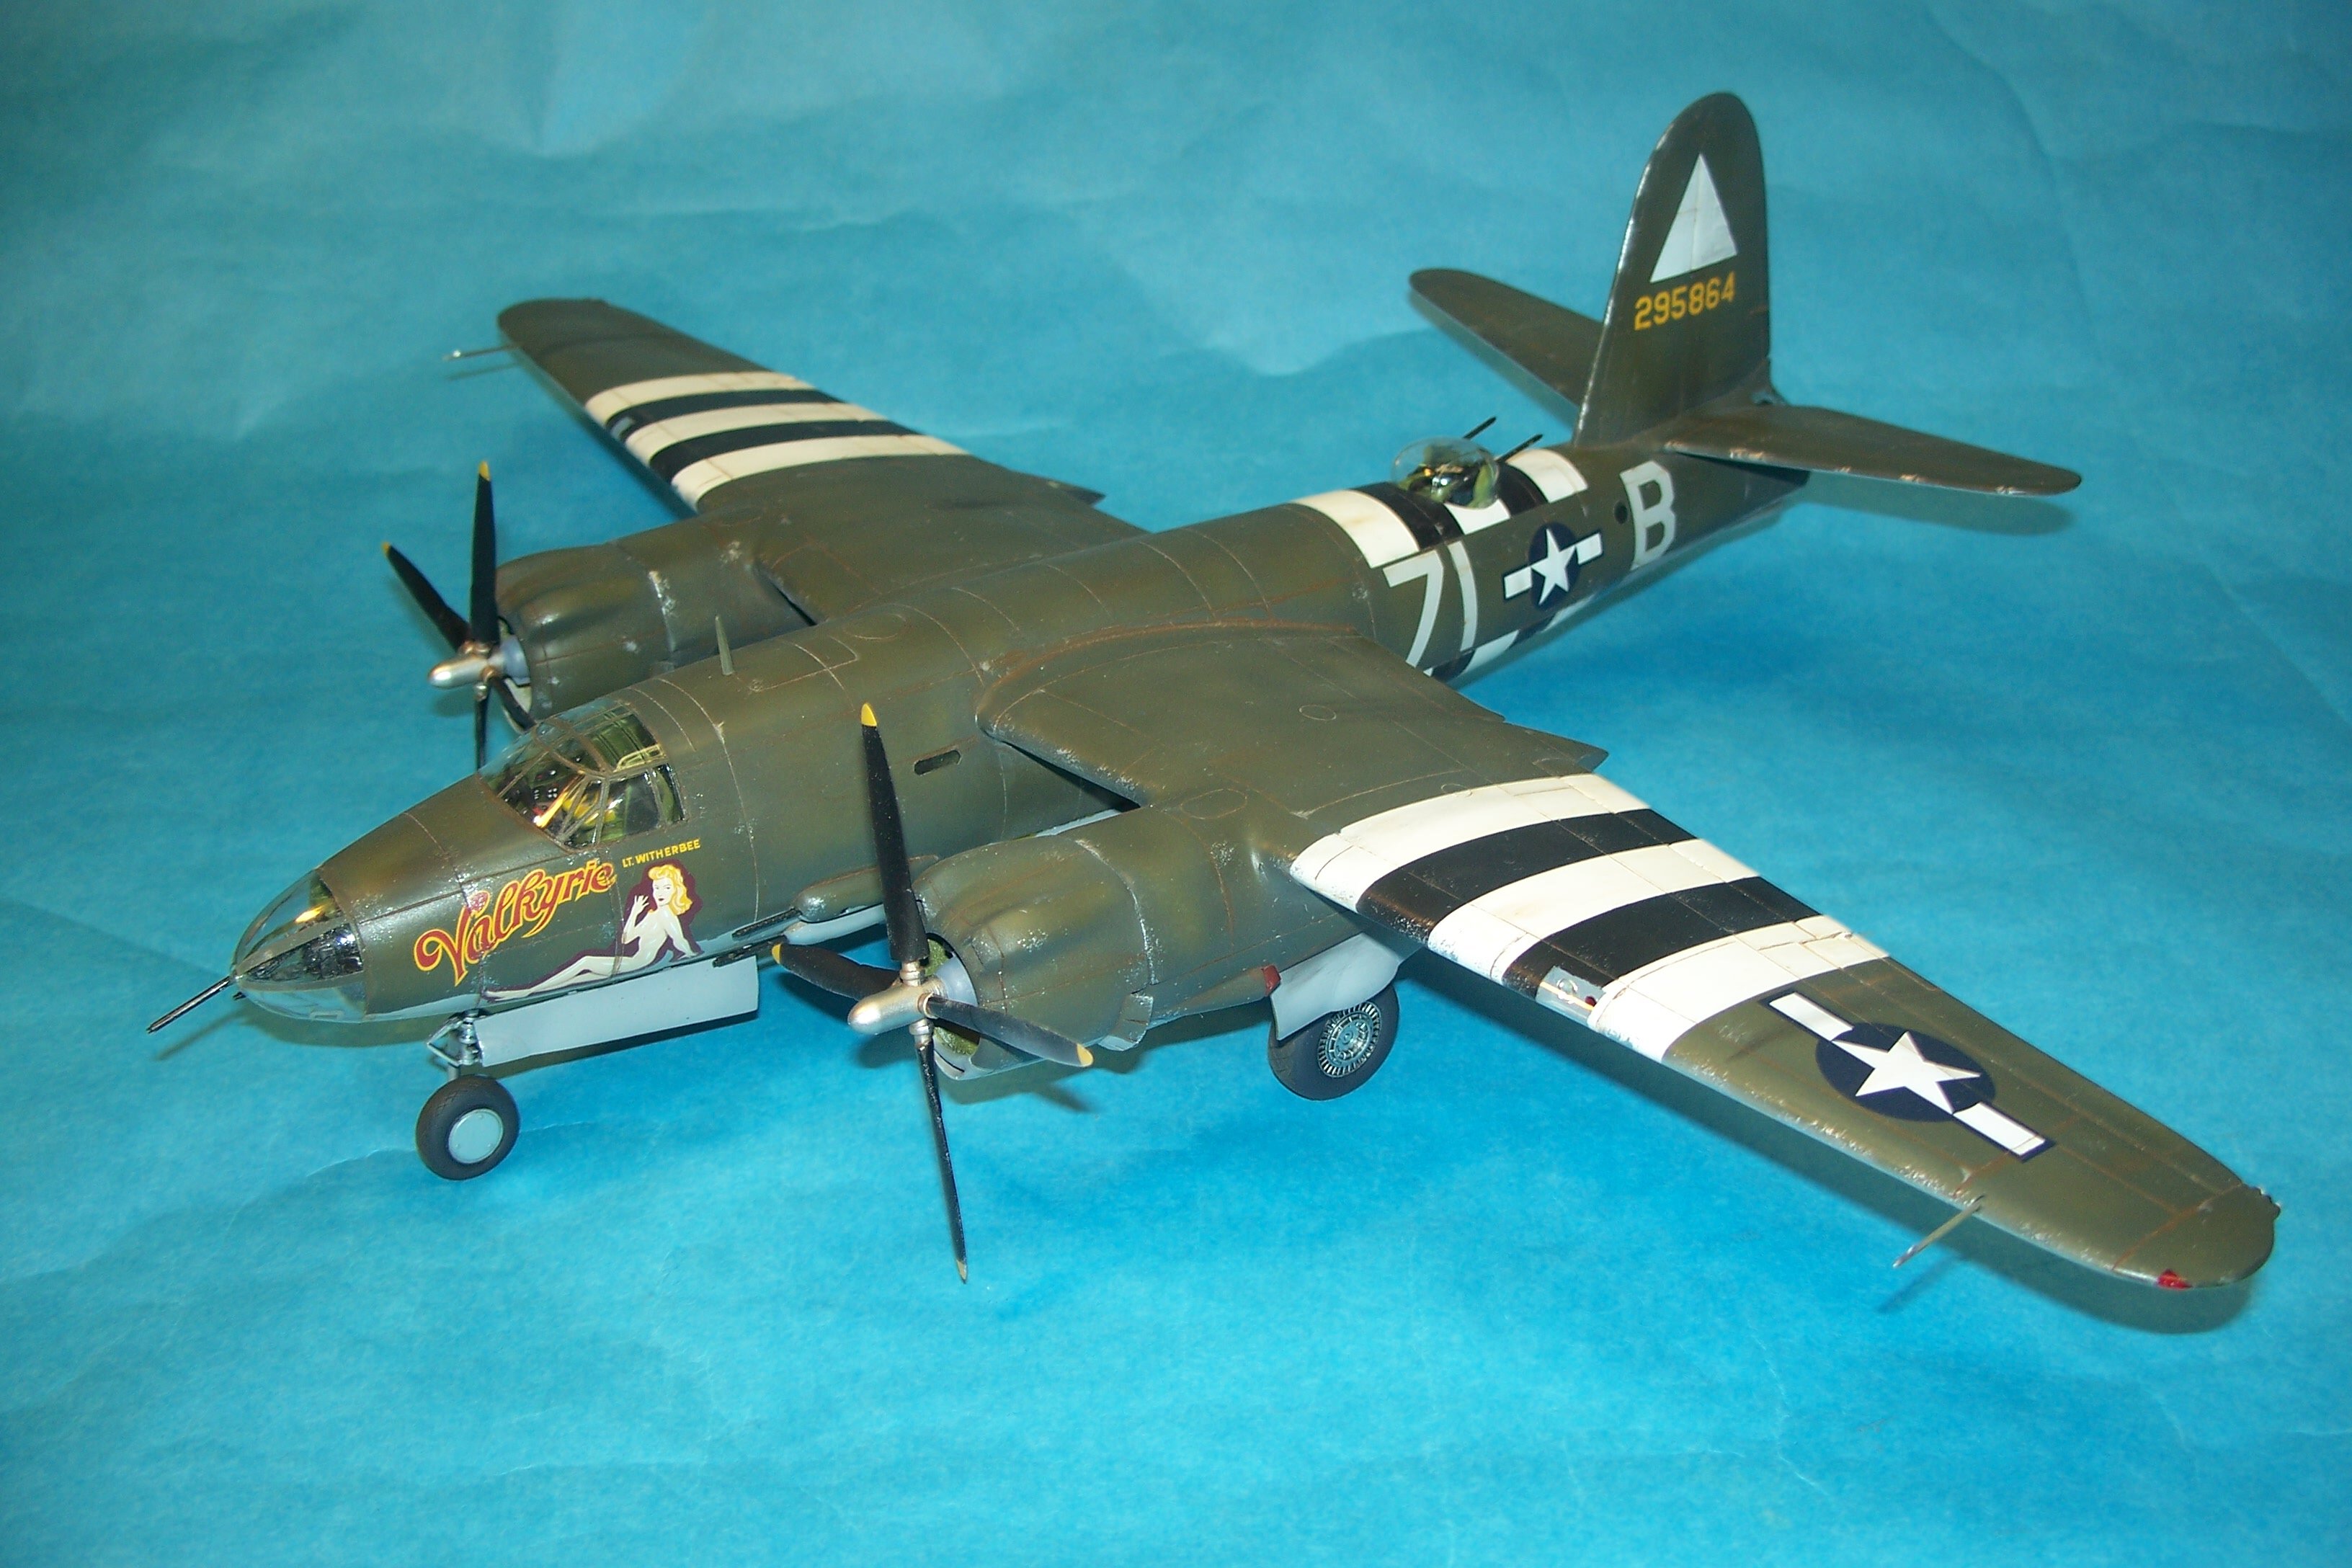
With the news of a new 1/48 B-26 Marauder on the horizon (now just released), I decided I'd build my old Monogram kit that had been languishing in my stash for many years. It's mostly OTB, except for some resin replacement engine cowlings I had in the box' as well as adding some MV lenses for the wing lights and IFF lights, adding clear colored plastic wing tip lights, and substituting some spare resin gun barrels for the kit ones. I also had an Eduard masking set which came in quite handy. The interior is OOTB. The big silver thingy is a Terry Dean nose weight I bought years ago, designed specifically for the kit. The entire model was rescribed using a razor saw for the fuselage and a UMM scriber for the wings and tailplanes. The shiny patches on the kit plastic are due to brushing some Testors liquid cement in the scribe lines to clean them out after the initial sanding. The kit has a bad rep for bad fit, but the only true problem were the extensions on the wing tops for the tops of the nacelles. Both of them simply needed to be gently bent downward (it did create stress marks in the plastic) and then they fit the nacelles quite well. The rest of the seams were average to good, but with no real fit problems, including all of the clear parts. I did, however, use UV cured clear resin for all of the fuselage windows except for the radio/navigator's right side window with the bubble. Also note the wire sticking out of the nose glazing. All of the kit guns were modified with either drilled holes or wire extensions so that the all of the gun barrels could be added at the end of the project. The pink stuff is Silly Putty being used to mask the exposed main gear, which have to be added before adding the underside wing nacelles. The 1-piece replacement resin cowls can also ne seen here. Everything else about the build was straightforward. Clear packing tape was used for the wing leading edges in place of the plastic kit parts. On to the finished pics! I used Alclad Gray Primer for the underside and Model Master 34086 Dark OD for the top, with 34087 OD used for some lighter panel variations. Tamiya brown panel line wash was used and some MIG powders brushed on for additional streaking and for the exhaust staining. The chipping was done with a small sponge and also with a silver colored pencil. I added D-Day stripes because I liked their look, though the decal sheet doesn't show them. The markings for Valkyrie were from Cutting Edge. Got this one done just in time before the new kit is being built by everyone else! Questions, critiques, and comments welcome, as always. Gil

-
Great progress and I have to agree that those resin guns are a very good improvement; well worth the cost! Gil
-
Super cool looking camo striping, especially in 1/72! I can see why the masks would have made things a lot easier, even if they took a while to apply. Did the Eduard masks all fit? I had a few on my current Marauder build that where a bit oversized (side windows), though 95% of them fit perfectly. Thanks for posting this! Gil
-
WOW! The camo work alone is impressive, but being a vac model too just adds to it! Outstanding! Gil
-
Amazing.... Gil
-
Those are some very cool builds! I've always like the markings on that P-47B and the NMF on the XB-51 is sharp! Thanks for sharing! Gil
-
The level of realism you're achieving is mind blowing! Really enjoying this build! Gil