


FJCook
-
Posts
17 -
Joined
-
Last visited
Content Type
Profiles
Forums
Events
Posts posted by FJCook
-
-
The camo scheme is well done. I like it. I especially like that this is the ESCI T-55 and your results defy the prevailing attitude that this kit is just a dog and not worth the effort.
-
Hi I have built one of these old Tamaiya kits too. I replaced the incorectly pined track with AFV individual links. I also replced the gun barrel with one from lion mark. Over all a nice kit. Yes I put in USMC colors. Once a Marine always a Marine. http://albanyipms.co...s/armor/1-35/-/
I like the job you did on yours what color green did you use over all?
Yours definitely looks sharp with those AFV tracks and the barrel. I like your vignette.
I used Tamiya Olive Drab (XF-62), lightening the center of panels by mixing either Desert Yellow (XF-59) for areas closer to the tracks or mixing in Deck Tan (XF-55) for higher areas of the tank. I used Sin Industries (available from MIG Productions) filter Brown for Dark Green (3837), which darkened the paint considerably, a result I didn't like as the olive drab paint was essentially darkened too much, almost as if I mixed in black or gave it a filter using black paint.
Semper Fi.
-
This is great info. How different is the Australian ASLAV to the Marine LAV? I'd like to make an Australian one if I could use a Trumpeter LAV to build it if possible.
The Australian ASLAV is an LAV-25 (also known as an LAV-II to the Canadian manufacturer), manufactured by the same Canadian company that makes the USMC LAV-A2 and LAV-III serving with Canadian Forces. The major visual differences include camouflage paint pattern and markings, no guard around the marine drive (used for fording; they're not fully amphibious), and an elongated exhaust with no cover. Many upgrades used by the Australian Army are mostly internal such as a new motor for the turret, a/c for the crew compartment, although some laser targeting stuff on the turret's exterior might need to be modeled.
I imagine the paint and markings would a matter of Internet research. Australian ASLAVs saw/see service in East Timor, Iraq and Afghanistan as well in the flood-ravaged areas of Australia recently. The Trumpeter 1/72 LAV-25 is a good start.
-
And here are ASLAV-25s in service with the Australian Army wearing "BAR armour."

-
Chuck,
Check out individual USMC LAR BN unit websites and look at their galleries. Also, go to Marines.mil and use their photo search.
1st LAR BN. Deployed in Afganistan. You see photos of their foot patrols and at least a couple variants of their LAVs as well as use of the MRAP.
The vehicles are often used by different units as they rotate in; it's cheaper to just sign the equipment over to the incoming unit. The LAVs retain their NATO tri-color schemes with a heavy layer of dust and dirt. The MRAPs are painted in a desert scheme.
Due to the mission of Marine LAR units, you won't see many heavily up-armored or wearing slat armor. The Marines won't use the LAV in a manner similar to the Army's Stryker or Canadian Forces LAV-III. When I was in, I was always with the main body. We were accompanied by Abrams tanks, HMMWVs variously armed used for flank security, rotary aircraft and artillery. We never saw LAVs because their mission required them to be way out in front of us, probing for the enemy and calling us in when they made contact. The only time I ever saw LAVs was in the "tango" training area at Camp Pendleton, at their ramp, and once at 29 Palms when one was broken down and in a rear area.
They're required to graduate from the Marines' School of Infantry first before entering the LAV crewman course. The rest of us attended Marine Combat Training (infantry-lite school) before moving on to our MOS schools.
The LAV's use in Afghanistan in USMC units is limited. A recent National Geographic special has some Marine commanders indicating they're not used often due to their mission and their light armor, which is nothing against IEDs and the typical man-portable weapons (RPGs) used by enemy combatants. They can serve in convoy duty or in the defensive, safely in a hull defilade position. You'll note the use of ballistic glass and armor "walls" around the top of the turret, used to protect the Marines riding at half-mast in the turret. The Canadians opted to bring in Leopard tanks and we're deploying Marine Abrams tanks to Afghanistan soon.
Iraq and Afghanistan:
Operation Desert Storm:
An LAV-L (logistic) tows an LAV-R. It's not uncommon to see the mixture of paint schemes in USMC units, regardless of time, conflict, active or reserve. An AAVP-7A1 towing a MICLIC is in the background.
-
Not trying to hog the Armor forum here.
These re-issues are often complained about, but I really enjoy seeing them on the shelf and checking out the box art as well as the original year of release. They're old, inaccurate, but stand the test of time because they're fun to build and lend themselves to improvements and honing your modeling skills without breaking the bank.
This is Tamiya's 1/35 M3 Stuart light tank (Item 35042) I finished in 2010. It has motorization holes in the hull, open sponsons, clunky vinyl tracks, funny tabs that are supposed to be handles, inaccurate shape, soft details, thick Tamiya decals. But it was so much fun to build!
I replaced the funny tabs with wire so the handles look like handles; filled in the motorization holes; did some sculpting on the sergeant in the cupola so his helmet looks more like a WW2 tanker's helmet instead of some weird lump on his head; and experienced the joys and beauty of Archer Transfers. The sergeant's chevrons and the big white stars are Archer while the rest of the decals are the kit's (and I regret using them because they are thick and need some work to blend into the paint job).
The .30 cal behind the SGT is from Academy's nice little U.S. Machine Gun Set (kit no. 1384). I added a charging handle and drilled out the muzzle (as well as all the muzzles of the other guns on this tank). I accidentally broke that mounting rod for the machine gun so scratch-built a new one.
The weathering is lightly done after a rather smelly Sin Industries filter. MIG Pigments all over, and graphite from a pencil rubbed on the guns, track assemblies, and edges of places the crew would scramble around. There's some light fuel spillage around the fuel caps. The antenna is stretched sprue.
The tracks are the kit's and the first time I lavished attention on vinyl tracks, thinking I could handle the pressure. "What's the big deal?" Nope. I primed them, painted them reddish dark brown, painstakingly painted every rubber track block, highlighted gently with some steel paint and graphite shavings, then had all kinds of trouble trying to get them on the tank without cracking the paint. Didn't work, so there are portions where the paint was stretched and cracked off, revealing the vinyl beneath.
It was a fun build, though. I notice Tamiya just re-issued a couple more US subjects...
-
Thanks, guys!
@Chris: nice work on yours. I actually saw it and thought about picking up another one to paint up in DAK livery, maybe even add a figure or two!
I agree it's one of those kits that's just fun to build, not slog through like the more recent giant boxes of 30 sprues, photoetch, etc. Those have their particular brand of fun and historical interest, but I think this little panzer II kit is a definite "oldie but goodie," and easily lends itself to honing your modeling skills, whether it's scratchbuilding or working with photoetch or painting. You're not afraid to make errors with it.
-
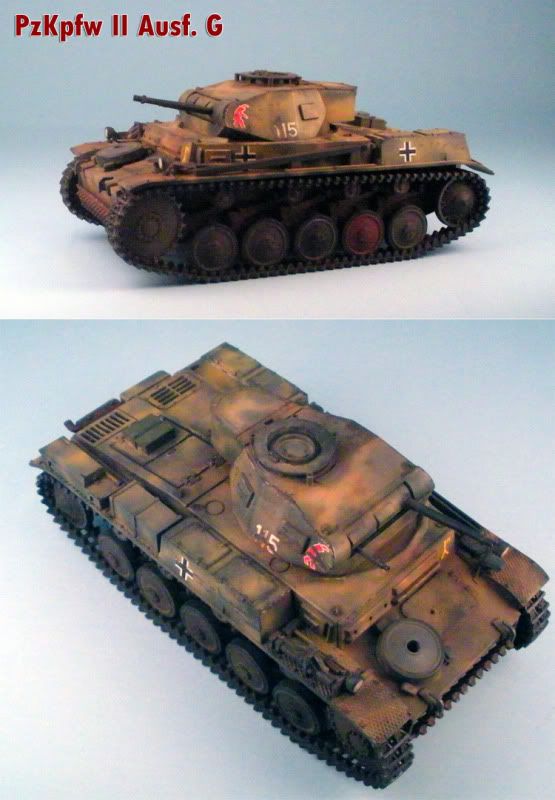
This is Tamiya's old Panzer Kampfwagen II Ausf. F/G (Item 35009). It costs $13.50 off the shelf, cheaper online. The hull tub indicates this kit was originally released in 1971 but I read somewhere it actually dates back to 1969. Comes with a DAK crewman for the turret hatch (holding binoculars) and four DAK infantryman advancing. You get several marking options. The decals are thick and took a little work to settle on the kit, even its flat surfaces covered with a smooth gloss coat! I weathered it with a couple of oil paint filters and MIG Pigments.
Some soft details, the vinyl tracks are really thick and not too accurate, and it takes more than adding a toolbox to the back of the turret to make an ausf. G. There are many inaccuracies, yes, but the kit went together well. I filled in the motorization holes, replaced an amorphous shape on the engine deck so it resembles a grab handle, drilled out the muzzles of the guns, and filled in the sponsons with plastic card. The paint scheme chosen is that of a panzer II kinda sorta on the east front during Operation Barbarossa, but the kit's painting and decal guide is entirely in Japanese and I lack good panzer II references. Most online stuff is sparse because the panzer II isn't as sexy as the Tiger .
At any rate, I enjoyed this one, intentionally overdoing the chipping and adding rust streaks. Not realistic but fun to do regardless.
-
Calvin Tan's "polymino technique" produces convincing results. No doubt you can use the same technique to paint US Marine MARPAT as well as modern Canadian Forces.
(Image courtesy Calvin Tan and Alpine Miniatures)
-
Calvin Tan, the figure painter who painted many of the Alpine Miniatures figures for their box art, has a tutorial on how he did it at his blog:
http://zyclyon.blogspot.com/2008/08/repres...acu-in-135.html
You're using Tamiya and he uses, mostly, Vallejo Model Color, but you can pull it off. Tamiya acrylics are good paints.
-
Thanks for the compliments, everyone!
-
Warning: Long post...
Hello! My name's Frank and I joined IPMS earlier this year. I was inspired by what I saw at the VA Beach Nats last year.
My hobby background started with tabletop gaming miniatures by Rackham, Enigma, Games Workshop, among others. This is my first scale model and it's my first, extensive, use of an airbrush; I practiced with my Paasche Talon on old water bottles and soft drink cans. A lot of these techniques are new to me. I'm following in the footsteps of color modulation guys like Sergiusz Peczek and Adam Wilder. Before scale models, my experience was with hand painting metal and plastic figures using acrylics from Vallejo, Citadel (GW), Reaper, Rackham and Privateer Press (P3 Paints). I chose the Paasche because of their reputation, the price, and the look (the Talon's very sexy).
Below are WIP photos of my first scale model, Tamiya's JS-2 (no.35289). I added Voyager tow cables, Armorscale Aerial Mount, Armorscale D25-T 122mm aluminum barrel with resin mantlet, and a TANK Models 12.7mm DSHkT (not pictured). The kit will get three figures (commander and two infantry riding on the engine deck), and a wooden base. The aftermarket stuff was bought to streamline the assembly process and because I'm curious to see which retailers are reliable as well as gain the experience of working with AM stuff that doesn't always fit.
The pictures are of application of filters and weathering and chipping. I need to build some shadows and dust down some things. The track assemblies will get some attention this week as I feel they've been neglected up to this point.
The machine gun on the rear is broken; the turret was attached to a spray can and fell over. | | :( I'll fix it with a Mission Models super glue applicator tube (it's just like a syringe).
Some fuel spill stains on the reserve fuel tanks. Began the first steps of chipping.
A chipping error on top of the turret near the commander's cupola. That black staining is removed chipping that just didn't look right. I believe it can be fixed.
The engine deck and rear with some spills and stains and dust. The tow cables and turnbuckles will definitely get some more dust, as will the rest of the engine deck. Too neat right now!
Some painting and weathering details:
I originally started the base coat with Tamiya Deep Green (XF-26), but it's too blue. I wanted to use Tamiya NATO Green, but the local Hobbytown doesn't carry it (it's XF-67 and the rack stops at XF-66!). I didn't want to order any off the Internet, so went with what the shop had, Testors Model Master Acryl Russian Armor Green (4807). Because I already had the bluish Deep Green on the model, it served as an excellent shade for the Russian Armor Green. To that I slowly added drops of Polly Scale Japanese Deep Yellow (F505282) and finally Tamiya Buff (XF-57). I chose the Japanese Deep Yellow only because that's the only airbrush-ready yellow I had on hand. In the future, I'd go with a more subtle yellow, one tending more towards white rather than orange/red.
Pouring the remainder of my airbrushed paint into a spare jar, I added to that a little more Buff and hand-brushed selected high relief items such as fuel and oil caps, edges of fender braces, loader's hatch torsion spring, edges of the mantlet cover, hand rails, some spots on the commander's cupola, etc.
Weathering began with a filter of Burnt Umber oil paint diluted with mineral spirits (called "white spirits" outside of the US/Canada). This was applied to all of the model's green surfaces. After a few hours, I loaded the airbrush with heavily thinned (5:1) Tamiya Buff (XF-57) and applied it to most of the lower portions of the tank, especially all over the suspension, road wheels and track assemblies. This was followed by adding some Tamiya Flat Earth (XF-52) to the Buff and then applying it into the tank's recesses, nooks and crannies. This gave me the base for dusting and mudding of the tank's tracks, running gear and bottom half.
Later, I mixed Burnt Umber with Titanium White thinned heavily with mineral spirits to give me a light brown tone. I used a series of pin washes into areas where dust tends to accumulate on a combat vehicle operating in the field. I used a large set of photos from my Marine Corps days for reference as well as quite a few JS-2 photos found on the Internet.
Testors Rubber (1183) enamel was thinned to begin pin washes for areas requiring delineation such as around the large panel and hatch on the engine deck, some parts of the tank fenders, hatches, etc. I'll follow up this with Testors Black enamel.
The exhausts were painted using Vallejo Model Color acrylics, starting with dark browns and slowly adding oranges to that, making sure it stays thin. Then I dusted it with rust colored pigment, washed with mineral spirits, which has better results than using thinner. I airbrushed Polly Scale's Steam Power Black (F414110) around the exhaust and reserve fuel tanks. This is a model railroading color and gives you a really sooty, oily, black. Be careful or you'll end up with results you don't like. Then I lightly drybrushed Vallejo Game Color Gun Metal on some edges, followed by black pigment powder.
Additional weathering includes exhaust and fuel spills on the reserve fuel tanks and the engine deck. I used Tamiya Smoke (X-19) to simulate greasy buildup/spills. The diesel fuel has a pinkish hue added with Vallejo Orange Brown. The tow cables need to be prepped to appear that their coats of grease have been covered with several layers of dirt. The rear of tanks do not stay clean!
The tank's suspension needs some caked on dirt, and the drive sprockets and road wheels need a dark metallic finish where the bare metal comes into contact with the track assemblies. Those will receive additional weathering and highlighting on high-contact surfaces such as the tread on the blocks and the teeth.
From there, I begin with some light chipping and scratching. I'm also experimenting with pieces of erasures to form 1/35 scale boot prints, which will end up here and there (engine deck, top of turret). This stage can't be overdone as you can easily get carried away and make the thing look like it's been sitting at a museum for the last few decades rather than an operating combat vehicle in eastern Europe.
The 12.7mm DShKT by TANK Models is an awesome resin compliment to this kit (the kit does not come with one). I'm researching this gun a bit to ensure I get its bluing or Parkerizing correct. It's easy to just paint it black and then drybrush it with metallics but I'd like it to look better than that as it's a big gun and it sits on top of the turret and therefore will be noticed immediately.


Painting ACU Pattern
in Figures
Posted
Calvin Tan, who sculpts and paints figures, including many available from Alpine Miniatures, has a little tutorial on his blog:
Representing ACU in 1/35 by Calvin Tan