


ju52junk
-
Posts
144 -
Joined
-
Last visited
-
Days Won
2
Content Type
Profiles
Forums
Events
Posts posted by ju52junk
-
-
I have the royal class Fw-190 early birds hope they have no fit issues. When I start them I wil keep everyone updated. Plus, I have all the PE and resin.
-
I would like to use Steel Beach OOP resin whees for the Trumpter Sky Warrior AD3. I do not wish to use the rubber wheels that came with the kit. I have been searching the web for months, including e-bay with no luck. Does anyone have one for sale?
-
Great looking EF-18. I like the shading around the panel lines. What is the brand of paint/metallics did you use? I have a Growler in my stash that one day I will build. The Growler is not the EF-18 but the EA-6 that was flown when I worked on the flight deck of the USS Eisenhower in the late 70 's. The days of the much more colorful hi-viz pant schemes
-
On Amazon/Ebay a Substance called Spaz Stix is sold it is called plastic prep to use before airbrushing. Years ago when Polly S plastic prep was available I would this to wipe down the plastc prior to airbrushing. Has anyone use Spaz Stix before?
-
This may have been mentioned in another post. I saw on a Florey Model YouTube video how to make a great filler. Get an empty Tamiya paint mixing jar, add to the jar some black colored Evergreen styrene cut up into small chunks, then add some Tamiya quick drying thin cement(the stuff with green cap). Let the styrene dissolve for a day, so you have a nice gooey texture. Then you can put the gooey mixture on a mating surface and put the two parts together. The glue in the mixture will bond the parts together and the gooey styrene will act as a filler. Wait about 24 hours for the mixture to set before sanding and any small gaps will be filled. On larger gaps like wing joints apply the mixture with a toothpick, allow to cure then sand. I have had good results. I like the styrene/glue mixture better than putty. Just make sure it is fully cured before sanding.
-
 1
1
-
-
8 hours ago, RGronovius said:
Nice scores, I love seaplanes for some reason.
I love seaplanes also. Will not have to worry too much about the rigging for the Dave and Pete seaplanes. I ordered from Japan some PE metal rigging Hasegawa made exclusively for these 2 planes. Similar to the PE rigging Tamiya made for the Swordfish(which reminds me that I also need to buy the Swordfish with it's PE rigging). Already have the Rufe and Rex Japanese seaplanes built. I still have to build the German Arado Ar 196 and the Japanese Aichi M6A1 Seiran. All in 1/48 scale.
-
23 minutes ago, ghodges said:
Mighty nice looking Meteor! Did the kit have an option to open the canopy? Seems a shame to add that nice pe detail and then cover it over.
GIL

I could be wrong, but it was a one piece canopy.
-
Been on a buying spree. Bought all these kits recently(will I ever build all of them?) along with all the aftermarket goodies.
-
Gloster Meteor, Eduard PE cockpit, Eduard canopy mask, True details resin wheels, AK paint, used lead pencil for panel lines.
-
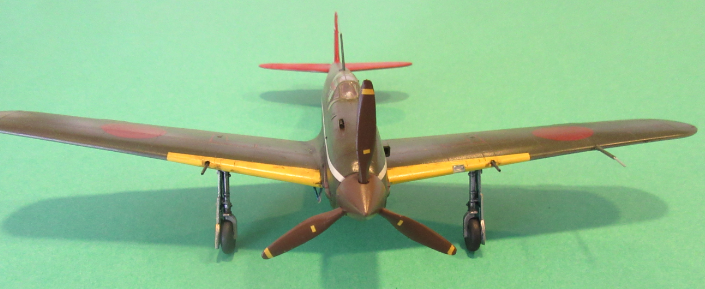
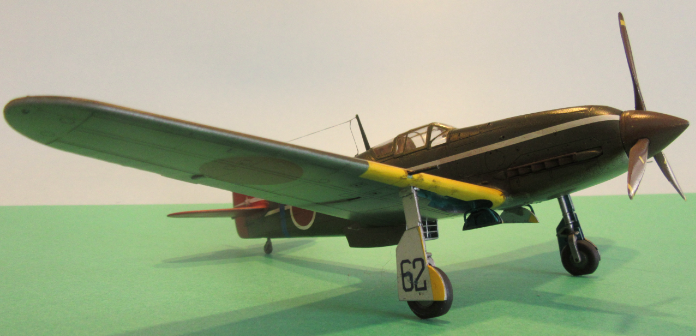
Hasegawa Hurricane. Eduard PE cockpit. CMK resin wheels, Montex canopy mask, Resin tail wheel/strut, Quickboost Resin Exhausts, Resin prop and spinner, Vallejo paints, AK panel line wash, AML camouflage mask. Had trouble with this build(all self induced). The right side landing light when clipping off the sprue was ejected into the ever hungry "carpet monster" never to be seen again. Also, as you can see in the photo the fin flashes did not react well (wrinkled) to Walther's solvaset. Must of broke the tail wheel, rear antenna mast and lower pitot tube about a half dozen times.
-
Tamiya's 1/48 N1K1. Eduard PE cockpit, Eduard canopy mask, Vallejo paint. Used a lead pencil for the panel lines. I wish Tamiya would use a duller red for the Hinomarus.
-
About half finished with the P-40E. Will have decals for a P-40F operating in the MTO. Not sure, but I think no really big changes in the airframe between the E and F, just the powerplant and the wing mounted 50s from 4 guns in each wing to 3 guns in each wing. Does anyone know if the E or F have antenna wires or a an antenna mast? I do not see either wires or a mast in my references.
Eduard cockpit PE with a resin seat.
Sorry for the focus.
-
12 hours ago, RGronovius said:
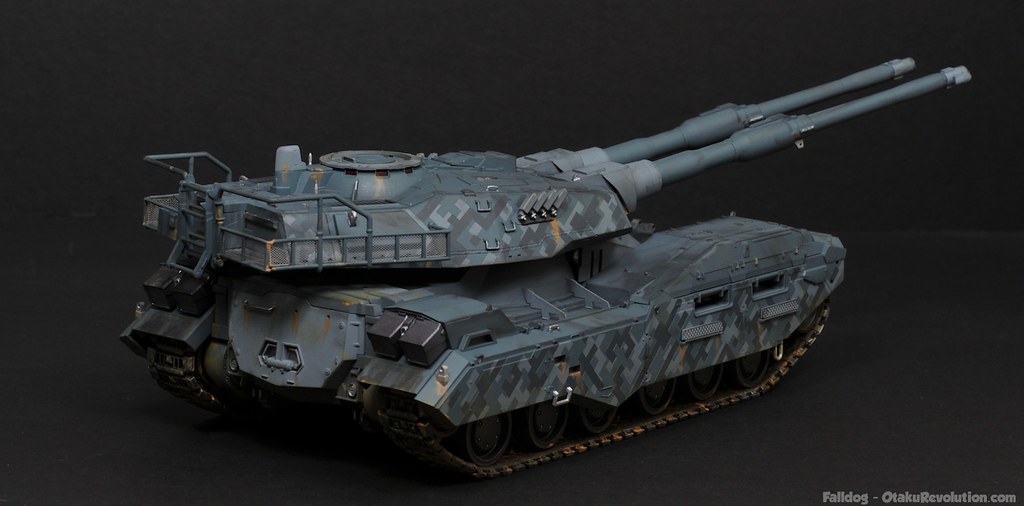
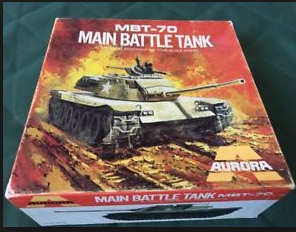
To me, model building is model building. I started with unpainted Lindberg, Monogram, Revell and Aurora kits. Might have started painting black tires and silver machine guns, or white teeth on my saber toothed tiger. In the 1990s, I rebuilt my oldest surviving armor kit, an Aurora MBT70 that I built in the 70s using a builder's kit I bought on eBay in its early days of existence. I paid $5 for the glue bomb kit and $3 for shipping. That kit was unpainted OD green plastic with some gloss black machine gun parts. Decals had mostly flaked off the bare plastic. It had been a source of pride for many years and had lost many pieces parts due to my mother dusting and vacuuming it over the years.
It would certainly have been laughed at as a serious model kit. I have built several Gundam kits. Many of them are very high quality models molded in different color plastic on the same sprue. Almost no painting necessary for some of them. There is also a line of Gundam kits with futuristic looking armor vehicles in 1/35 scale. I built a couple and have the M61A5 Semovente left to build. It is an awesome looking tank and if you do a Google search, you'll see it in various real world paint schemes and markings.
I built this kit(Aurora MBT70) too when I was wee lad. Didn't the actual design get cancelled by West Germany/USA? The only tank I still have from those days is the Aurora Swedish S tank. Not in the best of shape any longer. I think I built all of the 1/48 scale Aurora tanks.
-
2 hours ago, ghodges said:
Good luck with getting the yellow out. I've heard it works for decals, but not aware of anyone trying it for a model.
Model Master/Testors lacquer gloss coat is famous for yellowing over time, and the more you apply when you build the model, the more it will yellow noticeably. Heck, if you buy an older bottle it'll already have a golden tint to it!
The problem is UV rays, which cause white and yellow enamel/lacquers to yellow.
I've switched to using Alclad Klear Kote lacquer gloss, which has a UV inhibitor in it. If you cannot find some of that near you, check your local Home Depot/Lowes/Ace hardware store for a gloss lacquer "varnish" that has a UV inhibitor. Hope this helps!
GIL
Thanks for the tip Gil. I bought some "Lucky" varnish from Mig the other day. Hopefully this varnish will not yellow over time.
-
Great looking biplane. Nice job on the rigging. What material did you use for the rigging?
-
2 hours ago, ghodges said:
Good looking Butcher Bird, and I really like the mottling you did. Did you hand brush those, use a mask, or free hand them?
GIL
Used a PE mask.
-
5 minutes ago, Nick Filippone said:
Try parking it in sunlight. It will bleach out the yellow over several weeks. Just don't let it get too hot! This technique also works for decals that have yellowed.
I will try exposing the model to sunlight. Thanks for the info.
-
Years ago I built a F6F Hellcat. At that time I used Testor's Master Model Enamel paints and used Testor's Semi gloss Lacquer spray for the clear coat. Over time where the white paint is the paint has yellowed. Is the yellowing on the enamel white paint or the Lacquer clear coat? Is the enamel paint out gassing and causing the lacquer to yellow over time? What can I do(if anything) to remove the yellowing? Thanks.
-
Tamiya's FW 190-A3, Eduard' PE cockpit, Eduard's Canopy Mask, True details Wheels, Master Model Gun Barrels, Vallejo Paint, AK Panel Line Wash.
-
Hasegawa's 1/48 Ki 61 "Tony". Eduard's PE cockpit, True Details Resin Wheels, Quickboost resin exhausts,
Eduard's Canopy Mask. AK paint, Panel Line Wash.
-
1
-
-
Tamiya's 1/48 He 162-A2. Eduard's PE cockpit, Eduard's Canopy Mask, True details Resin Wheels. Master Model Pitot tube and Gun Barrels. AK paint, Metallizer, Panel line wash.
-
1
-
-
I really would like to thank everyone for the kind comments made on my aircraft builds. Also, thanks to all the good suggestions to the questions I ask. Living in Vermont, it is a breath of fresh air to talk to fellow modellers who have the same passion about building models that I do. No longer do I have to hear models called toys and I am too old to be making models. I have made models all my life, except the 4 years I was in the Navy(worked on A7-Es).
-
2 hours ago, ghodges said:
That would obviously work, but I have to say I'm REALLY not a fan of this being done. There's way to much "pc" crud we have to deal with already, and as slow as this forum is, censoring typical WWII nose/tail art (to me) would be yet another nail in its coffin.
I understand if someone isn't comfortable themselves with posting it (but then, why'd they build it?), but I also think we have both a firm reason and plenty of precedent here on this website to allow for posting such stuff.
I'd really hate to see this become an issue when it has not been one up to now!
GIL
Gil, I agree. I wil post pictures of the plane without any self censorship, and see if the pics get deleted. Being new to IPMS, I just wanted to see what the comments would be. It is historical fact there was suggestive art on WW2 aircraft.
-
1 hour ago, ghodges said:
I know a few people who've used the EZ line and liked it. For myself, when I tried it, I couldn't get it to work. Trying to put the end of the line into an anchor hole was like trying to shoot pool with a piece of rope....
GIL
I will try wire on one model and EZ line on another model, to see which method of rigging I like best. I use EZ liine for antenna wire but not for rigging. I have been on a buying binge lately(who am I kidding, I am always on a buying binge). I have just ordered Hasegawa's Dave and Pete(both biplane float planes and Hasegawa's PE rigging made for both planes(like the PE rigging for Tamiya's Swordfish).


 Eduard cockpit PE with a resin seat.
 Sorry for the focus.


Paint fumes
in General Modeling
Posted
After 50 years of building models, I have inhaled all kinds of paint fumes(from Pactra to Hataka). I know inhaleing all these fumes is not healthy, akin to sniffing glue. I am just wondering whar people think is the most "pleasent" smelling paint fume? Enamels seem to be the stinkest, that is why I just use acrylics now. Some paints if I get a whiff of I can tell what lthe brand of paint is. I can always tell if Polly-S acrylic, Tamiya acryilic, Humbrol enamall or Vallejo acryiic is being used. The paint fume that I most pleasent to smell is Vallejo, smells like there is perfume in the paint. So, what paint do you find the "stinkest" smelling to the most "pleasent" smelling?