Wolfman63
-
Posts
624 -
Joined
-
Last visited
-
Days Won
109
Content Type
Profiles
Forums
Events
Everything posted by Wolfman63
-
This update covers the building and detailing of the engine and the detailing of the ammunition bays for the wing guns. The engine cylinders were painted aluminum, weathered with black and dark gray pastel chalk, then the photo etch wiring was added. The hub was painted neutral gray and detailed with silver and black. The wiring was panted canvas brown. I obtained some decals for the ID plates. I opted to use the open cowls so I added the cowl braces included with the photo etch set. The engine was mounted into the cowl and the assembly was mounted to the fuselage. Next I cut open the panels in the wing (a tutorial on cutting open panels will be posted later this week) and assembled the photo etch ammunition bays. The ammo belts were then fed into them and mounted to the wing. A little detail painting and the bays are done. I am working on the landing gear bays now. You can see all the details and photos from the start in my build log at https://davidsscalemodels.com/build-log/1-48-p-47d-thunderbolt-bubbletop/
-
This week’s update on the Thunderbolt is for the detailing of the fuselage. The oil cooler vents just behind the cowl, like the intercoolers, has nothing behind them and the detail kit does not provide anything as well. I searched thru my miscellaneous photo etch extras and found some oil cooler grates and used these along with some styrene stock and added details behind the vents. Then I started on the engine. For the firewall I drilled out the lower intakes and added photo etch details. I then added some photo etch details to the engine cylinders and painted them aluminum. The fuselage was then assembled and now I am working on the engine mountings and the wiring. Also I am checking out a new paint source. The interior of the fuselage was painted with yellow zinc chromate. In order to replicate this color I ended up purchasing paint from Mission Models. The color is very accurate and the paint goes on very well. For this being the first time using this brand I am very happy with the results. Will need to try other colors later. Now onto the photos. You can see more photos and details in my build log at https://davidsscalemodels.com/build-log/1-48-p-47d-thunderbolt-bubbletop/
-
This build is the Tamiya 1/48 scale P-47D Thunderbolt “Bubbletop”. It will be detailed with Eduard’s Big Edition photo etch set. For this scheme I will be using the brand new set of decals from Thunder Cals. This is their latest set featuring P-47D’s from the European Theater. I will be doing the “Ozark Queen” of the 84th FS/78th FG from the 8th Air Force. It was flown by Captain Alfred F. Eaton in the summer of 1944. You can check out the details of their new set on their website at https://thundercals.com/48006-78th-fg-365th-fg-bubbletop-and-razorback-tbolts-new-decal-announcement/ As typical with aircraft builds, it all starts with the cockpit. While the Tamiya cockpit is highly detailed out of the box, Eduard does add some placards and fine details that further enhance the cockpit. Once the cockpit was built up I started preparing the fuselage to install the cockpit. Eduard does provide an interesting add on. Typically the intercooler on 1/48 scale P-47’s has an opening that just goes into the fuselage and is typically open. Eduard actually includes all the duct work to the intercooler. It is difficult to photograph but I was able to just get a good angle to show it. If you want to see more photos and follow along check out my build log at https://davidsscalemodels.com/build-log/1-48-p-47d-thunderbolt-bubbletop/
-
The HUD was painted with chrome silver then clear green.
-
This weekly update has the final assembly of the Draken as well the competed photos. I used the kit decals and they were great. They applied easily and worked well. Next using the photo etch parts I detailed the HUD and installed it. I added the dash gauges that sit on each side of the HUD then I painted the frames of the windscreen and canopy. I gave both pieces a nice polish and installed them. Finally the drop tanks and the landing lights were installed to complete the model. This was a nice build. The fit was very nice and assembly went well. The kit utilizes some nice decals. I really enjoyed this build of this unique aircraft. The entire build from start to finish can be seen at https://davidsscalemodels.com/build-log/1-48-j-35-draken/
-
The weekly update on the J-35 Draken has the build up and detail of the ejection seat. This is all resin and photo etch details. I found some reference photos of the seat and copied the detail as best as I could. After being painted I added some scratch built details then moved on to adding the photo etch details and seat belts. The seat was installed into the cockpit tub and I started painting the aluminum center and the gray bottom. Moving to the top I painted the base coat of the camouflage and the tail. Finally the aluminum leading edges were painted. I also realized the tail required a wire to be added as this detail is not included in the kit. The aircraft is now ready for decals and weathering. Check out all the build photos from start to finish in the build log at https://davidsscalemodels.com/build-log/1-48-j-35-draken/
-
I do not know of any waterslide decals for generic numbers and letters. I do have about10 sheets of the microscale sets. I have white, dark blue, black, and brown letters. I have scanned in the colored ones so I can make my own. As soon as I can get the white toner ink I plan on printing a few sets of the white letters. The sheets have many different sized letters for many scales.
-
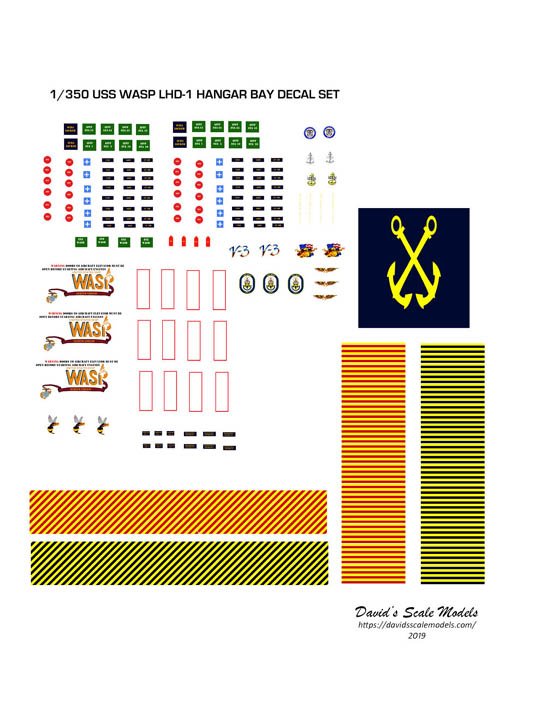
I have updated my Aircraft Carrier Hangar Bay decal sets and added a couple of Wasp class LHD Hangar sets. See my posts in the For Sale Section Aircraft Carriers: https://forum.ipmsusa3.org/topic/20918-for-sale-1350-us-navy-modern-carrier-hangar-bay-decal-sets/ Wasp Class LHD's: https://forum.ipmsusa3.org/topic/21138-1350-wasp-class-lhd-hangar-decal-sets/

-
I have made a decal sets for 1/350 Wasp class amphibious assault ships (LHD’s) These sets include the signs, logo’s and safety stripes needed to detail the hangar bays. These are printed on clear film decal paper. Each decal must be trimmed before dipping in water. The stripes are cut to width due to the various stripes used throughout the hangar bays. The price is $25.00 per sheet. Free first class shipping worldwide. https://davidsscalemodels.com/decals/1-350-wasp-class-lhd-hangar-bay-decal-sets/
-
Moving forward on the J-35 Draken Swedish Fighter I assembled the fuselage, wings, intakes and tail assemblies and then detailed them with some photo etch accessories. The landing gear has been assembled and detailed with photo etch accessories. All painted then installed into the fuselage with their doors. Finally for the week I added some photo etch details to the fuselage. See all the details and photos from the start on my blog in the build log section – https://davidsscalemodels.com/build-log/1-48-j-35-draken/
-
The next build is the 1/48 scale of Eduard’s Limited Edition J-35 Draken Swedish Fighter. The J-35 entered service in 1960 and served as an interceptor for many years. It served in Sweden, Denmark, Finland, and Austria until its final flight in 2005. The scheme I will be doing is the J-35F from the F10 wing based in Angelholm-Barkakra during 1989 and flown by Cpt. Vincent Ahlin. The limited edition issued by Eduard includes many photo etch accessories and a few resin parts like the ejection seat, wheels, and various add-ons for the fuselage based on which version you build. The decals allow you to build a version used by each of the countries that flew them. Starting with the cockpit tub I added the photo etch accessories and detail painted some areas. There are a few photo etch accessories that go on the port fuselage cockpit wall then the tub was installed and the fuselage was assembled. Follow along on my blog in the build log section – https://davidsscalemodels.com/build-log/1-48-j-35-draken/
-
The1/48 Hasegawa Ki-45 TOYRU (NICK) is now done. The fit is very good. The decals went on well but the Manchukuo Air Corps logos do not have a white backing so the camouflage shows thru a bit on the top. The only other issue is the pilots canopy is two pieces and it is a butt fit so getting the correct distance so it fits the fuselage required a fixture. I measured the width it needed to be than taped each side onto a piece of cardboard and then glued the center seam. Overall I would recommend this kit. You can see all the details and photos from start to finish in my build log at https://davidsscalemodels.com/build-log/1-48-ki-45-toryu-nick/
-
The paint is Tamiya Japanese Army Dark Green (XF-13). I thinned it 60/40. Thinning it does not leave brush marks and lightens it slightly and makes the edges not as sharp.
-
Tedious painting on the Ki-45 camouflage continues. I tried masking the pattern and realized it was actually easier to just hand paint the jungle camouflage. The base coat is Japanese Army light green and the camouflage is Japanese Army dark green. In the end I really like the look of this camouflage. I then painted the wing leading edges yellow and the white fuselage stripe just forward of the tail. For the wing landing light I painted the light bezel chrome silver and filled it up with acrylic gel to simulate the lens. See all the details and photos in the blog build log at https://davidsscalemodels.com/build-log/1-48-ki-45-toryu-nick/ At this point I move the model to another table and upgraded the work bench area by adding work table to organize the work surface. Check out the updated photos of the working area on my blog at https://davidsscalemodels.com/gallery/the-studio/ The new workspace
-
Continuing forward I assembled the wings and detailed the main landing gear bays. I assembled the rear gun using the resin version and the photo etch gun sight and mounted the cannon gun sight above the dash. I then mount the wings. Found another issue when mounting them. The kit has spars to support the wings. I ended up cutting these off the kit assembly and attaching them to the fuselage. It was not difficult and the wings lined up very well to the fuselage. The engines came then. They were detail painted and then the copper intercooler for the intake was installed. The engines were then put into their cowls and mounted to the wings. The wings were then installed and the entire fuselage was painted with the base coat. Weathered and added the belly 37mm cannon and then the landing gear was painted and installed. Next up will be the camouflage painting. You can see all the photos and details from the start in my build log at https://davidsscalemodels.com/build-log/1-48-ki-45-toryu-nick/
-
This build is the 1/48 Hasegawa Ki-45 Toryu (nicknamed “Nick”) and the scheme is the Manchukuo Air Corps version. The Ki-45 is a twin engine heavy fighter and was used for ground attack and as an interceptor. Manchukuo was a puppet state of Japan in located Manchuria that aided Japan in their Indo-China operations and later intercepting U.S. B-29’s that were fire bombing Japan. For this build I will be using the CMK resin cockpit detail set. I started by removing all the parts from the resin casting. The cockpit tub required very little trimming to fit in the fuselage. After some detail painting and adding some photo etch accessories I started installing the cockpit. I then found some errors in the CMK instructions. The first was the instructions show the dashboard mounted too far forward and does not show the control pedals. I had to remove it then relocated it to the correct position and added the control pedals. The second issue is the instructions do not inform you that the top of the dash on the kit needs to be notched in order to fit the cannon gun sight. Once these minor issues were corrected the cockpit tub fit in without any problems. I am now moving on to the wings and engine/landing gear bays. You can follow along on my blog in the build log at https://davidsscalemodels.com/build-log/1-48-ki-45-toryu-nick/
-
The Raptor is now finished and on the display shelf. This was a nice build. The photo etch parts were tedious but worked very well. The “stealth” coat does not show up very well when photographing the model. The kit itself fit together very well. The decals were great. They slid in place very well and conformed to the surface. The only caution is once the landing gear is installed, you need to use care as it seems a little flimsy. I did not break any of them but they appear to flex easily. Thanks for following along with this build. See all the details from start to finish at https://davidsscalemodels.com/build-log/1-48-f-22-raptor/
-
Minor update part 2 on the Raptor. The Weapons bay doors have been installed. It was a little tricky getting them lined up and installed but they settled in nicely. I then built, detailed, panted and installed the missiles. I only installed two of the AIM-120’s in the main weapons bay as the second set from Eduard had a problem. The set had three sets of forward fins and only one set of rear fins. I sent them back to exchange them for a correct set. Meanwhile I just installed the two AIM-120’s in the center and the AIM-9X into the missile bays. Decals installed, some weathering done and final coat using 8 parts matte and 2 parts of Vallejo metallic clear were sprayed to emulate the scheme. While it is drying I then started to detail the canopy. The kit comes with both tinted and clear canopies. I opted to use the tinted version. Hoping to complete this build by the weekend. Check out the build log for details and photos from the start at https://davidsscalemodels.com/build-log/1-48-f-22-raptor/
-
Minor update on the Raptor. Had a minor health issue that kept me away from the bench for a couple of weeks. Over the last couple of days I was able to finish building the main weapons bay doors and prime them. I then assembled and primed the missile bay doors. Working on finishing the landing gear doors then onto the weapons to fill the bays. See all the photos from the start in my build log at https://davidsscalemodels.com/build-log/1-48-f-22-raptor/
-
I am using the Glue Looper. It is an awesome tool to apply CA glue. I have used it for applying Tamiya thin glue as well. For CA glue I place a small pool in an aluminum dish and dip the tip of the tool into the glue. Just touch the edge and the glue flows under the PE and there is no excess to be seen. Gives me a very clean looking bond. I use to use dental picks but this tool works a lot better and is very precise. Especially when glue very small PE parts. https://davidsscalemodels.com/tips-and-tricks/photo-etch-tools/
-
This week’s update on the F-22 is a small one. Between my oldest son’s graduation from college and life getting in the way I was not able to spend a lot of time on the bench. However I was able to complete the main weapons bay doors. The small doors had 14 parts and the larger doors had 50 parts each. The braces are 1mm X 1mm styrene stock and the hinge shaft is 28awg wire. Next I will be assembling the photo etch replacement missile bay doors and then priming all the doors for paint.
-
 Looking for the Furball Aero 48010 1/48 A-4 Skyhawk, Lo Viz Devil Dog Scooters decal set. I need the VMA-214 decals specifically. Thank you.
 -
Thank you! This is for my own collection.
-
More work on the Raptor. This update is a little early as my oldest son is graduating from college this weekend. As for the build, lots of tedious work. The landing gear is now detailed and installed. There are 22 parts for each of the main landing gear. I was able to get the base coat of all the paint on the tails and upper fuselage. I am still experimenting with the top coat to give it the metallic sheen. I am now working on the weapons bay doors. All of the doors are completely photo etch and around 80 parts each. This is going to take some time but so far it is looking great. See all the photos from the start at https://davidsscalemodels.com/build-log/1-48-f-22-raptor/
-
Work continues on the fuselage of the Raptor. To start with the RAM panels on the fuselage are very thick. In scale they would be 4” thick! So I grabbed some 600 grit wet/dry sandpaper and went to work wet sanding all of them. The 600 did a nice job thinning them out. I then wet sanded with 800 grit, 1000 grit, and finally 2000 grit. This removed any sanding marks. Once the few photo etch vent panels were applied I looked into the paint scheme. Using some home experimenting mixology I ended up with the following colors. The lightest color is 3 parts light ghost gray and 1 part flat white. The median color is 9 parts dark ghost gray and 1 part gunship gray, the vent panels are gunship gray and I will be using neutral gray for the last color for the scheme. The final color “blobs” will be applied with an airbrush so I can get a good fade line between the colors. The paint on the actual F-22 has a color changing hue similar to a pearlized clear coat. This causes the aircraft to appear to lighten and darken depending on the angle of the light. I am still experimenting with different ideas on how to accomplish this. Once I figure out the process it will be applied as a final coat after the decals. I am now working on the landing gear. So far the nose gear is just about ready to install. I will attach the landing lights later so that the final pant coat doesn’t affect the clear parts. You can see this build from start to current progress in my build log at https://davidsscalemodels.com/build-log/1-48-f-22-raptor/