


TheRealMrEd
-
Posts
71 -
Joined
-
Last visited
-
Days Won
6
Content Type
Profiles
Forums
Events
Posts posted by TheRealMrEd
-
-
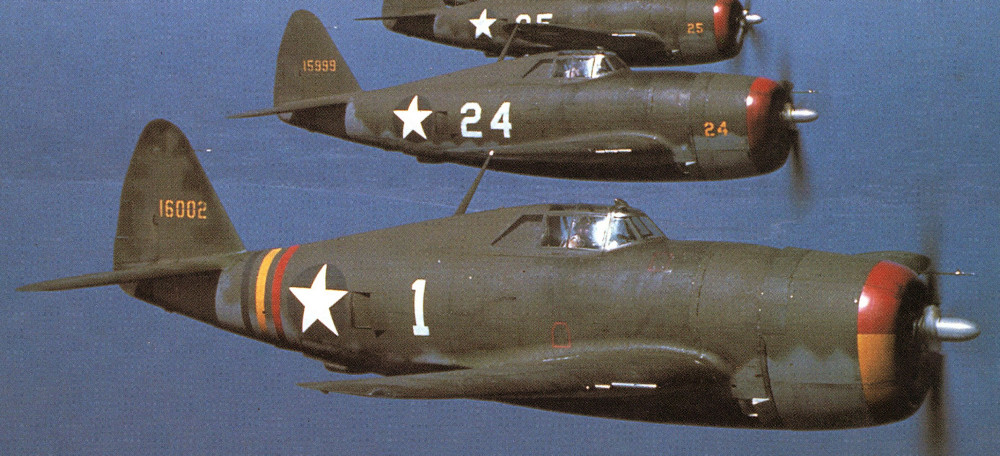
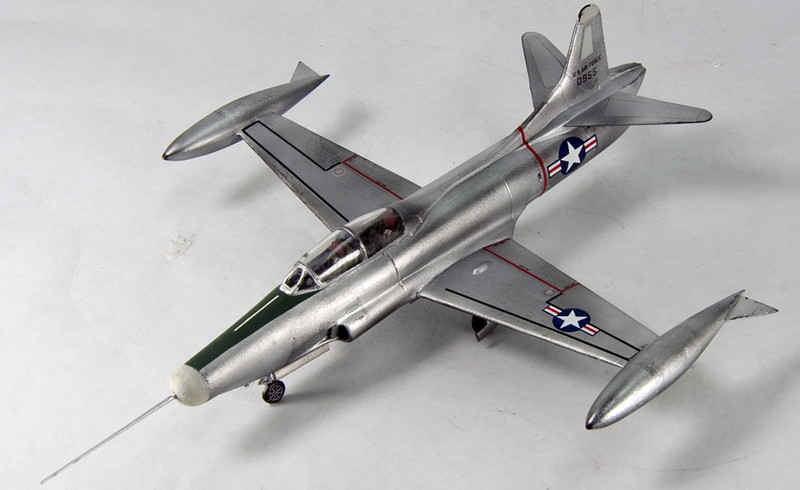
On 8/6/2023 at 9:07 AM, SkyKing said:
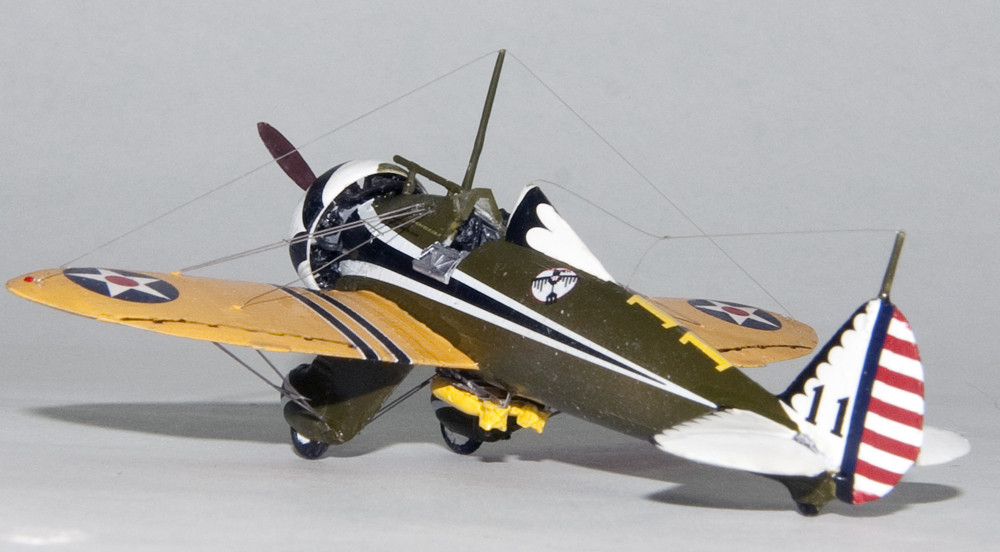
Front landing gear is too short. The airplane had a definite nose-high attitude when on the ground. Other than that, which is probably the fault of the kit, excellent model!
High Mike, not sure whether the gear is too short, or whether I missed the correct location, due to lack of pins/holes or other means of positive location. The build thread describes these problems, and after three tries, I was glad to just get something to stick in place, and left it alone! That being said, there were also issues with correct location, trying not to have the aircraft "lean" to one side or another, which affects the wing tips being at the proper height, in order for the wing tip landing gear to properly clear the ground.
This is definitely NOT a kit for the beginner, and everybody else needs to test assemble and check every last assembly and how they interact with the overall model. I can hardly wait for the next guy to do a build thread on this, to see whether all my observations help the next guy in line...
Ed
-
 1
1
-
-
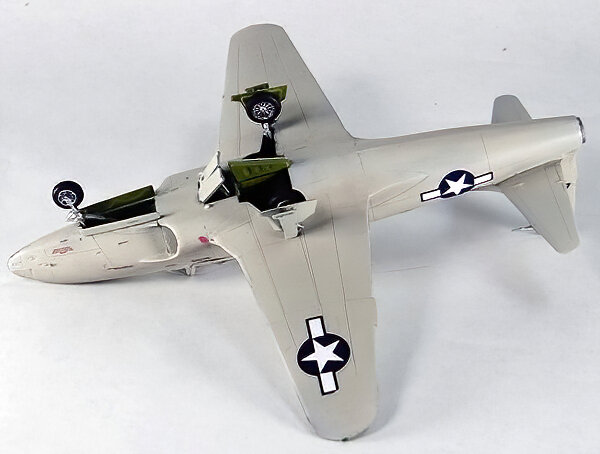
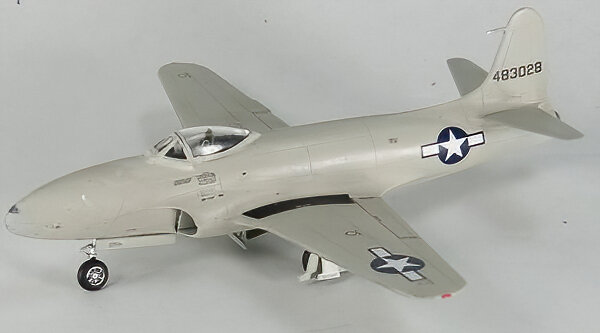
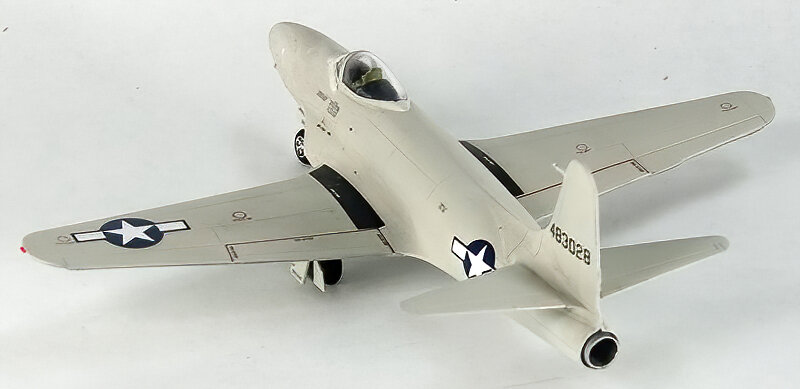
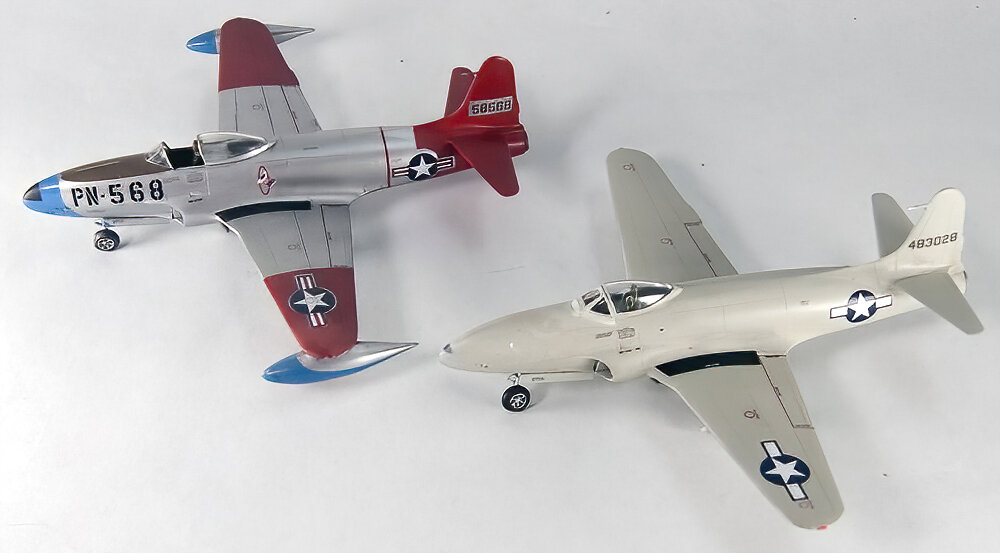
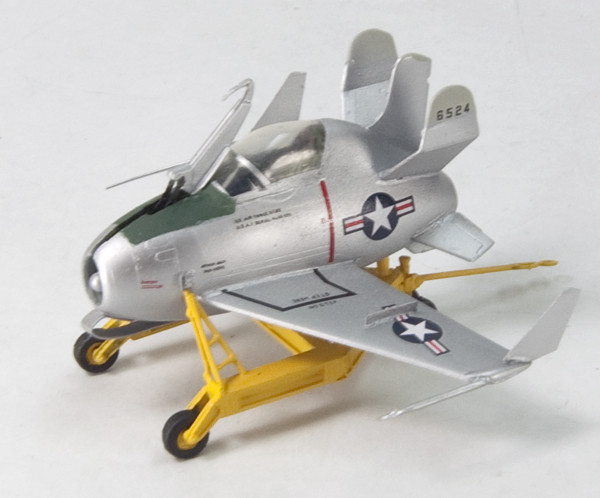
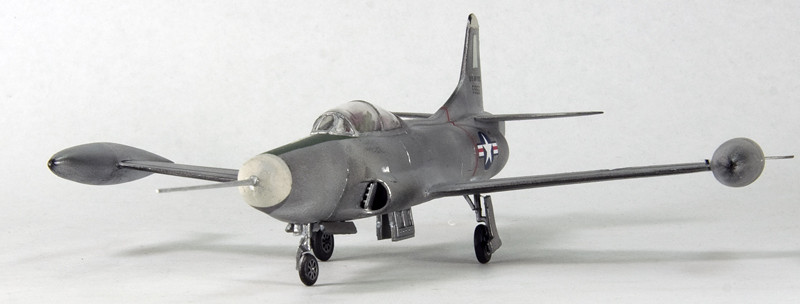
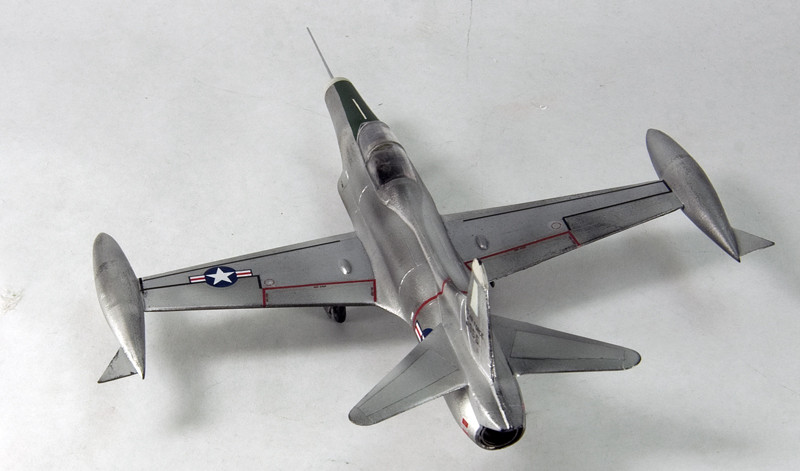
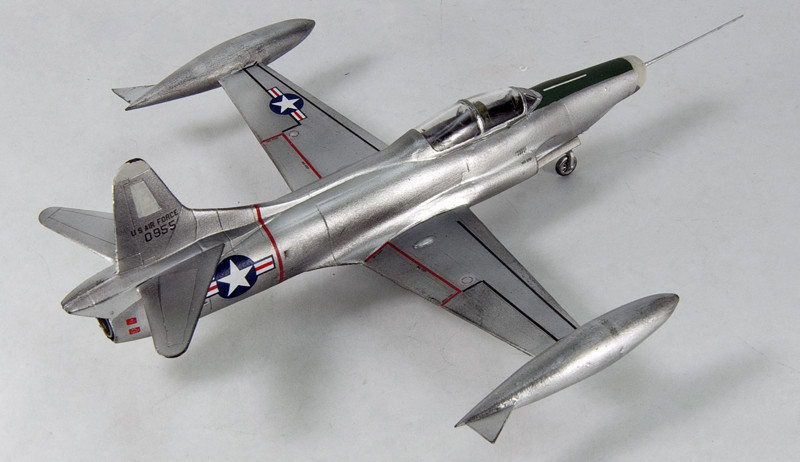
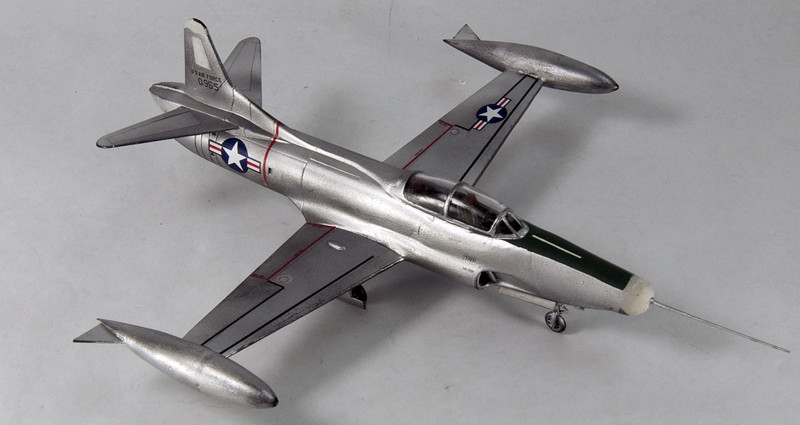
Hi Gill, and thanks. It did indeed fly, and was featured as the fictional "Gilbert XF-120" fighter, in the William Holden movie, "Toward The Unknown".
Ed
-
1
-
-
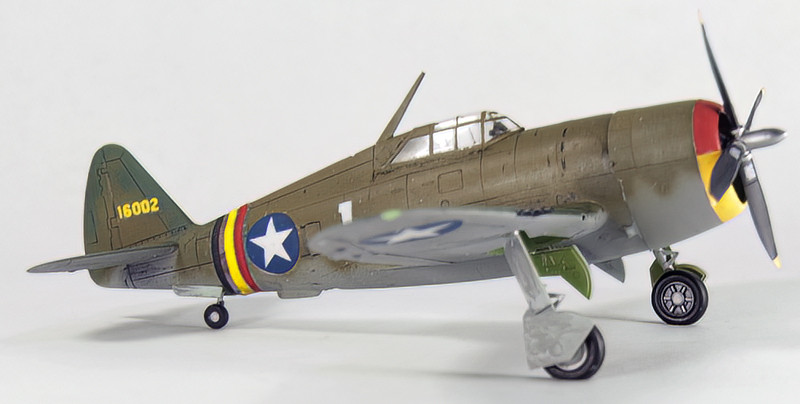
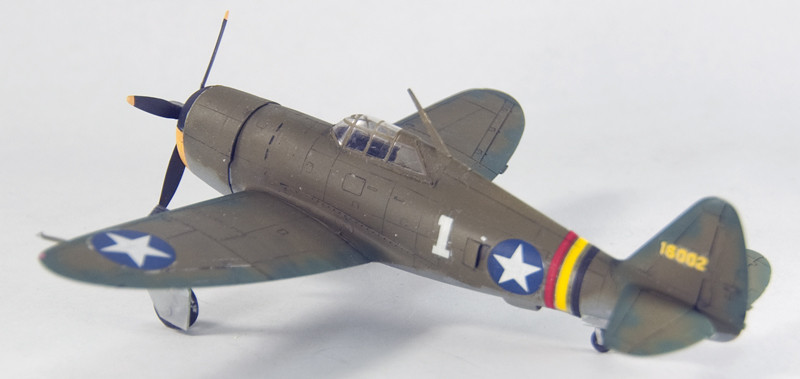
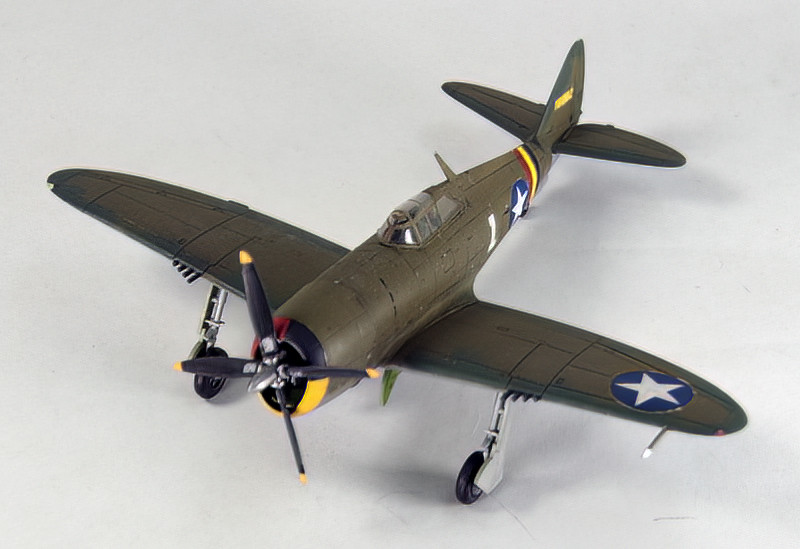
Finally completed this brand new kit. While not without a myriad of challenges, it is hands-down the best 1/72 kit of this aircraft I've seen, to date. For those interested in the details, the build thread is HERE.
The pics:

Thanks for looking!
Ed
-
2
-
-
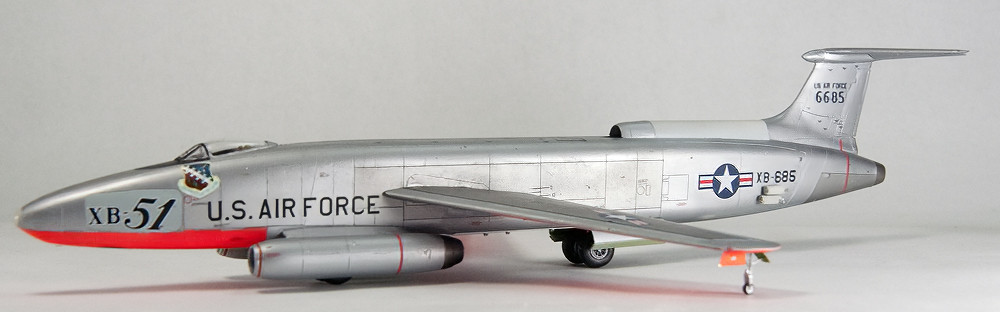
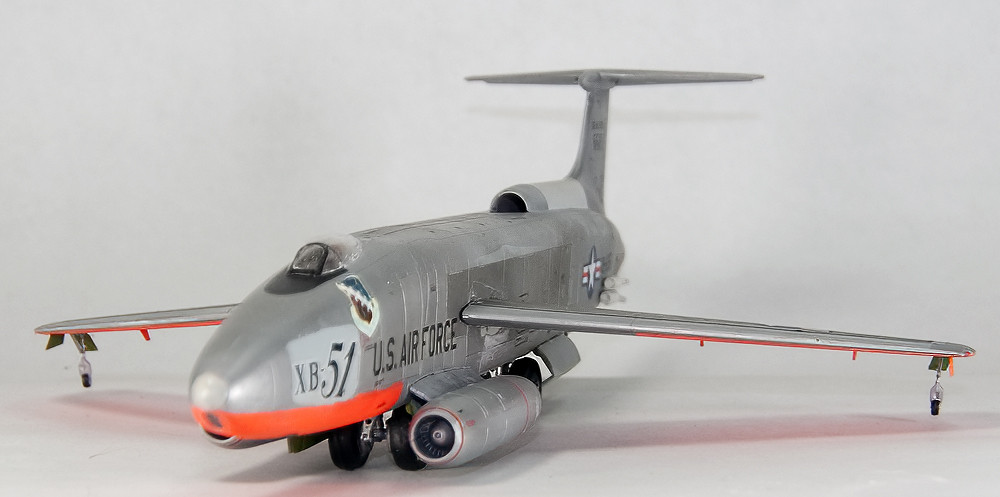
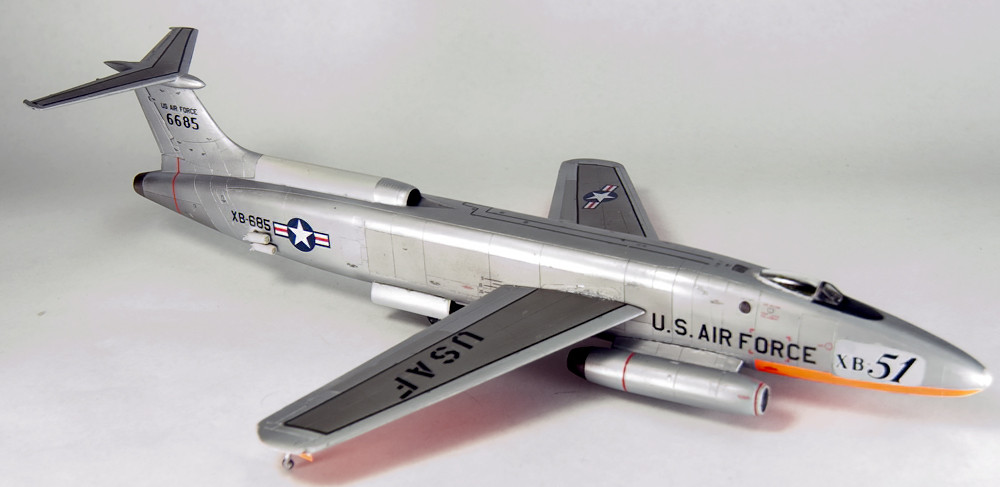
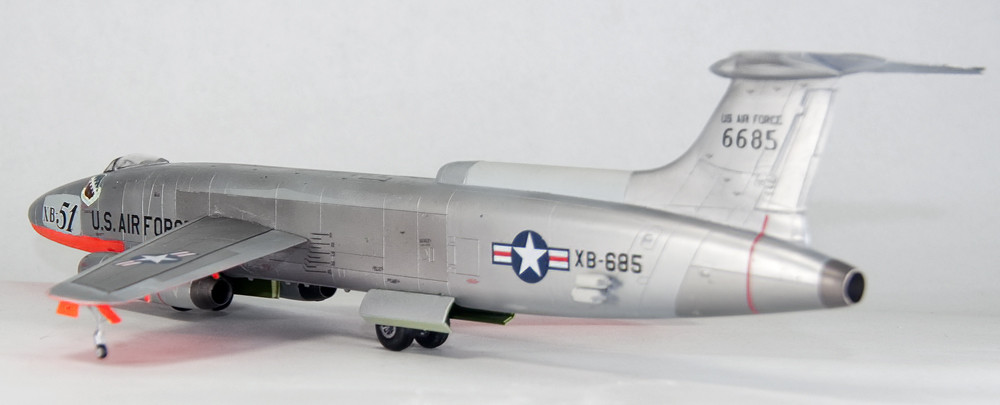
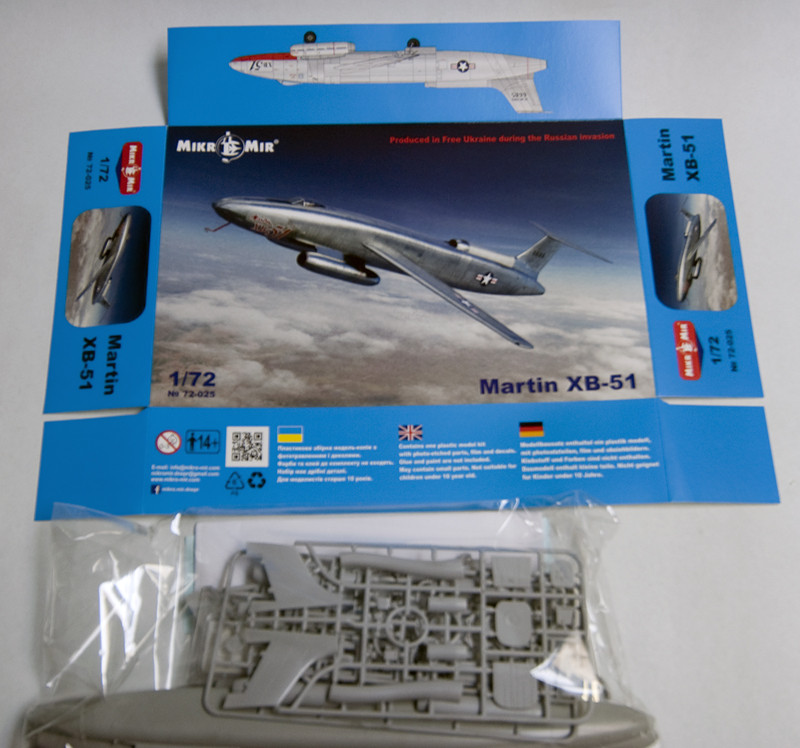
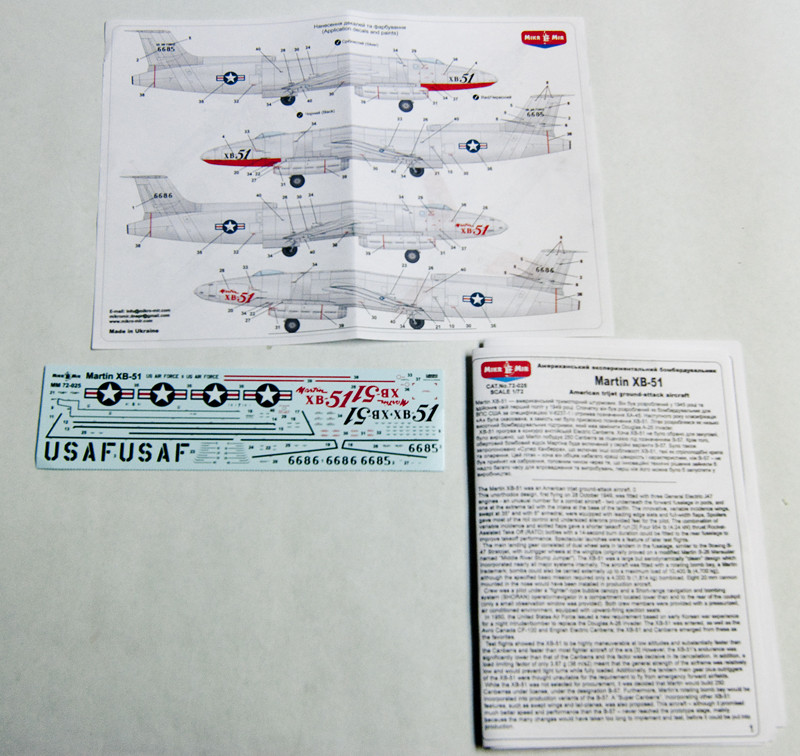
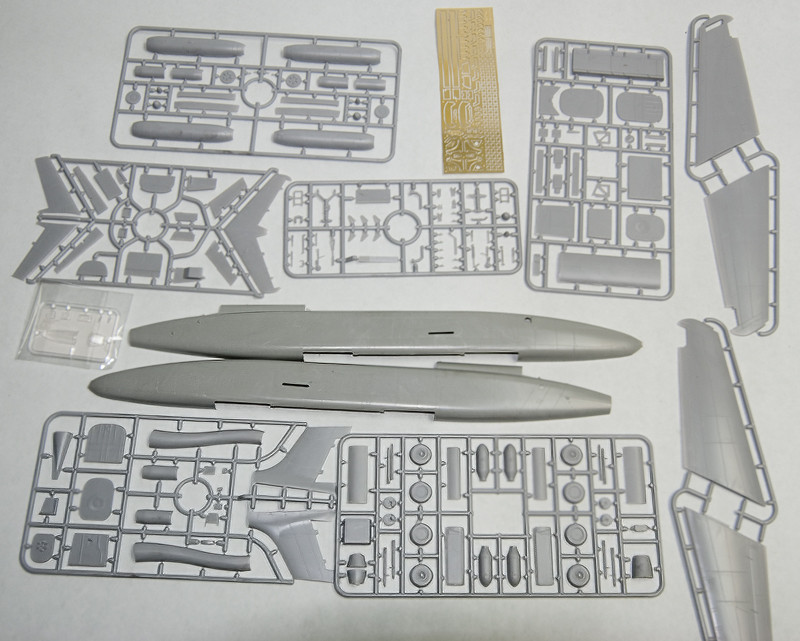
Just a heads up to those who may be interested. A company called Mikr Mir in Ukraine has just released a new tool 1/72 scale plastic model of this unique bomber. I ordered mine directly from the manufacturer (you can find it on-line), as I couldn't find it yet in any of the hobby dealers. With postage to the US, it ran around $73.00 or so, and arrived in only about three weeks, rather than the two+ months they stated!
I am doing a build thread/simultaneous kit review over on BritModeler HERE
Ed
-
Hello again.
For a long time, I had considered building the old Lindberg 1/72 P-47B, in 1/72 scale. I had acquired various parts, cowling, engine, cockpit, vertical stabilizer/rudder, main gear, wheels, prop and so forth to bring the kit closer to today's' standards. In the end, I decided it was easier to simply fall back on my usual methods, namely modifying an Academy P-47D razorback kit, by shortening the cowl a scale 8 inches, sanding off the "belly bulge", and some other small detail to make a P-47B. I did, however, use the original decals from the old Lindberg kit, as they were pristine. I also gave them a couple of coats of Microscale Decal Film, just to be safe.
I was modeling Col "Hub" Zemke's P-47B, when it was working up with the 56th Fighter Group at Farmingdale, NY, prior to shipping to England in WWII:
Here's how the model turned out:
In retrospect, I probably should have replaced the old Lindberg roundels with modern decals, as they are thick, and maybe not quite the right shade... call it nostalgia for the old kit, I guess. I had last built one around 1972.
Anyway, I've finally gotten an actual P-47B for the collection. Not perfect, but better than what I had!
Thanks for looking,
Ed
-
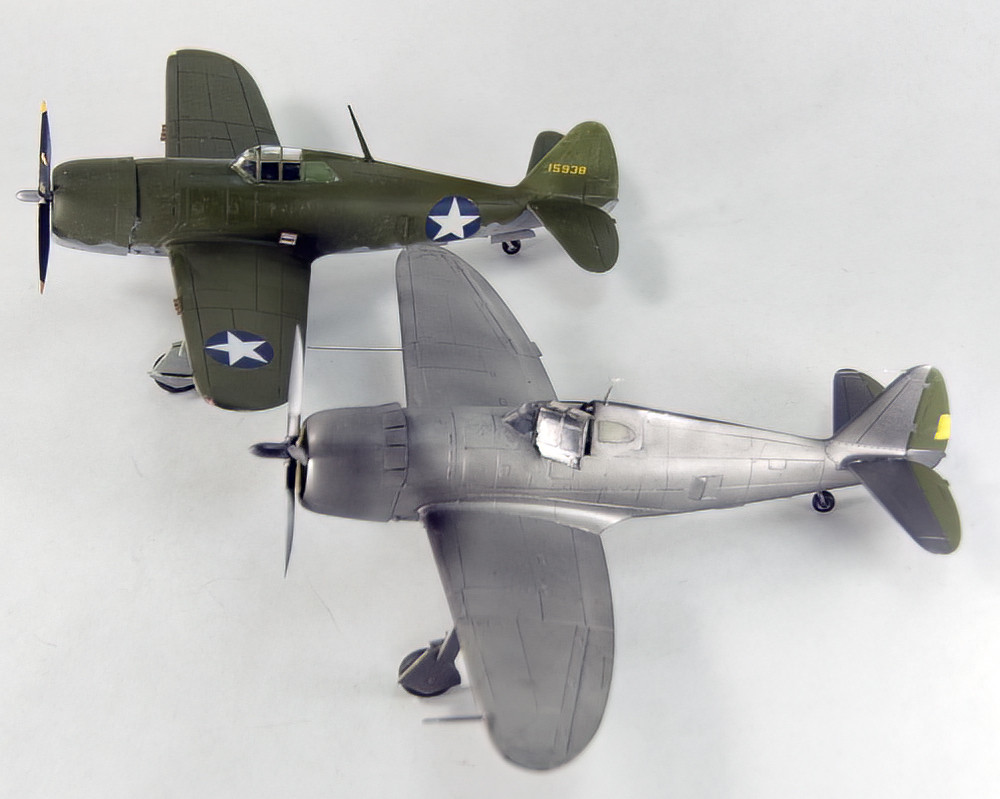
My most recent completion, the Republic XP-47F experiment with a laminar flow wing, made by converting my old hack and saw favorite, the Academy P-47 Razorback kit:
For comparison sake, a shot with my XP-47B conversion, done a couple of years ago:
For complete "how=to" instructions and a wing pattern, please refer to the build thread
Thanks for looking,
Ed
-
1
-
-
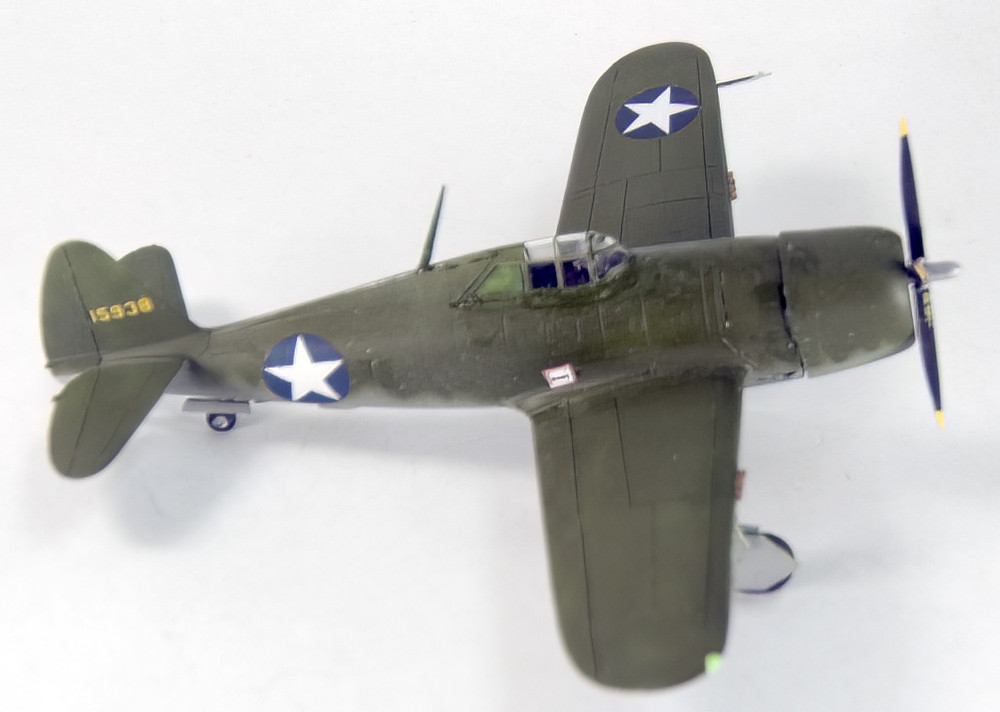
For those interested, the build thread is HERE
A few pictures of this odd P-47B variant, the "Double Twister":
Thanks for looking.
Ed
-
A little late, but here we go...
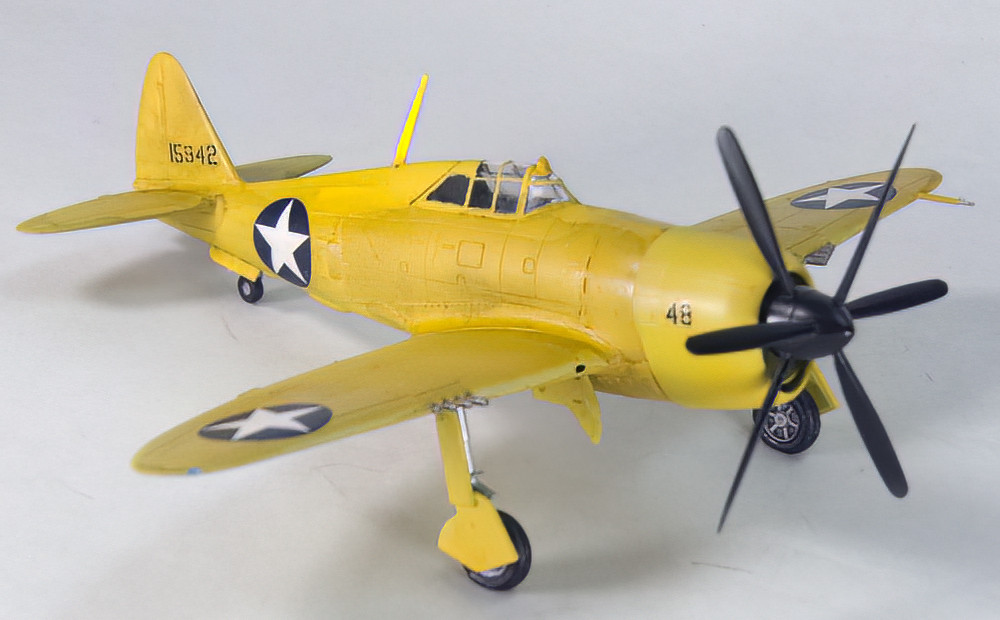
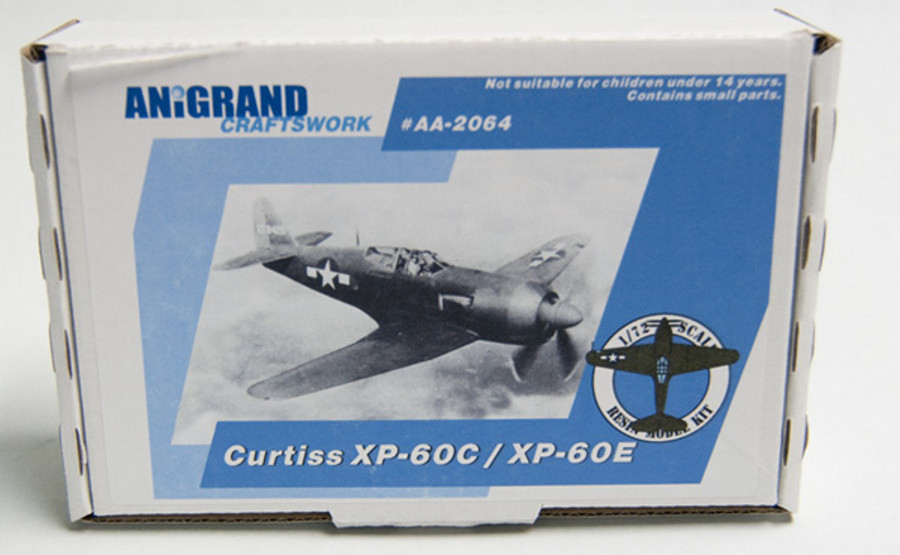
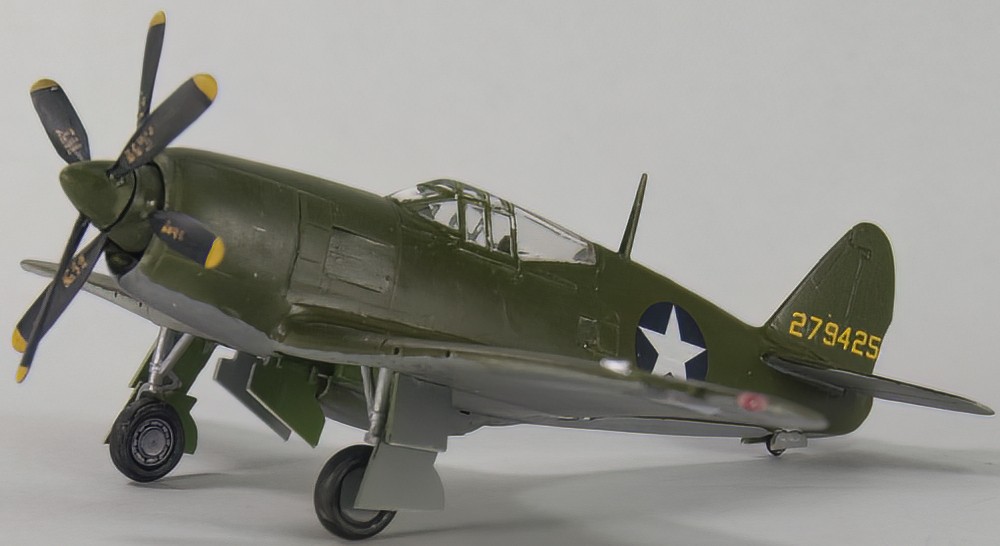
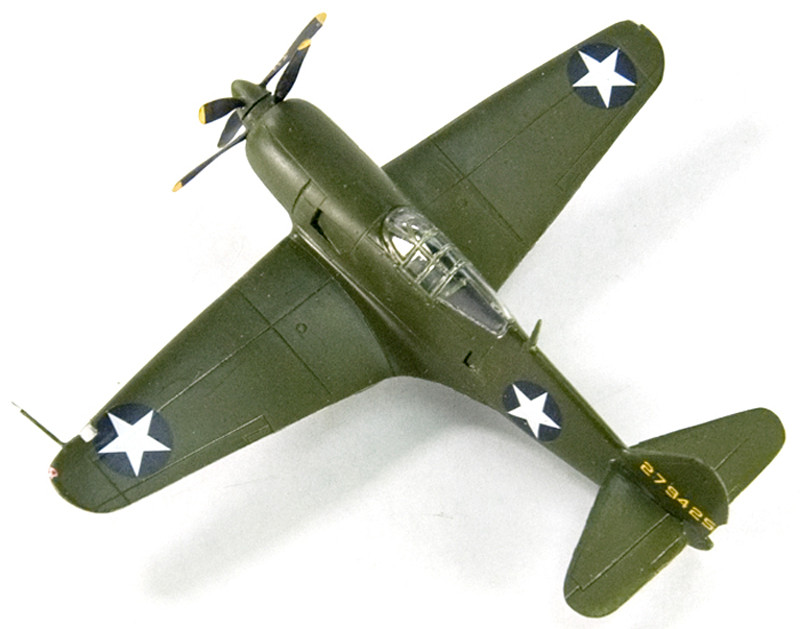
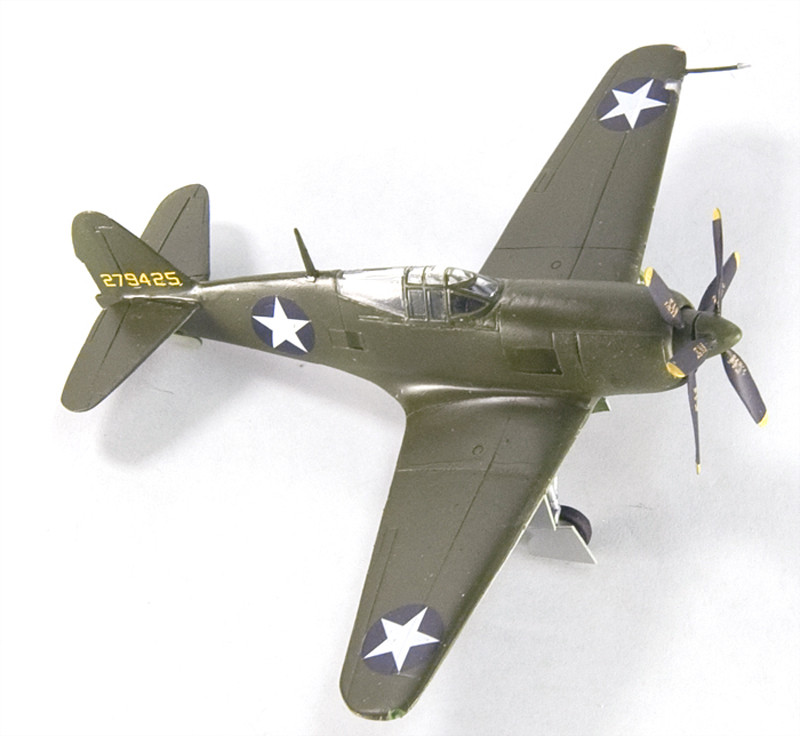
For my first completion of the New Year, may I present my rendition of the Anigrand 1/72 scale resin XP-60. While Anigrand provides the simple necessities for the XP-60C and E variants, sadly, they did not offer items to build the XP-60A, B, or D versions, all of which I think are more unusual. Due to the simplicity of the various parts, sparse cockpit, etc., I elected to sort of "take a break" and build it as the XP-60C, which at least adds to my collection of "Double Twister" propeller-driven models!
The XP-60 series derived from the proposed Curtis XP-53, all of which is explained quite well elsewhere on-line, so I will just say that it is simply another example of Curtis aircraft trying to extend the P-40 series into infinity, mostly efforts that failed due to poor or late engines, war-time production needs of P-47's (sub-contracted), or just design passing them by. In this case, their under-belly scoop and laminar wings had more drag than did the P-51's, and so forth.
Here is the box:
and without fanfare, a few pictures:
I was originally going to do a build thread, but a resin fighter is a resin fighter, more or less, the world 'round, so I didn't. Didn't seem to be much to show to add to the modeling world's collective knowledge. I'm just posting these for the historical value, and because it's sort of an odd critter.
Thanks for looking,
Ed
-
1
-
-
7 hours ago, ghodges said:
Wow! That makes for a GREAT year, considering all of the extra work you had to do on most of those builds. Your build threads make for great references for anyone else who may want to attempt to follow in your daring footsteps. Thanks for sharing!
Gil

Thanks Gill, that's why I do it. I spent so many years watching good modelers, if effect, say "look what I did", rather than "here's how you can do it also". There were a few old-timers who showed other techniques and the like, and most of what I think I know comes from those who have gone before. Many models that I build today I wanted years ago, but did yet have the skills to build them.
My goal is to amass as much information in once spot, so that others may be able to duplicate (or hopefully better) my efforts, which why I try to provide scale drawing, sized decal masters, etc., just to make life easier.
Of course, I also rely upon times on my rather large spares box. And how does one acquire a large spares box? -- When some models just don't work out, but their parts are used somewhere down the road. Every build is a learning process; what to do, and very often, what NOT to do. To get better, one must challenge themselves; to paraphrase "faint heart ne'er won fair contest"!☺️
I just that down the road, someone else will build some of these neglected models, AND pass along what they learn, someday down the road.
Ed, just ramblin' on...
-
1
-
-
A little late posting these this year. I'll try to do a little better in future!
Not so many this year as last, but some that I really wanted in the collection, For those interested, the build threads offer detailed instruction about how the models were built, so that others could, if desired, build these often rare models themselves. When needed, artwork is provided for your use. The artwork part also applies to some RFI's, which are only photos of the completed model, due to reasons of simplicity, sameness, or just that documenting their build would probably not add to the general pool of knowledge.
First up, the
YP-80A, one of those that flew in Italy in 1945, , a modification of the 1/72 Sword P-80 A/B kit, which is only really accurate out of the box for the "B" version:
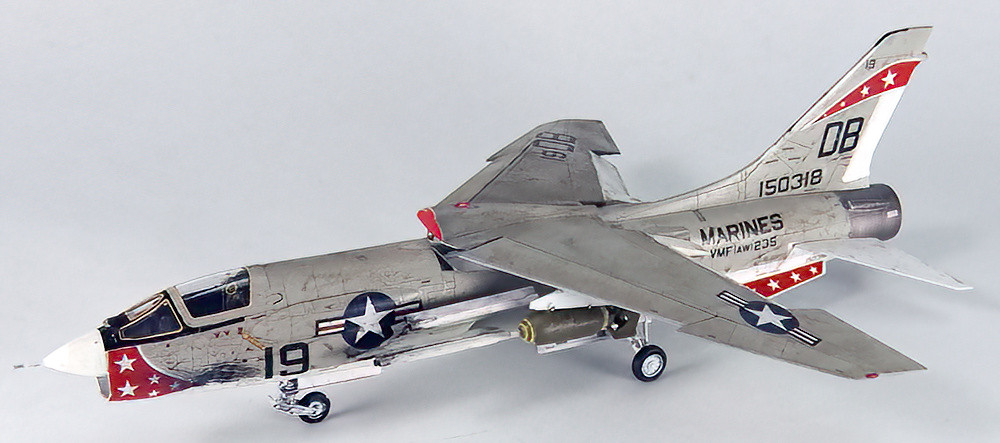
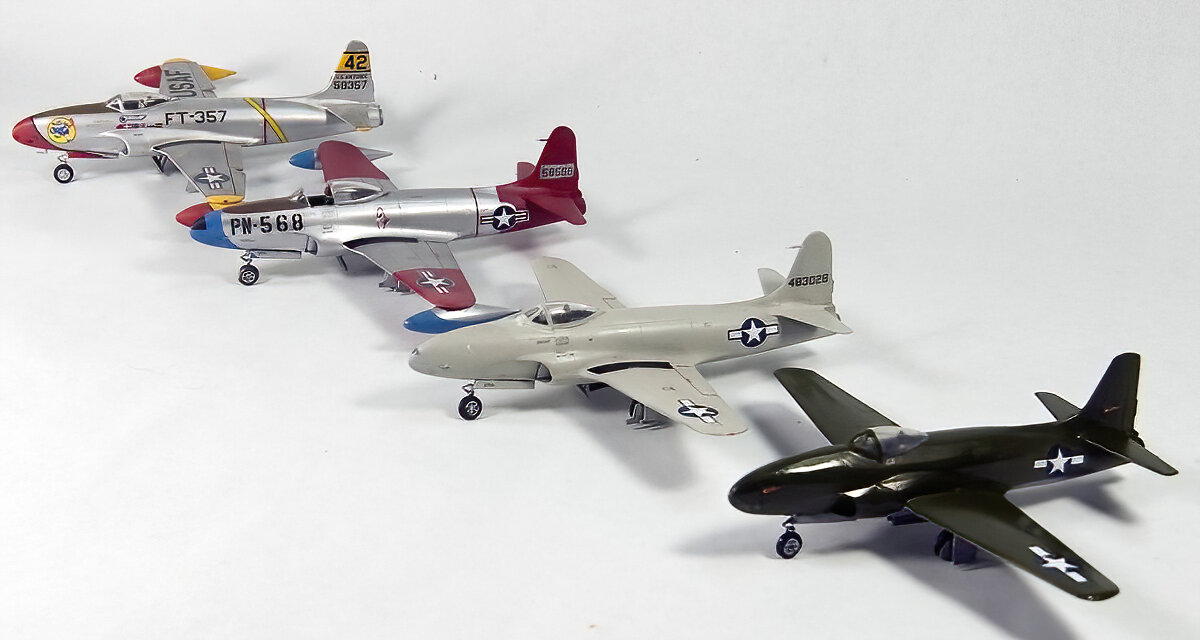
Next an F-8E Crusader build of the 1/72 Academy kit:
Next up, a modification of the 1/72 Scale Trumpeter F-100C kit into an North American F-100A Short-Tail, built for the Century Series Group Build here on Britmodeler:
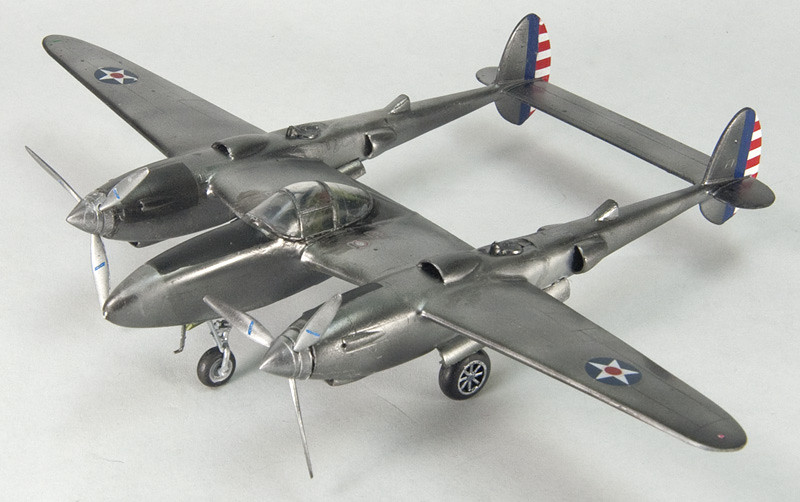
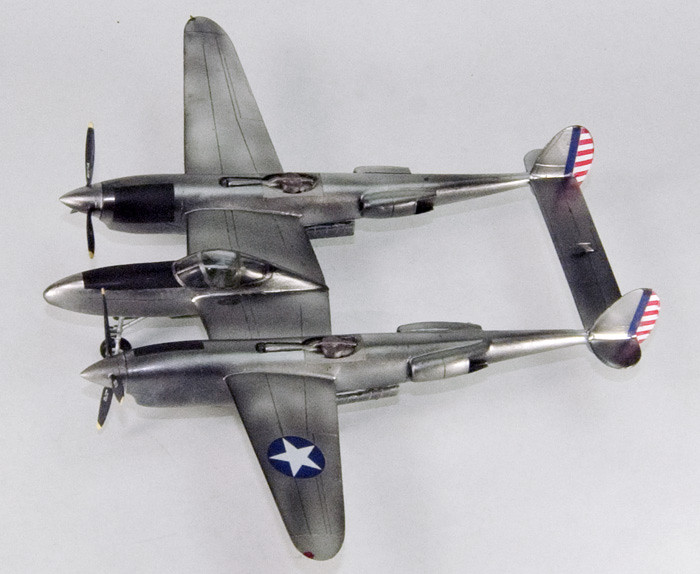
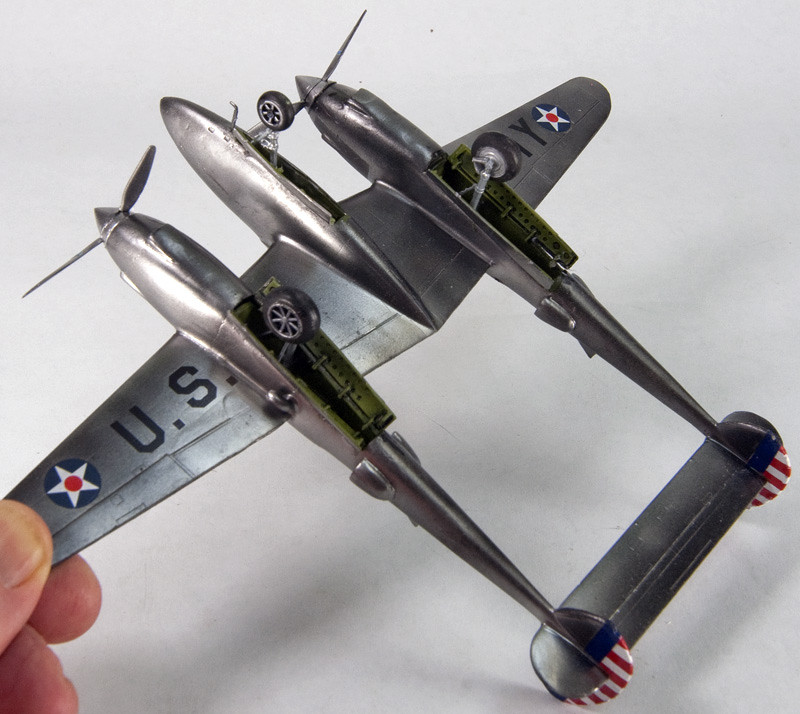
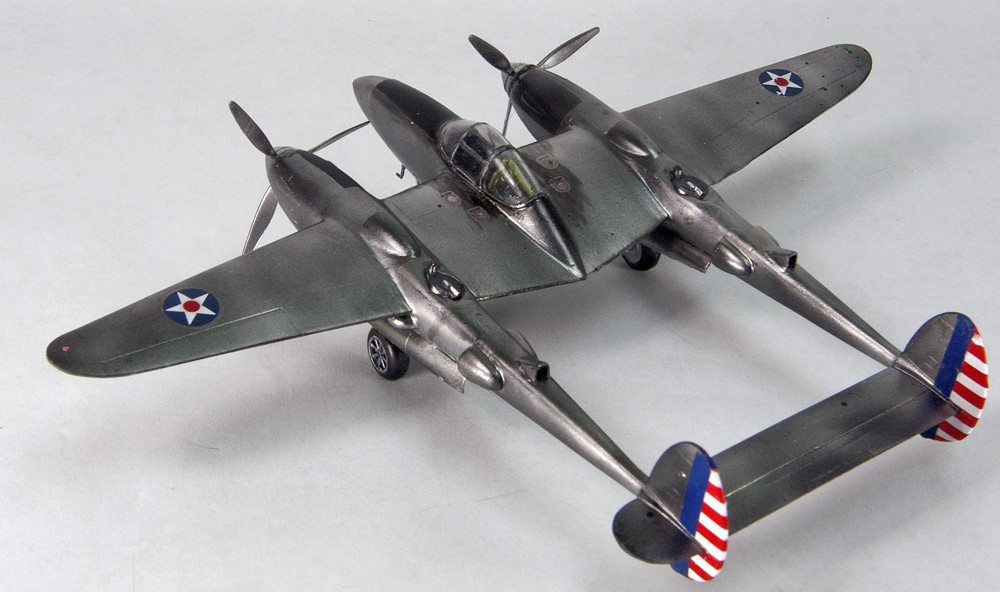
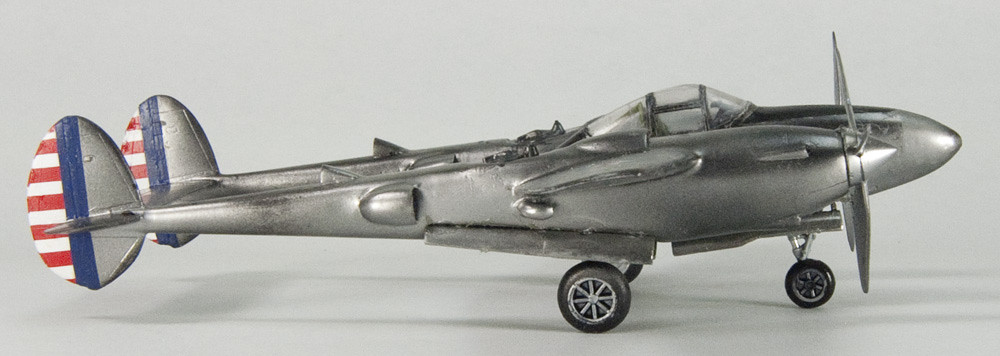
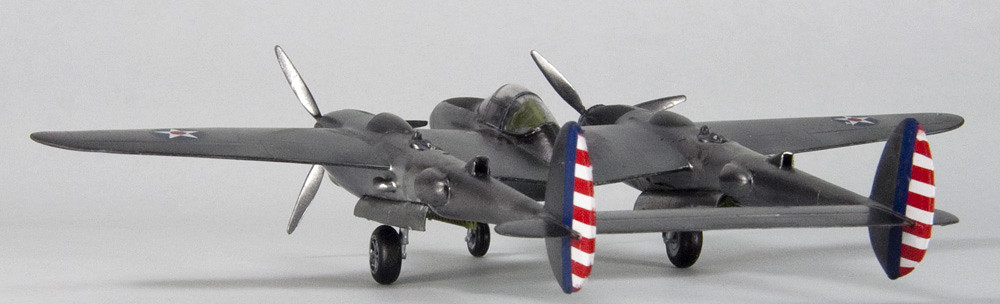
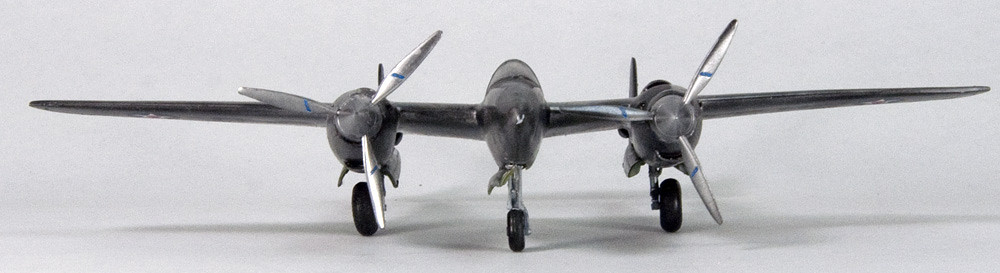
Followed by my personal favorite, The XP-38 kitbash, using the RS Models P 322 1 Lightning and an old MPC P-38F kit, both, of course, in God's Own Scale -- 1/72:
Next, Anigrand's 1/72 resin model of the XP-49, a larger cousin of the P-38:
And then, RS Models plastic 1/72 XP-79B model. They also made a resin version earlier, which may be a little more detailed and I also have in the stash, but I was feeling lazy!: However, the plastic did require some modification and tricky building, as referenced in the build thread:
After which the Italeri/Hi-Tech models F4U-7 offerings, built as the prototype XFU-6/XAU-1 Corsair, all of which is explained in the RFI, along with needed art work:
And last, the 1/72 Revell F4U-4 Corsair, using the Hobby Boss kit decals of the same variant:
As I've said above, not as many, but some I've been wanting to add to the collection. Thanks for looking.
Ed
Edited January 6 by TheRealMrEd
-
Beautiful job on this! I've always thought about doing one of these, but I'll probably start with the more modern Roden one. I could only hope that I could do one as nice as this.
Ed
-
Very nice job on this. It is interesting to see that other than much clearer clear parts, and undoubtedly fewer attachment points to chop off, the Valom kit really builds up about the same as the old Mach2 kit. But, your excellent finish and clean workmanship show this kit off to a great advantage.
Ed
-
1
-
-
Well, after much chopping, filling sanding and other general mayhem, this combination of the RS Models P-322 1 and the MPC P-38F models have been beaten into a semblance of the very first Lightning, the XP-38. For those who might be interested in the hows and whys, the build thread is HERE.
The pics:
Thanks for looking in.
Ed
-
3
-
Thanks folks, glad you enjoyed them.
Ed
-
Plugging away on my Lockheed collection, I found that I lacked a P-80A. While researching the build, I found that the Sword P-80A/B kit had a definite error that needed correction. For that whole story (and cure), the build thread is over on BritModeler HERE
For those just mildly curious, here are the pics:
Thanks for looking,
Ed

-
4
-
-
Another tip is, after masking, gently wipe the unmasked areas with a tiny Q-tip (not the regular kind -- they might shed -- moistened with drug store alcohol. Also, try to always use a primer, under the paint. I use the Alclad II White, Gray, and Black Primers. Of course, when you have to use something like interior green or so, you may try the technique of masking the inside of the canopy, and shooting that color, after priming, on the inside, and painting the outside with it's own primer/paint layers.
I do this on 1/72 scale models all the time. On quarter scale and up, it should be duck soup!
Ed
-
Another vote for invisible thread!
The hardest part, is drilling all the very tiny holes! After that, I secure the anchor end with a tiny drop of CA cement. After that dries, I pull the length of thread (cut excessively long) through the hole in let's say the wing. I then put tension on the thread, using a tiny alligator clip, etc. (Fly-tying hackle pliers work great for this!). Sometimes I have to put something, like a box or paint bottle, against the model while I tension the thread, just enough to pull it taut. Then I apply another drop of CA where the thread exits the top or bottom of the wing. When dry, trim closely, sand if needed, and touch up the paint. I usually paint the wings first, but leave off the decals. Then I rig, then touch up or over-spray the top of the top, and bottom of the bottom, wings...
Start with something simple, like a Stearman, before tackling the giant bombers!
Best of luck,
Ed
-
2
-
-
Avery pretty aircraft -- well done!
Ed
-
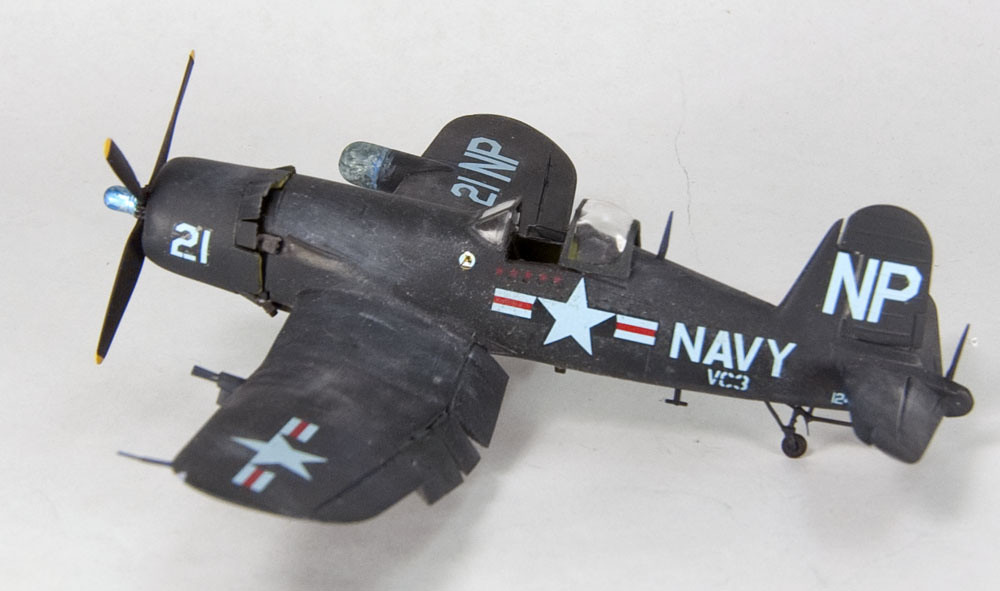
On 12/28/2021 at 8:26 PM, johneaton said:
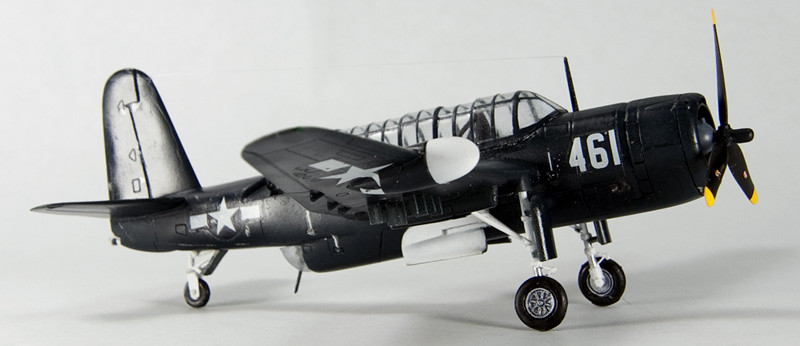
Nice selection of models. I did the same LF A-18 this year and the MPM XF-85 in the past, so I know what you've accomplished. How was the TBF build?
You mean the TBY-2 Sea Wolf? It was challenging to get a lot of the piece to fit, masking the clear areas, and other stuff as mentioned in the build thread. Iw as not a snap togther!
Ed
-
Well, time for the usual year-end roundup. 2021 has been an odd year, but I got some more done:
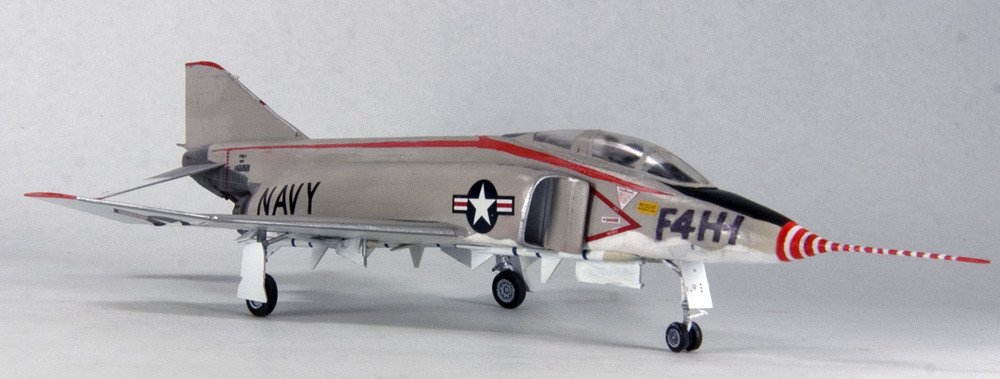
First up, the 1/72 F4H-1 Phantom Prototype conversion, using no aftermarket parts:
A few challenges, but worth it. For those interested, more pics HERE which will then link to the build thread proper. Same process will be repeated for all the models...
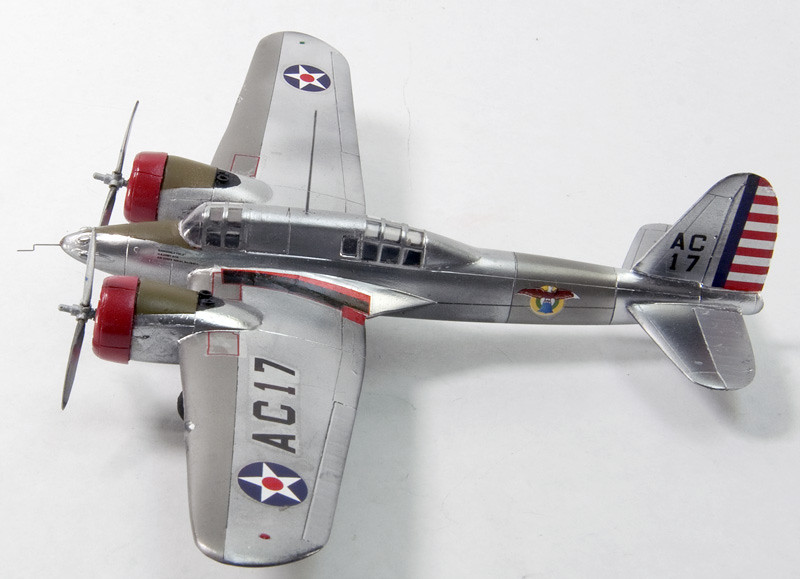
Next up, the Curtiss A-18 Shrike resin build:
More pics HERE
Next, the F3H-1N DEMON conversion:
More pics HERE
Next, the Lockheed YF-97/YF-94C kitbash/conversion:
More pics HERE
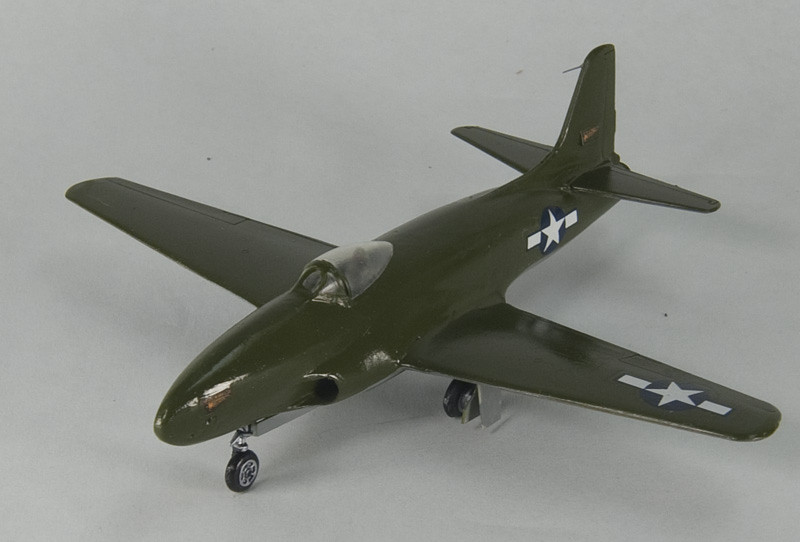
Next up, the diminutive XF-85 Goblin:
Build thread HERE
Next, Lt Guy Bordelon's F4U-5N Corsair night fighter, all gussied up with aftermarket goodies:
More pics h
Next, LF Model P-30 resin kit:
More pics HERE
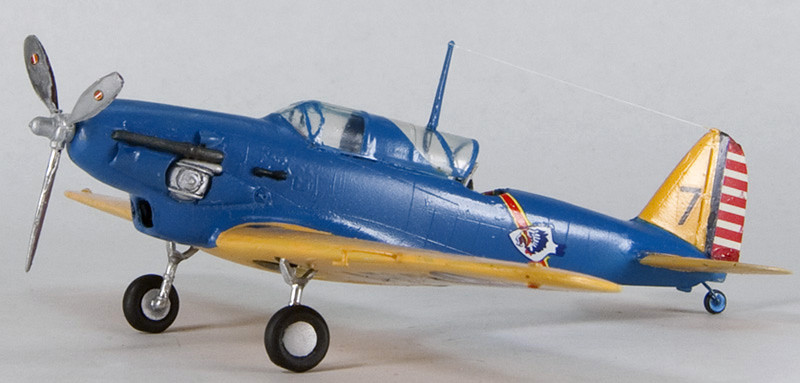
Next the P-26 Peashooter, also all gussied up with aftermarket:
More pics HERE
Next up the Lockheed YF-94D conversion, my personal favorite:
More pics HERE
Next, the Lockheed T-33 Twin-Tail conversion, also called the TV-2:
Build thread HERE
Next the Platz Shiny T-33 squadron hack:
ore pics HERE
Next up, the resin Consolidated TBY-2 Sea Wolf:
More pics HERE
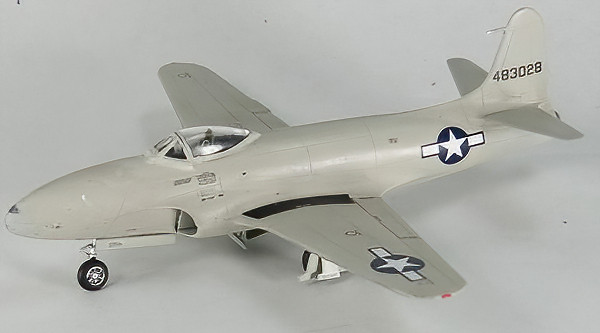
And finally, the last and most difficult of the year, the Lockheed XP-80 conversion in the garb of it's initial flight:
More pics HERE
All in all, a challenging but rewarding year, whittling down the bucket list a bit!
Thanks for looking and a great New Year to everyone!
Ed
-
1
-
-
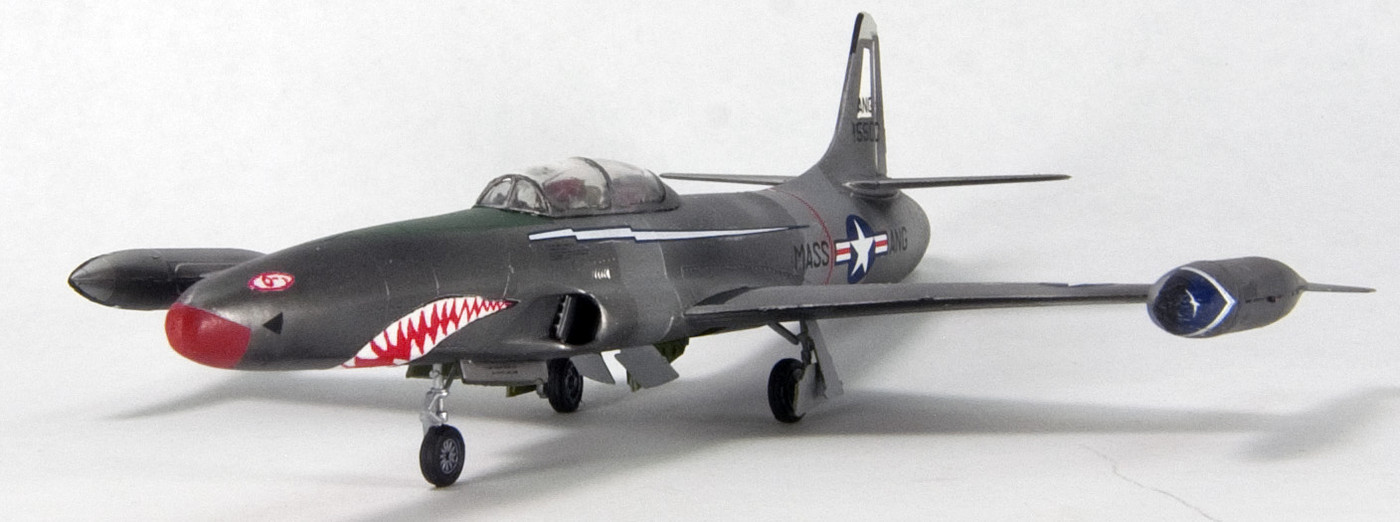
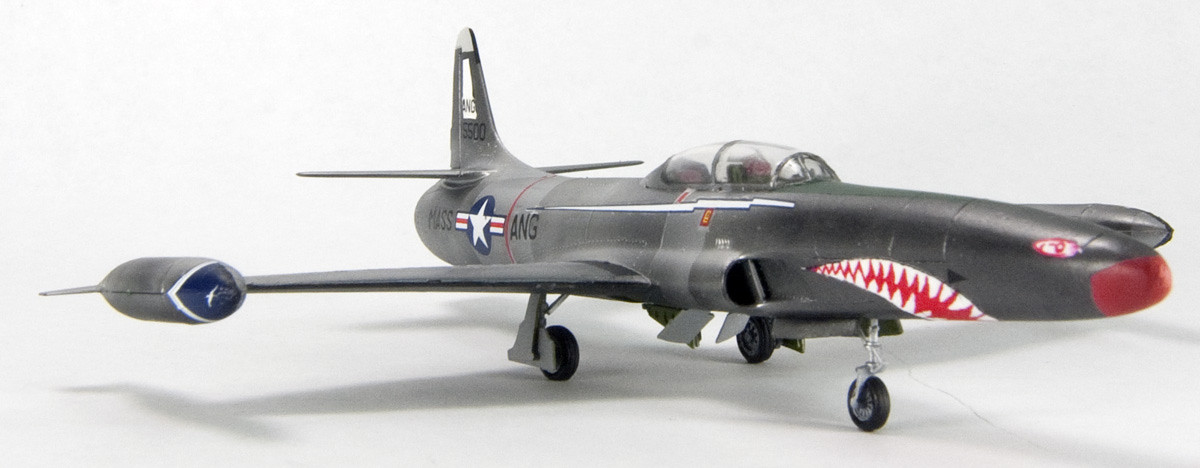
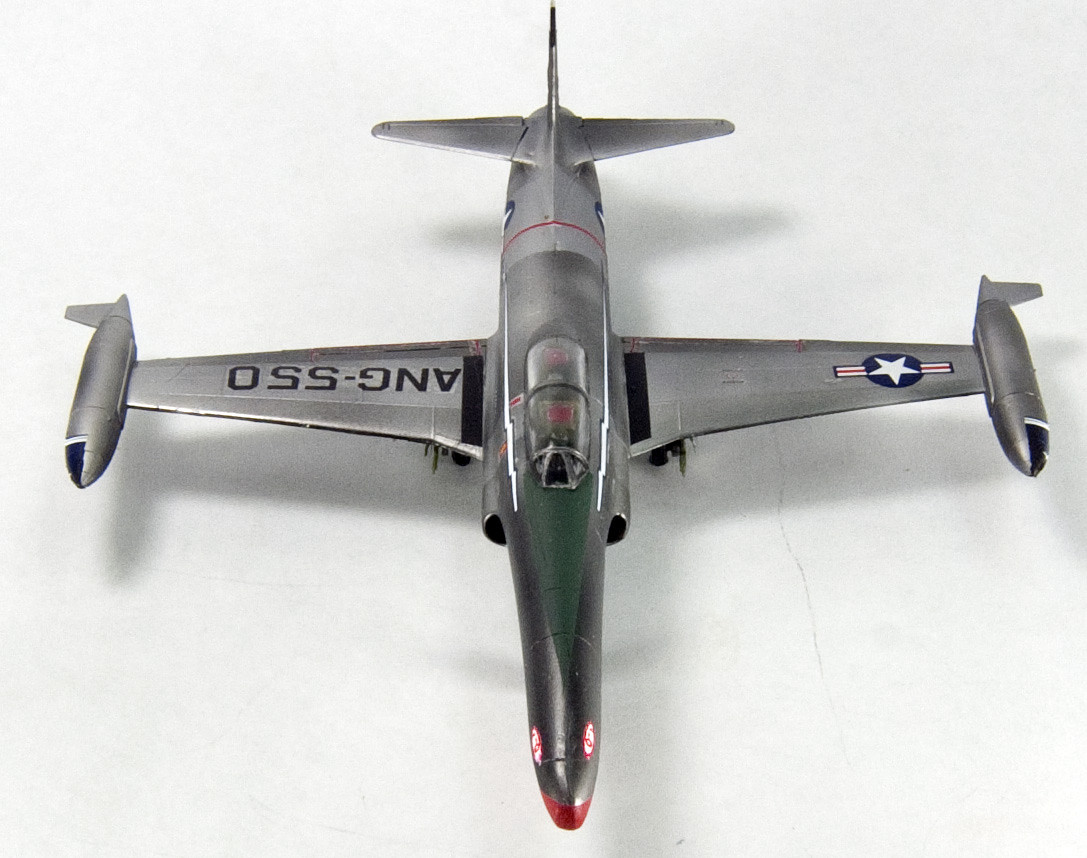
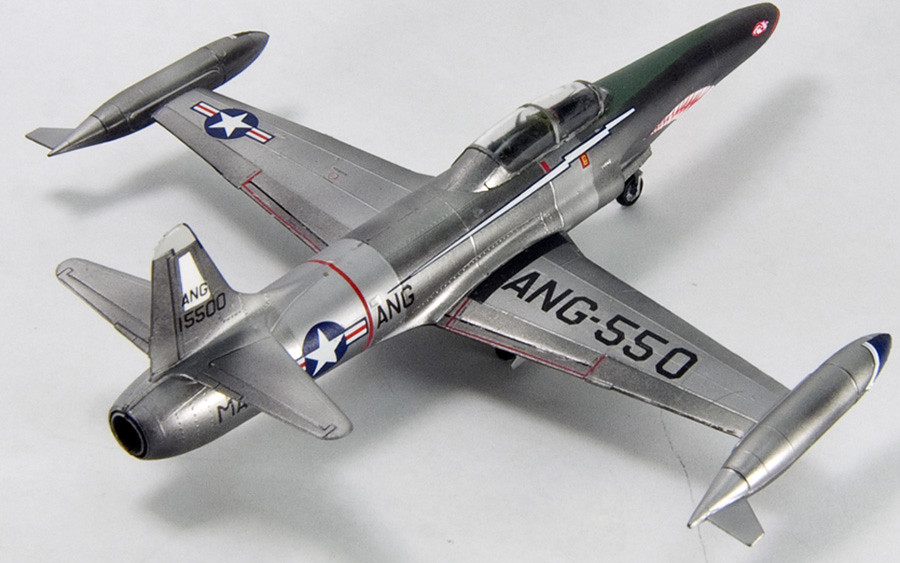
As usual, I waited a long time for this model, hoping someone else would jump in, etc. etc. No one else did, so I did, and here is something you won't often see, the YF-94D, which was actually a converted YF-94C in an earlier life. This aircraft was going to be a ground-bashing version of the F-94 series, but that never really got off the ground. This plane and it's single sister ship were used to test the M-61 Gatling gun and 20mm cannon. When these tasks were completed, they were seconded by the Air Force to the Mass ANG for use as trainers.
For those interested, the build thread and art work are HERE
The pics of old "Pinocchi-nose":
Hope that you enjoyed looking as much as I enjoyed adding this bird to the collection. As usual, while not perfect nor excruciatingly detailed, it's a lot better than the one I had before...
Ed
-
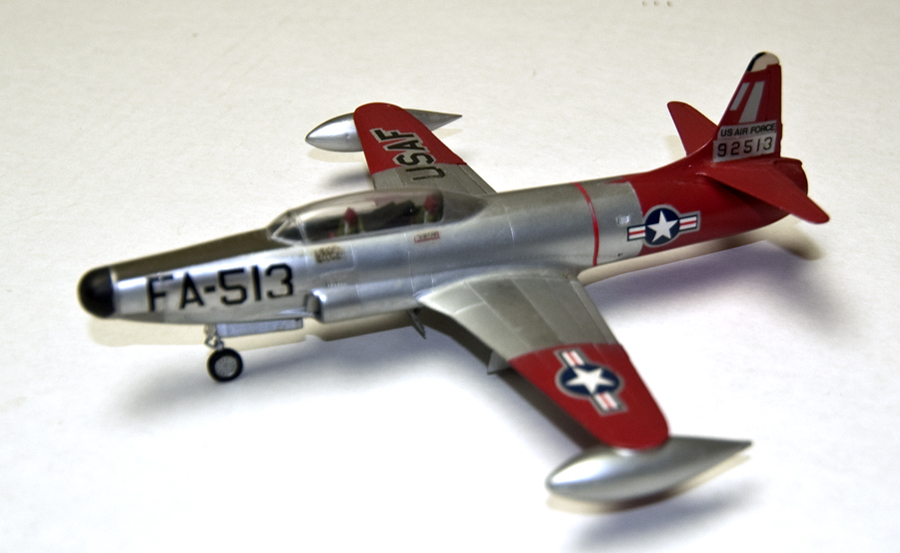
Here's something very similar, an F-94A I built from a T-33 kit, decades ago, the same way that one was built:
This was way before any F-94B kits came out...
Ed
-
Thanks guys,
I just love this P-80, T-33, F-94, etc. jet family. Hope to build one of each type, if I last that long!
Ed
-
1
-
-
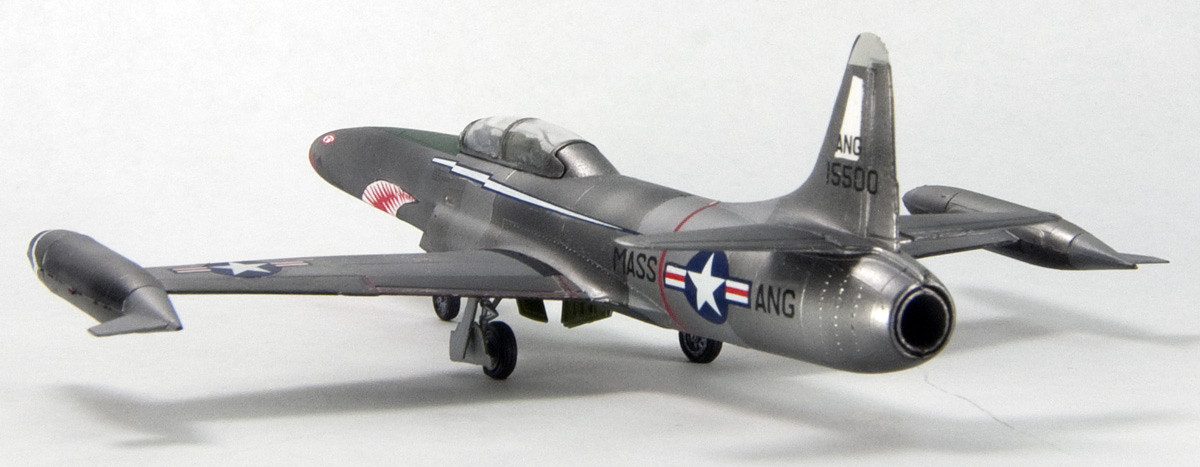
Adding another of those odd little models to the collection, may I present the Lockheed YF-97, later known as the YF-94C. I've never seen one built, so I decided to give it a shot...
For those who might be interested, the build thread for this model is HERE
Without further ado, the pics:
A fairly simply conversion. I hope you'll try one yourselves!
Thanks for looking in,
Ed
"Dispensing the Tribal Wisdom since before there WAS a Tribe!"
-
2


TheRealMrEd in 2023, A FEW Different...
in Builds
Posted
Can't remember whether I posted all these or not, but some may find these interesting, and the build threads worth a look, for conversion lovers out there :
First off, the Anigrand Curtis XP-60:
A few more pics HERE..
Followed by a P-47B Double Twister conversion, using the 1/72 Academy P-47D kit:
For those interested, the build thread is HERE..
Then, a P-47F conversion, with the laminar flow wing, also using the Academy P-47D kit:
Build thread HERE..
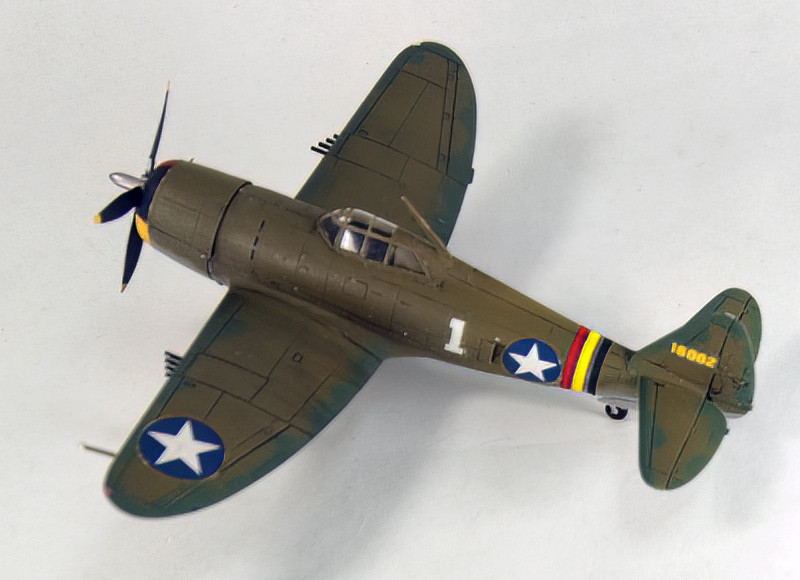
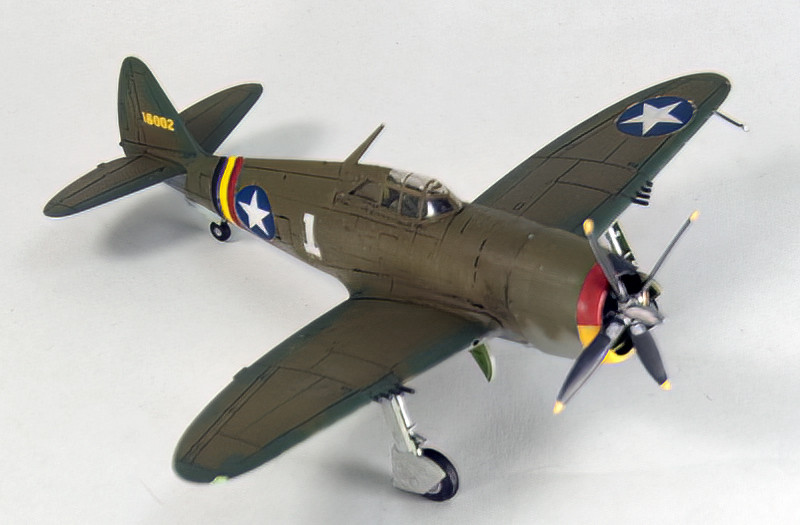
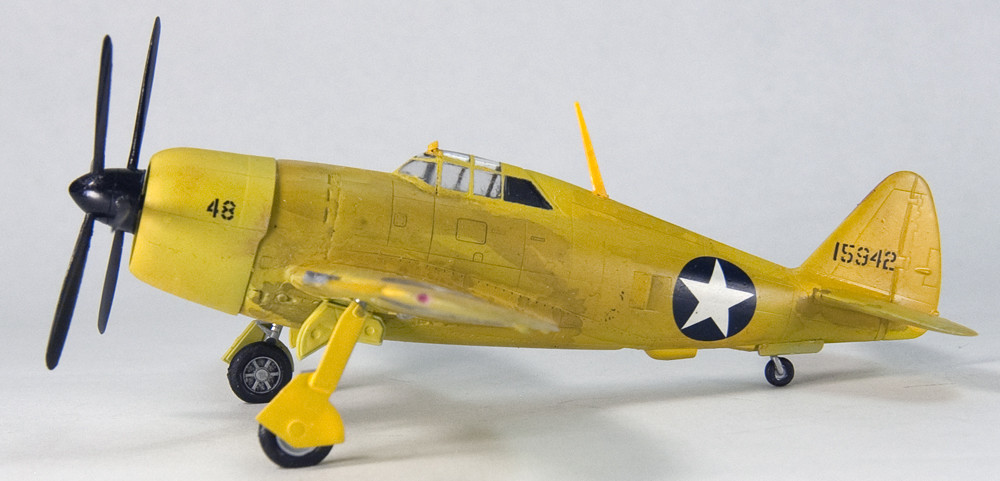
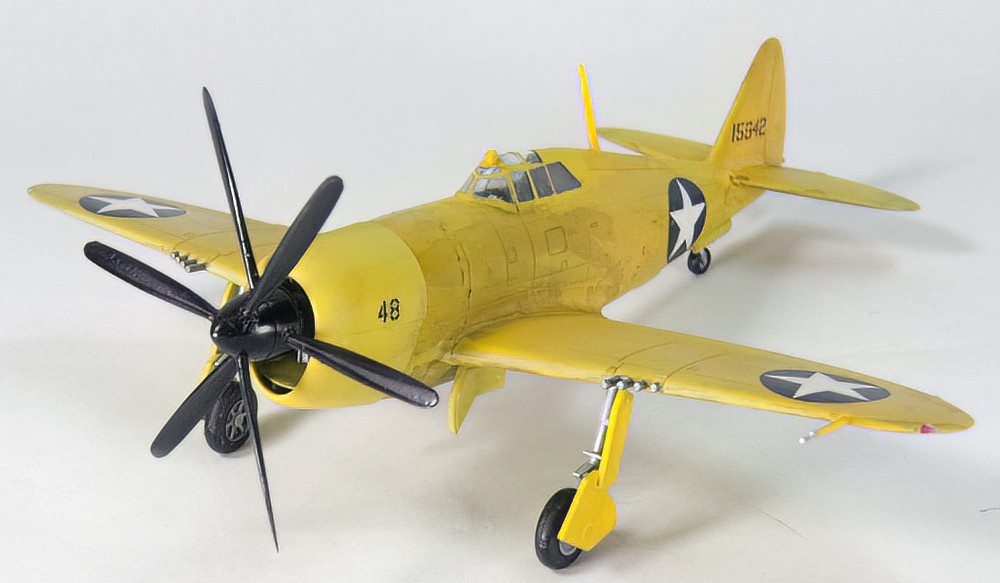
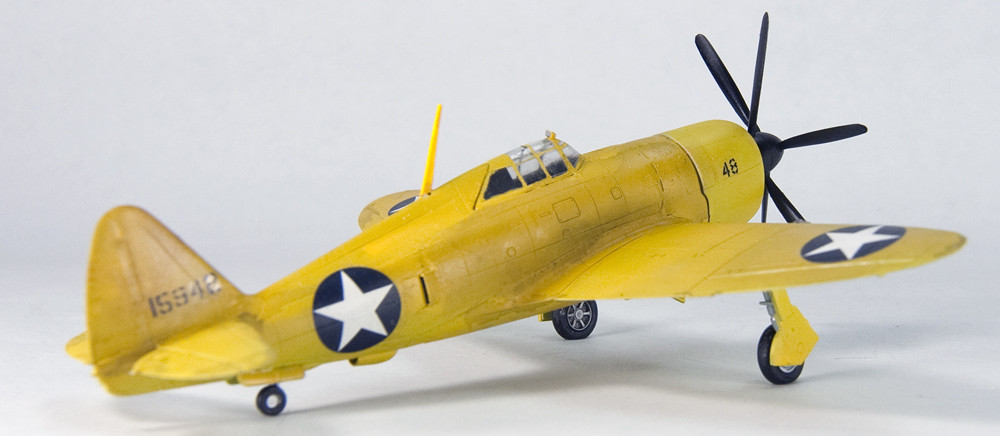
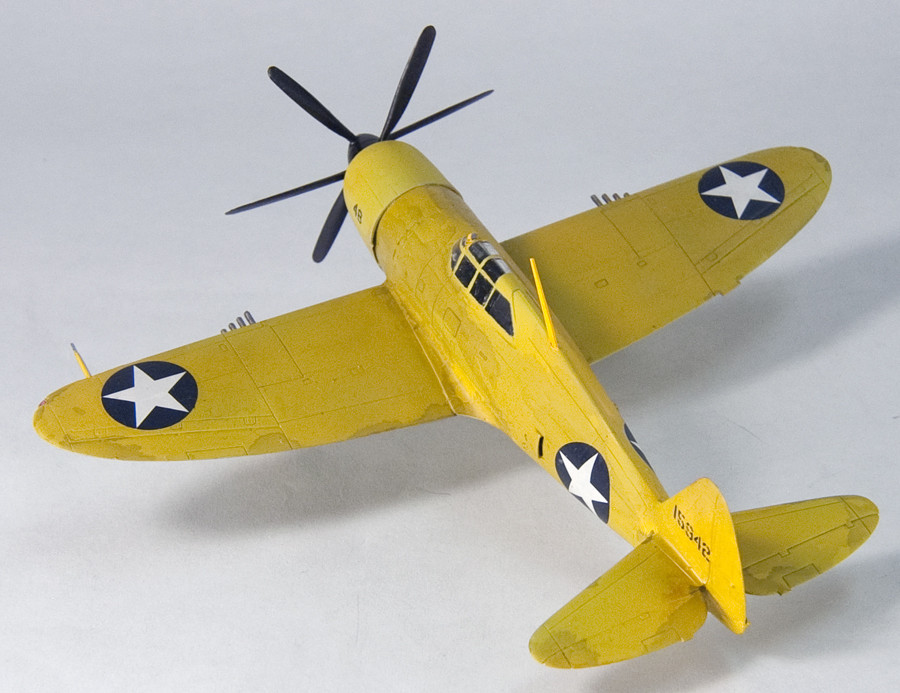
Next up, one of my personal favorites, which I have seldom seen built, another conversion of the Academy kit, the P-47B:
A few more pics HERE..
Next up, the Brengun A-36 Apache kit, but with so much work needed to make it accurate, it might as well have been a conversion:
A LOT of detail changes and accuracy conversation HERE..
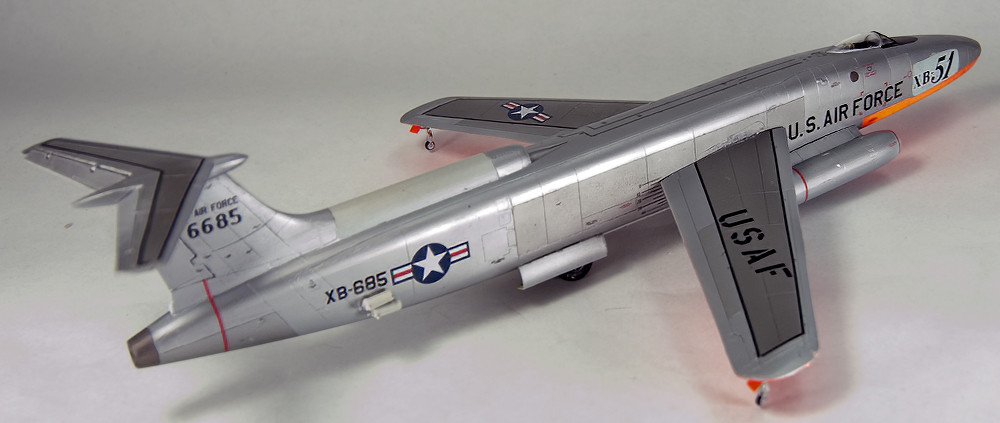
And last for the year, and one of my all-time favorites, the new 1/72 scale XB-51 bomber kit from Mikro Mir:
Before starting one of these I would SERIOUSLY recommend that you read through the build thread (you'll see why) HERE..
Well, that's all. Not a lot for the year, compared to normal, but some fairly interesting ones, I think.
Thanks, as always, for looking!
Ed