

goodguyinar416
-
Posts
14 -
Joined
-
Last visited
Content Type
Profiles
Forums
Events
Posts posted by goodguyinar416
-
-
Contact a local resin caster and ask about special ordering some parts made. I have been casting for almost 15 years and that is the only way to go. Make a great looking original and cast several for saving.
Art
ABC Specialties
Resin Casting
-
Gary,
That is so impressive...Makes me want to start building a sprint car. I'm like you very detailed in making my cars. Doing my casting business ABC Specialties, I enjoy making the small detailed items. Please keep photos coming!

Art
ABC Specialties Resin Casting
-
-
Keep em coming, that car is so awesome. Love it. Awesome job...
Art
-
Awesome job!
-
Gary,
Great start to an awesome build. I have been building models for over 40 years and I really like the bracing to hold the chassis in place. Very professional and as for the before and after photos I think that's a great idea. The seat looks so awesome.
More More!
Art
ABC Specialties
Resin Casting
-
Gil,
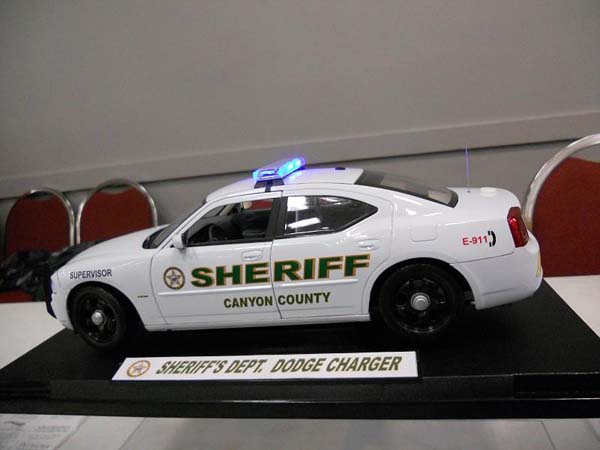
That is a 1/18th scale diecast Dodge Charger. I started doing diecast some time ago and they are awesome to work with, as you can still paint the outside, but really detail the inside. The 1/18th scale is so easy to work with and the decals when done look so good. The lights look awesome and so real when on. The light bar has several different patterns, as does the rear deck arrow bar. The headlights are strobed, as the rear tail lights and also wig/wags. Do checkout my site for other photos of police units I have done and thanks for the nice compliments everyone.
Art
-
Here's a tip I use for putting head/tail lights and small tiny parts to be glued onto the model car. I use dental wax that you can buy at Wally world and several other places.*
Cut the end off a Q-Tip or some cocktail tooth picks. With the end cut off, take a small piece of wax and forming a small ball, wrapping it around the Q Tip or toothpick end. It will stick fine and can be used over and over.
*Pick up the headlight or the small part with the wax tip and after placing a very small dab of glue onto it, place it onto your model. *I use a toothpick to add glue. It works great!
Good Luck!
Art
-
Dodge Charger Interior was heavily modified. Prisoner back seat was hand made out of Evergreen sheet plastic. Prisoner cage partition was hand made then resin cast.*Working sliding partition glass. Cable type prisoner seat belts were added. Radios, console, microphones, switch box were hand made and resin casted.
An ignition/key along with a dash mounted shift lever were added for detail. Trunk mounted GPS antenna hand made then resin cast.
*Interior dome light actually works. Front interior compartment was painted two-tone Charger Gray. *Charger has working LED strobe light bar, rear deck traffic advisor bar. Strobe Wig/Wag head/tail lights. *Lightbar and push bumper clamps were added for extra detail.
*ABC Specialties hand held radar gun was added on passenger side seat. (Bottom Photo)
*All graphics/decals were designed and done by ABC Specialties.....Build time 3 Months
Checkout other police units I have done on my web site >>> http://public.fotki....Goodguyinar416/
-
ABC Specialties Resin Casting. Racing, Military, Police, Fire, Railroad Items, Special Orders!
*Checkout The Nascar Model Kits & Decals Sets 4 Sale
ABC Specialties Web Site >>> http://public.fotki.com/Goodguyinar416/
-
Here's another tip for all. I use either Scotch or Duck brand double sided tape, I prefer Scotch, for sticking alot of my items.
When I don't want to use superglue or anything that might damage the windows, unit, or interior. I use it for sticking my GPS Antennas onto the rear deck of my units or license plates, etc. and should I need to remove it, I just pop it off and (No Damage), but maybe a little sticky glue residue you can wipe off.
I also use it for placing radios onto consoles, laying items onto seats, dashs, etc. and it holds and sticks great.
*If you stick something with super glue and get it on wrong or crooked then it's OOPS, :o but if you stick it on wrong with the tape, just pop it off and redo it, no harm done! :lol:
*Cut a very small tiny piece, stick it on the part first and then to whatever or wherever you want !
Try it and hope this helps some of you, Good Luck!
Art
-
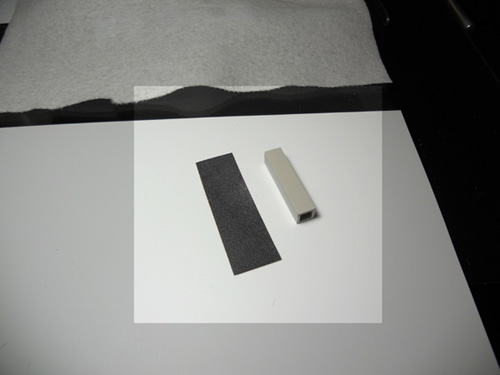
I'm going to show for those that are not aware of, a little tip on how to make a cheap and very useful sanding block using a piece of plasticstruct square/round tubing and whatever grit of sandpaper. Get yourself some plasticstruct square tubing.
*You can also use metal tubing, but I prefer the Plasticstruct.**Always use Extra CAUTION when using sharp objects and super glue!
1. Pick a couple different sizes of plasticstruct that suit you.
2. *Sand one side of the plasticstruct your using a little flatter then it is, so it's good and flat!
3. Get you some sand paper and use whatever grit that you suits you ???
4. Using super glue, (Caution) put it *Sanded side of tubing and spread around with toothpick covering the bottom completely.
5. Now lay the plasticstruct down onto the sanding block and wait a few minutes.
6. Trim close around the sanding block with exacto knife. (Use Caution)
7. Homemade sanding block.**Please always use Extra CAUTION when using any sharp objects and super glue!
-
I started out building 1/25th/1/24th scale plastic model cars, many, many years ago, 40 to be exact, OUCH!, which is too many and then got into Nascar, street, hot rods, etc. and now into the building of the diecast Police/Fire cars. They are very addictive to build and I do my own graphics and design along with decals. I recently retired from the Police Dept. as Patrol Shift Sgt. with over 28 years of LE.
I'm also a Global Moderator for a couple of other model car forums.
I do custom models resin casting and have for over 12 years now. Racing, Police, Fire, Hot Rods, Street, Military!I'm looking forward to joining this forum.


New Forum user
in Welcome to the Forum!
Posted
Mike,
Newbie myself and I've been building models for over 40 years OUCH! Always room for one more....lol Great forum and some really awesome people...
Art
ABC Specialties
Resin Casting
http://public.fotki.com/Goodguyinar416/