

BryanKrueger
-
Posts
348 -
Joined
-
Last visited
-
Days Won
29
Content Type
Profiles
Forums
Events
Posts posted by BryanKrueger
-
-
Clever conversion and play on name. 😄
-
The working area of the quad flak may be too large for the half-track without cutting the sides down. Could be a cool look.
-
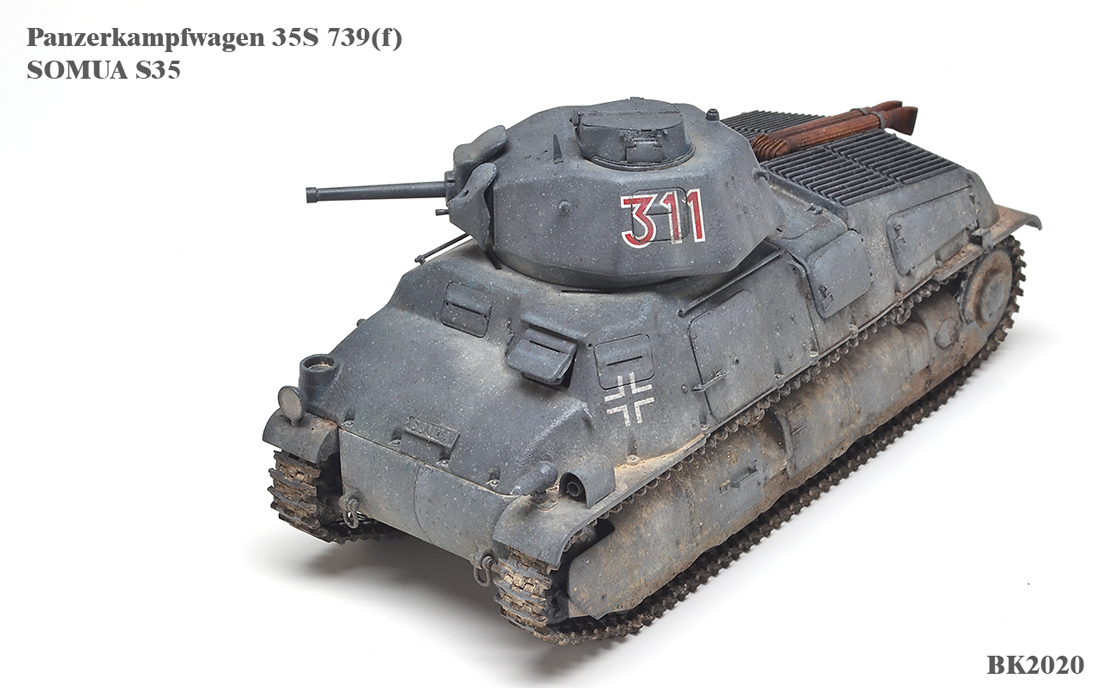
I recently finished my build of the Tamiya SOMUA S35 French light tank. I built it as a BeutePanzer using the DEF Models conversion set. Model is painted with Tamiya acrylics and weathered with primarily oils and pigments.

-
Lately my preferred online hobby shop has been EBay - sad to say. I can usually find what I'm looking for at a good price. Pay attention to shipping times and cost and you can usually find a good deal.
-
I recently finished this conversion. The KV-2 was used as a test bed for the ZIS-6 107mm gun to evaluate for the KV-3 and KV-5. The project was cancelled but a few photos are available of the test fire demo. I decided to build this as a what-if production version.
Model is detailed with Voyager Fenders, Aber Barrel, Fruil Tracks, and Eduard PE. The parts that make the gun mount unique are designed in 3D...

and printed on a Form 2.
Finished Model.
Additional images can be found here: KV-2 with 107mm
-
-
Thanks Bill.
-
Thanks Sprueguy!
-
Thanks!
-
I've always liked the Soviet Light Tanks, especially the angled ones like T-30, 40, 60 and T-70. I picked up this kit last year at a swap meet for $10. I already had the Aber PE set because I used the bins for the SU-76i. The kit bins are pretty bare so I just left them off. I found a photo in German service with missing bins as reference.
$10 kit.
Aber PE and Jordi Rubio Barrel. The barrel cost more than the kit.
I believe theses really are some of the smallest parts I have ever worked with.
-
With so much time at home I was able to finish this one.
Additional images can be found here: MK44 SternenKnight
-
 2
2
-
-
Rental car companies will gouge you with fees on the toll road charge. I think you can purchase toll coverage from them at time of rental.
-
I think I am able to call this one done. Figure is Tahk with Alpine head. Correct T41 grousers were designed in 3D cad and printed on a Photon printer.
Additional images can be found here: M3 Lee Late
-
1
-
-
John, the original post was from 2014. Chances are the photos are no longer on the web image host.
-
Dave,
Thanks for the update. I just had a fried print some parts on a Photon. Amazing quality but brittle. I really want one of those but no place for a proper set up.
Keep us posted on your progress. Will be cool to see some printed parts from your project.
-
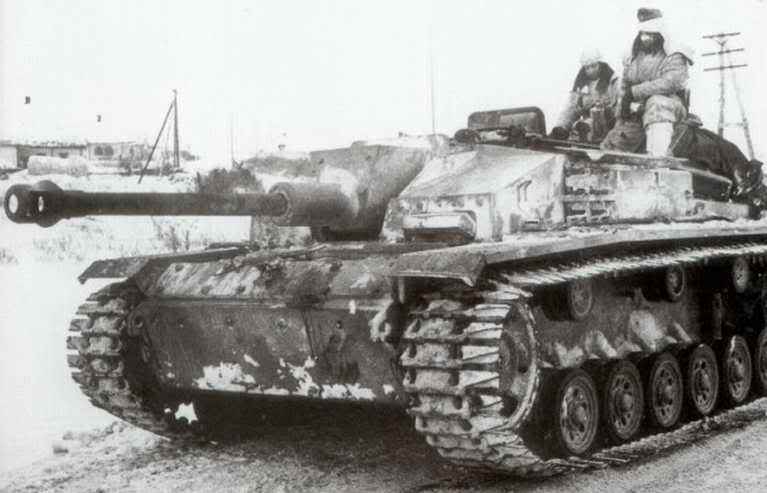
I *think* it's done. It's a difficult finish to pull off. As I understand, these Stugs rolled off the rail cars and into the lines. There wasn't a lot of time to get banged around and missing fenders. The ice packed roads and snow covered landscape kept these pretty clean. I think we are so use to seeing tank models covered in dust and mud.
-
Kharkov F8s were painted the Tropen 2 Scheme 8020/7027. They were intended for the Mediterranean conflict but were shipped to the eastern front. I've never painted this scheme before and its more complicated than I thought it would be to get the colors right. I found some recipes online but they looked off. I kept adjusting and after the third time I finally got it right.
To adjust the base color, I first applied a wash and filters. Next I used the hair spray technique to add the distressed white wash paint effect. Next I went back with AK Washable White to add some mapping. Over the white wash I applied a grey-brown wash and a very light blue-grey filter. Next I used Humbrol Enamel White to add additional mapping effects. Tracks have been given couple of dark washes and polished with Uschi Steel.
-
My latest model depicts a StuG III Ausf F8 at Kharkov in the winter of 1943.
I started with the Dragon 6644 kit. A very nice representation from Dragon's hay day.
I started assembling the Voyager PE Fender set and after about 5 hours I only made it this far. That's enough. I'll stick with the kit fenders. Most reference photos of F8s during winter show fairly intact fenders.
-
I can't comment on your particular project but may I offer some insight from experience. I don't have my own 3D printer, but I have used both shapeways and panzer concepts to print my 3D files. I use SolidWorks to create the 3D CAD files..
Designing parts for 3D printing is very rewarding but does require it's own set of unique skills. Interpreting documentations and converting into a 3D representation is fairly time consuming, even for what you think are relatively simple parts. Often times drawings do not line up or every reference photo misses that one detail. However, if you are retired, then power onward and upwards! Facebook is immensely useful for reaching out to a world full of modellers and they may have that one image you need. Several of my projects are only possible with the aid of a guy in Russian that barely speaks English.
It's important to understand the quality of the 3D printer. Even the finest 3D printers still have faint build lines that need to be cleaned up so the higher the quality printer you can afford the better your prints are going to be and lessen the amount of cleanup required. Shapeways offers a high resolution white that is good for model building but not the highest resolution out there. There are some desktop DLP printers with smoother finishes. These were printed on a Form 2.
If you sell direct thru Shapeways, then the people buying the parts should be at least have some reasonable expectations on the quality of parts. Designing parts for Shapeways is a little different. They charge per piece so you will need to design your small parts to fit on a sprue to minimize cost. Printing yourself you can avoid that and orient and optimize your parts for build.
If you are offering kits, 3D printed parts tend to be very brittle and many modelers will not be familiar or comfortable with working with this resin. Panzer Concepts use to offer 3D printed conversion and full kits but after too many complaints from people that did not understand the process and material PC switched to just resin cast parts using the prints as masters. There are a few small garage kit suppliers offering direct 3D prints parts for sale so it is possible. FC Model Trend is one however I still haven't seen photos of actual prints, just CAD images.
-
I'd also try asking on the Track 48 forum
https://www.tapatalk.com/groups/track48/
https://www.tapatalk.com/groups/track48/track-48-buy-sell-f433830/index-s50.html
-
Have you tried Tamiya customer care for replacement parts? They might be able to help. Sometimes i see the HB 1/48 at swap meets for 5-10 bucks. Might help to look there.
-
Thank you for clarifying Ed.
I'll see Mark at a local show in March. I'll ask him then.
-
In regards to I-4, II-3 and II-5...
I have a few potential entries that would I would like some clarification. I design my own parts to be 3-D printed. These are conversions to represent drawing board concepts for WWII Soviet SPGs. The 3D parts are used in conjunction with traditional scratch building techniques. The silhouette is changed substantially from the original kit. How would these be categorized? Would these be entered under 228, 229, 200-C or 821?
Thanks,
BK
-
What a unique looking vehicle. Nice finish.


Identifying tank models help
in Armor
Posted
This is an IS-1
This is an SU-85