


PaulD
-
Posts
42 -
Joined
-
Last visited
Content Type
Profiles
Forums
Events
Posts posted by PaulD
-
-
I'm noticing the same thing Don is....if I don't log in I don't see the model building forums...
-
Just in case your canberra is getting jealous after all the corsair complements.....Great Canberra! I really like the tonal variation across the top, it is not easy to get an impression of size from a monotone paint job, but you did.
P.S. what is the Canberra painted with?
-
there are advantages to silver tracks....thirty years ago when I weathered my 1/32nd scale Sherman tank with half a bottle of Testors tan my mother told me to "get that filthy thing off the table and out my kitchen"
-
... if you wanted a good F, why didn't you just build a FineMolds version? :D
I can't explain it Clare, sometimes its just fun to do things the hard way. Sometimes I don't even use a kit at all:
-
I've started Airfix’s new tooling BF-109 for the Airfix group build over on Hyperscale. This kit isn't quite as nice as Airfix’s new spitfire IX. The fit is pretty good over all but Airfix made some obvious goofs that I decided to fix. First they left out the bulkhead behind the pilot, very obvious to see through the canopy. Second, the breech covers over the nose guns were molded as a single hump like on a sopwith camel. Third the pilot figure seems to be wearing a modern hard-shell helmet or a giant afro.
I've added the missing bulkhead and shaved the pilot's head to a more reasonable size. I've also added some rudimentary cockpit detail. (the kit had nothing other than a seat) The October issue of Flying Scale Models has a nice set of scale drawings of the 109F so I decided to shave the breech covers completely off and convert the plane to an "F". The kit has a nose of constant taper, while the drawings show a much steeper taper just behind the spinner. To copy this I cut around the top of the cowl beginning at the first panel line behind the prop so that I could raise the top of the cowl like a car's hood and then shimmed it in this position. I then filled in front of this step and made a steeper taper down to the spinner. I also thinned the oil cooler and supercharger intake. On the landing gear openings I rounded the outboard ends to match the shape that most F's had. Rather than restore the panel lines I mangled, I'm filling in most of the other panel lines.

-
Paul,
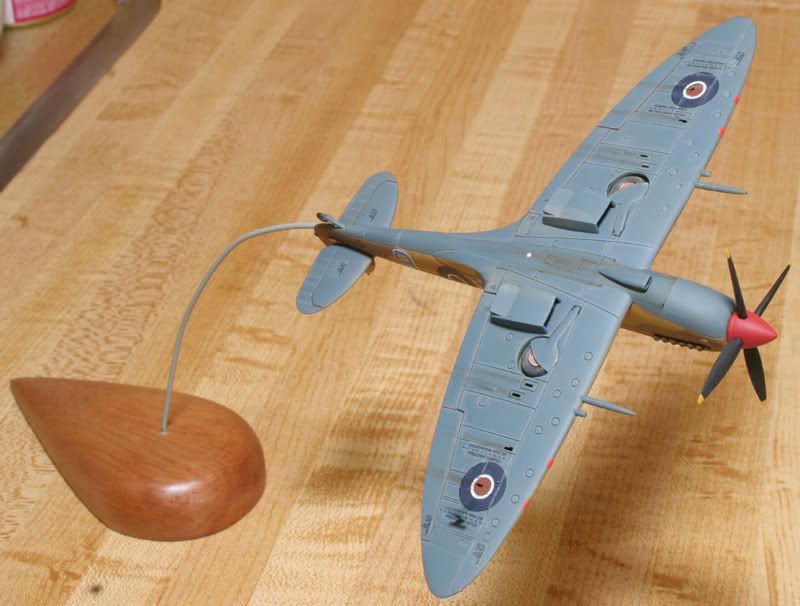
What color blue did you use? I really like the look.
Mark
Hi Mark, I used Humbrol 157 80-90% and Humbrol 166 10-20% sorry I don't remember the exact proportions. The model looks a little darker and bluer to my eye than the picture I see on my screen.
-
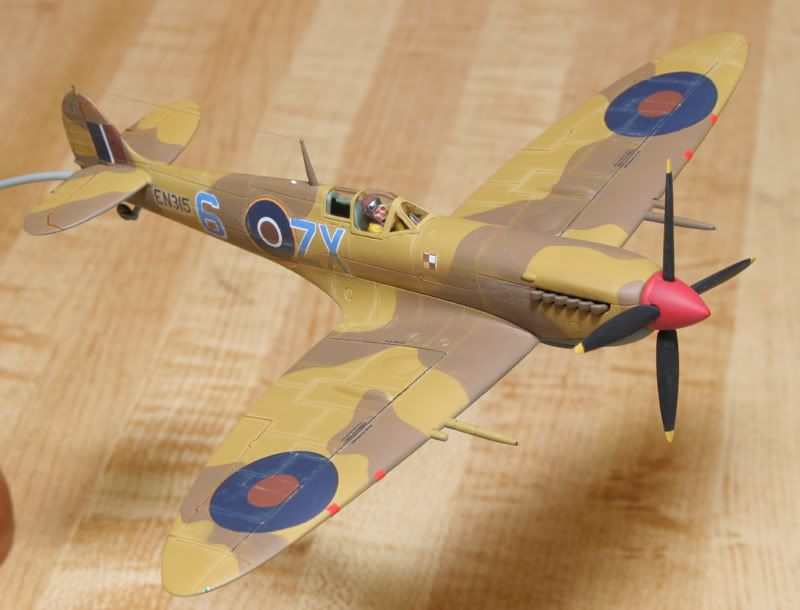
Just finished my first Airfix kit since joining the forum. The 1/72nd Spitfire mk IX. I had some problems with decal silvering, they seemed to be imune to "Micro-set". The provided pilot seemed too small so I stole one from a hurricane kit. Over-all an easy and fun kit. It's nice not paying for a lot of interior detail that you can't see after you're done. I love it that they included parts for building a wheels-up version. I wish all manufacturers would do that.
-
Did you post the Heinkel too?
Chris
Thanks Chris, you can see the Heinkel at: http://smm.solidmodelmemories.net/Gallery/...s.php?album=216
If you navigate up from there http://smm.solidmodelmemories.net/Gallery/index.php?cat=1 you can see work by other folks who build solid models.
The solid model memories gallery http://smm.solidmodelmemories.net/Gallery/index.php also has plans from old kits and WWII vintage plans for building ID training models.
The member's forum has a lot of build threads in it http://smm.solidmodelmemories.net/SMF/index.php
-
Wow! How long did it take you to do this (assuming you're not also growing the trees yourself)?
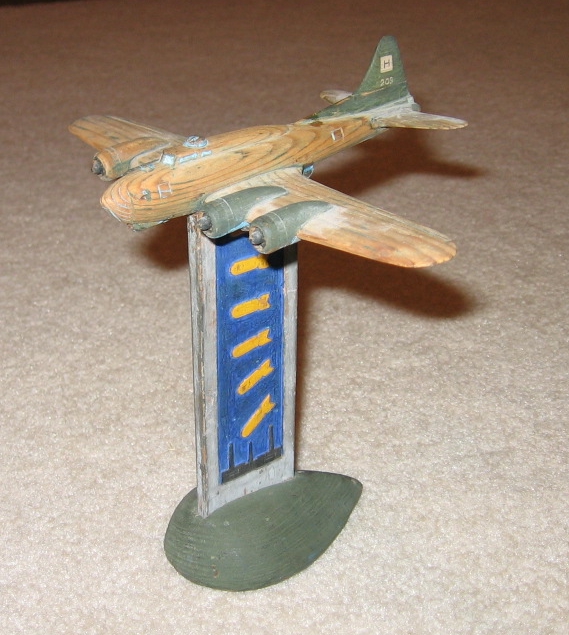
Thanks Guys, to answer your question--I really don't know how much time I spent on this. I started it about a year ago but there have been months I didn't touch it at all and there were days when I spent hours on it. It takes me longer to finish a wood model than a plastic kit, but some wood models are relatively simple and go quickly. A P-38 basically has three fuselages and a lot of external hardware to build. The heinkel 100 I built last year was 1/3 to 1/4 as much work.
-
I just finished my P-38F, I carved it out of basswood because that is just the way I behave sometimes. Sorry, no plastic. Maybe next time. The stand is from tanoak, the superchargers are made from paper, wire, and brass tube. The radio aerials are fishing line. The national markings were donated by a plastic kit. Serial numbers are from woodland scenics dry transfers. The panel lines were drawn on with colored pencil. Exhaust stains are artists oils.
If you go to :
http://smm.solidmodelmemories.net
you can see work by a bunch of other folks who are still building models out of wood.
-
Nice neat work, you made it look like a larger scale than it is. I hope you didn't use a lot of glue on the engine cowl, it looks like it is on up-side-down. The air intake should be on the bottom and the gun troughs on top. Hopefully it will just pop off without too much fuss. I've made similar goofs myself, now I don't throw out the box art until I'm done. Good looking build overall.
-
Hi Patti, didn't I see the gentleman with the feathered hat at McMinnville in September? I remember being impressed by him then. It's good to see more work from you, very nice!
-
Well done! It makes me happy to see someone finish a tri-motor in American livery....just like my grandfather used to fly! It took you about as long to build it as it would take the real thing to fly coast to coast.
-
My workspace is a workbench in the corner of the basement by the water heater. I frequently tell myself that I need more room, tools, lights, shelves, cabinets, etc. but I find a way to get models built. Someone on another site sent me this link that illustrates how someone with a passion for building will find a way to do it. http://www.merkki.com/images/plane%20carve...bed%20slats.jpg It was made by a POW in Stalag Luft 1 out of bed slats!
-
There is a guy on the solid model website ( LOU ) who is building a 144th scale carrier with a complee complement of aircraft "airwing?". All scratchbuilt from wood.
http://smm.solidmodelmemories.net/SMF/index.php?topic=130.60
-
Nice work! I especially like your wood-grain effect and how you have it vary a little bit between panels. My first posting after joining IPMS was of this kit and I can second all the compliments you have for its engineering. The fit of this kit is so good that a patient novice can get a very good result, skilled builders like yourself can build a real masterpiece!
-
I'm starting to feel like some kind of wierdo, I've never built the same plane twice!
-
Railroad rail is sized depending on what kind of use it is expected to withstand, on the mainlines where there is heavy and fast-moving traffic the rail is very thick and tall, on sidings or places where traffic is infrequent or slow-moving the rail is much smaller. There is no one correct size. So you can really use what you think looks right or what you can get. Spike heads should be just over an inch wide, I don't know for sure if they used spike plates in the 1860's, they may have just spiked the rail directly to the ties. Ties were often made from local materials and may or may not be creosoted, labor and wood was cheap back then.
For your tender load you could get a couple of different sizes of dowell of even-grained wood like poplar. Roughen up the surface by grinding it between your shoe and the sidewalk, cut it into scale 18" lengths then split it with your knife. Stain some or all of the pieces with slightly dirty thinner, you can paint the inside edge of some of the pieces in muted pink or brown to simulate the heartwood at the middle of the tree. You can add bark to some of the pieces by gluing gray-painted tissue on the outside edge. You only need to detail a few of the pieces at the top of the pile to get the right effect.
-
Hi Tim,
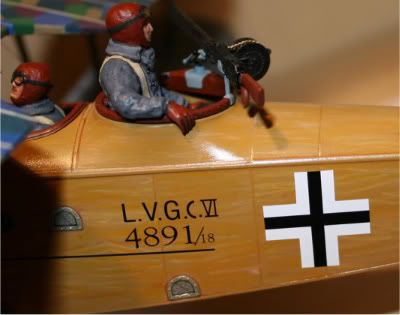
Since no sculptors have spoken up, I have some suggestions on modifying figures that may help. If you have a figure with a good deal of forward bend in the torso you can attach it to a sitting set of legs. Limbs are pretty easy to reposition...cut a V-shaped notch on the side in which you want it to bend (like notching a tree in the direction you want it to fall) then saw through from the opposite side. Drill a hole in each of the cut ends to accept a short piece of copper wire and glue the figure back together. The copper wire will let you work on the pose of the figure like the old possable gumby doll. When you like the pose fill the notches with putty and file some creases in if needed.
I used this technique to get a Tamiya 1/35th scale Tommie to hang onto a 1/32nd scale LVG.
You might ruin some limbs at first (hopefully just plastic ones) but it is a trick worth learning and not that hard once you get the hang of it.
-
Woodland Scenics has dry transfers in a very similar font:
http://woodlandscenics.woodlandscenics.com...em/MG739/page/8
http://woodlandscenics.woodlandscenics.com...em/MG744/page/8
http://woodlandscenics.woodlandscenics.com...em/MG746/page/8
There are many other fonts and colors available, also stripes and signs.
The white and silver colors are especially useful when you can't afford a printer that can duplicate those colors.
-
Looks good! If you snip off the locating pins you may be able to slide the sight in through the front of the canopy then glue with elmer's or clear part cement.
-
Cold weather seems to be a great time to apply a gloss finish.
-
beautiful work! Is your rigging all steel? if steel wires, do you glue at both ends or leave one end loose?


Stegosaurus!
in Figures
Posted · Edited by PaulD
Built from the Tamiya kit. As molded the kit has a rather boring posture with no side to side bends. I fixed this by cutting wedges from one side of the fuselage and inserting them into notches on the other side to get a sinuous look. I think that it makes him look like he is going somewhere. He is painted with artist's oils. I used woodland scenics ground foam for the moss, bits of wire for the horsetails, I used sprigs of juniper to represent the auracaria-like plants. The cycad body is an alder seed cone, the cycad cones are alder pollen cones, and the cycad fronds are pressed leaves of western yarrow. To represent rotted wood, I cleverly used bits of rotted wood. I think that it needs some ferns, but I haven't figured out how to make them yet.