nmertes
-
Posts
177 -
Joined
-
Last visited
-
Days Won
7
Content Type
Profiles
Forums
Events
Everything posted by nmertes
-
Looking good, Ron. Like the addition of the scorpion decal.
-
First, thanks for the cockpit/fuselage color info you passed on on facebook. If I may be so presumptuous as to point out an error to the master; at least according to the directions. The landing gear doors on Allison powered Mustangs did not bleed down like those on Merlin powered birds. They had different hydraulic and locking systems that mechanically locked the doors up after each opening cycle to extend or retract the undercarriage. The only time they would be down was if a ground crew member had unlocked them to perform maintenance on something in the wheel wells. The odd part is that the instructions show them in the down position. Looking forward to seeing more of your quarantine builds.
-

soldering Iron recommendation sought
nmertes replied to tomqvaxy's topic in Tools, Tips & Techniques
I've had a Weller NE1010NA that I purchased from Amazon 2 years ago along with a set of tips that included a couple very fine screwdriver tips. I've owned a couple Weller's over the years & always found them dependable. -
Thanks for the info, Ron. Unfortunately, when I click on the "About" & "Officer Directory & Email", it only shows past officers. There is no email listing for anybody.
-
Thanks, David. I thought that would be the right person but, I couldn't find a way to contact her directly.
-
I've managed to move 3 times in the last 6 months which would explain part of the problem but, I haven't received the November/December & January/February issues of the journal. Forwarding requests are apparently being ignored by the post office. How do I get replacement copies?
-
Check out Mr. Surfacer primer. It comes in several grades both rattle can & bottle. The higher the number, the finer the finish. https://store.spruebrothers.com/searchresults.asp?Search=mr.+surfacer&Submit=
-
Sounds like an interesting project. I'm not into armor but, you have to start somewhere. Should be a good retirement job if it takes off. Good luck & looking forward to seeing how it progresses.
-
Congratulations, Mark. Very nice work. You & Ron Bell seem to like Braille Scale.
-
Is anyone else having problems with Squadron.com?
nmertes replied to davenport49's topic in General Modeling
A couple years ago the Eduard F-8 Crusader kit was shown online as being in stock & I place an order. Got a confirmation email that it would ship soon. A week later I still didn't have a kit in hand but it was still showing online as being in stock. Emailed customer service and received a reply that the kit was no longer available. When I inquired as to why it still showed in stock on the website, I was told the website isn't always correct. Haven't ordered from Squadron since then. Ordered the Hasagawa version from Sprue Brothers along with the Eduard PE included in the Eduard version. Had it in 4 days. -
I've used a product called 5 second fix that I got from Amazon. It's a clear cement that is cured by UV light (the opposite end of the pen). Works well & doesn't take near as long to cure as Elmers. I wouldn't use rubber cement. You run the risk of deforming the plastic.
-
I'm with Gil as far as the best shade of white. I would recommend laying down a couple light coats of flat white as a primer to prevent any color bleed through.
-
Looking good, Mike. I like the way your battle damage turned out. Very realistic.
-
Nicely done natural metal finish, Bill. Also very nice job on the painted markings. Until I read your comments with the 1st photo, I would have sworn the yellow/black markings were decals.
-
Welcome back. Looking forward to seeing your work.
-
The best advice I can give you is to use a white primer. Almost any gloss white airbrushed in light coats will give you a good finish if you're careful about dust.
-
Thanks for the comment, Gil. I've seen the rack and it would be rather a rather complicated structure to build in 48th scale. I don't understand why Kitty Hawk didn't bother to make the camera setup more accurate. I did attempt to install the original camera setup in the nose but, the lenses don't lineup with the windows. The model in the D&S has the access panels open. I think part of the reason the builder opened the panels is because of that.
-
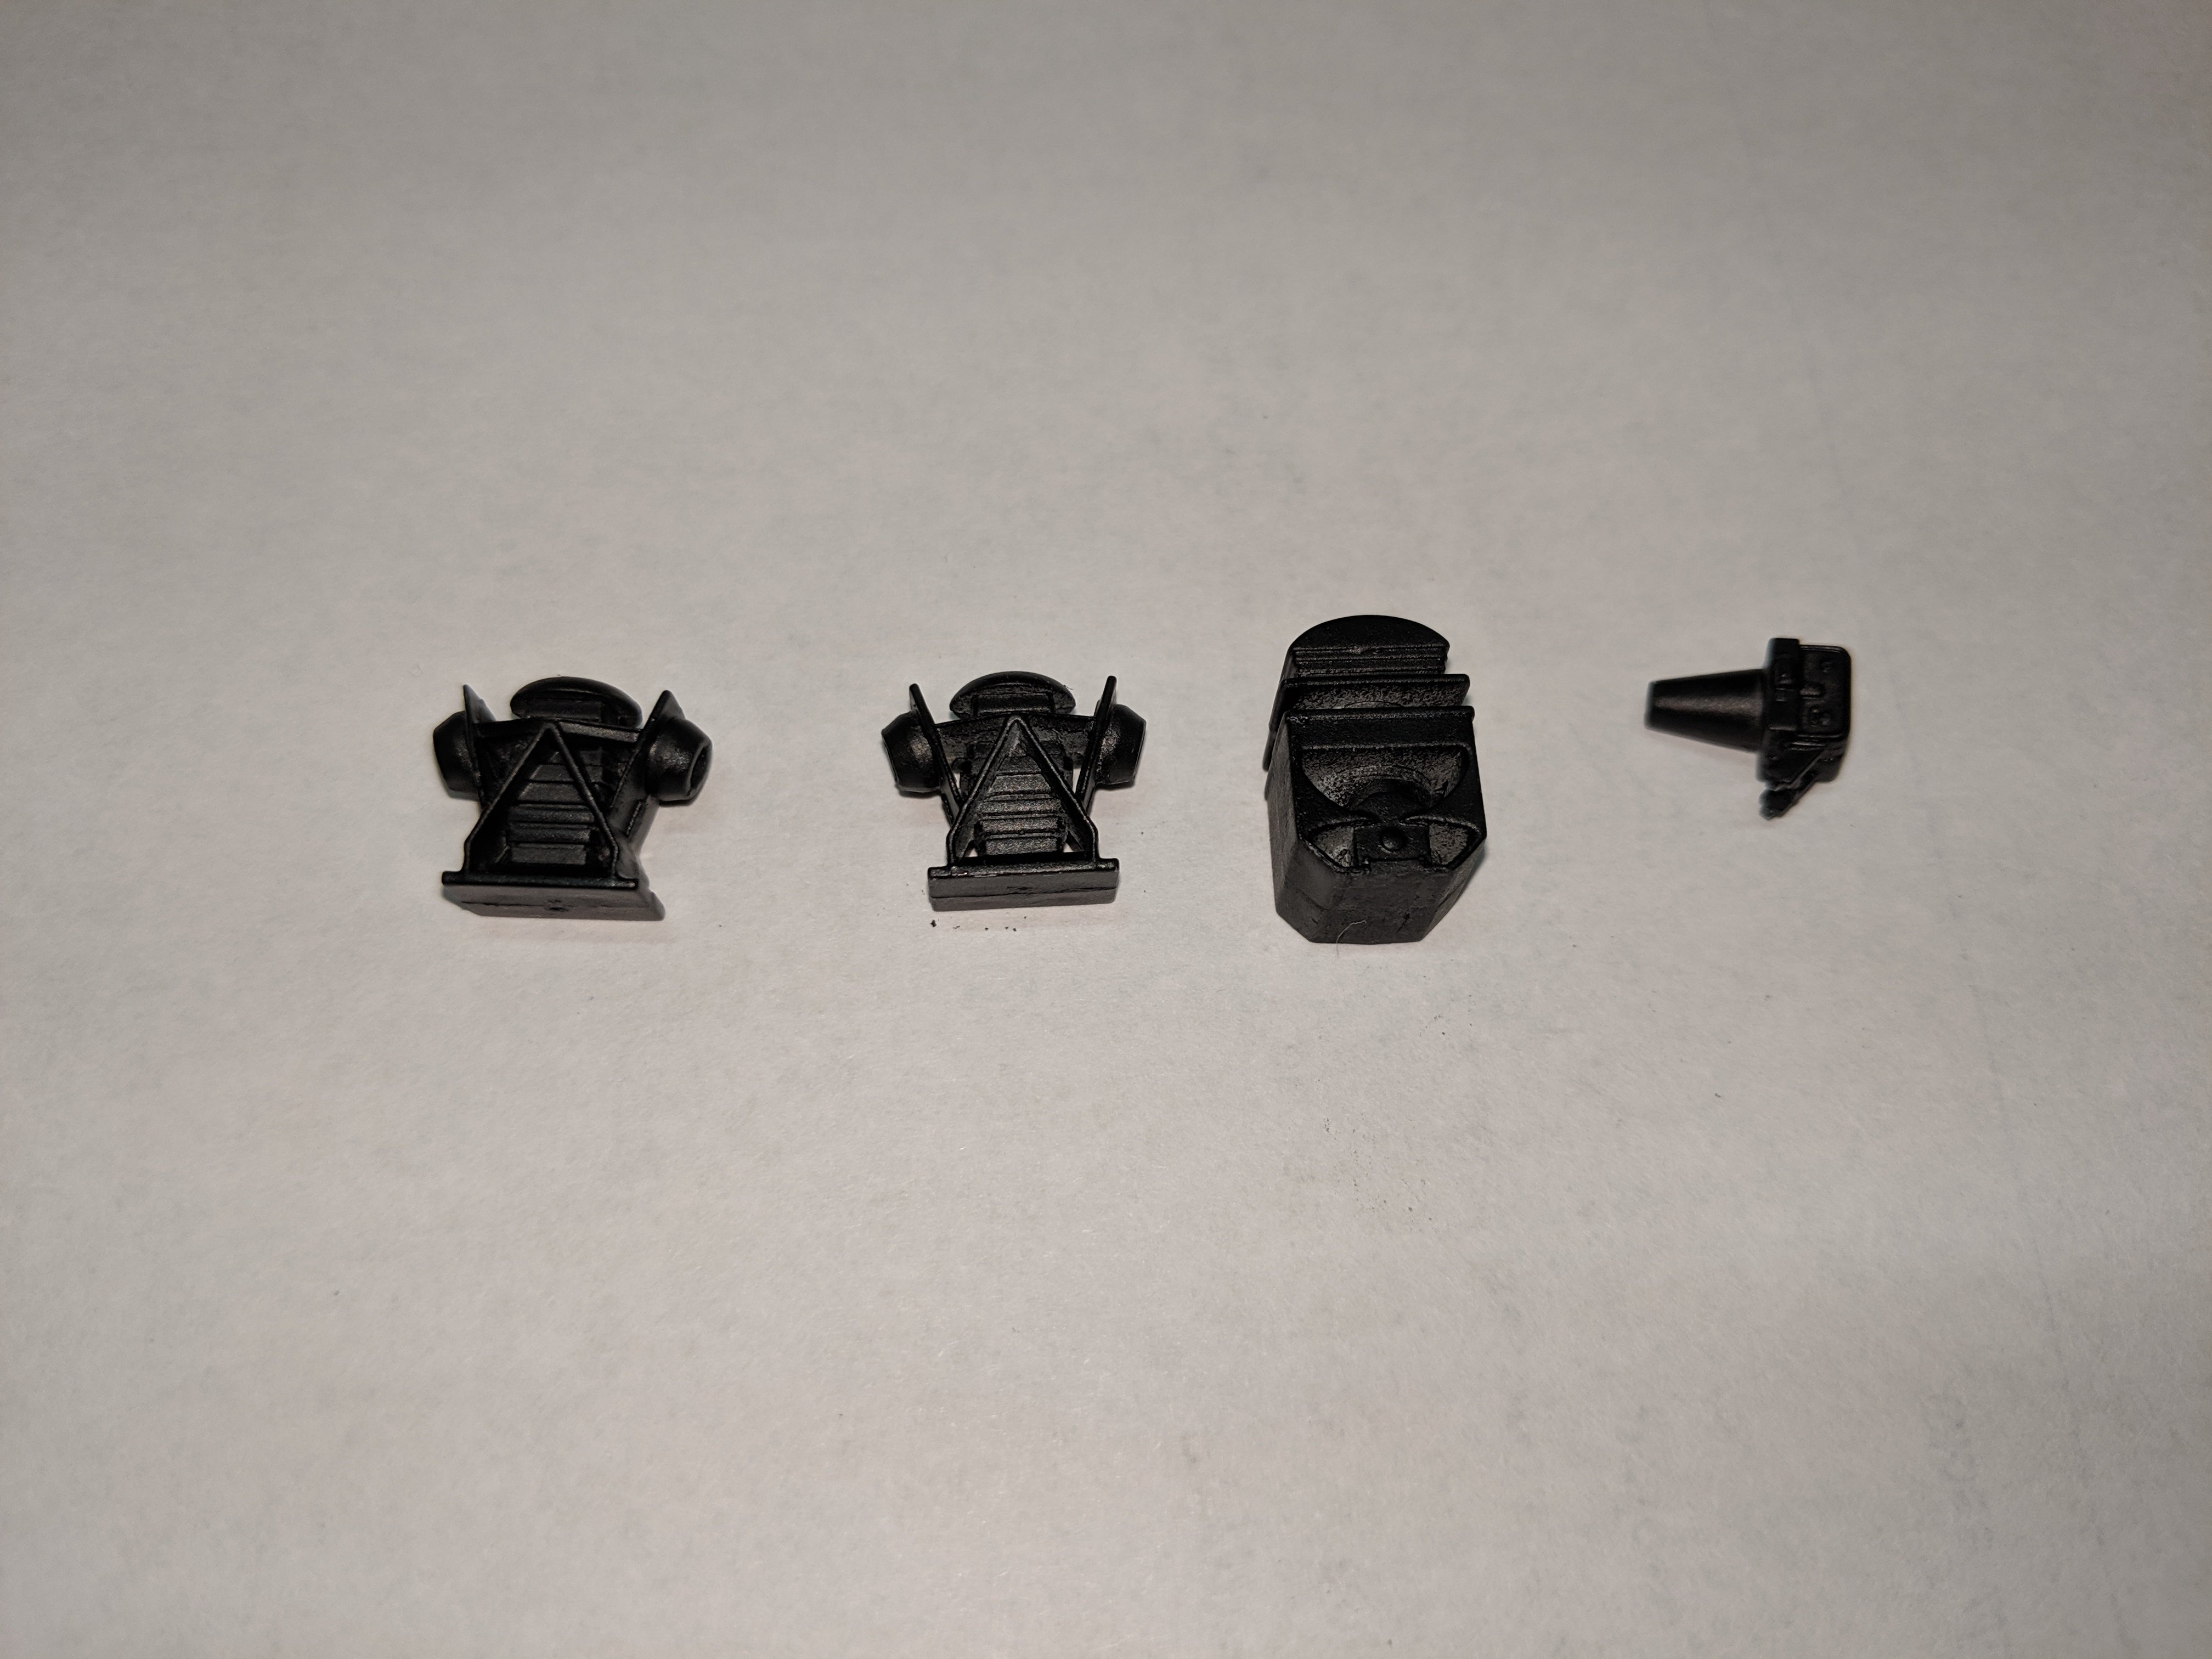
As I posted some time ago, the camera setup in the Kitty Hawk Banshee kit doesn't resemble any aerial camera I ever saw. The mounting rack is a tubular affair with 3 vertical positions & several oblique positions. Attempting to scale it down to 48th scale is beyond my abilities & the tubing is thin enough I suspect it would be almost impossible to replicate. So, since the rack isn't visible once the access panels are closed, I figured it wouldn't make that much difference. Photo #1 is the original setup built as supplied in the kit. Photos #2 & 3 are my solution This is a fairly typical setup for a mapping mission. The cameras are from a CMK resin kit designed for the Tanmodel RF-84 but, they're the right scale and very similar to the cameras the Banshee would have carried. All that's required now is some paint & permanently mounting the cameras.

-
Bob, I know there are several sources for the decals you're looking for. The only 1 I can think of right at the moment is Mustang Decals. I'll check my sources when I get home from work & see if I have a reference to others. EDIT: It's not Mustang Decals, it's Mustang Hobbies in Rivers Edge, NJ. They have a lot of decals I haven't seen any place else. Here's the link to the 1/72nd scale decal pages (there's 22 pages). You should be able to find something there. Other brands include Speed Hunter & Techmod that aren't sold by the online hobby shops. EDIT AGAIN: I forgot to include the link. http://www.mustang-hobbies.com/category_s/1887.htm
-
I was wondering the same thing earlier today. Haven't received mine either.
-
Looking good there, Gil. I have 1 in my stash planning to mark it as a bird from Heavy 7. Just ordered the Nautilus support set. May have to move the Vigilante up in my build order.
-
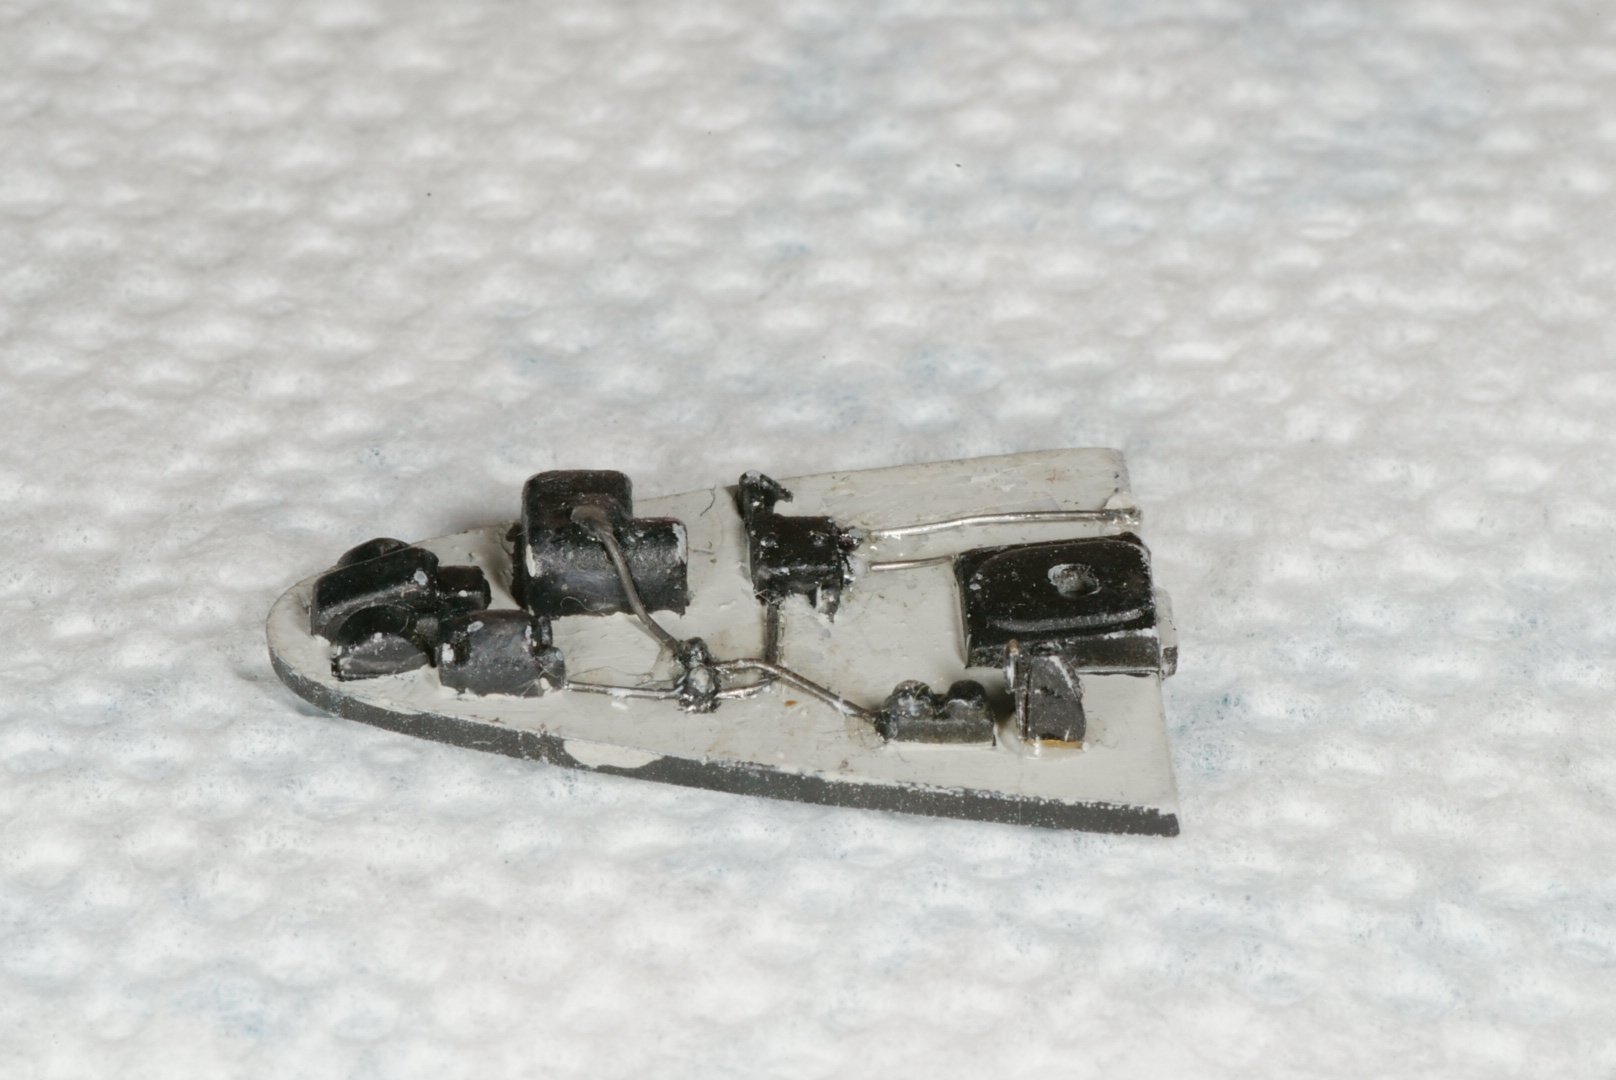
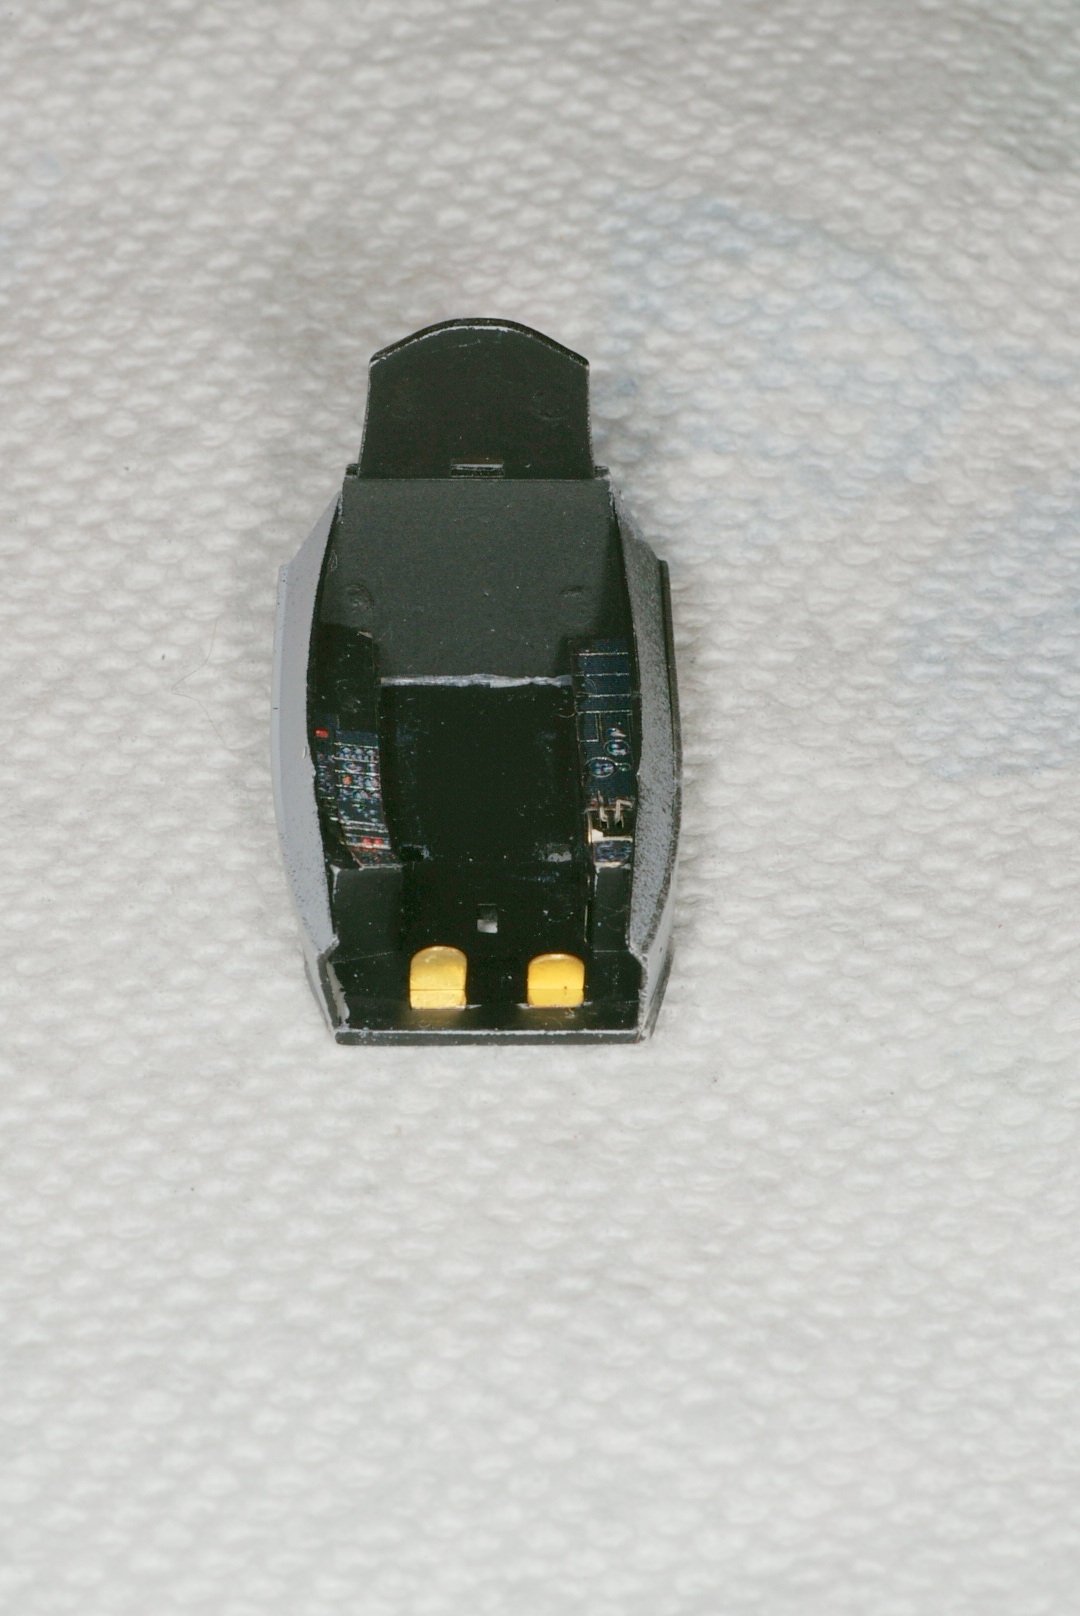
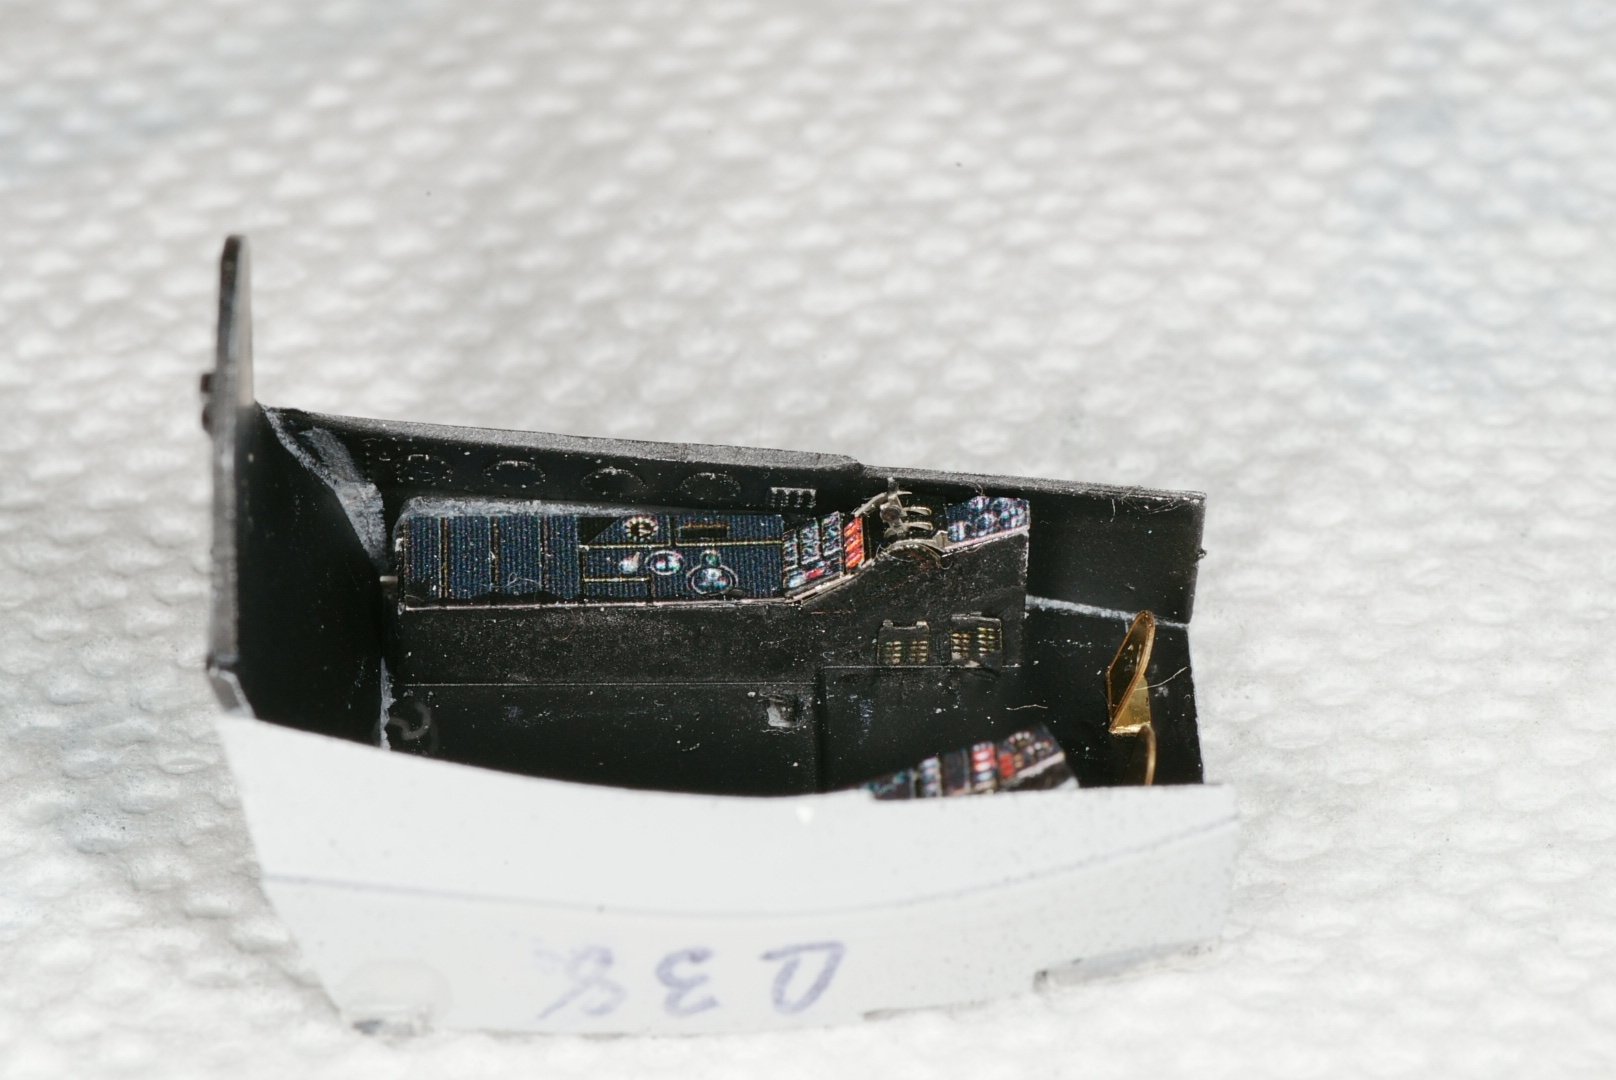
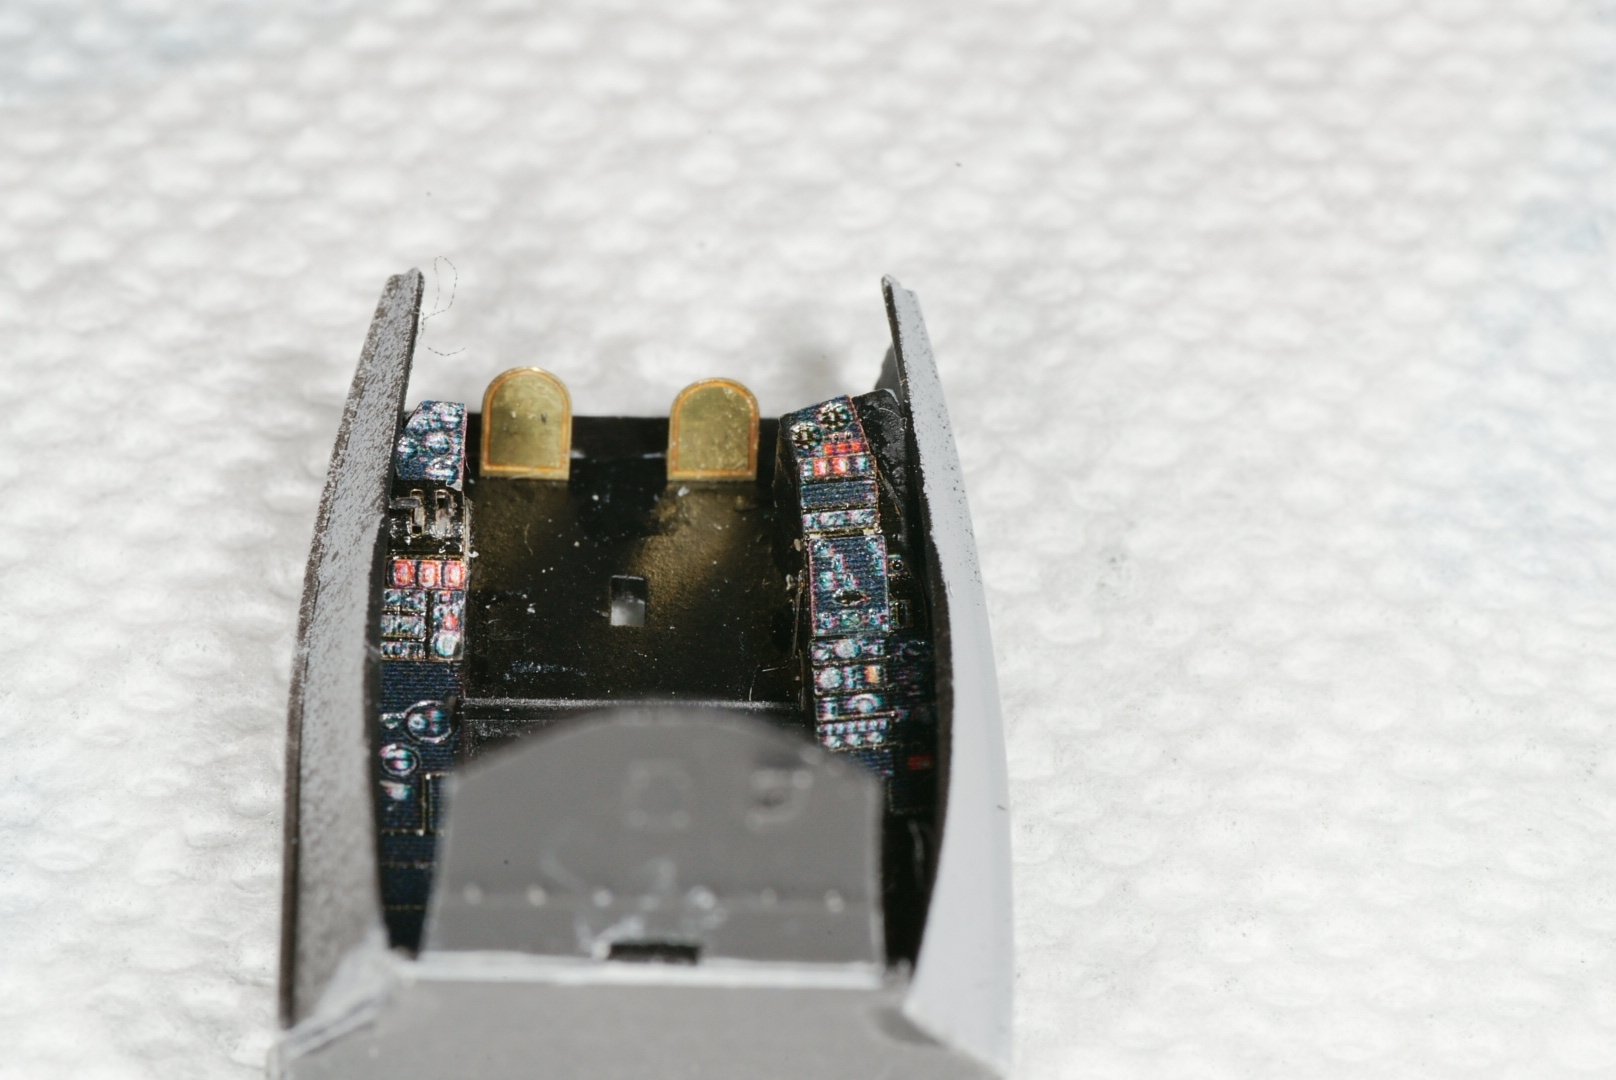
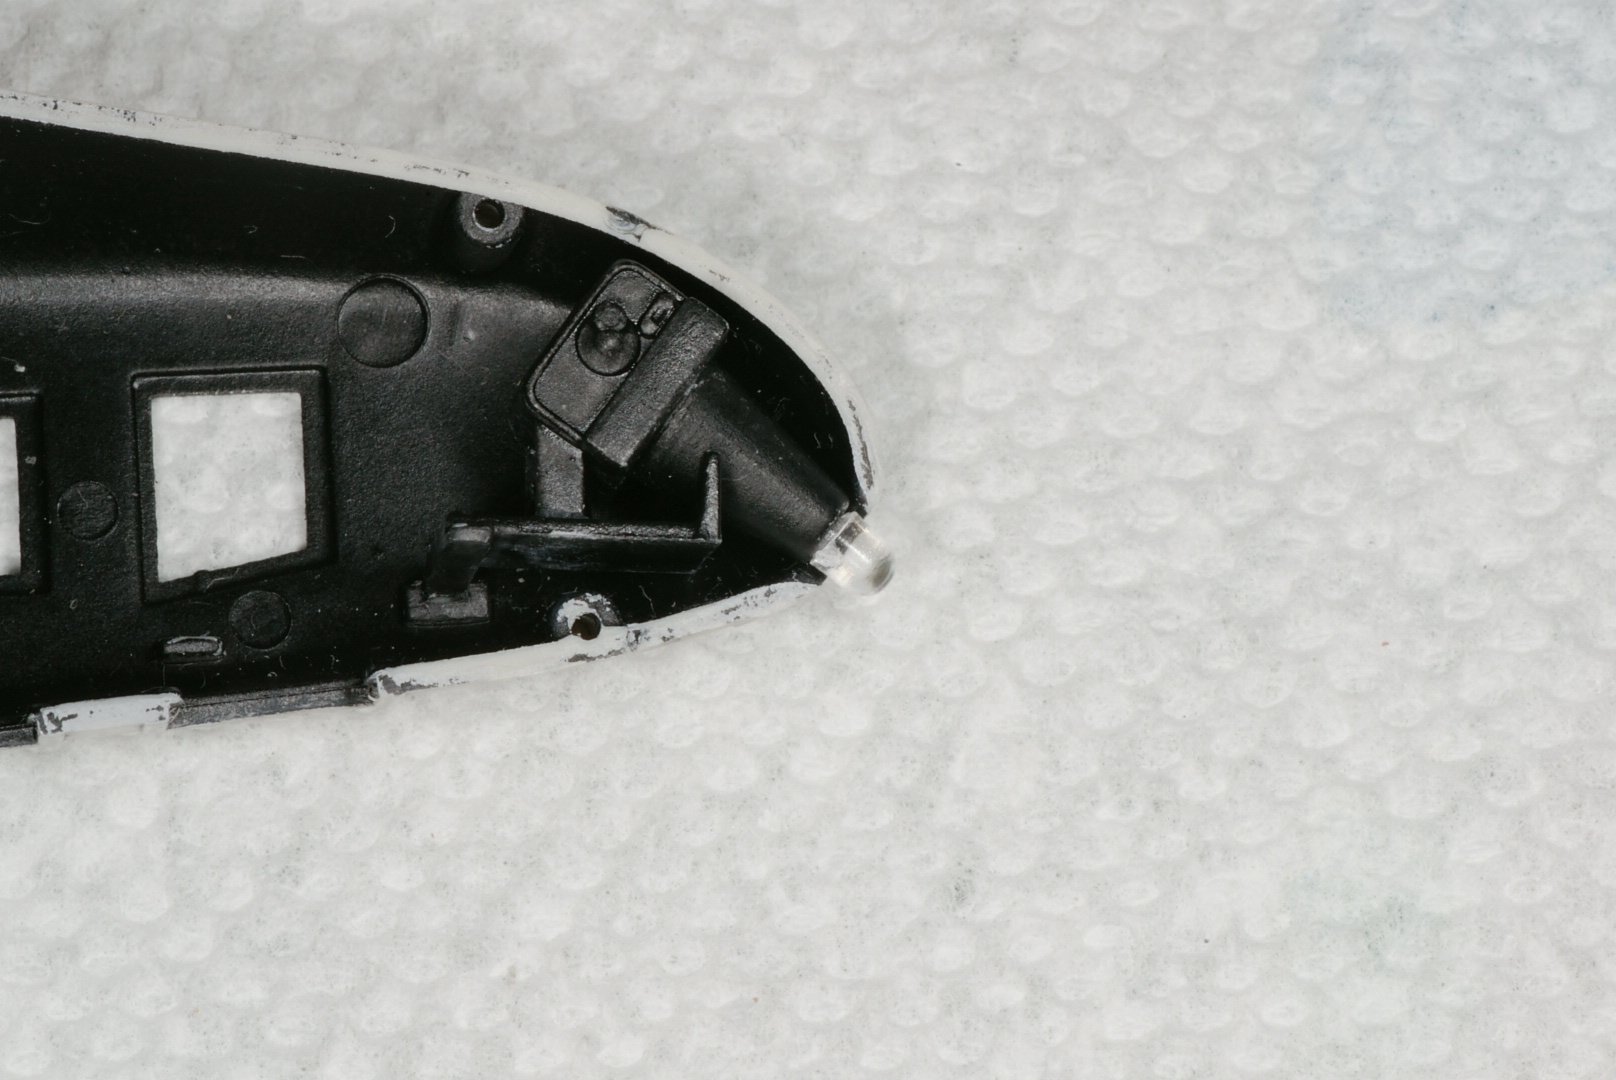
Progress on the Banshee build. Picture 1 is the shelf behind the pilots seat. I added the cabling using .2mm wire & Elmer's glue. I'm tempted to remove the wires & redo it. There's too much glue around the wires. #2 is the instrument panel. I'm using the Eduard BIGSIN PE set to make detailing easier. #3-6 are the cockpit tub. I still need to paint the pedals. #7-8 are the nose mounted forward oblique camera. The nose camera is flush with the tip of the nose. The kit makes it look the plane has a wart on its nose. It will be easy to fix. Just a pain to have to do it. #9-10 are the camera platform. I don't understand how Kitty Hawk could screw up the camera bay parts as bad as they did. Photos in both the Detail & Scale book & Naval Fighters #73 have good detail shots of the camera installation.
-
Recce planes have for years used either 5" or 9" wide film. The RF-4C's that I'm most familiar with shot 5" normally. In Southeast Asia, a mission might run 200-300 feet. Training mission here in the states usually didn't run more than 100-150 feet. The OBC camera installed in the nose of an SR-71 had a 10,500' roll of film that took about 12 hours to process. The frames were 6' long. 74 frames would fit on a spool that held 500' of film. So a technician stayed at the end of the processor and cut the roll of processed as required. Too many days spent in a darkroom with a Houston-Fearless film processor. I hope to have some time to work on the Banshee this weekend. Will post some pictures next week.
-
Hi, Gil. I'm not planning to have the panels open. That would take a lot of work I'm not up to doing currently with the limited amount of time I have at the work bench. I bought the CMK resin camera set with plans to do something with an RF-4 or F9F-8P (which is also in my stash & I think has the same camera setup as the Banshee). The person who did the panel open model published in the D&S book on the Banshee did a very good job but anybody familiar with aerial cameras would notice the error. In addition, there's no reason to have 2 oblique cameras on the same side or both sides in the case of what's included in the kit. A mapping mission would have a right oblique in the forward station on the right side, a vertical camera in the center station & a left oblique in the 3rd station. I know; more information than you probably wanted. As for the windows, I'll probably use Krystal Klear or similar if the kit parts don't fit well. BTW the 3rd camera appears to be an infrared line scan camera. I haven't been able to confirm that from what is in the D&S book or what I've found online.
-
First an update. The Monogram F9F-5P Panther I had started suffered a fatal accident. It fell off my workbench & I didn't see where it landed. Rolled my chair back & heard the crunch everybody dreads. I'll keep it for airbrushing practice. So I started on the Kitty Hawk F2H-2P Banshee with plans to do it in VC-61/VFP-63 markings. The cockpit is almost complete so I started assembling the cameras. I'm not sure where Kitty Hawk got their information on what the cameras look like but, they don't look like any that I've ever seen. I spent 18 of my 22 years of military service working in & managing recce labs. I had the opportunity to get up close to the cameras in the RF-4, SR-71, & U-2. These look nothing like an aerial camera. The 1st photo is the camera set from the kit. The 2nd photo is CMK's resin set 4333 for the Tanmodel RF-84F. The RF-84 flew a couple years after the Banshee and would have had similar if not the same cameras. The kit cameras look like they have lenses on both sides in an oblique orientation. In normal operation, a mission might have had a left & right oblique and maybe a vertical camera. They would not have been mounted on the same station. If this is the biggest complaint I have about the kit, I'll be happy.