Leaderboard


Popular Content
Showing content with the highest reputation since 04/09/2024 in all areas
-
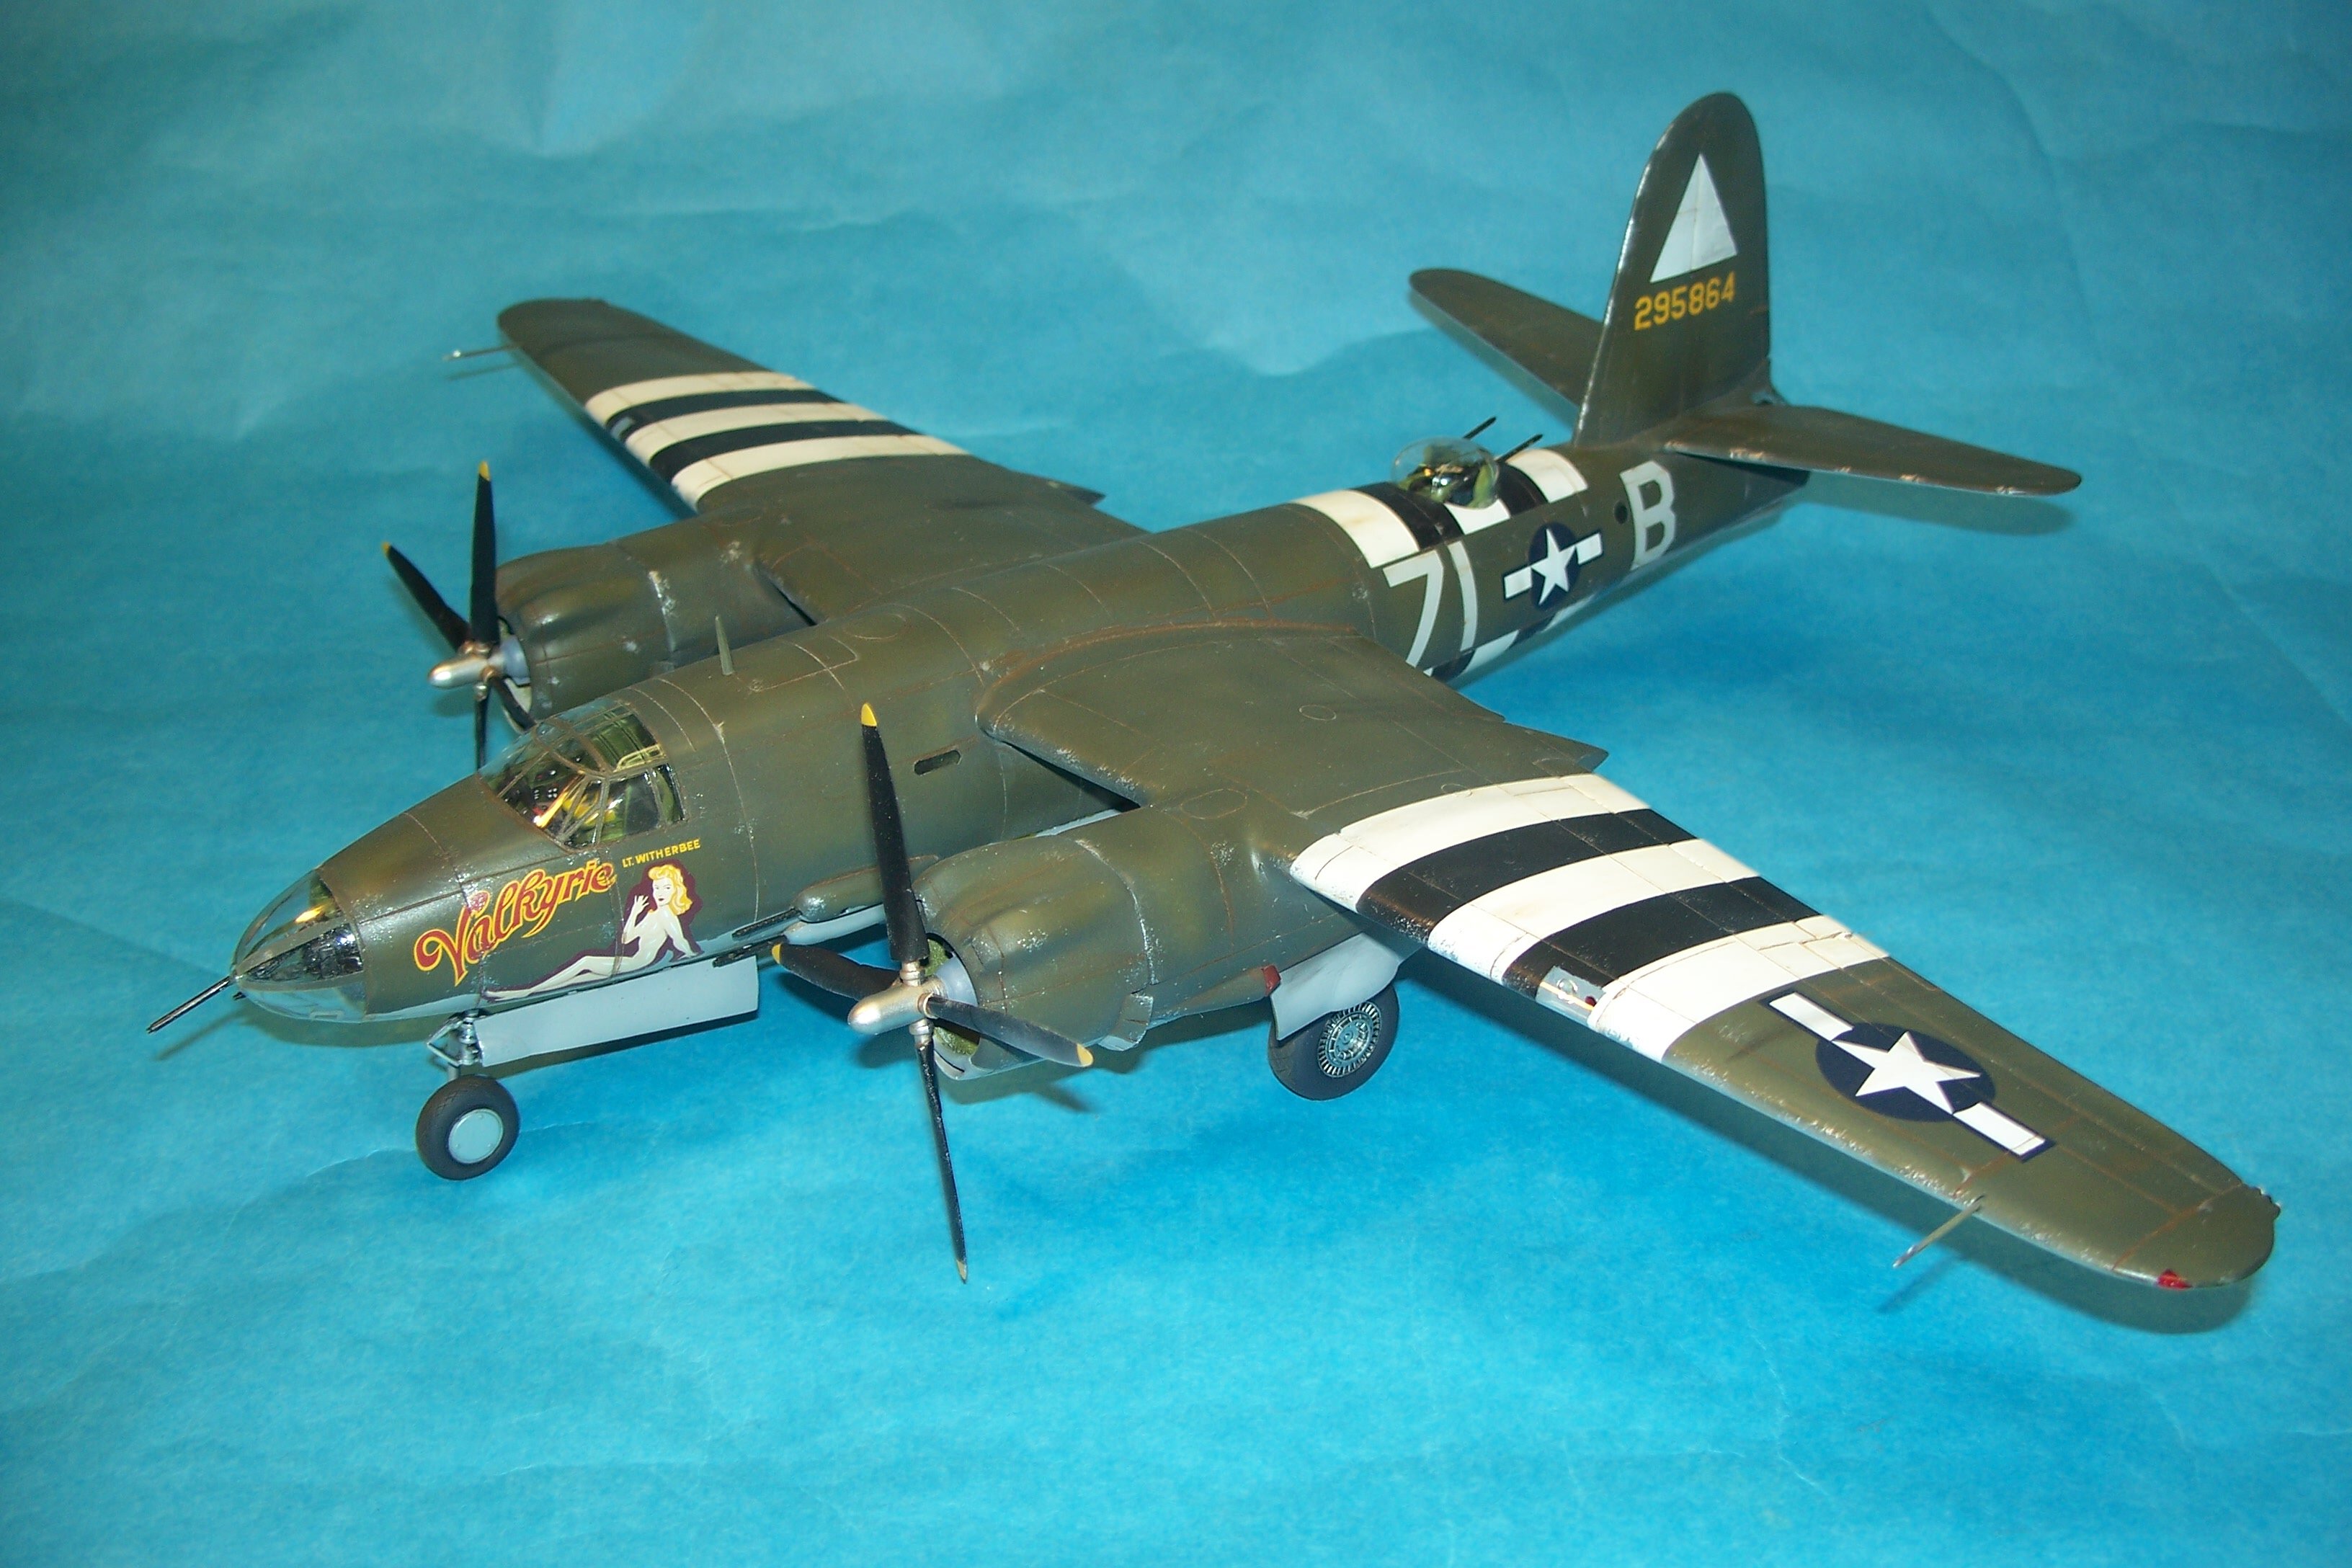
With the news of a new 1/48 B-26 Marauder on the horizon (now just released), I decided I'd build my old Monogram kit that had been languishing in my stash for many years. It's mostly OTB, except for some resin replacement engine cowlings I had in the box' as well as adding some MV lenses for the wing lights and IFF lights, adding clear colored plastic wing tip lights, and substituting some spare resin gun barrels for the kit ones. I also had an Eduard masking set which came in quite handy. The interior is OOTB. The big silver thingy is a Terry Dean nose weight I bought years ago, designed specifically for the kit. The entire model was rescribed using a razor saw for the fuselage and a UMM scriber for the wings and tailplanes. The shiny patches on the kit plastic are due to brushing some Testors liquid cement in the scribe lines to clean them out after the initial sanding. The kit has a bad rep for bad fit, but the only true problem were the extensions on the wing tops for the tops of the nacelles. Both of them simply needed to be gently bent downward (it did create stress marks in the plastic) and then they fit the nacelles quite well. The rest of the seams were average to good, but with no real fit problems, including all of the clear parts. I did, however, use UV cured clear resin for all of the fuselage windows except for the radio/navigator's right side window with the bubble. Also note the wire sticking out of the nose glazing. All of the kit guns were modified with either drilled holes or wire extensions so that the all of the gun barrels could be added at the end of the project. The pink stuff is Silly Putty being used to mask the exposed main gear, which have to be added before adding the underside wing nacelles. The 1-piece replacement resin cowls can also ne seen here. Everything else about the build was straightforward. Clear packing tape was used for the wing leading edges in place of the plastic kit parts. On to the finished pics! I used Alclad Gray Primer for the underside and Model Master 34086 Dark OD for the top, with 34087 OD used for some lighter panel variations. Tamiya brown panel line wash was used and some MIG powders brushed on for additional streaking and for the exhaust staining. The chipping was done with a small sponge and also with a silver colored pencil. I added D-Day stripes because I liked their look, though the decal sheet doesn't show them. The markings for Valkyrie were from Cutting Edge. Got this one done just in time before the new kit is being built by everyone else! Questions, critiques, and comments welcome, as always. Gil
 2 points
 -
This model was built from scratch using brass and plastic stock along with Renshape and resin castings. The soft top is 2 ply tissue with white glue/water mix applied. Paint is Testors olive drab. Tires are painted with Tamiya rubber black. Information was taken from variouss sources including Tankograd publications for both tractor and trailer. Decals were computer generated and ALPS printed. Scale is 1/25.
2 points
-
The topic about new kits from ukrainian company Clearprop. New releases CP4821 I-16 type 5 (in the sky of Spain early version), 1/48 48211920×1399 287 KB CP4822 I-16 type 5 (in the sky of Spain late version), 1/48 48221920×1398 208 KB Accessories, 1/48 CPA480411333×796 232 KB CPA721191342×836 160 KB Accessories, 1/72 CPA721191342×836 160 KB CPA721211321×782 225 KB CPA721221324×784 247 KB CPA721301325×800 251 KB CPA721311311×787 243 KB CPA721321337×796 258 KB1 point
-
Phenomenal! The modeling is enough, but the electrical work is also an engineering marvel. Those couple of pics of your interior fuselage shots could double for reference pics from a walk-around book! Gil1 point
-
Two Tamiya kits, just having a little fun with these guys.
1 point
-
The ninth week is my “challenge week” on the CH-46A/D! I call it challenge week because trying to put the fuselage together with all the wiring routed requires all the subassemblies to be put together at the same time. To start with I scratch built the fire extinguishers for the cabin using styrene rods and some solder. Two of these were mounted near each of the gun mounts. The third one will mount near the rear door later. I then began routing the wiring. Starting with the tail the wiring was routed thru the upper panels into the forward bulk head with the other wiring. I used acrylic gel to hold down the wires so they would not interfere with the forward rotor shaft. They were then routed over the bulk head and between the bulk heads between cockpit and cabin. All of this wiring was routed thru the floor and tied in with the wiring for the instrument panel and lower flashing navigation light. The nose light wiring was then run under the cockpit floor and all of the wires were tied together where the rear landing gear assembly will be mounted. I then performed a light check to make sure all the lights were wired in. The starboard side wires were also routed the same way. I then performed a light check to make sure all the lights were wired in. The fuselage halves were then carefully aligned and were glued together in sections making sure not to pinch any wires. With the halves glued together I used some long tweezers to mount the starboard side seats and the upper panels. The wiring was all dressed up and a second light check was done. The lighting effects are exactly how I wanted them to look. I need to clean up the fuselage seams and then assemble and install the rear landing gear assembly. The wiring will be routed thru each of the rear landing gear and tires so they can pass thru the base. There are still a few more details to add the fuselage as well and then I can start with the base coat of paint. You can see more photos and details of this build from the start in the build log at: https://davidsscalemodels.com/build-log/1-48-ch-46a-d-helicopter/1 point
-
These are the latest vehicles I finished to add to the collection. These were some simple and kits I started some time ago and left behind, so it was time to just get them finished up. One of them was actually finished in March on the 31st. It's this little 1/72 scale Military Wheels Russian PK-43 Field Kitchen: Next is this Valiant Miniatures German IG-8 Infantry supply train: Here you can see a little bit of the supplies they have loaded up: And last, we have the Syrian T34/85 tank. I used Braille Strike decals to make this a Syrian tank: Yes, the triangle got messed up on the one side of the turret. Someday I'll fix that. And that's what I got done for this month (and last), thank you all for looking in, comments are welcome.1 point
-
here is the update PROJECT # 1 EC-130V version ... (APR 12th ) ..Today , I glued back the nose wheels, done a clear coat on the wing /back section of the fuselages and continue the work on the wing tanks and painted one of them ! Like to view the complete WIP of this project ,follow this Google link .. https://goo.gl/photos/jxfUh5Muw34MqsRY7 Enjoy and it's an 'rendez-vous' next week for more .on this particular project..!.
1 point
-
Dear friends I want introduce the not young and not famous ukrainian manufacturer. But this manufacturer offer interesting kits in different scales - 1/35, 1/48, 1/72 and some of 1/144, 1/350, 1/16 Here will be topic concerning news from AMG. To see more from their line you can here So, last news: AMG 72108 - Pz.Kpfw 771(r) Ger Small AFV WW2 era 1/72 AMG 35208 - Pz.Kpfw 771(r) Ger Small AFV 1/35 35208750×554 127 KB AMG 35308 - Max HENSCHEL aerosan (attack version), 1/35 1 353081600×902 163 KB AMG 72308 - Max Henschel aerosan (Attack version), 1/72 723081000×731 188 KB AMG 35305 - NKL-26 Aerosan FINNISH Service , 1/35 353051600×1106 486 KB AMG 48906 - Hawker AUDAX. 1/48 489061000×736 197 KB AMG 72606 - Hawker Audax 1/72 726061000×737 175 KB1 point
-
Thanks for following this WIP, it's quite appreciated EDUARD 1/48 DFW-28 FLOH (APR 09th).. Today I sanded the work done last time and apply more putty on the bottom joint, I also continue the work in the engine bay finally located an old AURORA engine that I plan to details and use for this project .! If you like to view the complete WIP on this project , just follow this GOOGLE link: https://photos.app.goo.gl/uHDXvrXDAzX93vMf7 If you like to view the other WWI kits I have done just follow this Google link : https://photos.app.goo.gl/kHNcWFg6wQ5QgDYp6 Enjoy ! Jmarc
1 point
-
WHOOOOO.. Lots of nice stuff in there .. thanks for sharing them with us, it's quite appreciated !1 point
-
Brilliant work Ed! You sure have the Midas touch when it comes to making these masterpieces!1 point
-
Those are some very cool builds! I've always like the markings on that P-47B and the NMF on the XB-51 is sharp! Thanks for sharing! Gil1 point
-
Hey Everyone! Here's a few I recently acquired. The tools are some micro chisels from UMM.1 point
-
I got two models recently. One was a gift from a guy clearing his closet. He's more of a gamer so all that mattered to him was that I build models and it was a model he gave me. Yes, I'll build it: This next one was a purchase at my SoCal AMPS meeting that I picked up to start at our build night meeting that was starting that night. I'm going to be making this a Syrian tank: Thanks for looking in.1 point