Leaderboard


Popular Content
Showing content with the highest reputation on 03/09/2021 in all areas
-
Thanks Mark. 'Preciate you stoppin' in buddy! Thank you for your comments as well Mark. There were two firsts with this car. When I was 14 it was the best gloss I'd turned out to date. And then again some 31 years later it was again....the best gloss I'd ever achieved on a car. I stripped the original gloss and decals from the body and obtained a new set of cals and glossed over the molded body color for the second time around. Hell must've froze over or something because the gloss just went on......and that was it. It was perfect....no dust....no wet sanding and no polish. It just wound up as you see here. I chased that same result for 3 more years but never got the same results again without wet sanding or polishing. Just my lucky gloss day on that day I guess. lol1 point
-
I've been wanting to build this car for the last few years and figured that now might be a good time to break it out. There's not much in the way of AM for this kit so it was the perfect one to do an OOB build on. The only things that were added was an "AC Delco" decal on the oil filter, a Hot Rod Magazine in the passengers from seat with a picture of an older T/A on the cover and I robbed the dual outlet exhaust pipes from the Revell 2000 Camaro SS kit. Just couldn't build this car with the single outlet exhaust system like it came from the factory with. The kit wasn't too bad but there were several fit issues with it starting with the chassis to body assembly. For some reason the glue adhesion didn't set up right at the rear of the car resulting in a slight twist. I made some bracing that went from the body down to the chassis and glued that in place to suck the chassis up on the side that got the lower part of the twist. Flash and mold lines were TERRIBLE on this thing. I spent ALOT of time getting rid of those and still didn't get them all. The front and rear facias fit great during the test fit and didn't want to cooperate at all during the assembly process. I got them pretty close however, disassembling the whole friggin' car to straighten everything out. Once I got the chassis sucked up in the back on the drivers side to where it was supposed to be I noticed that now there was a gap between the engine throttle body and the molded in intake duct on the body. I ended up cutting a piece of plastic and carving it to fit the gap there. The only other things that I did with this car that needed to be done was that I lowered it about a scale inch or so all the way around to give it a more aggressive stance and blacked out the tail light panel for a totally bad ass look out back. I'll tell you one thing that I did NOT like though......there are no "Trans Am" emblems on the doors. Hopefully I can find some red Trans Am decals for those.1 point
-
First....let me go into the actual car. I've been wanting to build a Maverick for a VERY long time but there aren't many kits to choose from. The best offering (and this isn't saying much) is the Jo-Han kit. I was fortunate to get mine from someone on another forum for the mere price of $50. These kits are running around 300+ bucks nowadays so 50 bones is a friggin' steal. Then there came the matter of subject. I was looking for a car to build....you know....a pattern. Nothing struck my fancy for the longest time until I found Dyno Don's car. Man....I was smitten! Just an evil lookin' car! So .....I set out to build it. The real deal: When I started this project one year ago almost to the day I just didn't realize what ride I was in for. This started life as a Jo-Han kit and I quickly found out that it would become much more on down the line. The only things used out of this kit were the body, base interior tub (which got modified at that) and the engine. The rest....went in the trash. The chassis is from AMT's 67 Mustang Fastback, interior is almost all aftermarket stuff to include the 27 piece shifter and the 25 piece seat belt harness. In fact so much scratch and up level detailing was done in the interior that I don't even know where to start. Total parts count for the interior alone is 125 pieces in all. Extensive mods were done to the chassis to get everything to "work" and although not accurate it allowed me to achieve the stance and overall look that I was after. Probably the BIGGEST hang up I had with this car was trying to figure out how to fabricate the shock tower/ inner fenderwells for it because I just couldn't get anything to work. After MANY hours in thought and experimentation I ended up fabbing them up from soda can aluminum. Paint....I used Tamiya's Pure Red with a Testors Wet Look clear. Car decals were from a supplier on Ebay....forgot the vendor. Wheels and tires are from the parts bin except for the rear wheels which I used from Revells 41 Willy's gasser kit. All lettering on the sidewalls of the tires are from Slixx decals. The engine has details from so many different suppliers that I forgot half of where I got everything from. LOTS of scratch work though. Cooling fans are from the Revell Rick Dobbertin Pontiac J2000 kit and again....were heavily modified to fit into this car. This was definitely a test of my abilities as a modeler to say the least but I learned ALOT from this build (as well as learned a few new curse words). There are inaccuracies that'll be noticed by anyone who knows anything about this car and a few liberties taken here and there in the name of adding interest to the car but I feel like it came out alright. I also left off the wheelie bars. I was going to scratchbuild a set but the longer I looked at it the more I thought that they would detract from the overall looks of the car. Any how.....I present here...the finished product. and like all my latest builds she finds herself in my garage for a while now....1 point
-
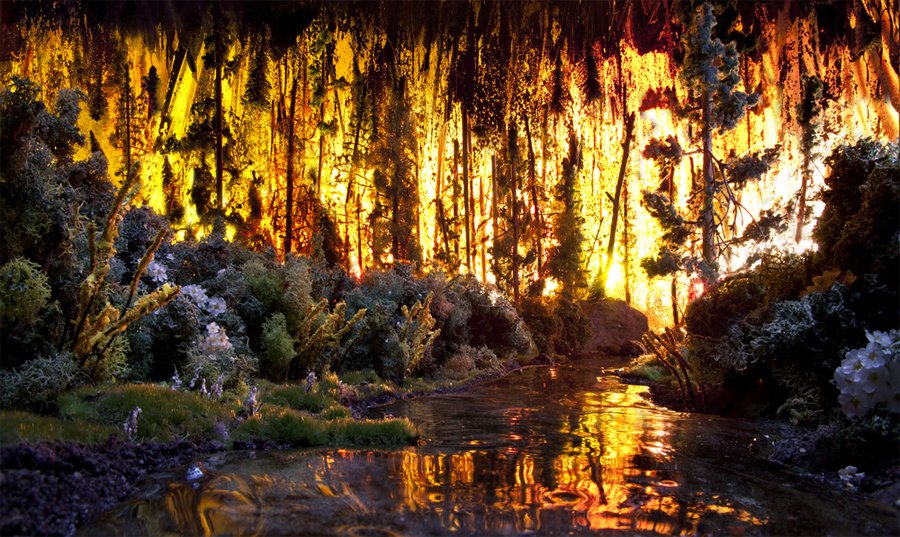
Matthew Albanese: Modeler & Photographer Matthew Albanese’s fascination with film, special effects and movie magic—and the mechanics behind these illusions—began early. Born in northern New Jersey in 1983, Albanese spent a peripatetic childhood moving between New Jersey and upstate New York. An only child, Albanese enjoyed imaginative, solitary play. He loved miniatures and created scenarios intricately set with household objects and his extensive collection of action figures. After earning a Bachelor of Fine Arts degree in Photography at the State University of New York, Purchase, Albanese worked as a fashion photographer, training his lens on bags, designer shoes and accessories—this small-object specialization is known in the retail trade as “table top photography.” Albanese’s creative eye soon turned to tabletop sets of a more wildly eclectic nature. In 2008, a spilled canister of paprika inspired him to create his first mini Mars landscape. More minute dioramas—made of spices, food and found objects—followed. In 2011, Albanese was invited to show at the Museum of Art and Design of New York. His work has also been exhibited at the Virginia Museum of Contemporary Art, Winkleman Gallery, and Muba, Tourcoing France. Matthew is represented at Bonni Benrubi Gallery in New York. See his amazing work at https://www.matthewalbanese.com
 1 point
 -
In addition to scarfing up a 1st place in its category and Best in Automotive in Houston back in April I racked up a 2nd place award in Austin last month.1 point