All Activity
- Today
-
Welcome back.
-
Yes, after a long hard fight, I can now declare this bird done! This is the 1/72 scale Revell British Airways Concorde SST. It's got 11 coats of white and clear on it. The nose had broken when this fell a few days back, so I glued it in the raised position, mostly because I like the way it looks that way: This beastie is nearly three feet long, so it was darn near impossible to photograph! These are the best I can do for now. Thank you all for looking in, comments are welcome!
-
Thank you Jean Marc! I do have more to post soon.
-
Now there's a familiar name from the past! Welcome back Ron! Looking forward to seeing what you've been working on!
-
Glad to have you back in the fold. I like your areas of interest as they match mine pretty nicely. I hope we will see some of your work here in the future.
-
Welcome back, Ron!
- Yesterday
-
Hi, I am Ron Wilkinson from Herriman Utah. I was an IPMS some years ago and had let my membership lapse but I have come back. I do mostly pre-WWl ships, merchant vessels and WWl armor and aircraft. Ron W.
-
First I'd like to thank you for following this WIP, it's quite appreciated ! BANDAI 1/48 MACROSS VF-1S/A AIRCRAFT MODE (APR 15th )..Today I done the antenna cover and started the work in the nose electronic and radar section ! If you like to follow the WIP on this project ,Just follow this Google link: https://photos.app.goo.gl/jEtQtXgwPi8L8RVf9 Enjoy !

-
LLLLLLLLLLLLooking great as usual ..Keep them coming !
-
Thank you for following the 'WIP' on this project ,it's quite appreciated ! (APR 15th)...Today ,I completed the framing of the clear section and the weathering ! If you like to see the complete WIP on this project , just follow this Google link : https://photos.app.goo.gl/Yor8v3Q9pGkybXLh6 If you are curious and like to view the other WWII GERMAN sub I have done in 1/48 , just follow this link : https://goo.gl/photos/PM4EWugGVMb8Fzgm9 Enjoy ! jmarc
-
Thank you Gil!
-
 Charlie’s Plastic Models has produced four 3D printed caddies for modelers, each with different holes, receptacles, and spaces to accommodate various modeling supplies we use in our hobby. My review sample was billed as the “Finishing Caddy” without Micro Set/Sol holes (for those bottles). The photo of this item from his website (www.charliesplasticmodels.com) shows it containing appropriate items like panel washes, Solvaset, cotton swabs and brushes [Photo 1]. I saw another great possibility for my sample and turned it into “Gluey Louie” by loading it with more basic tools to stick one bit of plastic to another: two kinds of liquid cement, CA, and applicators from The Glue Looper. [Photo 2] tweezers and small clamps. This may not be exactly what it was intended for in the first place but boy, it works for me. View the full review
-
Reviewer’s Comments:Charlie’s Plastic Models has produced four 3D printed caddies for modelers, each with different holes, receptacles, and spaces to accommodate various modeling supplies we use in our hobby. View the full review
-
Carnation Revolution Volume 2: Coup in Portugal, April 1974 is a part of Helion and Company’s Europe@War series, No. 39 (HEL 11844). This is the third book about Portuguese forces that I have read, authored by José Augusto Matos (he co-authored Sanctuary Lost, Portugal’s Air War for Guinea 1961-1974, Volume 1, with Matthew M. Hurley, reviewed, and the first volume by authors José Augusto Matos and Zelia Oliveira. For those who have not read Volume 1, or the previous review, a recap is necessary as the title states, this book is the second volume of this coup that re-shaped Portugal’s future and starts where the first volume leaves off. View the full review
- Last week
-
The topic about new kits from ukrainian company Clearprop. New releases CP4821 I-16 type 5 (in the sky of Spain early version), 1/48 48211920×1399 287 KB CP4822 I-16 type 5 (in the sky of Spain late version), 1/48 48221920×1398 208 KB Accessories, 1/48 CPA480411333×796 232 KB CPA721191342×836 160 KB Accessories, 1/72 CPA721191342×836 160 KB CPA721211321×782 225 KB CPA721221324×784 247 KB CPA721301325×800 251 KB CPA721311311×787 243 KB CPA721321337×796 258 KB
-
 CannibalNoises joined the community
 -
Hello colleagues. Familiar modellers, forum users and subscribers of the channel, repeatedly suggested to make a video about files and needle file. I thought it was a good idea. Time passed and - it took place. In the first part, is considered the design of the tool, the correct holding when working, methods of processing the material, the rules of processing round workpieces, as well as work with sheet metal. Visit the channel, watch the video, put likes, subscribe. Thank you. Select subtitles in English.
-
Yeah, I always have the Micro Scale liquid Decals Film handy. I figured that I'd test on some of the excess decals that I do not plan to use anyways. I will say that I've had pretty good luck with old ESCI kit decals.... Today after our monthly AMPS meeting here, we made the usual trip to Andy's afterwards where I picked up these goodies... I just can't help myself sometimes...
-
Phenomenal! The modeling is enough, but the electrical work is also an engineering marvel. Those couple of pics of your interior fuselage shots could double for reference pics from a walk-around book! Gil
-
Thanks. I never saw the technique before until this YouTube guy was trying something to make his commissions go by quicker. If you go to his page you can watch and see him do it rather than just individual images - https://www.youtube.com/@Groundeffected/videos When you try, make sure to take. pics. I'd like to see how it turns out.
-

This week at MADDOG 1/48 CANADIAN SUBSIDIARY plant ( WEEK # 14)!
Jmarc replied to Jmarc's topic in Photos: On the Bench
WEEK # 14 UPDATE .... Enjoy ! Jmarc # 1..LOCKHEED EC-130V HERCULE (ITALIERIE/TESTOR + MODIFICATION MAISON) Lien Google du montage complet du project... https://goo.gl/photos/jxfUh5Muw34MqsRY7 (AVR 13) Cette semaine j'ai recoller les roues avant qui étais tomber durant le dernier transport , continuer le travaille sur les bidon des ailes, terminer un et lui es donner une couche de peinture # 5 MQ-1 / MJ-1 CHARGEUR DE BOMBE (ESCI + MODIFICATION MAISON) si vous désirez voir le montage intégrale de ce project visitez ce lien Google https://photos.app.goo.gl/16gXQWKbDne45uwQ8 (AVR 13) Cette semaine j'ai débuter le détaille de la section avant et l'asemblage/peinture de la fourche avant ! # 6 THUNDEBIRD # 1 (RV 3D MODEL + SCRATCH) si vous désirez voir le montage intégrale de ce project visitez ce lien Google https://photos.app.goo.gl/5owtT1jAX7j8xj9Y9 (AVR 13) Cette semaine j'ai peint l'intérieure du poste de pilotage et continuer le travaille sur le rebord de la fenêtre intérieure ! # 18 CHARIOT POUR SOUDEUR ( SCRATCH ) Si vous désirez voir le montage intégrale visitez ce lien Google https://photos.app.goo.gl/uvpuN6o5JxcXekDc8 Si vous désirez voir l'intégrale de tout les chariots que j'ai monter visitez ce lien Google https://photos.app.goo.gl/F9RviTZpfp321S3EA (AVR 13) Cette semaine j'ai terminer le travaille de base sur la structure et l'es peinte , es aussi peint les bonbonnes ! # 19 TUBE ROCKET W.GR.21 AIR/AIR ROCKET de la LUFTWAFFE PROJET WHIPPET ( HASEGAWA + SCRATCH ) Si vous désirez voir le montage intégrale visitez ce lien Google https://photos.app.goo.gl/ftizUU3ehth5wfkYA (AVR 13) Cette semaine j'ai terminer le travaille sur les tube rockets ,coller le tous sur la base et débuter les dernier détailles ! # 29 HMCS MAGNIFICIENT CL-21 (MAGGIE) (SCRATCH) Si vous désirez voir le montage intégrale visitez ce lien Google https://photos.app.goo.gl/8Smg9shSEVMwggfs8 (AVR 13) Cette semaine j'ai terminer la correction du bas de l'ilôt de commande ! #33 SOUS-MARIN ALLEMAND TYPE VIIc (trumpeter + additions) Si vous désirez voir le montage intégrale de ca projet ,visitez ce lien Google https://photos.app.goo.gl/Yor8v3Q9pGkybXLh6 (AVR 13) Cette semaine j'ai rajouter une roues a l'intérieure ,peint le support a canon ,retoucher la peinture et continuer le contour des vitres ! #36 Petit NIC NAC ... (SCRATCH) Si vous désirez voir PLUS ,visitez ce lien Google https://photos.app.goo.gl/mzzBBq5WxJKEVh1v9 Si vous désirez voir l'intégrale de tout ls projet fabriquer a date , visiter ce lien Google : https://photos.app.goo.gl/8h1ExuE1BfxczTHP9 (AVR 13) Cette semaine j'ai fouiller dans ma filière d'image et retracer celle-ci , j'ai donc débuter le travaille sur les forme de base et assembler peint la boîte 'FOD' ! #40 DFW-28 FLOH au 1/48 (EDIUARD + MODIFICATION et ADDITION) Si vous désirez voir PLUS ,visitez ce lien Google https://photos.app.goo.gl/uHDXvrXDAzX93vMf7 (AVR 13) Cette semaine j'ai retracer dans ma boîte de pièce un moteur et aminci la parroie et continuer les structure de la section avant ! #42 DUESENBERG SJ 1934 ( REVELL + MODIFICATION) Si vous désirez voir le montage intégrale visitez ce lien Google https://photos.app.goo.gl/FswjJNvz63yF5awq8 (AVR 13) Cette semaine j'ai continuer le détaille de la cabine et portières #48 MACROSS VF-1S/A (HASEGAWA + ADDITION et MODIFICATION) Si vous désirez voir le montage intégrale visitez ce lien Google https://photos.app.goo.gl/jEtQtXgwPi8L8RVf9 (AVR 13) Cette semaine j'ai terminer le travaille dans la section arrière et rajouter du détailles sur les côté , rajouter le mireur dans le poste de pilotage ! #69 PROJET AIM-9 ( HASEGAWA + MODIFICATION +SCRATCH ) Si vous désirez voir le montage intégrale visitez ce lien Google https://photos.app.goo.gl/v1WhuFKpDT7m2LqB6 (AVR 13) Cette semaine après avoir chercher de l'information es décider de débuter le projet avec l'une des version d'essaie du AIM-9 , utiliser un missile AIM d 'HASEGAWA ,couper les ailettes et débuter les modification ! On the CANADIAN SIDE .. # 1 .....Muck-up de bois du ARROW MACH 2 (HOBBYCRAFT + MODIFICATION MAISON) si vous désirez voir le montage intégrale de ce project visitez ce lien Google: https://goo.gl/photos/jXeQLJioaoky58HR9 (AVR 13) Cette semaine j'ai continuer le travaille sur la baie des missiles ! # 2 .....Le BOMARC IM-99B et sont HANGAR de lancement (project REVELL + MODIFICATION +scratch) si vous désirez voir le montage intégrale de ce PROJECT visitez ce lien Google: https://goo.gl/photos/q4rxkYiwrrbd8Tmi8 (AVR 13) Cette semaine j'ai réparer la section de la pince du nez du lanceur qui avais brisée dans le transport ! 3...JIG D'ASSEMBLAGE DU AVRO CF-105 ARROW (PROJECT SCRATCH) Voici le lien Google pour le montage complet du projet (c'es la phase 2) https://goo.gl/photos/d6TczBBAmLeLeeGRA (AVR 13) Cette semaine j'ai continuer le travaille sur la structure ! # 4 MOULE MAÎTRESSE de la section extérieure des ailes (kITBASHING +SCRATCH ) si vous désirez voir le montage intégrale de ce project visitez ce lien Google ' Phase 3 ': https://photos.app.goo.gl/3pBpv8FH0OhzQalQ2 (AVR 13) Cette semaine j'ai terminer l'asemblage des structure ,coller sur la base et débuter les dernier détailles ! # 08 Site d'information du CF-105 ARROW ( SCRATCH) si vous désirez voir le montage intégrale de ce project visitez ce lien Google https://photos.app.goo.gl/3n8AXR62ufi2hADi6 (AVR 13) Cette semaine j'ai terminer le détaille de la table et débuter l'assemblage des chaises en métal ! # 15 AVRO (DTV) Delta Test Véhicule (SCRATCH ) Si vous désirez voir le montage intégrale visitez ce lien Google https://photos.app.goo.gl/mteEH2v7U1HjPssE6 (AVR 13) Cette semaine j'ai terminer le travaille de base sur le panier et l'es peint ! # 16 AILES du CF-105 'RL-205' EN DÉMONTAGE CHEZ AVRO CANADA (HOBBYCRAFT + SCRATCH) Si vous désirez voir le montage intégrale visitez ce lien Google https://photos.app.goo.gl/1TVjeJLmC4Zxcekd6 (AVR 13) Cette semaine j'ai terminer les dernier détaille ,coller le tout sur la présentation et le projet es terminer ! #17 La maquette soufflerie 1/10 du AVRO ARROW ( RV3D + SCRATCH) Si vous désirez voir le montage intégrale visitez ce lien Google https://photos.app.goo.gl/DvrVTZbBUFoAfKBSA (AVR 13) Cette semaine j'ai coller la soufflerie sur sa base de présentation et débuter les raccord entre les 2 sections ! #21 AVRO PHANTOM SEDAN CRUISER "PHASE 1' ( SCRATCH) Si vous désirez voir le montage intégrale visitez ce lien Google https://photos.app.goo.gl/qacEYojtRAw7ASFE6 (AVR 13) Cette semaine j'ai débuter l'assemblage des structure du bateau ! -
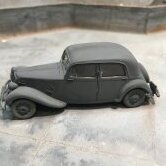
Two Tamiya kits, just having a little fun with these guys.
-
Mr. Bell, Sounds like the voice of experience.
-
Neat!
-
The ninth week is my “challenge week” on the CH-46A/D! I call it challenge week because trying to put the fuselage together with all the wiring routed requires all the subassemblies to be put together at the same time. To start with I scratch built the fire extinguishers for the cabin using styrene rods and some solder. Two of these were mounted near each of the gun mounts. The third one will mount near the rear door later. I then began routing the wiring. Starting with the tail the wiring was routed thru the upper panels into the forward bulk head with the other wiring. I used acrylic gel to hold down the wires so they would not interfere with the forward rotor shaft. They were then routed over the bulk head and between the bulk heads between cockpit and cabin. All of this wiring was routed thru the floor and tied in with the wiring for the instrument panel and lower flashing navigation light. The nose light wiring was then run under the cockpit floor and all of the wires were tied together where the rear landing gear assembly will be mounted. I then performed a light check to make sure all the lights were wired in. The starboard side wires were also routed the same way. I then performed a light check to make sure all the lights were wired in. The fuselage halves were then carefully aligned and were glued together in sections making sure not to pinch any wires. With the halves glued together I used some long tweezers to mount the starboard side seats and the upper panels. The wiring was all dressed up and a second light check was done. The lighting effects are exactly how I wanted them to look. I need to clean up the fuselage seams and then assemble and install the rear landing gear assembly. The wiring will be routed thru each of the rear landing gear and tires so they can pass thru the base. There are still a few more details to add the fuselage as well and then I can start with the base coat of paint. You can see more photos and details of this build from the start in the build log at: https://davidsscalemodels.com/build-log/1-48-ch-46a-d-helicopter/